
Most forms have groups of related items organized into sections to facilitate the form recipient completing the document. Grouping the related items visually is a good start. Physically creating subforms during the design process allows you to control many additional features.
Subforms are more than groups. In Designer groups are only used to format and align objects. Subforms are organizational containers that are useful for both static and dynamic forms. Subforms are used to create flowing dynamic layouts, control the tab sequence, and are used for data binding. Subforms properties specify if a page break is allowed within the subform area, which of the master pages content areas it is to be placed in, defining header and footer areas around the subform, and if the subform repeats, just to name a few.
Subforms are what make dynamic forms that grow and shrink possible in Designer. They are the containers that keep the objects inside them positioned correctly as the form adjusts. Subforms can be hidden until needed by the form recipient, creating a truly customized interactive experience for the user.
As we discussed in the previous Designer chapters, taking the time to name objects and organize them is vital to working efficiently in Designer. Each object must have a logical name and related objects are organized into subforms.
In this chapter we explore the benefits of using subforms in both static and dynamic form design. We discuss the subform properties necessary for effective subform use.
Every form has at least one subform. Designer creates this initial subform for you. It is the untitled page subform you see in the hierarchy each time you start a new form. The default subform size is set to match the content area of the master page. On a portrait letter size page the content measures 8 inches wide by 10.5 inches high, leaving you with a .25 inch margin on all four sides.
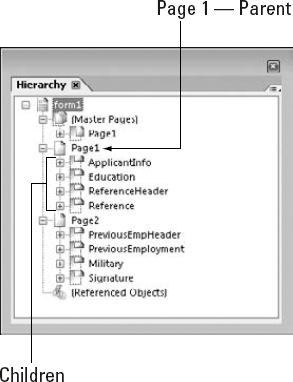
You can place a subform inside another subform and nest them. This is common practice. Usually the page subform is not altered in size and is left to match the content area. Additional subforms are added to control the position and flow of the remaining document. However, we don't want you to go overboard and add subforms where they aren't necessary. Having too many subforms can reduce a form's performance. Figure 28.1 shows the logical groups the form fits into. The form has been designed with section headings followed by the related form field objects.

Looking at the form hierarchy, as shown in Figure 28.2, we see all of the form's objects in a long list. We will not be very efficient finding objects in this disorganized list.

Some form designers create the subforms before placing any fields on the page. Other designers lay out the form and then decide which form objects belong together in subforms. Having an idea of how the form will look before you begin is helpful when adding subforms before adding the fields. If you are building a form from scratch and still determining how it is to be laid out, it is best to add the subforms after the design is set. Use the method that works best for you when adding subforms.
The subform object is stored in the standard group of the Object Library. Adding a subform from the Standard library to the design page is just like adding other objects from the library. You can use your favorite technique including stamping, drag and drop, or drawing the subform.
Note
For details on how to add fields to the design page, see Chapter 24.
When you drag or stamp a subform on the design page its dimensions are set at 3.937 inches wide by 1.9685 inches high. You almost certainly need to resize this to suit your needs. Resize the subform using the layout palette or by dragging the handles on the design page.
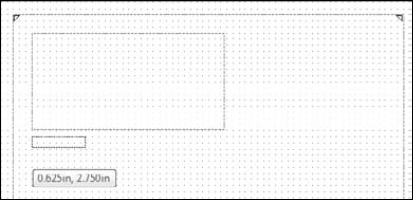
When placing subforms before adding additional content to the form, pay close attention to the subform indicators as shown in Figure 28.3. The indicators appear as triangles when dragging objects into a subform, marking the four corners of the subform to assist in placing objects inside the boundaries.

Compare the subform indicators in Figure 28.3 to Figure 28.4. Notice that the object is being placed below the nested subform, and the indicators appear in the corner of the page subform. Don't worry if you have difficulty placing objects inside a subform. The objects can be moved in or out of the subforms as necessary. Even the subforms can be removed and recreated if needed. Objects can also be repositioned using the Hierarchy palette. Drag a field and drop it on a subform name to place it inside that subform.
After you have created the form design you are ready to organize the contents into subform containers. When adding subforms around existing objects, the process is called wrapping in a subform. When you wrap objects in a subform, the dimensions of the selected objects determine the subform size. This can be a huge time-saving feature if the intent is to tightly wrap the objects. If the form design is complete, this produces ideal results. However, if you are not finished with the form design and plan to add a few more objects, then resizing the subform may be necessary.
Let's look at how we might polish up the form shown earlier in Figure 28.2 by wrapping objects in a subform. To do so, follow these steps.
Note
The form you see in Figures 28.1 and 28.2 is included on the CD-ROM. For the following steps we use the GFApplicationNoSubforms.xdp file from the Chapter28 folder on the book's CD-ROM.
STEPS: Wrapping Objects in a Subform
Open a form. We'll open the GFApplicationNoSubforms.xdp from the CD-ROM in Chapter 28.
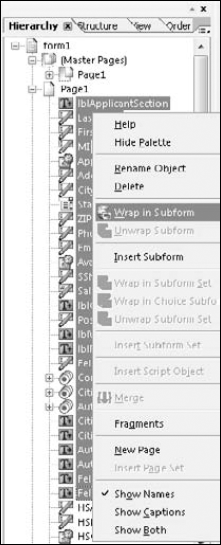
Select all objects to be grouped in to the subform. If working with the GFApplicationNoSubforms.xdp file from the CD-ROM select all of the objects in the Applicant information section. Using the Hierarchy palette start the selection with the Section name (lblApplicantSection) and end with the text field for explaining a felony (FelonyExplain). Trying to select the objects on the design page with a marquee can be difficult because the objects are closely spaced together.
Right-click one of the selected objects. This opens the context menu of options.
Tip
Wrap in Subform is found in the right-click menu when the mouse is over the selected objects in the design page or the hierarchy. It is also located in the Insert Menu and the Hierarchy palette menu.
Choose Wrap in Subform. As shown in Figure 28.5, this inserts a subform the same size as the collective object set and places the selected objects inside the new subform.
Rename the subform. Be sure to give the subform a name that makes sense to you. We named the new subform ApplicantInfo.
Tip
Naming a subform follows the same rules as naming other objects. Objects must start with a letter, no spaces are allowed, and the name can contain numbers. Only a few special characters are allowed: a dash, an underscore, and a period. Special characters are highly discouraged because they have special meanings when scripting. Adding special characters in your field names complicates the script needed to refer to those objects.
Repeat these steps for the Education section. Start with the HSName field and continue through the OtherDegree field.
Save a copy of the form. Save the form in a location of your choice on your computer. We continue to use this form in the next section. You may continue working on this copy of the file, or choose to open another sample from the CD-ROM for the next set of steps.
We have found that both methods are useful depending on the current layout. Wrapping in a subform is the method we choose to use most often, as it reduces the time needed to resize all of the subforms. Be careful when adding additional objects. If there is not enough empty space inside the subform boundaries, you need to resize it. Getting the subform handles selected when tightly wrapped around objects can be tricky. Therefore, using the Hierarchy palette to select the subform is the best practice to avoid accidentally selecting objects inside the subform.
Subforms properties affect how subforms are handled by Designer both at design time and runtime. The Object palette contains most of the settings we discuss in this section. Many of these properties apply to both static and dynamic forms, while a few apply only to dynamic layouts.
Note
For more information on design time versus runtime, see Chapter 29.
One of the most important settings for subforms is the content type, as shown in Figure 28.6. Positioned and flowed layouts can be used in both static and dynamic forms. Flowed layouts are generally reserved for use with dynamic form design, but not always. The fact that the property has been changed to Flowed does not make your form dynamic. Many additional items must be properly configured before a document can change dynamically at runtime.
Note
For more information on creating dynamic forms, see Chapter 26.

The Content property determines how the objects in the subform are displayed, either positioned based on their coordinates or flowed by Designer into the next available location. When objects are added to the design page, they have coordinates that are stored in the Layout palette. The coordinates are subjective to the subform they are placed in. If a subform is set to Positioned, the coordinates are respected relative to the boundaries of the subform. If the subform position changes, the objects contained in the subform are also moved. Their new coordinates are determined by their relative position inside the subform.
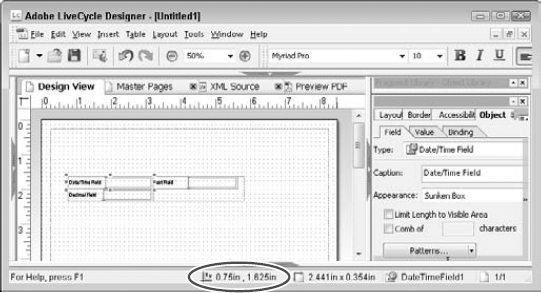
In Figure 28.7 the three objects each have specific coordinates and are wrapped in a positioned subform. Let's focus on the Date/Time field coordinates: X = 2.125 in and Y = 1.25 in, which is where we placed them initially. When the subform is moved to a new location, the text field also moves but maintains its relative distance from the subform as shown in Figure 28.7.

In Figure 28.8 the three objects were not moved individually to the new location; the subform was moved. The new coordinates of the Date/Time field are: X = 2.123 in and Y = 2.123 in.

If a subform's Content property is set to Flowed, the coordinates are no longer utilized. Designer places each object in the next available position. Flowed documents can be top to bottom or Western Text. Top to bottom moves each object up and to the left until it touches the object above it. The objects flow in the form from top to bottom with no spaces between them. Figure 28.9 shows the same three objects' new locations after we set the Content property to Flowed with a top to bottom direction.
Notice how the objects all moved up and to the left within the subform. The subform height also changed to accommodate the objects' new positions. Opening the layout palette for any of the objects in the flowed subform gives the same results. They have height and width measurements but the coordinates are no longer stored, as shown in Figure 28.10.


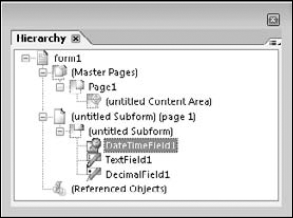
It is important to point out that the Date/Time field was below the other two fields in the original positioned objects, as shown in Figure 28.7. In both of the flowed examples the Date/Time field is the first object in the subform, as shown in Figures 28.9 and 28.10. When using a positioned subform, the order in which the fields are listed in the hierarchy is irrelevant to their position on the page most of the time. However, a flowed form positions the objects based on their order in the hierarchy. This caused the date field to become the first field in the subform, as the hierarchy shows in Figure 28.11.
Tip
The only situation where hierarchy position is a concern in a positioned form is when objects overlap each other and a stacking order must be determined. The object's position in the hierarchy determines the stacking order. The first object added is at the top of the hierarchy and is at the bottom of the stacking order.
Western Text flows left to right. Designer takes each object and positions it immediately to the right of the previous object until it runs out of room in the content area on the right side. When no more room is available to the right, the objects continue below the existing objects and lay out in a left-to-right direction. The date field in our example is still the first object, but the other two objects move to new positions as shown in Figure 28.12 after the subform is set to Western Text.
As we mentioned previously, flowed layouts are usually reserved for forms that are rendered in a dynamic layout. However, they can be used in a static layout as a shortcut to positioning objects. Have you ever needed to remove all of the spaces between a set of fields? Placing them in a subform with the correct flowed direction can do just that.
When the subform is set to positioned content, many of the remaining properties are disabled in the Object palette. One that is still active seems to generate some confusion. The Subform tab provides a check box to allow page breaks within content, as shown in Figure 28.6. This may seem strange, so consider the following scenario: The subform is set to positioned, and we placed it where we wanted it on the page. There should be no question as to whether or not we want to allow a page break, right? Wrong. A positioned subform can be nested in a flowed subform. If the outer flowing subform pushes the positioned subform near a page break, should the content be allowed to split across two pages? Again, if your form is not designed to be dynamic you can safely ignore this option.
Note
For more information on nested subforms, see the section "Nesting Subforms" later in this chapter.
The remaining pagination options, as shown in Figure 28.13, can be found on the Pagination tab of the Object palette. These settings are restricted to a flowed subform or a positioned subform nested inside a flowed subform.

The options on the pagination tab of the object palette include:
Place: This option determines where the initial subform will be laid out. Even though a subform is created in the design view of the form with other subforms above and/or below it, this does not mean it has to render in that position at runtime. Changing this setting allows you to customize the subform placement. Placement options are flexible in allowing you to choose either the content area (regardless of the page) or the page where you want the subform to be positioned as shown in Figure 28.14.
Following Previous: This is the default setting. It treats the subform just the way it was created on the design page. The subform follows the previous object in the parent subform of the hierarchy.
In Content Area: You must choose the content area by name. Use this setting when you want to place the subform within a specific content area. Remember that content areas are defined only on the master pages. Placing in a content area is very useful for columnar layouts. The subform is placed after any existing items already in the content area.
Top of Next Content Area: Without having to name the content area, you want Designer to find the next content area and place this subform at the top of it.
Top of Content Area: You must choose the content area by name. Use this option when you want the subform placed at the top of the content area instead of after the existing items.
On Page: You must specify the page number. This option places the subform on the specified page and creates a page break if one does not occur naturally.
Top of Next Page: Designer finds the top of the next page, without you specifying the specific number. This option also generates a page break if needed.
Top of Page: You specify the page number and Designer places the content at the top of the page, generating a page break if necessary.
The next four options are available only if the master page set has the printing property set to Print on Front Side Only, Print on Both Sides. Printing on the front side only or both sides is supported only in Acrobat 8.1 and later. The default setting for the master page set is Page Occurrence. Occurrence allows you to determine how many times a master page is used.
On Odd Page: Designer places the subform on pages that print on odd numbers only, with other content if any already exist.
Top of Next Odd Page: Designer places the subform on the top of the next odd-numbered page generating a page break and a blank page if needed.
On Even Page: Designer places the subform on pages that print on even numbers only, with other content if any already exist.
Top of Next Even Page: Designer places the subform on the top of the next even-numbered page generating a page break and a blank page if needed.
Note
For information on how to configure master pages to allow odd and even placement see Chapter 25.
Keep With Previous: Keep this subform together with the previous subform. Do not allow a page break between the two subforms. If one subform is pushed to the next page, they both move to the next page.
Keep With Next: Keep this subform together with the next subform. Do not allow a page break between the two subforms. If one subform is pushed to the next page, they both move to the next page.
After: After this subform has been placed in the form design, this setting determines what section should be filled next. Much like the options for setting initial placement, the after options include page area or content area choices as shown in Figure 28.15.
Continue Filling Parent: This is the default setting. It treats the remaining subforms just the way they were created on the design page. After this subform is placed Designer returns to the parent subform in the hierarchy to continue filling content. The subform's parent container is the next highest subform in the Hierarchy palette, as shown in Figure 28.16.
Go to Next Content Area: After this subform is placed, continue placing objects in the next content area.
Go to Content Area: You must name the content area that is filled after this subform is placed.
Go to Next Page: After this subform is placed, continue placing objects on the next page in the form.
Go to Page: After this subform is placed, continue placing objects in the page you specified.
Go to Next Odd Page: After this subform is placed, continue placing objects on the next odd page in the form. This option is available only if the master page set is configured for odd and even placement.
Go to Next Even Page: After this subform is placed, continue placing objects on the next even page in the form. This option is available only if the master page set is configured for odd and even placement.
Conditional Breaks: The number indicates how many conditional breaks are in the document. Set conditional breaks with the Edit button. Use this option to prevent widow and orphans in a table, for example. You can create a conditional break if there is only one body row on the first page of the table; insert a page break before the table header. Conditional breaks are also used to separate data by values in subform sets to manipulate the data set so it appears in a predetermined order. The Edit Conditional Break dialog box is shown in Figure 28.17.
Overflow: If the subform spans a page break, these settings determine how the remaining content is placed in the form:
None: Designer starts filling the next page because no overflow placement was specified.
Go to Content Area: Specify the content area name where you want the overflow information placed.
Go To Page: Specify the page where you want the overflow information placed.
Overflow Leader: If the subform spans a page break, you can specify another subform as a repeating header (leader).
Subform Name: Specify the subform you want used as a repeating leader if the subform spans a page break.
None: No repeating leader is used.
New: Designer allows you to create a new subform and set it to be the repeating leader.
Overflow Trailer: If the subform spans a page break, you can specify another subform as a repeating footer (trailer).
Subform Name: You specify the subform name you want to use as a repeating trailer if the subform spans a page break.
None: No repeating trailer is used.
New: Designer allows you to create a new subform and set it to be the repeating trailer.


In a dynamic form, headers and footers are very important elements to consider when creating subforms. In Designer these are called overflow leaders and overflow trailers. If the form always remains static these are unnecessary. Overflow leaders and overflow trailers are used to specify what happens when the repeating subform spans a page break.
In the application we have been working on, the applicant information, education, and the signature sections have a limited amount of data being requested. However, in the remaining sections the amount of data input can vary according to the form recipient's personal history. To make these sections dynamic we should separate the section bar from the fields inside the section to allow the areas to be controlled independently. The shaded section bar becomes the overflow leader. It does not repeat every time we add a section, but it repeats if the section grows beyond the current page.
Compare the image in Figure 28.18 where the subform was not set up with overflow leaders and Figure 28.19 where the subform was set up with an overflow leader.


Setting up the overflow leaders and trailers requires changing only a few settings after the subforms have been created. The properties are stored in the Pagination Tab of the Object palette. We begin by creating the subforms for the reference sections and then adjust the overflow settings.
STEPS: Setting Up a Subform with an Overflow Leader
Open a Form. If you completed the steps Wrapping Objects in a Subform, you can continue using the file you saved. If not open the GFApplicationOverflow.xdp file from the Chapter28 folder on the book's CD-ROM.
Select the References Section Bar. The object name is lblReferenceSection in the hierarchy.
Right-click the selected object. This opens the context menu.
Choose Wrap in Subform. This inserts a subform the same size as the collective object set and places the selected objects inside the new subform.
Rename the subform ReferenceHeader. This name is how we refer to the overflow header.
Select all the objects in the References section. Start with the ReferenceName and continue through the Phone field. Notice there is only one set of fields in the form's References section. We need to set additional dynamic properties that allow this section to repeat as many times as we need.
Right-click one of the selected objects. This opens the context menu of options.
Choose Wrap in Subform. This inserts a subform the same size as the collective object set and places the selected objects inside the new subform. Notice the size of this subform does not extend the width of the page. The previous subforms extend to the page width because of the section name, which we did not include this time.
Rename the subform Reference. Notice that the remaining sections of the form have already been wrapped in subforms. This allows us to move on to the next step more quickly. If you'd like to build them yourself, right-click a subform and unwrap the subforms to proceed on your own. After you complete this step your form hierarchy should look similar to Figure 28.20.
Resize the Reference subform. We want the subform to be the width of the design page. Select the right handle and drag to the right edge. Or, select the Layout palette and increase the width to 9.5 inches.
Save a copy of the form. Save the form in a location of your choice on your computer. This step is very important. You always should save a copy of the form before changing the layout to flowed in case you encounter anything unusual and need to get back to the previous layout. Flowing the document can change far more than you realize. We recommend saving the form with a notation like GFApplicationbeforeFlowed. Even if you never need this extra file, it is better to know it is there.
Tip
All objects need to be wrapped in subforms prior to changing the main page form to flowed. Failing to do so results in objects moving extensively on the form design page. You can undo the flowed layout if you catch the misplaced objects soon enough. Double-check your form before changing the Content Type to Flowed.
Select the Page1 subform. Overflow leaders and trailers are allowed only in flowed documents. We need to change the Content Type of this subform to Flowed.
Open the Subform Tab of the Object palette. This is where the subform Content Type is stored.
Change the Content Type to Flowed. This causes any gaps between the subforms in the design page to be removed. The subforms now touch each other on the design page. If you need space between the subforms, add the blank space to a positioned subform.
Verify the direction is Top to Bottom. This is the default setting when changing the Content Type to Flowed.
Select the Reference Subform. We need to turn on the dynamics of this section. We start by setting the repeat for each data item then continue with setting the overflow leader properties.
Open the Binding tab of the Object palette. We need to allow the subform to repeat.
Turn on Repeat Subform for Each Data Item. Notice the minimum is set to 1 by default, but there are no maximum or initial numbers provided.
Set the Minimum, Maximum, and Initial Values. We want to prompt the form recipient to complete three references. We choose to not restrict them from adding a few more. Set the initial count of 3 and a maximum of 5. You also may choose to change the minimum number to 3 if desired. Our binding settings are shown in Figure 28.21.
Note
The settings we create here are fixed and don't allow the person filling in the form to change them. We create buttons later in this chapter to give control back to the form recipient. See the section "Creating User-Controlled Dynamic Forms" later in this chapter for details.
Open the Pagination Tab of the Object palette. The Pagination tab allows you to decide where the subform should be placed initially and what to do if it spans a page break.
Set the ReferenceHeader as the overflow leader. If the references span a page break, this tells Designer to repeat the colored section bar at the top of the overflowed area. The Pagination tab should match Figure 28.22.
Select the Subform Tab of the Object palette. We want the references to flow onto page 2 if necessary. However, we do not want a page break within a reference.
Deselect Allow Page Breaks within Content. This prevents page breaks within an instance of the References section. Because the page subform allows page breaks, this option allows a break to occur between instances of the references subform.
Select the ReferenceHeader Section from the Hierarchy palette. We want to ensure that if the content above the References sections grows or changes, a page break near the beginning of the References section does not cause the header bar to appear by itself at the bottom of a page. We always want the header bar to appear with the first reference.
Open the Pagination Tab of the Object palette. In the place settings we need to verify the ReferenceHeader is not separated from the References section.
Select the Keep With Next option. This ensures a page break does not occur between the header and first instance of the References section.
Save a copy of the form. Save the form in a location of your choice on your computer. We recommend naming it with the word flowed for clarity until after all the design work has been completed. We'll name our form GFApplicationFlowed.xdp. You may continue working on this copy of the file, or choose to open another sample from the CD-ROM for the next set of steps.


Testing the form requires that we check a few additional settings before proceeding. Setting a form's Content Type to Flowed is only part of the process to making a dynamic form. Next we check the following form settings:
The form is saved either as an XDP or a dynamic XML form: If the form has been saved as a static PDF, the flowing layout does not work properly. To check this setting select File

Note
The Save As choices changed in each of the recent version updates of Designer. If your settings do not match the dialog box in Figure 28.23 you need to select a setting for a dynamic type form. For the purposes of this example, select any dynamic version number available in the Save As options.
The Preview Format allows dynamic content: A form can be saved as a dynamic compatible type, but the preview still treats it as a static form. Check this setting by choosing File
Select the Preview Tab in the Properties window: The Preview Type must be Interactive Form. Set Preview Adobe XML Form As to Dynamic XML Form if you save your files as XDP formats. Verify that your settings match Figure 28.24.


Note
The starting file (GFApplicationFlowed.xdp) and completed file (GFApplication.xdp) used in the "Preview a Dynamic Form" steps can be found in the Chapter28 folder on the CD-ROM.
STEPS: Verify Dynamic Properties and Preview a Dynamic Form
Open a Form. If you completed the steps "Setting Up a Subform with an Overflow Leader," you can continue using your saved file. If not, you can jump in here by opening the GFApplicationFlowed.xdp file in the Chapter28 folder on the CD-ROM.
Go to File
Save As. Verify the form is saved as Dynamic XML Form (*.pdf) or an XML Form (*.xdp) format. If necessary resave the file with one of these formats.Choose File
Form Properties and click the Preview Tab. Because we are previewing from within Designer, we need to verify the preview performs dynamically:Set the Preview Type to be Interactive Form.
Set the Preview Adobe XML As to Dynamic XML Form.
Press OK to save the Form Properties.
Select the Preview PDF tab (F5). If all the preceding settings have been correctly set, your form displays with three reference sections at the bottom of page 1. If the form does not have enough room for all three sections on page 1 and an instance of the references spills onto page 2, the page break is between references.
Return to Design View. If there were any unexpected results in the preview, then go back and double-check the steps above. If you continue to have trouble, try opening the sample files and compare the settings between your document and the samples.
Save your form. We'll save our form as GFApplicationFlowed.xdp. You may continue working on this copy of the file, or choose to open another sample from the CD-ROM when we continue working on this document in the steps for creating user-controlled dynamic buttons.
Technically we nested subforms in the previous section, because we wrapped objects in subforms and never altered the default page subform inserted by Designer. We are going to take a brief break from our application while we look at other documents that use nesting subforms.
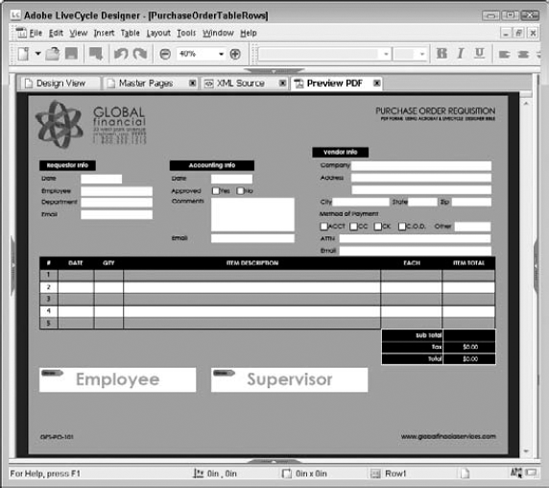
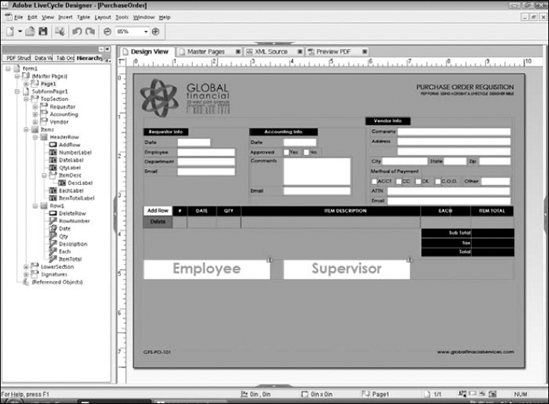
Figure 28.25 shows a purchase order whose subforms are already set up with the fields grouped into logical sections. The sections across the top of the form are Requestor, Accounting, and Vendor; followed by the Items Table, Totals Table, and Signatures.
Note
The purchase order forms used in this section can be found in the Chapter28 folder of the CD-ROM.
This purchase order would not work well in a top-to-bottom flow with the current arrangement of subforms. The requestor information would be above the accounting information as shown in Figure 28.26. To get the form to respond the way we want it to, we need to either change the flowed direction or some additional subforms to control the position of some objects.


We do not want the top three sections to flow top to bottom, even though we want the rest of the form to do so. To prevent that from happening we need to wrap the top three subforms in another larger static subform. You might be wondering why we wrapped the three sections in smaller subforms to begin with. Why not take all of the objects at the top of the form and wrap them in a single subform to start? As we discussed in Chapter 22, default tab order works left to right then top to bottom. If we had a single subform at the top of this purchase order the tab sequence would not be logical for the person completing the form.
Note
For more information on adjusting tab order in Designer, see Chapter 25. For default tab order behavior see Chapter 22.
Our intent is to create a form with flowed content, top-to-bottom direction, and the correct tab order maintained in the finished form. Once we have the top three subforms maintaining their respective positions we need to alter the single table row to become a dynamic table.
Note
To follow these steps, use the PurchaseOrder_Start.xdp form from the Chapter28 folder on the book's CD-ROM.
STEPS: Nesting Subforms to Position Objects
Open a form. We opened the GFPurchaseOrderStart.xdp from the book's CD-ROM.
Select the subforms to be nested in another subform. We selected the Requestor, Accounting, and Vendor subforms in the Hierarchy palette. These are the objects we don't want moved when we flow the page subform.
Warning
Wrapping objects in another subform can cause calculations and scripts that have been written using relative syntax to fail. You need to double-check that all scripts and calculations work properly after adding subforms. The formulas in our purchase order were written with these changes in mind and continue to work.
Note
For more information on using calculation scripts in Designer, see Chapter 29.
Wrap the objects in a subform. We right-clicked on a selected subform in the hierarchy and chose Wrap in Subform from the context menu. Notice in the Subform tab in the Object palette shows the content is positioned. This ensures the objects don't move inside the subform when the page subform is flowed. Also notice the subform width is the same size as the collective objects you selected. This subform is almost as wide as the design page and prevents the objects from shifting to the left.
Note
For more details on other subform creation methods, see the section "Creating Subforms" earlier in this chapter.
Rename the subform. Always take the time to name objects logically. We named our new subform TopSection.
Note
We are not using the Wrap in Subform method for the next example. When wrapping objects in a subform the subform size is always equal to the size of the collective objects. When you adjust the subform size, the objects inside shift position. For this situation we recommend adding a subform object and then moving the desired objects inside the subform.
Add a subform object to the design page below the Items table. We need to prevent some additional objects from being repositioned when the page is flowed. We do not want the Totals below the table to move to the left side of the form.
Rename the subform. We called our subform LowerSection. We need to extend the width of the TableTotals subform to match the width of the content area to ensure they do not shift to the left.
Change the subform width to match the content area width. Verify the LowerSection subform starts at an X coordinate of .25 inches and the width is 9.5 inches. We selected the subform and used the Layout palette to make the changes. Don't worry about the height of the subform right now. Forgetting to alter the subform width causes totals to shift to the left when the document is flowed as shown in Figures 28.27 and 28.28.
Move the Totals Table into the LowerSection subform. We used the Hierarchy palette to select the Totals Table and dragged it onto the LowerSection subform.
Select the LowerSection subform and adjust the height. Notice that the object height adjusted to enclose the table objects but did not reposition the table objects. We set the LowerSection subform height to .8 inches.
Check the form hierarchy for subform order. The subforms must be moved to the positions indicated in the Hierarchy palette. When we created the LowerSection subform, it was placed at the bottom of the Hierarchy palette. If not changed, the signatures appear above the LowerSection when the content is changed to flowed as shown in Figures 28.29 and 28.30.
Change the order of the subforms if necessary. We needed to drag the LowerSection subform above the Signatures subform in the hierarchy.
Save a copy of the form. Always save your form before changing the subform Content Type to Flowed. Save the form in a location of your choice on your computer. We saved our form as PurchaseOrderbeforeFlowed.xdp.
Set the Page subform to flowed content. Select the SubformPage1 from the Hierarchy palette and open the Subform tab of the Object palette. Set the Content Type to Flowed. Leave the flow direction as Top to Bottom. Notice how the blank area between the subforms was removed, but the objects inside a positioned subform were not altered. Your form should look similar to Figure 28.31.
Save a copy of the form. Save the form in a location of your choice on your computer. We recommend naming it with the word flowed for clarity until after all the design work has been completed. We'll save our form as GFPurchaseOrderFlowed.xdp. We will continue to use this form in the next section. You may continue working on this copy of the file, or choose to open another sample from the CD-ROM for the next set of steps.


The Purchase Order form has been changed to a flowed content form. Why go to all that work, when we really don't want any of the objects to move? We are planning to turn Row1 of the table into a repeating subform that can adjust when we merge data with it, or when the form recipient is entering data they can adjust the number of desired rows.

Tables are frequently used in form design layouts because they provide structure and visual clarity to the form. In Designer tables are a specialized subform, which makes them ideal for repeating sections of a form. We will take the purchase order used in the previous section and allow the rows to repeat as needed for additional data. The process for making a table row repeat is the same as for a subform. Select the subform and change the binding to repeat for each data item.
Note
For more information on using tables in Designer, see Chapter 27.
By default a subform has a Content Type of Positioned, and the subform allows page breaks within the content area. We have already discussed those settings earlier in this chapter. It is important to understand that the table has those same default properties assigned to it. However, the rows within the table do not share those default properties. A table can have header rows, body rows, and footer rows. By default the setting to allow page breaks within the content area is not turned on for the rows within the table. These are optimal default settings, but worth noting before you begin to work with tables as repeating subforms.
Note
To follow the next set of steps use the file saved from earlier steps or open the PurchaseOrderFlowed.xdp file from the Chapter28 folder on the book's CD-ROM.
STEPS: Setting a Table Row to Repeat
Open a form. We'll continue with the GFPurchaseOrderFlowed.xdp file from the previous steps. If you did not complete the previous set of steps you can open the GFPurchaseOrderFlowed.xdp form from the book's CD-ROM.
Select the table row to be repeated. We selected Row1 of the Items Table. Notice the Object palette already contains the Subform tab.
Select the Binding Tab of the Object palette and turn on Repeat Row for Each Data Item. Because our form was already set up for a flowed layout all we need to finish are the desired maximum value and initial counts.
Set the Minimum, Maximum, and Initial Values. We set an initial count of 5, left the minimum at 1, and did not specify a maximum value.
Preview the Form. Select the Preview PDF tab or press F5 on the keyboard to view your dynamic table. Verify that the form appears similar to Figure 28.32.
Note
If your form does not show the additional table rows see the "Previewing a dynamic form" section earlier in this chapter.
Save and close your form.
We have created a form that is capable of adjusting dynamically based on data merged with the form. The form is also able to adjust the number of rows by changing the subform properties. We expand on this concept a little later in the chapter and give the user a button to adjust the number of rows while entering data.
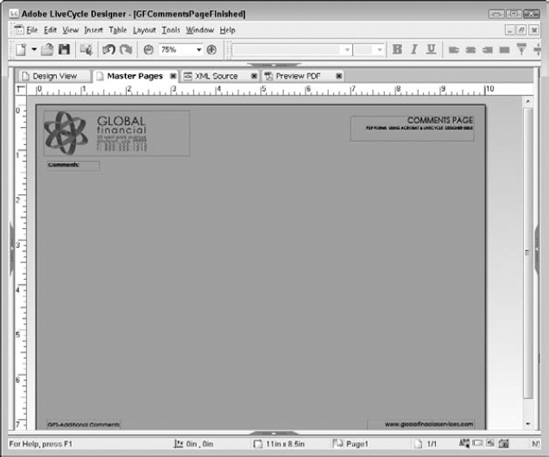
Having sections of a form that can grow and shrink dynamically (in both Acrobat and Adobe Reader) is one of the more powerful features and a big reason we enjoy designing forms in LiveCycle Designer. Sometimes a form is not as complicated as the samples used so far in this chapter. What if we need a comments page to attach several recipient comments to one of our forms? The comments page should use the same look and feel as our other forms. This means we need to include the header at the top, the form and page numbers at the bottom, and an area in the middle for comments, as shown in Figure 28.33.
Note
The Comments Page starting file and a completed version can be found in the Chapter29 folder on the book's CD-ROM.

How do we create a form with a text field that grows instead of an entire subform? Although this example seems easier than the previous ones, it relies on the concepts covered earlier in this chapter. We begin with a basic Designer form with the default page subform set to positioned content and a regular text field as shown in Figure 28.34.
Notice the text field is not very tall. Without some property changes our comments form becomes a disaster. A default text field in Designer cannot handle more than a single line of text even if it is tall enough to hold many. As soon as the focus moves out of the text field, a plus sign appears in the lower-right corner to indicate that additional text cannot be displayed, as shown in Figure 28.35. The entire contents of the field are stored in the form data, but they cannot be displayed on the screen or in the printed document.
Note
For more information on formatting fields and setting field properties, see Chapter 25.


The first setting we need to discuss is the text field property: Allow Multiple Lines. Located in the Object palette, this check box allows the text to wrap within the available field space and produces a much better result for printed forms as shown in Figure 28.36.

The problem remains when the form recipient enters more data than the field has room to display. The field reverts to showing the text field with the black plus sign in the lower-right corner of the field as shown in Figure 28.37. The improvement is apparent because we can see more than one line, but this solution does not meet our need for a growing text field for comments.
The second setting is the height of the field in the Layout palette. Turn on the Expand to fit check box and our form behaves more like what we wanted, as shown in Figure 28.38. Now our problem is at the bottom of the page where the content runs over the edge.

The third setting is the page subform type. It is still set to Positioned content (the default) and the text fields are set to Expand to fit. So the text field is spilling outside the subform area and covering the form number that was placed on the bottom of the master page.
Note
Subform content types are discussed in the section "Understanding positioned and flowed content areas" earlier in this chapter.
When we set the Content Type to Flowed and leave the flow direction set as Top to Bottom, we finally have all of the pieces together that we need to make our comments page work, as shown in Figure 28.39. The remaining items are a few aesthetic settings needed to finish the form. Because we are not working with a subform that can have a Leader set to repeat the comments label at the top of the second page, we should create that label as a static object in the master page and prevent the spillover from touching the logo.

To add a comments page with an expanding text field, follow these steps.
Note
To follow the next set of steps, use the GFCommentsPageStart.xdp form from the Chapter28 folder on the book's CD-ROM.
STEPS: Creating a Comments Page with Expanding Text Field
Open a form or create a new form with a text field on it. We'll open the GFCommentsPageStart.xdp form from the Chapter28 folder on the book's CD-ROM.
Select the Comments Text Field. Open the Field tab of the Object palette.
Turn on Allow Multiple Lines. Figure 28.40 shows the check box setting. This setting allows the text to wrap within the available field area.
Open the Layout palette and select Expand to fit under the height setting. Figure 28.41 shows the Expand to fit option. This setting allows the text field to grow in height. However, if the page subform is still set to Positioned it spills out of the subform area and covers content below the page subform.
Select the page subform and set the Content Type to Flowed. Open the Subform tab of the Object palette to change the Content Type to Flowed.
Remove the caption from the comments text field. In the Layout palette set the caption property to None.
Select the Master Page tab and insert a static text box above the comments field to be used as a caption. Adjust the content area if necessary to make room. Your form should be similar to Figure 28.42.
Save a copy of the form. Save the form in a location of your choice on your computer.
Preview and test the form. Select the Preview PDF tab or Press F5. Enter enough text in the comment box to cause it to expand. Click outside the box to watch it adjust to the new contents.


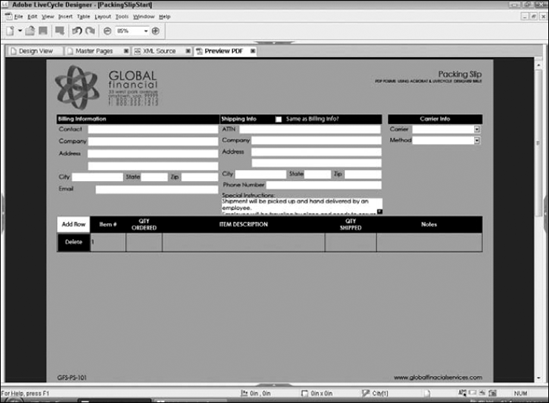
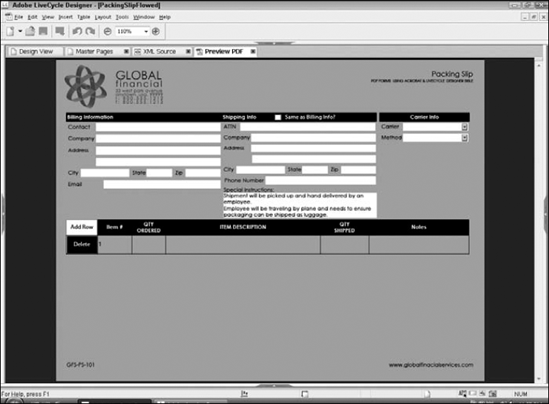
Creating a dynamic expanding text field requires an understanding of subforms and content areas to create a field that correctly spans more than one page. We want to expand these concepts of growing subforms and growing text fields together into another form example where both are used to complete the form design. The packing slip we are building is similar to the purchase order, as seen in Figure 28.43. This form has three subforms across the top of the page and a dynamic table below them.
The difference in the packing list is the field called Special Instructions. We need this area to be expandable, which in turn pushes down the table if needed. For this reason, we cannot wrap the shipping information area in a static subform. It must be a flowed subform.

To create a flowing form with an expanding text field, follow these steps.
Note
To follow the next set of steps, use the GFPackingSlipStart.xdp form from the Chapter28 folder on the book's CD-ROM.
STEPS: Creating a Flowing Form with an Expanding Text Field
Open a form. We'll open the GFPackingSlipStart.xdp form from the book's CD-ROM.
Open the Hierarchy palette. Notice that the subforms have already been created and all subforms are positioned content types. Nothing is set up to flow yet.
Select the Preview PDF tab. Type a few characters followed by a return, and repeat until you have more than three lines of text in the Special Instructions field. When you tab out of the field, any text that didn't display in the first three lines is not visible on the form, as shown in Figure 28.44. We can't have the instructions cut off of the packing list when printed.
Return to Design View. We begin by setting the Special Instructions text field to expand properly.
Select the Special Instructions field. We need to set the text field to allow multiple lines.
Open the Field tab of the Object palette, and select Allow Multiple Lines. This setting allows the text to wrap within the currently available space. To have the field expand to accommodate additional text lines, we need to set the height of the field to expand to fit.
Open the Layout palette and select the Expand to fit below the Height property. When the form has been set to flow the contents, the height of the field adjusts as needed.
Select the Preview PDF tab or press F5. Type a few characters followed by a return, and repeat until you have more than three lines of text in the special instructions field. When you tab out of the field, any text that didn't display in the first three lines is not visible on the form. Notice that even though we have made the necessary adjustments to the text field, the field remains stationary in height. This is because the text field is inside a static subform that cannot adjust as needed.
Return to Design View. We need to change the subform properties to allow the section to adjust. We cannot set the subform to flow top to bottom, because it would change the layout of our fields in that area. We also cannot leave the subform on positioned content type.
Open the Subform tab of the Layout palette.
Change the Content Type from Positioned to Flowed. This alters the layout of our subform and causes the fields to move to the left side of the subform.
Change the Flowed Direction to Western Text. This places the fields back into the proper layout for our needs. The text field cannot adjust yet because the page subform is still positioned content.
Select the page1 subform from the Hierarchy palette.
Open the Subform tab of the Layout palette.
Change the Content Type from Positioned to Flowed. This alters the layout of our subforms causing them to wrap down the left side of the page.
Change the Flowed Direction to Western Text. This places the subforms back into the proper layout for our needs.
Select the Preview PDF tab or press F5. Type a few characters followed by a return, and repeat until you have more than three lines of text in the Special Instructions field. When you tab out of the Special Instructions field, the size adjusts to your newly entered text and pushes the packing list table down the page as needed, as shown in Figure 28.45.
Save a copy of the form. Save the form in a location of your choice on your computer. We will save this form as GFPackingSlipFlowed.xdp.
In this example we took the concepts of dynamic subforms and dynamic text fields and combined them into a single form. We have found that when beginning to work with dynamic subforms and fields, designers tend to wrap objects in unnecessary extra layers of subforms.
For example, the fields in Shipping subform could have been split into two subforms, one for all of the static fields and another for the special instructions. By wrapping those two subforms in an additional subform (that makes three subforms for the shipping information section), we could have set the Shipping subform flow direction as Top to Bottom. This creates additional, unnecessary subform objects and can reduce your form's performance.
When you begin working with subforms we advise you to be creative with settings and explore other possible settings that may work with fewer objects on the form. Always save a copy of your form before setting the Content Type to Flowed so you can go back and adjust, or try different layout options.
Now we want to go back to our Purchase Order, Packing List, and Application forms to add the user-controlled buttons that complete our form designs.
The dynamic forms we built earlier in this chapter aren't quite finished. They don't allow the form recipient to control the form's dynamics. Creating buttons for the form recipient to adjust the form layout requires a little bit of script to finish. No need to panic—each button requires only two lines of code. Yes, we said two lines of code. You can even copy them from one of the forms on the CD-ROM if you'd like. If you went to look at the Table of Contents just now, it doesn't say anything about scripting in this chapter. We wanted you to keep reading so you would realize just how easy this can be.
Note
Understanding the differences between JavaScript and FormCalc, and writing calculation scripts, are covered in Chapter 29.
We start by finishing our Purchase Order form that has all of the properties set to allow the dynamic table to grow. We just need to place two buttons to allow the user to add and remove rows of the table.
Designer has code built in to handle instances of subforms needed at runtime. This code, the Instance Manager, has the following methods available:
Add: Use Add when you need an additional copy (instance) of a subform.
Remove: Use Remove when you no longer need an existing copy (instance) of a subform.
Set: Use Set to add or remove copies (instances) of a subform. Let's say we use the set method for four instances. If the form already contains two instances, the set method adds two more. If a form already contains five instances, the set method removes one. Set forces the number of subforms to appear.
Move: Use Move to change the position of the subform instances already on the form.
Of the four methods available in the Instance Manager, we need only two for our example, Add and Remove. Let's move on to create the buttons so we can add our script.
Our Purchase Order form does not have any buttons. We need to adjust the table columns to give us room for a button in the header row and a button beside each row of the table to remove that row. When we have room for the buttons, we add the scripts to call the Instance Manager to adjust the rows.
Note
If you don't have the file saved from earlier steps handy, use the GFPurchaseOrderIMStart.xdp file from the Chapter28 folder on the book's CD-ROM.
STEPS: Adding Buttons to Call the Instance Manager
Open a form. If you completed the steps for setting a table row to repeat earlier in this chapter, you can continue to use your saved form. Or, you can open the PurchaseOrderIMStart.xdp file from the book's CD-ROM.
Reduce the width of the Description column in the table by about .75 inches. This gives us enough room to add a button next to the rows of the table. You can click and drag the width of the column on the design page, or use the Layout palette.
Insert a new column to the left of the Item Number. Right-click on the Item Number and select Insert
Adjust the new column to fill any remaining space in the table. Drag the column width until it fills the form.
Note
For details on working with tables, see Chapter 28.
Add a button to the new column header area. Drag the Button object from the Object Library to the untitled text area in the header row.
Rename the button AddRow. Using the Hierarchy palette, right-click the new button and select Rename from the context menu. Add a caption of Add Row to the button.
Add a button to the new column in the body row. Drag a Button object from the Object Library to the untitled text in the body row.
Rename the button DeleteRow. Using the Hierarchy palette, right-click the new button and select Rename from the context menu. Add a caption of Delete to the button. The new buttons should appear similar to the buttons in Figure 28.46.
Format the two new buttons if desired.
Open the script editor if necessary. The script editor is located at the top of the screen above the Design View and Preview PDF tabs. To open or close the script editor, go to Window
Select the AddRow button.
Select the click event from the Show drop-down list in the Script Editor. The Show drop-down menu is located in the top-left corner of the Script Editor window; refer to Figure 28.47. The event determines when the script is run.
Select JavaScript from the Language drop-down. The Language drop-down list is located in the top-right corner of the Script Editor and specifies which of the scripting languages you are using as shown in Figure 28.47.
Add the following two lines of code to the Script Editor. The first line says locate Row1 in the form and set the addInstance method of the Instance Manager to true. The second line says find the top of the form and recalculate the entire form.
_Row1.addInstance(true);
xfa.form.recalculate(true);
Tip
When typing in the Script Editor, code hinting pops up to help you. If the item you want is highlighted, you can press Enter to select it. Then continue typing your code. Scripting in Designer is case-sensitive. You must enter the code exactly as you see it here.
Note
When first selecting an event from the Show drop-down list, only the event name is listed. After code has been written the Show list contains an asterisk after the event name. When working with scripts you can tell which events have scripts associated with them by selecting the Show drop-down list and looking for the asterisks.
Save a copy of the form. Save the form in a location of your choice on your computer.
Select the DeleteRow button.
Select the click event from the Show drop-down list in the Script Editor. The Show box is located in the top left corner of the Script Editor window; refer to Figure 28.47. The event determines when the script is run.
Select JavaScript from the Language drop-down. The Language drop-down list is located in the top-right corner of the Script Editor, as shown in Figure 28.47, and specifies which of the scripting languages you are using.
Add the following two lines of code to the Script Editor. The first line says locate Row1 and call the removeInstance method of the Instance Manager to remove this row of the table. The second line says find the top of the form and tell the form to recalculate.
_Row1.removeInstance(this.parent.index);
xfa.form.recalculate(true);
Select the HeaderRow from the Hierarchy. We want to repeat this header information if enough rows are added to the table to cause a page break.
Open the Pagination Tab of the Object palette. Select Include Header Row in Subsequent Pages option.
Note
You can write the same script in multiple ways. For example, you can rewrite the "xfa.form. recalculate(true)" statement and the "_Row1.addInstance(true)" using a number 1 in place of the word true. Most of the Designer help documentation uses the numeric version of the scripting. We chose to use the word for clarity in this chapter.
Save the form.
Select the Preview PDF tab or press F5. The form already contains five rows in the table because of the section we completed earlier in this chapter. Click Add to add a row. Click Delete to remove a row.
Return to Design View. If your code is not working correctly, double-check that it is entered exactly as shown here. A letter in the wrong case causes the code to not work. Also check each line of your code for a semicolon on the end. If you still have trouble, open the completed form on the CD-ROM and compare your document.

We created buttons so the form recipient can add and remove rows from a table while they are entering data into the form. To use the preceding code again for another form, you need to have the correct reference to the table row you wish to dynamically change.
Note
For details on referencing objects in scripts, see Chapter 29. For help with comparing FormCalc scripts to JavaScripts, see Chapter 32.
Forms are not only for collecting data; you also can use them to display data. When testing a form's functionality, entering data each time you want to test takes a long time. Wouldn't it be easier if you could import some sample data? You can, and you don't have to understand XML files to do so.
We talked a little bit about Extensible Markup Language (XML) in Chapter 21. XML is an industry standard format designed to structure, store, transport, and exchange data. Many files can read and write XML including Acrobat and Designer.
If you are comfortable with XML and have some sample files to work with, you are ready to move on to importing XML data. If you need a sample XML file, let's create one.
We need to use Acrobat to complete the following steps. Opening a form in Acrobat (Standard, Pro, or Pro Extended) enables you to extract data from the form. We are going to open Acrobat, fill out the form one time, and save that form data as an XML file to use each time we test the form. Sounds easy enough, don't you think? To try it, follow these steps.
Note
Use the GFPackingSlipFinished.pdf form from the Chapter28 folder on the book's CD-ROM to follow these steps.
STEPS: Creating a Sample XML Data File from an Acrobat Form or Designer Form
Open the form in Acrobat. We opened the GFPackingSlipFinished.pdf file from the book's CD-ROM.
Enter some sample data into the form. As shown in Figure 28.48, make sure you enter realistic sample information. One of the best ways to test a form is by completing it just as the form recipient is expected to. Take your time, you won't have to do this each time you test the form in the future unless you want to. If you encounter anything that you don't like, make a note about it so you can modify the form.
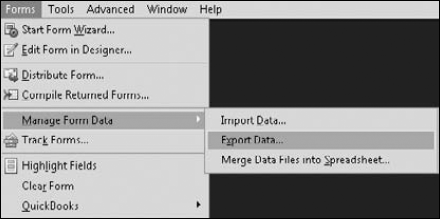
Once the form has been completed, select Forms
Manage Form DataExport Data. The Forms menu is shown in Figure 28.49.In the Export Form Data as Dialog box, name the file and leave the save as type set to XML files. Make sure the file location is easy to locate again for the next set of steps.
Close Acrobat. You do not need to save the form. Because the data has already been exported you can import the data again in the future.
Note
For more information in importing and exporting data from Acrobat, see Chapter 14. For more information on editing XML data, see Chapter 27.
When importing data into a form in Acrobat, you can save the form with the completed data contained in the document. When importing sample data in Designer the data is only used for previewing and testing purposes. You still need Acrobat to import or export data from the PDF form.

Now that we have a sample XML file, we would like to be able to utilize it each time we preview our Designer form. We recommend you create a few different sample XML files to test your forms with. Having a sample file with too little data does not push the form to the limit and verify all settings are working properly. A form with too much data can cause you to miss problems. Using sample XML data in Designer requires only setting a few form properties.
By creating our own sample XML file directly from the form we can rest assured that the data populates the form again in the proper fields. If your sample XML file came from a different source, you may need to match the fields in the XML data with the field names in the Designer form. Designer is excellent at handling data from various sources and correctly displaying it in the form.
Note
For more information in creating data bindings in Designer, see Chapters 27 and 31.
We discussed several form properties necessary for previewing dynamic forms correctly inside Designer. The Form Properties are also where we set up the sample XML file we wish to use when testing and previewing our form in Designer. Open the Form Properties dialog box by choosing File
To test a file using XML data and binding the data to the form, follow these steps.
Note
To follow these steps use the GFPackingSlipFinished.pdf form from the Chapter28 folder of the CD-ROM and the data file you exported from the last series of steps.
STEPS: Importing Sample XML Data in Designer
Open the form in Designer. We opened the GFPackingSlipFinished.pdfform from the book's CD-ROM.
Select Row1, and in the Repeat Row for Each Data Item, set the initial count to 1. Because we are going to use this form to print packing slips, we don't need the extra blank lines in the form.
Select the Preview PDF tab to verify that only one row of the table appears.
Return to Design View.
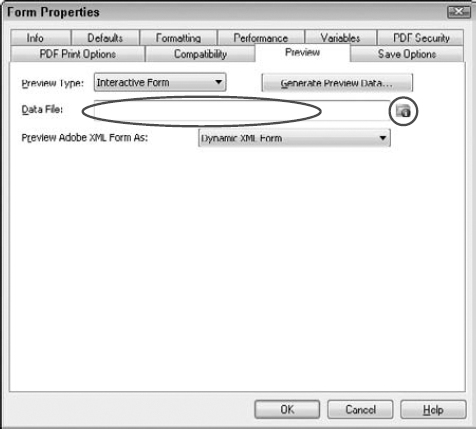
Choose File
Form Properties and click the Preview tab. As we mentioned in the previewing dynamic forms section, it is important to verify that the Preview Type is set to Interactive Form, and the Preview Adobe XML Form As Dynamic Form is also set.In the Data File area, click the Browse button on the right as indicated in Figure 28.50. Navigate to where you stored the XML file and press Open to return to the Form Properties Dialog box.
Select the Preview PDF tab or press F5 to test the form data. Once the file has been selected in the Preview tab, it appears each time you preview the form. You can repeat Steps 5 through 7 to see various amounts of data.
Taking the time to locate or create a few sample XML files the first time you need them can greatly reduce the testing time used again in the future. We recommend using two or three sample XML files to test the forms during production. If you are unfamiliar with the form data, then ask someone who uses the form to do the initial testing and have them save the file in Acrobat for you to export.
Dynamic forms don't always work exactly the way we want them to. Some very common settings to double-check include:
The form is saved either as an XDP or a Dynamic XML form (*.pdf).
The Preview Adobe XML Form property is set to allow dynamic content in the Preview tab of the Form Properties dialog box.
At least one subform has the Content Type set to Flowed.
Repeat Subform for Each Data Item is selected for the repeating subform, or Repeat Row for Each Data Items is selected for a table row.
Scripts used in buttons to add and remove subforms have no typographical mistakes.
The Acrobat viewer is a supported version for dynamic content.
We hope you agree that when you have grasped the concepts behind dynamic forms, turning them on and making them work is not difficult. The more you work with dynamic forms the easier it becomes.
Subforms are a key part of building flowed document layouts.
Subforms also control tab order.
You can add subforms before or after adding content.
Coordinates of objects are respected and maintained on positioned content areas.
Coordinates of objects in flowed content areas are relative to the container's coordinates.
You can nest subforms to create optimal layouts.
Subforms can flow in Top to Bottom or Western Text (left to right) directions.
Tables are specialized subforms with additional properties for easy formatting.
Dynamic forms can adjust based on user input or merged data.
You can add buttons to a form design to allow the form recipient to control the subforms.
Use the Instance Manager when scripting changes to the number of subforms.
Use sample data for previewing and testing form designs.
Troubleshoot dynamic form issues by checking basic form properties and file type settings.