
3. The First Hour
The First Things to Do After Starting Windows 7
If you just installed Windows 7, or have just purchased a new computer that came with Windows 7 already installed, you’re probably itching to use it. This chapter is designed to help get you off to a good start. We’re going to take you and your computer on a guided tour of Window 7’s new and unusual features, and walk you through making some important and useful settings. Here’s our itinerary:
• A quick tour of Windows 7’s important features
• Setting up user accounts
• Personalizing system settings to make using Windows 7 more comfortable and effective
• Where’s my stuff?—or, an introduction to Windows 7’s new file location scheme
• Transferring information from your old computer
• Setting up Internet access and automatic updates
• Logging off and shutting down
Our hope is that an hour or so invested in front of your computer following us through these topics will make you a happier Windows user in the long run.
A Quick Tour of Windows 7’s Important Features
Windows 7 is in many ways similar to its predecessors Windows Vista, XP, and 2000. The differences that do exist range from fun to peculiar to irritating (at least, irritating at first). This section discusses some of the most important features and the most significant differences between Windows 7 and its predecessors. It would be best if you read this while seated in front of your computer and follow along. That way, when you run into these features and topics later in this book and in your work with Windows, you’ll already have “been there, done that” at least once. We’ll start with the Welcome screen, which appears after you finish installing Windows 7, or when you turn on your computer for the first time (if Windows 7 came preinstalled on your new PC).
Note
![]()
If you’re using Windows 7 in a corporate setting and your computer was set up for you, some of the steps in this chapter won’t be necessary, and they may not even be available to you. Don’t worry—you can skip over any parts of this chapter that have already been taken care of, don’t work, or don’t interest you.
The Welcome Screen
When Windows starts, you see the Welcome screen, shown in Figure 3.1. On your computer, of course, you’ll see different usernames.
Figure 3.1 The Welcome screen is the starting point for logging on. Choose a user and enter the appropriate password or use the icon at the lower right to log off, restart, shut down, or place your computer in hibernation mode.
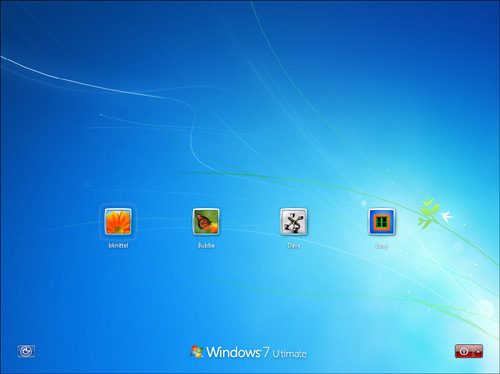
The Welcome screen lists all the people (users, in computer parlance) who have been authorized to use the computer. Click your name, and if asked, enter the account’s password. After you enter the password, press Enter, or click the right arrow button to complete the logon process.
Note
![]()
If you just purchased a new computer, the first screen you see might be from the tail end of the installation process described in the previous chapter. Your computer’s manufacturer set it up this way so that you could choose settings such as your local time zone and keyboard type. If you do see something other than the Welcome screen, scan back through Chapter 2, “Installing and Upgrading Windows 7.” If you recognize the screen you see in one of that chapter’s illustrations, carry on from here.
If Windows jumps right up to the desktop, your computer’s manufacturer set up Windows not to require an initial logon. In that case, skip to the following section in this chapter, in which we show you how to set up a user login.
The first time you log on, it may take a minute or two for Windows to prepare your user profile, the set of folders and files that holds your personal documents, email, pictures, preference settings, and so on. Logging on should take only a few seconds from the second time on. After the logon process is complete, Windows displays the desktop.
The New Start Menu
As with every version of Windows since Windows 95, the route to Windows applications and functions is through the Start menu. To open it, click Start and...wait a minute. Start?
The Start button doesn’t say Start on it. It’s a round icon bearing the Windows logo, initially at the lower-left corner of the screen, as shown in Figure 3.2. (If move your mouse pointer over it, after a moment the word Start actually will appear, to reassure you I guess.)
Figure 3.2 The Start button doesn’t read Start anymore.

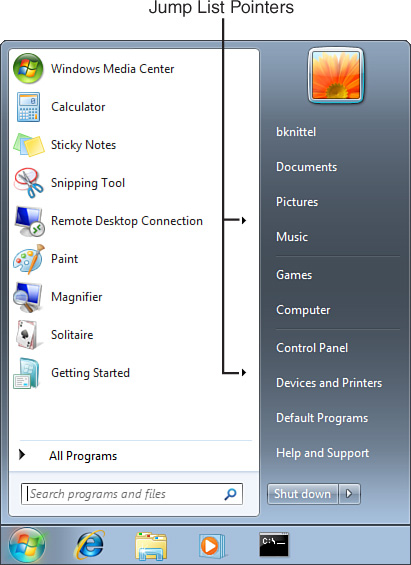
So: Click the Start button. The Start menu appears as a large panel with a list of frequently used programs at the left and a list of locations and tools at the right. The items in the right list that were called My Computer, My Documents, and so on in Windows XP are still present, but the names are now just Computer, Documents, and so on. (We’ll show you later in this tour how to select which items appear in this list.)
Tip
![]()
If you click on your username at the top of the Start menu list, Windows Explorer will display your user profile folder. Your profile folder contains your personal files and settings.
Windows 7 adds a new feature to the list of programs at the left side of the Start menu: Jump Lists. Notice the arrows next to some of the program names at the left side of Figure 3.3. If you click an arrow, the Start menu will display a list of files recently opened by or saved by this application. If you click one of those document names, Windows will start the program and open the selected document. You can right-click any of these names to remove them from the recent document list, or permanently “pin” them to the list.
Figure 3.3 Click a Jump List pointer to open a document recently used with an application.
Now, click All Programs, Accessories, and notice that the menus don’t expand out in a series of pop-up panels as they did in older versions of Windows. The idea now is to reduce visual clutter. Instead, only one menu at a time is shown in its entirety. The “back” link that appears at the bottom of the list takes you back to the previous menu list. Try it, and watch how the menu display returns to the original Start menu.
The Windows Search tool is also integrated into the Start menu. Under the words All Programs, notice the box that says Search Programs and Files. You can type a part of a filename or a phrase from a document into this box, and Windows attempts to locate the file or document. Results are displayed in the upper part of the Start menu panel.
A similar Search box appears in Windows Explorer, as you’ll see in the next section.
The New Windows Explorer
To continue our tour, let’s take a quick look at Windows Explorer, which got a major facelift in the jump from Windows XP to Windows Vista. It’s the same in Windows 7. Click Start, Computer, and Windows will display the Windows Explorer file manager, shown in Figure 3.4.
Figure 3.4 Windows Explorer sports a new look.
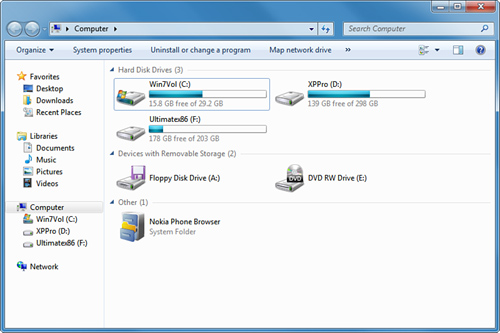
In the left pane, under Computer, click the C: drive, or whichever drive you used when you installed Windows. Double-click Users, then double-click the folder name that corresponds to your user account. (This is usually the same name that you selected on the Welcome screen when you logged on to Windows.) Finally, double-click My Documents.
Tip
![]()
When you have several applications running at once, Windows 7 makes it a lot easier to find a particular open window.
You’re probably familiar with the Alt+Tab key combination that steps through open windows, which dates back to Windows 3.1. Alt+Tab still works in Windows 7, but it’s learned a new trick: While you’re holding down Alt+Tab, you can hover your mouse over any of the small snapshot views of the windows, and you’ll be treated to a full view of the window’s contents.
If you press the Windows key+Tab, Windows rolls through open windows like a Rolodex.
Finally, you can hover your mouse over the icon for any active application in the taskbar, and Windows will display snapshot views of the application’s window(s). Click on one to make it the active window. Notice that these snapshot views also have close buttons, so you can quickly close windows you don’t need.
Notice that as you dig into these folders on your hard disk, the path is displayed at the top of the window, like this: Computer → diskname (C:) → Users → yourname → My Documents. The names in this list are called breadcrumbs (after the breadcrumbs dropped by the children in the fairy tale Hansel and Gretel). These breadcrumbs serve to show the way back through the path you took as you dug into the folders. The important thing to remember is that you can always click any of the names in the list to immediately jump back to that particular folder. Besides the standard concept of browsing through files by folder, Windows 7 lets you browse through files by type, through the new Libraries feature. A library is a combined view of several folders that all hold the same type of file. For example, by default, the Documents library lists the combined contents of your personal My Documents folder and the shared Public Documents folder. You can add additional locations to libraries, and you can construct new libraries of your own devising. We’ll talk more about Libraries and Windows Explorer in Chapter 5, “Managing Files and Searching.” Close Windows Explorer now and we’ll go on.
The Redesigned Control Panel
The wordy “web page” look and feel used all over Windows 7 reaches its penultimate in the Control Panel. Click Start, Control Panel, and you see the window shown in Figure 3.5.
Figure 3.5 The new Control Panel’s Category View looks and acts a lot like a web page. You can switch back and forth between this view and the old-style icon view using the View By drop-down box.
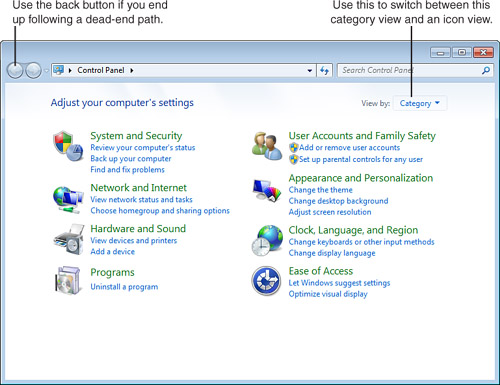
Whereas the old Control Panel model used icons to identify little configuration and control programs, the new Control Panel uses phrases—dozens and dozens of phrases—that describe various tasks. The major titles in large type, such as System and Security, Network and Internet and so on, are links to other pages with many subheadings and numerous tasks. The two or three tasks that appear under each title on the main Control Panel page, such as Back Up Your Computer under System and Security, are there as convenient shortcuts, and they appear on the subpages as well.
Now, click the green title System and Security. Notice that this System and Security page has its own long list of headings, such as Action Center, Windows Firewall, System, Windows Update, and so on, with tasks under each heading. On these pages, both the green headings and the task descriptions lead to various dialog boxes that let you configure and adjust Windows. Notice also that the Back and Forward buttons in the upper-left corner of the window work just as on a web page, and let you retrace your steps.
Note
![]()
The Back button is found all over the place in Windows 7. It can come in handy, so make a mental note to remember to look for it as you use various control panels, Windows Explorer views, setup wizards, and so on.
Personally, we think that the new Control Panel uses too many words. If you have a hard time finding a control panel applet that you know should be there, try either of these two techniques:
• In the search box, type a word related to the applet you want. For example, the easiest way to get to the Phone and Modem setup dialog is to type the word modem into the search box (no need to press Enter), then click Phone and Modem in the list of search results.
• Click the View By drop-down list in the upper-right part of the window, and select Small Icons or Large Icons. The resulting list of icons looks like the Control Panel from Windows XP.
Tip
![]()
If you have trouble finding a setting, check this book’s index, which should lead you to instructions for finding the correct links in the Control Panel or elsewhere. You can also use the Search box at the top of the Control Panel window.
That View By drop-down item lets you instantly switch back and forth between the Category view and an icon view. (By the way, in this book, almost all instructions will refer to the Category view.)
Before proceeding, be sure View By is set to Category. Next, we’re going to look at user accounts and security in Windows 7.
Devices and Printers
A new feature in Windows 7 is the Devices and Printers window, which Microsoft also calls the Device Stage. Click Start, Devices and Printers to display it. A typical display is shown in Figure 3.6.
Figure 3.6 The Devices and Printers window is new to Windows 7. It provides a single place to manage printers, monitors, imaging devices, Bluetooth devices, and so on.
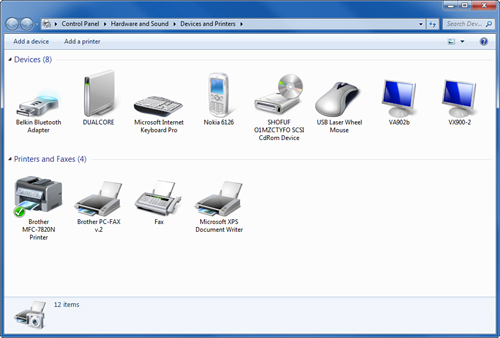
You can manage a device by right-clicking its icon. The pop-up menu will contain selections appropriate for each type of device. You can poke around the icons on your computer’s Devices and Printer window to see what’s available. Later in the book there are specific instructions for managing devices using this window.
User Account Control
We need to stop, at this point, to give you some background on the next feature that we’ll show you.
One area where Microsoft justifiably received a great deal of criticism over the past 15 years or so was its handling of security. Windows 95, 98, and Me had no security scheme at all—any user could modify any file or program.
Windows NT, 2000, and XP did have the necessary structure to secure the operating system. The way Windows security works, any program that a user runs gains the privileges associated with the user’s logon account; this determines what folders the user can save files in, what settings the user can change, and so on. Computer Administrator accounts, in particular, have the capability to change any system setting, change any file, or install any software.
Unfortunately, in Windows XP, all user accounts were by default created as Computer Administrator accounts, and it took a lot of effort and training to work with Windows any other way. So, for most home and small office users, Windows security was essentially bypassed. The consequences of this were, in turn
• Any program run by hundreds of millions of Windows 95, 98, Me, and XP users had complete access to the computer.
• When anyone was duped into running bad software downloaded from the Internet or received a bogus program by email, that software also had the complete run of the computer.
• Some tens of millions of Windows computers are, as a result, infected with spam-sending software, unbeknown to their owners.
• Criminals remotely control those computers and use them to send about 80% of more than 100 billion or so spam emails that are sent every day.
So, the next time you clear out your email inbox, consider that most of the spam in there got there because for 15 years Microsoft made no effort to make Windows Internet-secure “out of the box,” meaning, as delivered to the consumer. And few people knew how to take the complex steps needed to tighten things up.
Windows Vista and now Windows 7 change that in a big way. Out of the box, Windows 7 and Vista enforce security through several means, including these:
• The disk on which Windows is installed uses the NTFS disk formatting system so that access to files and folders can be tightly controlled.
• As initially installed, the security system is actually used and ensures that users do not have the ability to randomly create, delete, or modify files in the Windows program folders. This protects Windows not only from accidents but also from rogue software.
• Programs and system control panels that can make changes that have security implications use a special feature called User Account Control to ensure that changes can’t be made without your knowing it.
This latter part is what we want to talk about and show you now.
As mentioned earlier, Windows programs run with the permissions associated with a user account. Permissions include things such as the ability to create or modify files in each folder, change settings on features such as networking and hard disk management, install software and hardware device drivers, and so on. Computer Administrator accounts can do any of these things.
What changed starting with Windows Vista is that programs run even by users with Administrator accounts don’t automatically get all those privileges. The potential is there, but by default, programs run with a reduced set of privileges that lets them modify files in the user’s own folders but not in the Windows folder or the Program Files folder. Likewise, by default, programs run even by a Computer Administrator cannot change networking settings, install applications, install device drivers, or change system software services.
Instead, you have to take a special step to run a program with elevated privileges—that is, with the full complement of Computer Administrator privileges. And, on Vista, whenever you try to do this, Windows requires that you confirm that you actually do want to run that specific program with elevated privileges. Windows displays a dialog box, and you have to click a yes or no response before the program is allowed to run (or not). On Windows 7, as we’ll explain shortly, this mechanism is still there, but Windows requires this sort of confirmation in fewer circumstances.
What is important is that when this “go or no go” dialog box is displayed, it’s displayed by Windows in a secure way, from a deep, protected part of Windows, and there is no way for rogue software to bypass it, block it, or fake your approval. Thus, there is no way for rogue software to install itself without your consent. This is called User Account Control (UAC), and it’s the most important distinction between Windows 7 and Vista and any of their predecessors.
Another important feature of the UAC prompt is this: If you are logged on using a Computer Administrator account, Windows just asks you to consent to running the program. However, if you logged on using a Standard User account, Windows can still run the administrative program—the UAC prompt asks you to select the username and enter the password of a Computer Administrator account.
All this makes Windows more secure and usable. It makes it safer to let people have and use Computer Administrator accounts. And, it is now reasonable to set up Standard User accounts for everyday use, for anyone, and especially for people whom you’d rather not be asked to judge which programs should run—for example, children or non-computer-literate employees. Should they actually need to change some setting that brings up a UAC prompt, you can simply reach over their shoulders, type in a privileged account name and password, let them make the one change, and poof!—they’re back to being a limited-privilege user.
Of course, this type of intervention is required only for programs that involve security-related settings. And this brings us to the reason that the new Control Panel and other Windows management tools are so complex and fractured.
Microsoft had to go through all the Windows settings and adjustments and decide which ones could pose security risks and which were benign. For example, installing a device driver is a risky task, and selecting a desktop background picture is benign. Risky and benign settings had to be put into separate programs or Control Panel elements. The benign ones are packaged as nonprivileged programs so that they can be run by any user. The risky ones have been put into separate programs that are marked as requiring elevated privileges. So, Control Panel items that used to have dozens of settings on one dialog box had to be split into many smaller pieces.
This seemed to us to be a small price to pay for such a huge increase in security. But, Vista got a bad rap because these pop-ups popped up fairly often, especially in the first few weeks of using a new computer, when lots of software and hardware changes take place. It annoyed people who were used to the “Wild West” days of Windows 98. We think the bad rap was completely unjustified, but it stuck.
So, for Windows 7, Microsoft has softened UAC somewhat. By default, Windows now automatically grants elevated privileges to many less-risky Control Panel programs and dialog boxes, and pops up the confirmation box in only two situations: if it’s not sure that the requested program is absolutely safe, or if you are not using a Computer Administrator account, in which case an administrator’s password is needed. And, you can control how rigid UAC is, from turning it off entirely to requesting the Windows Vista–style of prompting before every change.
Caution
![]()
The default setting makes Windows 7 much less annoying than Vista, without compromising security too much. We strongly urge you not to reduce the UAC warning level below the default setting. Doing so makes your computer much more vulnerable to being taken over by criminals. If you have specific programs that don’t work well with UAC enabled, you can work around this just for those specific programs.
A program can be run with elevated privileges in three ways:
• Some programs are “marked” by their developers as requiring elevated privileges. These programs display the UAC prompt whenever you try to run them.
• You can right-click any program’s icon and select Run As Administrator. Generally, you need to do this only if you attempt some task and are told that you don’t have permission. This can happen, for instance, if you try to delete some other user’s document from the printer’s queue.
Note
![]()
If you’re interested in reading about the nitty-gritty details about how User Account Control works in Windows 7, go to technet.microsoft.com and search for “Inside Windows 7 User Account Control.” Look for the article of this name written by Mark Russinovich, who’s one of the Windows gurus behind sysinternals.com, and who’s now employed by Microsoft.
• If you have an old program that you find doesn’t work correctly with UAC, right-click its icon and select Properties. On the Shortcut tab, click the Advanced button, and check Run As Administrator. This will make the program run with elevated privileges every time you run it.
So...that was a long explanation for something that will help you tremendously but in practice won’t take up much of your time. Let’s go on with the tour.
If you aren’t looking at the Control Panel, now, click Start, Control Panel. Click on System and Security, and notice that some of the tasks are shown with a small shield icon. This is the indication that a task requires elevated privileges. By default, on Windows 7, most of these items will not bring up a UAC prompt; Windows will elevate most management tools automatically.
When you do get a UAC prompt, it will display one of the dialog boxes shown in Figure 3.7.
Figure 3.7 User Account Control asks for confirmation or asks you to provide an Administrator password.

If you are currently logged on to a Computer Administrator account, you see dialog box A shown in Figure 3.7. The dialog shows the name and the origin of the program, if it can be determined. You can click Show Details to see more information about the program file, if any is available.
If you are logged on to a Standard User account, Windows displays dialog box B shown in Figure 3.7. Here, you can also click Show Details to see more information about the program that caused the UAC pop-up. To proceed, you (or someone else) must select one of the Administrator account names and enter its password.
In either case, this is your chance to verify that you intended to run the program that caused the pop-up, and that you trust it to be safe to run.
Caution
![]()
Don’t get in the habit of just clicking Yes every time one of these dialog boxes appears. Read it and consider it every time.
If you have any doubts about the program listed in the dialog box, especially if a UAC pop-up appears when you didn’t expect it, click No.
In the next part of our tour, we will help you set up user accounts for the people who will be using your computer.
Setting Up User Accounts
As mentioned previously, distinct user accounts identify each person who uses the computer and regulate what settings and files the users can change. Windows 2000 and XP provided three types of user accounts:
• Computer Administrator—Could change any setting, view any file
• Power User—Could change many settings, view own files only
• Limited User—Could change virtually no settings, view own files only
Tip
![]()
If you want to transfer user accounts and files from an older computer to your Windows 7 computer using the Windows Easy Transfer program that is described later in this chapter, do that first, then come back to this section to set passwords on each of the transferred accounts.
The problem with this scheme was that Limited Users were constantly frustrated by being unable to make changes as trivial as choosing a screen saver. The Power User category should have been the right one to use for day-to-day use, but it wasn’t available on Windows XP Home Edition. Even on XP Professional, it wasn’t easy to create Power User accounts. The result was that most users were created as Computer Administrators, and we discussed in the previous section what a disaster that has turned out to be.
Tip
![]()
If you purchased a computer with Windows 7 preinstalled, the manufacturer might have set Windows up to skip the Welcome screen logon process entirely. There actually is a user account set up for you, and when you start Windows it automatically logs on to that one account.
If you expect to have others people use your computer, go ahead and create more user accounts now, and we’ll show you how to make the Welcome screen work later in the chapter, under “Just One User?”
On Windows 7, this situation has improved dramatically. First, the Limited User category is now named Standard User, to reflect its “mainstream” role. Most settings that don’t have security implications—such as changing the screen resolution—can now be changed by Standard Users. Plugging in a new USB device used to require Administrator privileges, but now, if a Microsoft-verified driver is preinstalled, a Standard User can add the device without any trouble. And for any tasks that do require Administrator privileges, the UAC system makes it easy to perform the task without having to completely log off and log back on.
As a result, it’s perfectly reasonable to use a Standard User account for your day-to-day work. And should you choose to use an Administrator account, even that is relatively safe now. So, while the Power User category is still present, it’s neither needed nor useful.
Tip
![]()
When you first installed Windows, Windows setup created a Computer Administrator account. We recommend that you create perhaps one additional Computer Administrator account, and that you create a Standard User account for yourself for day-to-day use. This gives you maximum protection against viruses and other malware.
At this point on our tour, let’s add user accounts for the people who will be using your computer.
Create New Accounts
If you aren’t looking at the Manage Accounts screen now, click Start, Control Panel, and then click Add or Remove User Accounts under the heading User Accounts and Family Safety. You should see the Manage Accounts window shown in Figure 3.8—of course, it shows your names instead of mine.
Figure 3.8 Manage Accounts lets you create or modify user accounts.
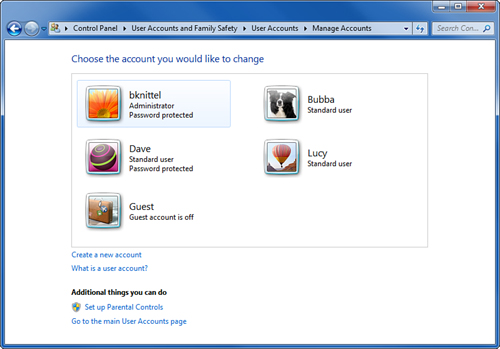
From the Manage Accounts screen, you can select an account to modify, or you can click Create a New Account. You’ll find that it’s best if each person who uses the computer has his or her own account so that each person’s email can be kept separate, settings and preferences can be personalized, and so on.
To create a new user account, perform the following steps:
1. Click Create a New Account.
2. Type a name for the account. Use just letters, numbers, and optionally spaces or hyphens. We typically use each person’s first initial and last name, but you can use any scheme you want.
3. If you want to create a Computer Administrator account, select Administrator; otherwise, leave the selection at Standard User. I recommend that you use Standard accounts for most users, and even for your own day-to-day use.
4. Click Create Account.
Note
![]()
Before logging on to any other accounts for the first time, see the “Configuring a Default User Profile” section at the end of this chapter.
The new user appears in the Manage Accounts screen.
Now, you can make adjustments to each account.
Change Account Settings
To change an account’s settings, view the Manage Accounts screen, as shown in Figure 3.8, and click an account name. The screen lists several tasks, including the following:
• Change the Account Name—Click to edit the account’s username. (Note: If the user has already logged on, this actually changes the name of his or her profile folder in the Users folder. If this doesn’t make sense to you right now, don’t worry about it.)
• Create a Password or Change the Password—Click to create or change the account’s password. We strongly recommend that you set a password on every user account, or at the very least on every Administrator account.
• Change the Picture—Click to select a different picture to appear on the Start menu and the Welcome screen. You can select one of the pictures supplied by Microsoft or click Browse for More Pictures to locate one of your own images.
• Set Up Parental Controls—Click to control when this user can use the computer, and what games and applications the user can use. (Unlike Windows Vista, website filtering and activity tracking are not standard features with Windows 7—you have to install third-party software for that.)
• Change the Account Type—Click to change the account type from Administrator to Standard User or vice versa.
• Delete the Account—Click to delete the account. You can elect to keep or delete the account’s files (documents, pictures, and so on).
Tip
![]()
Before logging on to other accounts for the first time, see “Configuring a Default User Profile” at the end of this chapter.
You can also select and enable the Guest account. The Guest account is a Standard User account that requires no password, and it should be enabled only if you want to provide a computer to guests in your home or office.
At this point on our tour of Windows 7, we recommend that you take a moment now to add a user account for each person who will be using your computer. Definitely set a password on each Administrator account. We recommend that you set a password on each Standard User account as well.
Tip
![]()
If you are in a home or small office environment, have more than one computer, and plan on setting up a local area network, we suggest that you create accounts for every one of your users on each of your computers, using the same name and same password for each person on each computer. This makes it possible for anyone to use any computer, and it makes it easier for you to manage security on your network.
After you add your user accounts, continue to the next section.
Before You Forget Your Password
If you forget your account’s password, you could be in serious trouble. On a corporate domain network, you can ask your network administrator to save you. But, on a home computer or in a small office, forgetting your password is serious. It can put your encrypted files at risk, and you could lose any passwords that you’ve stored for automatic use on websites. (Do you even remember them all?)
And if you can’t remember the password to any Computer Administrator account, you’ll really be stuck. You’ll most likely have to reinstall Windows, and all of your applications, and you’ll be very unhappy.
There is something you can do to prevent this disaster from happening to you. You can create a password reset disk right now, and put it away in a safe place. A password reset disk is linked to your account and lets you log in using data physically stored on the disk. It’s like a physical key to your computer. Even if you later change your account’s password between making the disk and forgetting the password, the reset disk will still work to unlock your account.
So...make a password reset disk now! Here’s how. You need a blank, formatted floppy disk, recordable CD, removable USB thumb drive, or other such removable medium. Follow these steps:
1. Click Start, Control Panel, User Accounts and Family Safety; then click the (usually green) User Accounts title at the top of the right-hand pane.
2. In the Tasks list at the left side of the window, choose Create a Password Reset Disk.
3. When the wizard appears, click Next.
4. Select a removable disk drive from the list and click Next.
5. Enter your current password and click Next.
6. Follow the wizard’s instructions. When the wizard finishes writing data, click Next and then click Finish.
Caution
![]()
A password reset disk, or rather the file userkey.psw that’s on it, is as good as your password for gaining access to your computer, so store the reset disk in a safe, secure place. By “secure,” I mean something like a locked drawer, filing cabinet, or safe-deposit box.
The disk will now contain a file called userkey.psw, which is the key to your account. (You can copy this file to another medium, if you want.) Remove the disk, label it so that you’ll remember what it is, and store it in a safe place.
You don’t have to re-create the disk if you change your password in the future. The disk will still work regardless of your password at the time. However, a password disk works only to get into the account that created it, so each user should create one.
Note
![]()
Be absolutely sure to create a password reset disk for at least one Computer Administrator account on your computer.
If you forget your password and can’t log on, see “After You Forget Your Password” toward the end of this chapter.
Adjust Your Own User Account
Windows has a few settings that are set on a per-user basis, and some of them can be set in only one particular way, using the following steps. You don’t necessarily need to do this now. If you want to, you can skip ahead to the next section.
Note
![]()
Each user should create his own password reset disk. In theory, a computer Administrator could always reset any other user’s password, but that user would then lose his or her encrypted files and stored passwords. Better to have a password reset disk for every user account.
To see the list of user account settings you can change, click Start, Control Panel, User Accounts and Family Safety; then click the User Accounts title at the top of the right-hand pane.
The most common tasks are listed in the window’s larger pane. These include options to change your password and the picture associated with your account, which we discussed earlier.
Look through the Tasks list on the left side of the screen. These selections appear only when you open the User Accounts control panel this particular way, and they have the following uses:
• Create a Password Reset Disk—Creates a disk that you can use to log on if you forget your password, as discussed in the previous section.
• Manage Your Network Passwords—Lets you add, delete, or change passwords that have been remembered by Windows for use on remote servers or websites. One useful feature here is that you can back up these passwords to a disk and copy them to your account on another computer.
• Manage Your File Encryption Certificates—Use this wizard to create, back up, or restore the certificates (keys) used to encrypt your files, on Windows 7 Professional, Enterprise, or Ultimate editions only.
![]() For more information on file encryption, see “Encrypted File System (EFS),” p. 884.
For more information on file encryption, see “Encrypted File System (EFS),” p. 884.
• Configure Advanced User Profile Properties—If your computer is on a domain network, you can select whether your user profile should be copied back and forth to the file server (a roaming profile) or just kept on the computer in front of you (a local profile).
• Change My Environment Variables—You can customize environment variables for your account here. Environment variables tell Windows applications where to look for executable files, where to store temporary files, and so on.
![]() For more information, see “Setting Environment Variables,” p. 825.
For more information, see “Setting Environment Variables,” p. 825.
Just One User?
If you are the only person who is going to use your computer, there is a setting that you can use so that Windows starts up and goes directly to your desktop without asking you to log on. You may find that your computer does this anyway; some computer manufacturers turn on this setting before they ship the computer to you. Technically, a password is still used; it’s just entered for you automatically.
We recommend that you don’t use this automatic logon option. Without a password, your computer or your Internet connection could be abused by someone without your even knowing it.
Still, in some situations it’s reasonable to change this setting—for example, if your computer manufacturer set your computer up this way, you can disable it. Or you may want to use the feature in a computer that’s used in a public place, or in an industrial control setting. To change the startup setting, follow these steps:
1. Click Start, and in the Search box, enter control userpasswords2 and press Enter.
2. To require a logon, check Users Must Enter a Username and Password to Access This Computer, and click OK.
Alternately, to make Windows go to the desktop automatically, uncheck Users Must Enter a Username and Password to Access This Computer, and click OK. Then, type the username and password of the account that you want to log on automatically and click OK.
The change takes effect the next time Windows starts up.
Setting Up Internet Access
Although you’ll probably want to change a number of settings, you should start by making sure that your computer has a working Internet connection, for two reasons. First, critical Windows security or device driver updates might have been released since your computer’s copy of Windows was made. You definitely want to get those updates installed as quickly as possible. Second, at least one setting, which we’re going to discuss later in this chapter, requires a functioning Internet connection.
If you have existing dial-up or broadband Internet service or, better still, have an existing network that you can just plug your computer into, this should be easy. We actually devote entire chapters in this book to the topic, but you might be able to get on the air in just a few seconds, so let’s give it a shot. Here’s what to try:
1. If your home or office has a wired Ethernet network (for example, a router) that provides shared Internet access, just plug in your computer. That’s all you should need to do. Open Internet Explorer (IE) and see whether it works.
2. If you have a wireless network adapter in your computer and a wireless network available that provides Internet access, turn on your wireless adapter. Windows should pop up a notice that wireless networks are available. If it doesn’t, click Start, Control Panel, Network and Internet, and then, under Network and Sharing Center, click Add a Wireless Device to the Network.
A list of available networks should appear. If your wireless network’s name appears in the list, click the name and then click the Connect button. The Connection Wizard then walks you through establishing the connection.
3. If you have broadband cable or DSL service and you plan to connect your computer directly to the cable or DSL modem, connect your computer’s network adapter to the modem now.
4. If you have cable Internet service, this might be enough to get your connection going...open Internet Explorer and see.
If you have dial-up or DSL service, click Start, Control Panel, Network and Internet, Network and Sharing Center, and then click Set Up a New Connection or Network. Select Connect to the Internet and click Next. Then follow the wizard to set up a PPPoE (DSL) or dial-up connection.
If this seat-of-the-pants procedure doesn’t work for you, jump ahead to Chapter 13, “Getting Connected,” to get your connection working.
When your Internet connection is set up, you’re ready to continue with the rest of this chapter.
Downloading Critical Updates
After your Internet connection is up and running, click Start, All Programs, Windows Update. In the left pane, click Check for Updates.
If no updates are available, and the screen says that Windows is up to date, you can close this window and skip ahead to the next section.
If there are any Critical or Important updates to download, click Install Updates and wait for the process to complete before continuing the tour. If Windows has to restart, log on, and immediately return to Windows Update and see whether any additional updates are available. It’s essential that you get all security fixes installed before proceeding.
Personalizing Windows
For the next part of your first hour with Windows, we want to help you make changes to some settings that make Windows a bit easier to use, and a little easier to understand. So, let’s tear through them.
As initially installed, Windows might set your screen’s resolution to a lower resolution than your monitor supports. You might also want to change the screen background from the picture you chose during installation or set up a screen saver. Let’s start personalizing Windows by adjusting these settings.
Personalize Screen Settings
Now we’re ready to make a couple of quick selections to the settings that control Windows’ appearance. To do this, right-click the desktop anywhere but on an icon and select Personalize. The window shown in Figure 3.9 appears.
Figure 3.9 Windows 7’s Personalization screen lets you change display and sound settings.
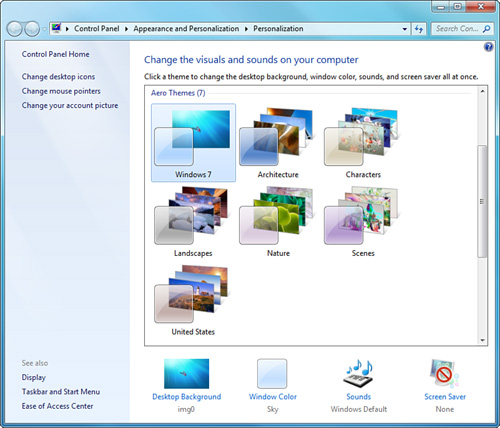
You can select a Theme, which is a collection of desktop and sound settings, and/or you can customize individual settings by clicking the icons at the bottom of the window. The two important settings to consider now are
• Desktop Background—Click to select a different desktop picture. If you check more than one picture, Windows will change the background every so often—the timing is set at the bottom of the window. You can also change the Picture Location to Solid Colors to select a plain, uniform background, or to Pictures Library to select one of your own pictures; or click Browse to locate a favorite picture of your own.
Note
![]()
You can put those unused computer processor cycles to better use than making the Windows logo swim around your screen. Several worthy screen-saver alternatives actually might help find a cure for cancer or eavesdrop on ET phoning home. Our favorites can be found at http://boinc.berkeley.edu.
• Screen Saver—Click to select a screen saver and set the timeout. If you want your computer to lock itself if you go away long enough for the screen saver to activate, check On Resume, Display Logon Screen.
Resolution and Multiple Monitors
On Windows 7, the display’s physical settings are changed through a different window. Right-click the desktop and select Screen Resolution.
Click the Resolution value, and drag the slider up or down to set the resolution of your monitor. If Windows looks a little blurry, especially on an LCD monitor, it could be that Windows guessed too low a resolution. Drag the resolution button up to set it to the exact native resolution of your LCD monitor; then click Apply to check the setting. If it works, click OK to keep it. (If the type is too small to read, don’t worry; we’ll get to the fix for that shortly.)
If you have two or more monitors attached to your computer, Windows should have offered you the option of extending your desktop onto all of them. If not, follow these steps:
1. Next to Multiple Displays, select Extend These Displays, and then click Apply.
2. Click the Identify button, and drag the numbered icons in the Screen Resolution pane so that they are in the same arrangement as your monitors. Click Apply again.
Font Size
If you have trouble reading the type on the screen, at the bottom of the window select Make Text and Other Items Large or Smaller, and select either Medium or Larger. Click Apply to check the setting.
ClearType Tuner
Finally, if you have an LCD monitor, use the nifty ClearType Tuner tool to ensure that the text displayed on your monitor is sharp and easy to read. Here’s what to do:
1. Click Start, Control Panel, Appearance and Customization, Adjust ClearType Text (under Fonts).
2. Be sure that Turn On ClearType is checked, and then click Next. Follow the wizard’s instructions to select the text layout that looks best to you.
3. When the wizard has finished, click the small icon at the top of the Control Panel’s left margin to restore the web layout, then close it.
Now, we’ll make some other adjustments to the desktop.
Tune Up the Taskbar
The taskbar at the bottom of the desktop has the Start button at the far left and the notification area at the far right. The middle section shows an icon for each running application. This much hasn’t changed since Windows 95. You might also recall the Quick Launch bar from previous versions of Windows, which had little icons you could use to start up commonly used programs with a single click.
Note
![]()
The old Show Desktop icon that parks all applications in the taskbar is now the unlabeled rectangle at the far right.
In Windows 7, the Quick Launch bar and the taskbar have been combined and enhanced, and now there is just one set of icons: they represent applications that are running, and those that represent programs you could run, as shown in Figure 3.10.
Figure 3.10 The new and improved Windows 7 taskbar is vaguely reminiscent of the Mac, don’t you think?
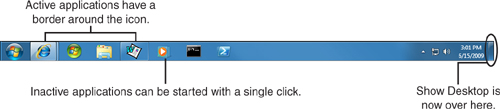
This new arrangement might seem strange at first, but it’s actually pretty handy, and we think you’ll like it a lot. (And if it seems vaguely familiar, it might be because the Apple Mac has worked this way for more than eight years!)
Follow these steps to see it in action:
• Click the blue e icon for Internet Explorer. (If it’s not present on your computer, use another of the icons.)
When you click the icon for an application that isn’t running, Windows starts it.
• Click the blue e icon two more times.
When you click the icon for an application that’s already running, Windows hides or brings up the application’s window, in alternation.
• Right-click the blue e icon, and select Internet Explorer.
This opens up another, separate instance of the application.
• Click the blue e icon.
When you click the icon for an application that has more than one instance open, Windows displays thumbnail views of the various windows, so you can select which one you want to use.
In practice, you won’t have to think about it. When you want to use a program, you just click its icon, and you get it, whether it was already running or not.
You can also easily organize the icons on the taskbar:
• You can drag the icons around to reorder them any way you want.
• To put an application in the taskbar permanently, if it’s already running, right-click the icon and select Pin This Program to Taskbar.
If the program isn’t currently running, you can locate it in the Start menu, right-click and select Pin to Taskbar, or, just drag the icon down to the taskbar.
• To remove an icon, right-click and select Unpin This Program from Taskbar. (Use this technique to get rid of icons that some application installers insist on putting on the taskbar whether you want them or not.)
You might want to take a moment now to add icons for the programs you use frequently. Personally, I always add icons for the Command Prompt, Windows Explorer, and Microsoft Word, but you might have other favorites. To add Windows Explorer, click Start, All Programs, then Accessories. Drag Windows Explorer down to the taskbar and release it.
Jump Lists
Another neat new feature of the taskbar is the Jump List. Remember the old Recent Documents list from previous versions of Windows? In Windows 7, this feature is now part of the taskbar, and recently used documents are linked to the icons for the applications that opened them.
Right-click the taskbar’s Internet Explorer icon, for example, and you’ll see a list of recently visited websites. Right-click Microsoft Word or WordPad or Notepad, and you’ll see the last several documents you saved using those programs. It’s all very intuitive and natural. (Although, it only works with applications that know about this feature. Older applications may not create a Jump List.)
Tip
![]()
If you want to keep a website or document in the Jump List permanently, right-click it and select Pin to This List.
Jump lists also appear in the Start menu, except there, you click the small arrow that appears next to an icon instead of right-clicking the icon itself.
Adjust the Explorers
You’re probably familiar with Internet Explorer, Microsoft’s web browser. The other Explorer you need to know about is Windows Explorer, the program behind the desktop itself, and the Start Menu, Computer, Documents, Music, and other file management windows. You’re using Windows Explorer when you use any of those tools. You can also use it by itself to manage files. By default, though, it hides some information about files, and we want to give you the option of seeing that hidden information.
Disable Hide Extensions for Known File Types
By default, Windows Explorer hides the file extension at the end of most filenames: This is the .doc at the end of a Word document, the .xls at the end of an Excel spreadsheet, or the .exe at the end of an application program. Hiding the extension makes it more difficult for you to accidentally delete it when renaming the file, but we think it also makes it more difficult to tell what a given file is. It can also make it easier to fall for ruses, as when someone sends an email virus in a file named payroll.xls.exe. If Explorer hides the .exe part, you may fall for the trick and think the file is just an Excel spreadsheet.
To make Explorer show filenames in all their glory, follow these steps:
1. Click Start, Computer.
2. Click the Organize button at the top, left side of the window, and select Folder and Search Options.
3. Select the View tab. In the Advanced Settings list, find Hide Extensions for Known File Types and uncheck it.
4. This one is optional: If you’re curious about Windows’ internal files and folders, and plan on investigating them, also select Show Hidden Files and Folders. You can change this setting after you finish looking around.
5. Click OK.
Customize the Start Menu
There are some Windows maintenance tools that, for some reason, Microsoft doesn’t put into the Start menu by default. We suggest that you enable them now so that you don’t have to dig through the Control Panel to get to them. Here’s how:
1. Right-click the Start button and select Properties.
2. Click the Customize button.
3. Scroll down through the list to find System Administrative Tools near the bottom. Select Display on the All Programs menu.
4. If you’re interested, check out the rest of this list for other Start menu options. If you find that you never use the Music link, for example, you can remove it from the Start menu here.
Or if you find that you miss the old Run command that lets you start programs by typing their name, you can enable it here. (Although, you can start a program by typing its name into the Search box on the Start menu, so Run isn’t as necessary anymore. Still, the Search window can run only programs that are in the search path, so for hardcore command-line users, the Run option is still useful.)
5. Click OK twice, closing both of the open dialog boxes in turn.
Set Internet Explorer’s Home Page
By default, whenever you open Internet Explorer, it immediately displays a Microsoft website, or a website specified by your computer manufacturer. Personally, I prefer to have Internet Explorer open to a blank page because I rarely start my browsing in the same place twice. You may also prefer to select a different “home” page, one that you want to visit rather than one selected by some company’s marketing department. To take control of your Internet Explorer home page, take the following steps:
1. Click Start, All Programs, Internet Explorer. (Or click the little e icon on the taskbar.)
2. To start IE with a blank page every time, in the upper-right corner of the window, click Tools, Internet Options. Then, click the Use Blank button.
Or to select a page that you prefer to see each time IE starts, view that page now. Then, in the upper-right corner of the window, click Tools, Internet Options. Click the Use Current button.
3. Click OK to close the Internet Options dialog box.
If you prefer to use a different web browser entirely, Safari, Chrome, Firefox, and Opera are popular alternatives to IE. For more information, see Chapter 14, “Using Internet Explorer 8.”
Set Internet Explorer’s Search Provider
Internet Explorer has a search tool built into the upper-right corner of the window. When you type something into this box and press Enter, IE sends the text to an Internet search engine and displays the result. This saves you having to open the search engine page first, type the search text, and then wait for the results.
However, by default IE sends you to Microsoft’s own search engine, called Windows Live. Or your computer manufacturer may have specified a different default search engine. Again, we suggest that you take control and tell IE what search engine you want to use. You can use Windows Live, of course, but you can also select a different default site.
To change the default search site, follow these steps:
1. Internet Explorer should still be open from the previous section, but if it’s not, click Start, All Programs, Internet Explorer.
2. At the upper-right corner of the window, locate the little magnifying glass icon and click the small down-pointing arrow just to its right.
3. Select Find More Providers.
4. Click the name of one of the providers in the Web Search or Topic Search lists. When the Add Provider dialog appears, check Make This My Default Search Provider. Then, click Add Provider.
5. Test the new search tool: Type your name into the Search box and press Enter.
Note
![]()
Normally, you have to go through most of these same setup steps for each user account on your computer. At the end of this chapter, under “Configuring a Default User Profile,” we show you how you can do all of your setup, tweaking, and adjusting just once, and have your finely tuned setup be the default setup for all of your computer’s user accounts.
If that sounds interesting, skip ahead to the end of the chapter now, before you or anyone else logs on to any other account on your computer.
That’s the end of our list of “must-do” Windows settings. You can, of course, change hundreds of other things, which is why we went on to write Chapters 4 through 38.
Transferring Information from Your Old Computer
If you have set up a new Windows 7 computer rather than upgrading an old one, you probably have files that you want to bring over to your new computer. Windows 7 has a tool called Windows Easy Transfer that will help you do that. The next several sections show you how to use it. (Corporate network managers can use a program called the User State Migration Tool, but it’s beyond the scope of this book.)
Note
![]()
Be aware that Windows Easy Transfer doesn’t transfer your application programs. Some third-party programs, such as LapLink PCMover, do purport to transfer applications, but I can’t vouch for them.
By default, if you elect to copy Shared Items, Windows Easy Transfer will copy data stored outside the usual My Whatever folders on all of your hard drives; that is, everything except the Windows, Program Files, and Program Data folders.
Windows Easy Transfer
The Windows Easy Transfer program lets you copy documents and preference settings from an older computer running Windows 7, Vista, or XP to a new computer running Windows 7. You can use several different means to transfer the data:
• If you can plug both computers into the same local area network (LAN), the transfer can occur directly over the network.
• If you don’t have a network but both of your computers have Ethernet network adapters, you can connect them using an Ethernet crossover cable. See “Connecting Just Two Computers,” p. 461. Then, you can use the network transfer method.
Caution
![]()
Passwords are not set up for user accounts copied by the transfer program, even though the Users control panel makes it seem that they are. Be sure to read the section “Password Issues” that follows shortly.
• You can connect the two computers using a special Easy Transfer USB cable, which you can buy for about $30 US.
• You can elect to copy data using a Flash drive, a removable, external USB, FireWire, or SATA hard disk, or a network folder.
Tip
![]()
The Windows Easy Transfer program and our instructions here refer to an “old computer” and a “new computer.” But, you can use it to save your user accounts and files and then restore them on the same computer. You might do this if you want to install a fresh copy of Windows 7 on a new or erased hard disk. Use Windows Easy Transfer to save your user files on an external disk, set up Windows on a clean hard disk, then run the program again to restore your files. Again, this doesn’t save your application software, but it does preserve user accounts and files.
• The system doesn’t make it easy to use a recordable CD or DVD drive. If you have a small enough amount of data to copy, you could, however, use the “external drive” method, save the user data file on your hard disk, and then burn this to a DVD or CD.
The wizard is self-explanatory, so we won’t give you step-by-step instructions here, but we do have some pointers that might make the process smoother and easier to follow.
The process goes like this:
• First, copy the Windows Easy Transfer program to your old computer. Then, run the program on your old computer.
• If you’re using a direct network connection or an Easy Transfer Cable, start up the Easy Transfer program on your new computer as well, select the user accounts and files you want to copy, and the program goes to town.
• If you’re using a flash drive, an external disk, or a shared folder, select the user accounts and files you want to transfer. The program will create one big file containing all the user data. Then take this file to the new computer and run the Easy Transfer program there. Tell it where the big file is. The program will re-create the selected user accounts and documents from the data stored in the file.
Now, we’ll give you some tips for each of these stages.
Copying the Easy Transfer Program
If your old computer is running the same version of Windows 7 as your new computer, you already have the program on both machines. Start at your old computer. Click Start, type the word easy into the Search box, click Windows Easy Transfer, and follow the instructions from there.
Otherwise, you have to get the transfer program into your old computer.
If you have your Windows 7 setup DVD handy, you can save some time using this trick: Start at your old computer, log on as a Computer Administrator user, and insert the Windows 7 setup DVD. If an AutoPlay dialog box pops up, select Open Folder or Browse Files; otherwise, open [My] Computer. Browse to supportmigwiz on the DVD drive, and double-click the migsetup or migsetup.exe icon. Follow the instructions from there. When you later run the transfer program on your new computer, tell it that the program is already installed on the old computer.
If you don’t have the setup DVD or if you don’t want to use it, you’ll need a USB Flash drive, a removable external USB, FireWire, or SATA hard drive that works with both your new and old computer, or network access to a shared folder. Start at your new computer. Click Start, type easy into the Search box, then click Windows Easy Transfer. Follow the instructions, and select I Need to Install It Now to copy the program onto your removable drive. Then, take that drive over to your old computer. Be sure to log on using a Computer Administrator account. Find and double-click the Windows Easy Transfer shortcut on the removable drive.
Selecting a Transfer Method
As previously mentioned, you can use a direct network connection, an Easy Transfer USB cable, or some sort of disk medium that can carry a file from your old computer to your new computer.
The direct network connection and the Easy Transfer Cable methods are the easiest, because they let the old computer talk directly to the new computer, you don’t have to worry about having enough room on the external disk for all of the files you’ll transfer, and it saves you a few steps.
But the external disk method is just fine too, and it’s the only method you can use if the old and new computers are physically the same computer—that is, if you want to store your user accounts and documents while you perform a fresh installation of Windows 7.
You can also use the external disk method if you want to use a recordable DVD or CD to transfer your data. (Remember, though, that a DVD can only hold 4GB to 5GB of data, and a CD can only hold about 700MB. Is that enough room for all of your files?) To use these media, have the transfer program save your information to the old computer’s hard disk. Then, burn a DVD or CD with the file that the transfer program creates. By default, this file is named Windows Easy Transfer - Items from old computer.MIG.
Selecting Accounts and Content
The Windows Easy Transfer program lets you select which user accounts to copy and, if you want to get picky, decide which files to copy from each account, as shown in Figure 3.11. By default, the program will transfer all accounts and all files and folders under each account (that is, My Documents, My Pictures, and so on). In addition, the Shared Items entry copies the files under UsersPublic on Vista and Windows 7 or under Documents and SettingsAll Users on Windows XP, as well as all other folders on all of your hard drives except Windows, Program Files, and Program Data. The total amount of data to be copied is displayed under the list of accounts.
Figure 3.11 Select which user accounts to copy. Shared Items copies all shared user files plus all other folders on all of your hard drives.
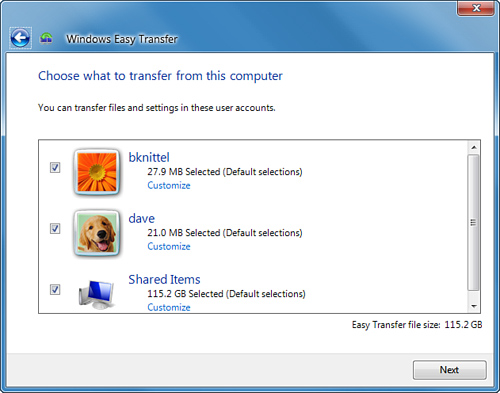
If you use a direct network or Easy Transfer Cable connection, you’ll make these selections from the new computer. Note that there is an Advanced Options link under the list of user accounts. If you click this, you can select alternate names for the user accounts that are copied. It makes sense to do this if you already have accounts with the same names on the new computer.
Tip
![]()
Under each user account, you can click Customize to select categories of documents and file types to copy, or not copy. Click Customize then Advanced to select folders and files on an individual basis.
And if your old computer has multiple hard drives, click Advanced Options, then click the Map Drives tab to select which drives on the new computer to use for data from your old computer.
If you use the external disk method to transfer accounts, you’ll select which accounts to copy when you run the Easy Transfer program on the old computer. You won’t have the option to set Advanced Options there; you’re just deciding what to store in the big data file. When you later run the transfer program on your new computer, you’ll see the account list again. This time, you can select Advanced Options, and you can rename the accounts or change drive letters if necessary.
Running Easy Transfer On the New Computer
If you’re using an external disk to transfer your data, when the transfer program instructs you to, unplug the external disk from the old computer and plug it into the new one. To run the Windows Easy Transfer program on your new computer, click Start, type the word easy into the Search box, then click Windows Easy Transfer. Follow the instructions it presents. The program will help you locate the transfer file that was stored on the external disk.
Tip
![]()
You can also start the transfer program by locating and double-clicking the .MIG file that the old computer created on your external disk or in a shared folder yourself; this will automatically start up the transfer program.
Viewing The Transfer Report
When the process is complete, the Easy Transfer program will display a window that lets you browse through the list of user accounts, documents, and program settings it copied. Another tab lets you see the list of application programs it detected on your old computer. You can use this list to remind you what to install on your new computer.
To view this transfer report again later on, click Start, type the word easy into the Search box, and click Windows Easy Transfer Reports.
Setting Passwords
When the old computer’s user accounts have been copied to your new computer, the Users control panel makes it appear that these accounts have passwords set. However, they do not. No password will be required when you select these accounts from the Welcome screen. Windows will prompt the users to create one the first time they log on. Therefore, it’s a good idea to use the Users control panel to set a password for each transferred account right after you finish with the Windows Easy Transfer program—otherwise the user accounts are unprotected.
Also, once you’ve copied accounts to your new computer, you might want to log on and create password reset disks for them, as described previously under “Before You Forget Your Password.”
You might then want to jump back to “Change Account Settings” earlier in this chapter to tune up the settings for each added user account.
Logging Off or Shutting Down
We end our tour and setup marathon by showing you how to log off and turn off your computer.
Windows 7 still requires you to stop by clicking the Start button, but at least it doesn’t say “Start” anymore. And, the Windows 7 shutdown options are a little clearer than Vista’s. So, click Start and look at the bottom of the Start menu, as shown in Figure 3.12.
Figure 3.12 Shutdown and other logoff options on the Start menu.
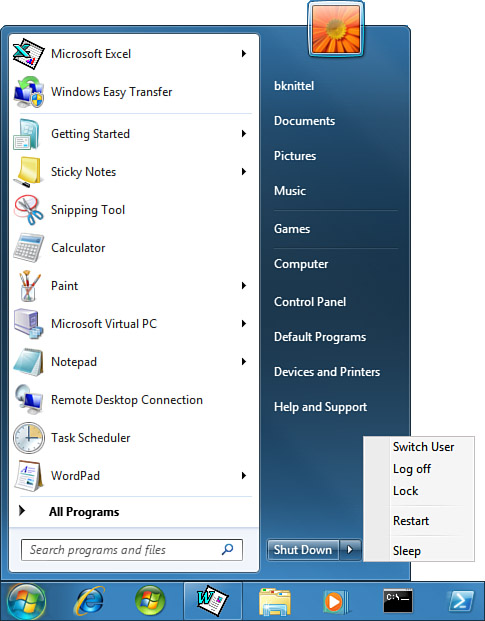
The Shut Down option is the first one you see. Click this, and the computer will shut down completely. If you click the small arrow to the right of Shut Down, you can make other selections, which should be familiar if you’ve used Windows XP or Vista:
• Switch User—Displays the Welcome screen so another user can log on and work. You remain logged on, and your applications keep running, invisibly.
• Log Off—Logs your account off entirely, and returns to the Welcome screen.
• Lock—Hides the desktop. You have to type your password to resume working. It’s about the same as Switch User, and the Windows+L hotkey does the same thing.
• Restart—Logs you off, shuts down Windows, and reboots.
• Sleep—Puts the computer in a lower-power mode, where it’s mostly off, except that Windows remains in memory, and can be restarted in a few seconds.
Sleep is a great way to save energy if you’re leaving your computer for more than 10 minutes and plan to come back. But, if the computer loses power, Windows will not have a chance to shut down properly, and you could lose data if you hadn’t saved your documents. By default, if you leave the computer “asleep” for three hours, Windows will automatically turn the computer back on, save its memory to disk, and then really power itself off. This is called hibernation. When you turn the computer back on, it’ll take longer to restart, but it’s still usually faster than a regular Windows startup.
Note
![]()
On desktop computers, Hibernate isn’t shown as an option on this Shut Down menu because the automatic hibernate-after-sleep mechanism, called Hybrid Sleep, is enabled by default. If you disable Hybrid Sleep in the Advanced Power Settings control panel, Hibernate will appear as an option on this Shut Down menu. On laptops, Hibernate should appear on the Shut Down menu because Hybrid Sleep is disabled by default.
This ends our tour. To close the book, so to speak, click the arrow next to the Start menu’s Shut Down button, select Sleep, and watch Windows power off. When it’s asleep, press your computer’s power button briefly and see how fast it powers back up.
More Than You Wanted to Know
In the remainder of this chapter, we cover some more advanced topics that some of you may want to know about, and some of you won’t. Feel free to skim the rest of the chapter and read just what interests you. You’re probably itching to start poking around with Windows 7 now anyway, and you can always come back to these items later on if the need arises.
Caution
![]()
Always use Shut Down or put your computer into hibernation before you unplug it.
Now, let’s go on to learn where Windows 7 stores your documents, music, and so on, and how this differs from previous versions of Windows.
Where’s My Stuff?: The User Profile Structure
Windows 7 and Vista store your documents, music, and pictures in a different folder layout than did Windows XP and earlier versions of Windows.
In Windows 7, each user’s personal files are stored in a folder with the same name as the user account inside folder Users. (In some cases, Windows adds other letters or numbers to the username to create a unique folder name.)
This folder is called a user profile, and it contains not only your personal documents but also some hidden files that contain your personal Windows Registry data (which contains information used by Windows and application programs), temporary files used by Internet Explorer, and so on. Another folder inside Users is named Public, and this folder can be used by any of the computer’s users. It’s a place to put files that you want to share with anyone else.
In Windows 7 and Vista, you can’t store your own files inside Program Files, Windows, or the root (top) folder of the drive on which Windows is installed, although you can create folders there and put files in the new folders.
The directory structure looks like this:

• The Windows and Program Files folders have the same purpose as older versions of Windows—to hold Windows and application programs, respectively.
• The Program Data folder is hidden, so you won’t see it unless you elected to show hidden files earlier in the chapter in the section “Disable Hide Extensions for Known File Types.” In it, the Start Menu subfolder contains Start Menu items that are displayed to all users. This was folder Documents and SettingsAll UsersStart Menu on Windows XP.
• The Users folder contains user profiles, the Public folder (which contains the rest of what was Documents and SettingsAll Users in Windows XP), and the Default user profile, which is discussed in “Configuring a Default User Profile” at the end of this chapter.
• A user profile folder for a given account is created only when the user logs on for the first time. The hidden Default folder is copied to create the new profile.
The user profile folder for the account named “myname” is c:Usersmyname, the folder for the account named “yourname” is c:Usersyourname, and so on.
Inside each user’s profile folder is a series of subfolders, which are listed in Table 3.1.
Table 3.1 User Profile Folders
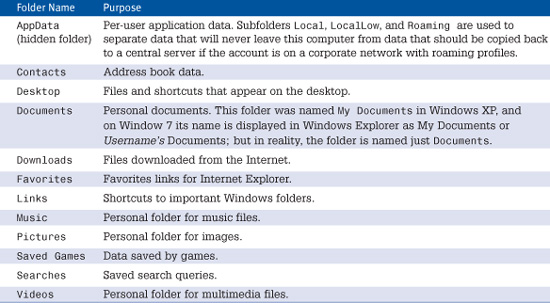
These folders are organized differently than in Windows XP, but correctly written application programs won’t need to know about the differences; Windows has mechanisms to provide to programs the paths to these various folders based on their function rather than their location. Still, for those applications whose programmers “wired in” the old XP structure, Windows 7 has a mechanism to let them run without problems, as we’ll show you in the next section.
Profile Compatibility Junction Points
Windows 7 setup creates junction points and symbolic links in the Windows drive that provide a measure of compatibility with applications that were hard-wired to expect the Windows XP user profile structure. Junction points and symbolic links are special “virtual” folders that point to other, real folders. When a program attempts to examine files in the virtual folder, Windows shows it the files in the real folder. If older applications attempt to read from folder Documents and Settings, for example, Windows shows them the contents of Users.
You should ignore these special link folders; don’t delete them, and to the extent possible, forget that they exist. They are hidden system files by default, so you only see them, in fact, when you instruct Windows Explorer or use the dir command-line command to display both hidden and system files.
Compatibility and Virtualization
In previous versions of Windows, applications could store files inside the Program Files and Windows folders, and they often took advantage of this to store common data that was shared among all users. The same was true for the Registry, a database of user and setup information—programs frequently stored information in the HKEY_LOCAL_MACHINE Registry section.
To make Windows more secure, user programs are no longer allowed to store files or Registry data in these areas unless their setup programs explicitly change Registry security settings to permit it. (And this has to happen while the program is being installed under elevated privileges.)
Most of the applications that ship with Windows are subject to these restrictions. Try it yourself—open Notepad, type a few words, and try to save a file in Program Files. You can’t. Any application that Windows deems as “modern” or “should know better” is entirely blocked from saving information in these protected areas. (Technically, the presence of a manifest file in the program’s folder or inside the program file itself is what tells Windows that the program is “modern.”)
Older programs, however, expect to write in these privileged directories and Registry areas, and to maintain compatibility Windows 7 gives them an assist called file and Registry virtualization. What happens is that if an older program attempts to create a file in one of the protected folders or Registry areas and access is blocked, and the program is not running with elevated permissions and the file doesn’t have a manifest file, Windows stores the file or Registry data in an alternate, safer location. Whenever an older program tries to read a file or Registry data from a protected location, Windows first checks the alternate location to see whether it had been shunted there earlier and, if so, returns the data from that location.
Thus, the application doesn’t actually store information in the secure locations but thinks it has.
Why are we explaining this to you? There are two reasons:
• One consequence of virtualization is that programs that try to share data between users can’t. Each user will see only his or her private copy of the files that should have been stored in a common place. For example, in the “high score” list in a game, each user may see only his or her own name and scores. This may also cause problems with programs that track licensing or registration.
Note
![]()
If you view a folder in Windows or Program Files in Windows Explorer, a button named Compatibility Files appears in the window’s taskbar If you click this button, Explorer displays the corresponding subfolder in your VirtualStore folder. This is an easy way to examine your virtualized files.
• If you go searching for files in Windows Explorer or the command-line prompt, you won’t see the files that got virtualized where you expected them to be because explorer.exe and cmd.exe have manifests—they don’t get the virtualization treatment, so they see only the files stored in their intended locations.
The first problem can’t be helped; the older programs just have to be redesigned and replaced. Knowing that virtualization occurs, you can work around the second problem by knowing where to look.
Note
![]()
Some Registry keys are not virtualized in any case. For example, most keys under HKEY_LOCAL_MACHINESoftwareMicrosoftWindows will not be virtualized; attempts to write data in this key or most of its subkeys will simply fail. This prevents rogue applications from creating startup program Run entries.
Files intended for Windows or Program Files (or any of their subfolders) will be placed into Users or ...usernameAppDataLocalVirtualStoreWindowsProgram Files, respectively.
Registry data intended for HKEY_LOCAL_MACHINE will be shunted to HKEY_CURRENT_USERSoftwareClassesVirtualStoreMachine. There is no quick-view button in the Registry editor, so to find this data, you have to browse to it.
After You Forget Your Password
Forgetting the password to your computer account is an unpleasant experience. It’s definitely no fun to have your own computer thumb its proverbial nose at you and tell you it’s not going to let you in to get your own files. If this happens to you, take a deep breath. You might recover from this. Here are the steps to try, in order of preference:
1. If you created a password reset disk, as described earlier in the chapter in the section “Before You Forget Your Password,” you’re in good shape. Follow the instructions in the next section, “Using a Password Reset Disk.”
2. If you are a member of a domain network, contact the network administrator to have him or her reset your password. The administrator might be able to recover any encrypted files you created.
3. Log on as a Computer Administrator user and use the User Accounts control panel to change your primary account’s password.
Caution
![]()
If you have to resort to option number three (logging on as an administrator and changing your primary account’s password), you will lose any stored website passwords linked to your account and, worse, any files that you encrypted using Windows file encryption (a feature found on Windows 7 Professional, Enterprise, and Ultimate only). There will be absolutely no way to recover the encrypted files.
4. If you don’t remember the password to any Administrator account, or you can’t find someone else who does, you’re in big trouble. Programs are available that can break into Windows and reset one of the Computer Administrator account’s passwords. It’s a gamble—there’s a chance these programs might blow out your Windows installation. Still, if you’re in this situation, you probably will want to risk it. Here are some programs you might look into:
• Windows Key (www.lostpassword.com) creates a Linux boot disk, which pokes through your NTFS disk volume, finds the Windows security Registry file, and replaces the administrator’s password so that you can reboot and log on.
Caution
![]()
The existence of such programs that allow you to reset passwords should raise your eyebrows. The fact is that with physical possession of your computer, people can get into it. However, these break-in tools won’t work if your hard drive is encrypted with BitLocker, a feature available in the Enterprise and Ultimate editions.
• Active@ Password Changer (www.password-changer.com) works on a similar principle, booting up in Free-DOS from a CD or floppy disk. The program finds the security Registry file on your Windows installation and deletes the password from selected accounts.
• There are several free password-reset programs that you can download from the Internet. The ones we tested did not work with Windows 7 or Vista, and we found that some of them didn’t even work on earlier versions of Windows as they claimed to. We’d try to get one of the for-sale products if possible and would attempt a free program only if we were really desperate.
5. If you need to retrieve only files, you can remove the hard drive and install it in another Windows 7, Vista, XP, or Windows 2000 computer as a secondary drive. Boot it up, log on as an Administrator, and browse into the added drive. You probably need to take ownership of the drive’s files to read them. (If the hard drive is encrypted with BitLocker, this technique won’t work either).
6. If you get this far and are still stuck, things are pretty grim. You’ll need to reinstall Windows using the Clean Install option, which will erase all your user settings. Then, as an Administrator, you can browse into the Users folder to retrieve files from the old user account folders. Again, you’ll need to take ownership of the files before you can give yourself permission to view or copy them.
If you are not a member of a domain network, you can avoid all this by creating a password reset disk ahead of time.
Using a Password Reset Disk
If you have lost your password but have a password reset disk that you made earlier, you can use it to log on. Just attempt to sign on using the Welcome screen. When the logon fails, click Reset Password. Then, follow the Password Reset Wizard’s instructions to change your password and store the password reset disk away for another rainy day. You don’t need to remake the disk after using it.
Accessing the Real Administrator Account
In Windows NT, 2000, and XP, there was an account named Administrator that was, by definition, a Computer Administrator account. You may have noticed that it’s nowhere to be seen in Windows 7.
Actually, it’s still there, but hidden. There’s a good reason for this. It’s disabled by default and hidden on the Welcome screen and even in Safe Mode. And it requires no password to log on. This was done to provide a way to recover if you somehow manage to delete the last (other) Computer Administrator account from your computer. In this case, Windows will automatically enable the Administrator account so that you can log on (without having to remember a password) and re-create one or more Computer Administrator accounts, or turn a Standard User into an Administrator. (You would then immediately log off and use the restored regular account.)
This is a good fail-safe scheme, and we recommend that you leave it set up this way. Still, if for some reason you want to set a password on the Administrator account or use it directly, here’s how:
1. Click Start, right-click Computer, and select Manage.
2. Select Local Users and Groups, and open the Users list.
3. Right-click Administrator and select Properties. Uncheck Account Is Disabled and click OK.
4. Log off or Switch Users; then log on as Administrator (which now appears on the Welcome screen).
5. Press Ctrl+Alt+Del, and click Change a Password.
6. We strongly urge you to click Create a Password Reset Disk and make a password reset disk for the Administrator account, as described earlier in this chapter. Be sure to store it in a secure place.
7. Back at Change a Password, leave the old password field blank and enter a new password as requested. Press Enter when you finish.
Caution
![]()
When you are logged on using the real Administrator account, User Account Control is bypassed, and all privileged programs run with elevated privileges.
Now, the Administrator account is accessible and secured.
If you’re worried that the default passwordless Administrator account is a security risk, remember that by default it can’t be accessed unless all other Administrator accounts have been deleted, and only an Administrator user could manage to do that. So, a nonadministrator can’t do anything personally to get to Administrator. If you enable the Administrator account, then, yes, you really must set a password on the account.
Configuring a Default User Profile
As you saw in this chapter, it can take quite a bit of time to tune up a user account and set it up “just so.” There are taskbar icons to add, things to change in Windows Explorer and Internet Explorer, and potentially dozens of other applications to configure. It’s bad enough doing this once, but if you have many accounts on your computer and you want them all to be set up more or less the same way (at least initially), you’re looking at a lot of setup time.
Fortunately, you can do this just once and have Windows use your settings as the base settings for other accounts. You can set up one account as you want it and copy that account’s profile to the Default user profile so that all future accounts start with a copy of your finely tuned setup. The trick is that you have to do this before other users have logged on to the computer for the first time. It’s also best to do this after setting up, but before really using, your own account.
To use this technique to set up nicely pre-tweaked accounts on your computer, follow these steps:
1. Log on to a Computer Administrator account and set it up just as you want all the accounts to look. (Of course, other users can change things after they log on; you’re just setting up their account’s initial look and feel.)
In addition to setting preferences, you can add icons to the desktop and taskbar and add documents to the Documents folder and favorites to the Favorites list in Internet Explorer. You can also delete marketing junk installed by Microsoft or your computer manufacturer.
2. Create a new Computer Administrator user account named xyz. Don’t bother setting a password for it.
3. Log out or switch users, and then log in using the new xyz account. Don’t bother making any changes.
4. Click Start, Computer. Click Organize, Folder, and Search Options. Select the View tab and select Show Hidden Files and Folders. Click OK; then close Computer.
5. Click Start, Control Panel, System and Security, System; then in the left Tasks list, select Advanced System Settings.
6. In the middle User Profiles section, click Settings.
7. Select the entry for the account that you originally logged on to and set up. Click Copy To. Then click Browse.
8. In the Browse for Folder dialog box, open the drive that Windows is installed on, dig into Users, and select Default. Click OK to close the Browse for Folder dialog box; then click OK to close the Copy To dialog box.
9. When prompted, click Yes to overwrite the original default profile.
10. When the copying finishes, close all the windows and log out.
11. Log back in to the original account.
12. Click Start, Control Panel, User Accounts and Family Safety, Add or Remove User Accounts.
13. Select account xyz and click Delete the Account. Click Delete Files; then click Delete Account.
Now, when any other user logs on for the first time, his or her user profile will be created with the settings, files, and icons exactly as you set them.