
12. Sound Recorder, DVD Maker, and Other Multimedia Tools
Become a Recording Star
As with past versions of Windows, Windows 7 comes with a simple tool to help you create and do basic modification of sound files—Windows Sound Recorder. Although it is admittedly utilitarian in nature, this tool enables you to add audio notations to everything from word processing documents to slideshows and enables you to create slideshows and photo CDs. This chapter covers the functionality of Windows Sound Recorder, the Snipping Tool, and making DVDs, and offers some troubleshooting tips for when things don’t come out sounding exactly right.
This chapter also touches on the other multimedia utilities that come with Windows 7. Because many of the accessory programs fall into discrete categories, such as communications, multimedia entertainment, or system tools, look to relevant sections of this book to find coverage of such tools. This chapter covers the more basic, yet still quite useful, tools that don’t fit neatly into a pigeonhole.
Windows Sound Recorder
Sound Recorder has been included with Windows since its earliest days. It is not feature rich by any stretch of the imagination—in fact, it enables you only to record an audio file and save it to the hard drive on your computer. Whereas the older version of Sound Recorder enabled you to record an audio file, change the speed of the recorded playback, and do basic editing and conversion of the saved output, this functionality is missing with Windows 7. Sound Recorder can work with files that are in the Windows Media Audio (.wma) format.
To start Sound Recorder, click Start, All Programs, Accessories, Sound Recorder. This gives you the Sound Recorder interface, shown in Figure 12.1
Figure 12.1 The Windows Sound Recorder main interface.

Really only one option is available: Start Recording. Clicking this button enables you to record audio using your PC’s microphone. When you have recorded all the information you need, click the Stop Recording button (which appears after a recording is started). When you stop recording, you get a Save As dialog box asking you where to save the recorded output, as shown in Figure 12.2.
Figure 12.2 The Save As dialog box, which defaults to the Documents library.
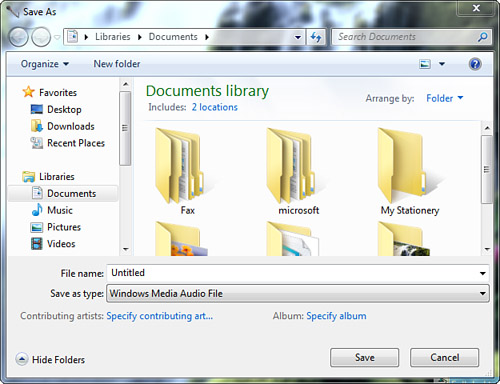
Here, you need to enter a filename to save the file; you can optionally enter artist and album information by clicking on the function links at the bottom of the Save dialog and entering the desired data (see Figure 12.3). If you enter the artist and album information, you can access this information later inside Windows Media Player and the Documents library.
Figure 12.3 The Save As dialog box, with optional tag information entered.

The file location defaults to the Documents library, but you can change the location where the file is saved by clicking the Documents icon in the sidebar (you might need to click the Browse Folders button) and browsing to the library where you want to save the file.
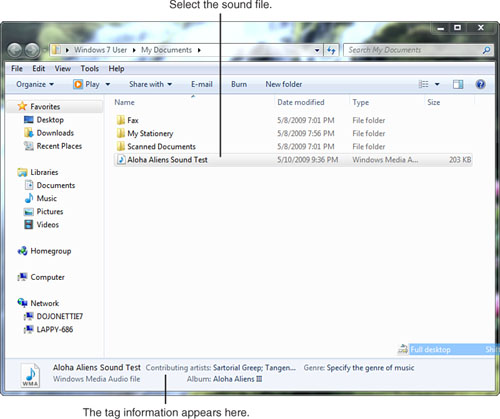
If you saved the file in the default location, you can click Start, Documents and see the file that you just recorded; if you specified the artist and album information, it is displayed here as well (see Figure 12.4).
Figure 12.4 An audio file in the Documents library. Notice the tag information that was entered earlier.
Volume Control
The Volume Control accessory is basically a no-brainer. It provides a pop-up volume control sporting balance, mute, and other controls for your audio subsystem. Whether you’re playing radio stations from the Web, playing CDs from your CD drive, listening to TV (if you have a TV tuner card), or recording sound files, you need access to these controls from time to time. Of course, if you don’t have a working sound card installed, this accessory isn’t available—or, at least, it doesn’t do anything. A little-known fact for many people is that this accessory has two sets of controls—one for recording and one for playback.
1. To open the standard volume controls, simply click the little speaker icon in the notification area on the Windows 7 taskbar (see Figure 12.5).
Figure 12.5 The volume mixer, as seen when you click the speaker icon in the notification area.
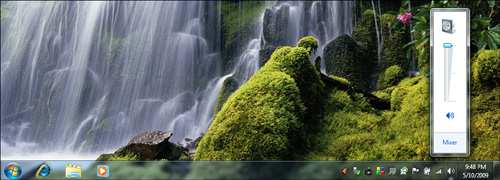
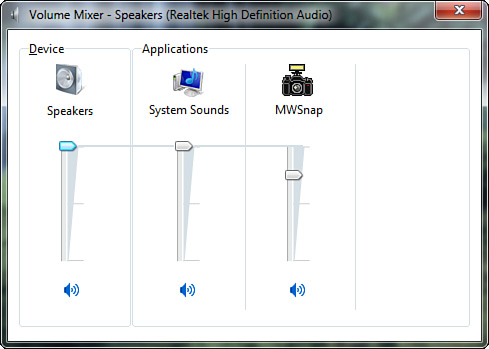
2. You can alter the system volume setting by dragging the volume slider up or down. You can mute the output by clicking the picture of the speaker at the bottom of the column. If you want to see another volume control, you can select Mixer at the bottom of the column. Figure 12.6 shows the standard volume control.
Figure 12.6 The basic volume control for setting playback volume.
Note
![]()
The Device slider links all the available sliders together and controls both up and down directions for all sliders. The position of the Device slider also represents the highest volume that any device can be set to. This is important because each Application slider can be set to a volume lower than the one set by the Device slider. Its somewhat confusing described in words, so try it in practice to see it in action.
3. In the Volume Mixer, you typically see two sliders, one for the audio device and one in the Applications group for the system sounds. You might see additional sliders for each running application. These sliders are linked, so adjusting the speaker volume changes the volume level for system sounds. Sometimes, though, you want the alert sounds to be lower than other sounds coming out of your computer, so you can independently control the sliders for each represented application. If you happen to be watching a YouTube video with low audio, you don’t want to be blown away by your New Email sound.
No Sound
![]()
What do you do when adjusting the volume control from the notification area icon still doesn’t produce any sound?
Various goofs, settings, conflicts, and/or program malfunctions can cause a loss of sound in your projects. As a result, troubleshooting your sound system isn’t always easy. One tip is in order here: If you’re using a laptop computer, ask yourself whether the sound stopped working after you hibernated or suspended the system. This problem is common on several laptops, and this bug might not have been worked out of Windows 7 for your sound chip set because some parts makers are still working through their transition to Vista drivers. Try rebooting the computer, and see whether the sound comes back to life.
Another thing to look for is a manual volume control on the computer. Many laptops have a control that you can turn or push, often found along the edge of the computer itself. For example, Toshiba has a hardware volume controller on its laptops, and HP has a touch-sensitive slider pad that needs special software to be installed. Such settings override any settings within Windows. If you have a set of powered speakers attached to your computer, make sure they are plugged in to power and are turned on. I often forget to do this and then wonder why I have no sound. For serious problems, you should consult other chapters in this book that deal with the Control Panel and the Device Manager. If none of these remedies works, you might have a bad sound card, or you might need a new device driver.
If you are doing any sound recording, be sure to view the recording controls, too. You can access both the playback and recording level controls as described next.
Tip
![]()
To quickly adjust or mute the sound output from your system, or to adjust the master volume level (useful when the phone rings), click the little speaker icon in the notification area, near the clock.
The controls you see by following these steps are a simplified version of the overall volume settings. To access the detailed volume settings, choose Start, Control Panel, look under Hardware and Sound in the default view and Sound if you have changed to Icon view, Playback; double-click the Speakers entry in the Sound window; and choose the Levels tab. Your sound system’s capabilities and default settings determine the format of the volume controls you see. On one of my computers, the controls look like what you see in Figure 12.7.
Figure 12.7 The detailed volume controls.
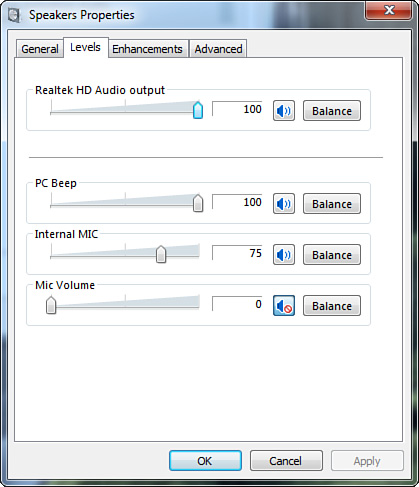
In this window, you can manually adjust the individual levels of the output elements. You can mute individual output elements by clicking the small speaker icon to the right of the volume sliders.
If you are using a sound card with support for more than two speakers, you can also run basic diagnostics and choose the speaker configuration here by clicking the Speakers item in the Playback window and clicking the Configure button.
More options are available to you, as well. Here they are, tab by tab:
• Playback—Use this tab to select the output device you are using. In the vast majority of cases, you will have only one option. However, if you have speakers that plug in and USB speakers, you can choose one of them.
• Recording—This tab works much like the Playback tab, but for recording devices. Many podcasting microphones use USB to connect instead of the usual input jack.
• Sounds—This is the standard Sounds tab that has been included in versions of Windows since time immemorial. You can select from sound themes in the Sound Scheme pull-down and modify which sounds do what and when in the Program Events list. One new thing for Windows 7 is that there are actual themes now—14 new ones plus two more for Ultimate users, to be exact.
• Communications—In this new tab, you can actually tell Windows how to deal with the volume if you happen to be using your computer for phone calls. The default is set to decrease the volume by 80%.
Using the Snipping Tool
The Snipping Tool, as you can see in Figure 12.8, is for capturing images of your desktop. Don’t underestimate the utility of a screen-capture program. If you ever have an IT guy say he can’t help you because he has never seen the error message, use the Snipping Tool to show him your evidence. Granted, you can’t always do this because your entire computer might be frozen, but it will come in handy.
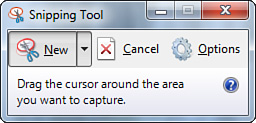
You start the Snipping Tool by going to Start, Snipping Tool (or by choosing Start, All Programs, Accessories, Snipping Tool). You select the type of “snip” you want by clicking the down arrow next to the New button. Your options are
• Free-form Snip—Enables you to literally draw around something as if you were cutting it out with scissors. The results will still be rectangular in form, though.
• Rectangular Snip—Enables you to drag out a rectangular-shaped area to the size you want. Think of it as precropping an image. Otherwise, you’d have to capture the entire screen and then cut out what you want. This option eliminates the extra steps.
• Windows Snip—Enables you to click on a particular window to capture only that window, automatically cutting out the desktop image and anything else, even underlying windows.
• Full-screen Snip—Enables you to capture the whole screen in one go.
Once captured, you can draw on or highlight sections of your images and then save them. Click the disk image in the toolbar to open the Save dialog box (or click File, Save). The default location is your Pictures library (covered in detail in Chapter 10). You can save your images in the following file formats:
• PNG—The Portable Network Graphics file format is the newest and most accessible file format today. It was developed to replace the GIF file format, which, at the time, was owned by CompuServe. PNGs are generally larger but they can also store more complex amounts of data.
• GIF—The classic GIF file format is a very simple file format designed to make images as small as they possibly can be for quicker transfer over the network.
• JPG—Also known as JPEG, this file format was designed by the Joint Photographic Experts Group to offer photojournalists a file format that could retain a lot of data but could also be compressed for network deliveries to newspapers around the world. JPG offers a lot of options, including continuously variable compression.
• MHT—A Single File HTML format, which is proprietary to Microsoft and really has little use, especially as a file format for screen captures. I’d avoid this unless your intent is to confuse individuals attempting to view images on your computer.
Viewing Your “Snipped” Images
Windows 7 offers a number of ways to view, organize, and work with your images, which are covered in detail in Chapter 10. There are two ways to quickly work with the images you have created using the Snipping Tool—Windows Photo Viewer, and Paint, the Windows classic, which has been updated significantly for the first time since the release of Windows 95 (see Figure 12.9).
Figure 12.9 Viewing your snipped image in Paint.
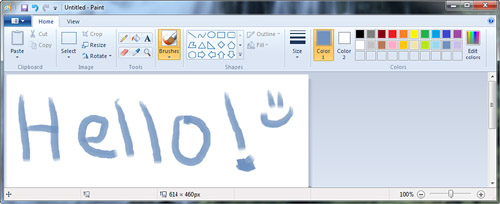
Aside from receiving a ribbon user interface somewhat like the toolbar system introduced in Microsoft Office 2007, Paint now sports a wide range of rather useful features and supports a number of file formats, including PNG, GIF, and JPG, which were covered earlier in this chapter. Other formats supported by Paint are
• BMP—The classic Microsoft Bitmap file format (with either the .bmp extension or the rarely used .dib extension) is available in monochrome, 4-, 8-, and 24-bit color formats.
• TIFF—This format, created by Aldus (those people who made PageMaker), is quite capable of storing a wide range of detailed image data. This makes it well suited for storing fax information, which is why Aldus created it, back when every fax machine maker had its own format. Its extensions are .tif and .tiff.
The new Paint offers you a load of new features with which you can further edit and manipulate your screen captures.
Recording to DVD
If you have saved a lot of pictures and/or home videos on your computer and now need to prepare a nice presentation, want to send DVDs to your relatives, or just want a nice way to store your media before it completely takes over every kilobyte of storage space, you’re covered: Microsoft’s DVD Maker program is a simple, fast, and efficient way to create DVDs that will play in most computers and even DVD players.
Unlike versions of Windows before Vista, Windows 7 comes with a DVD-burning application built in to the OS. You can open the DVD burner by choosing Start, All Programs, Windows DVD Maker (see Figure 12.10).
Figure 12.10 Adding pictures and videos to begin making your DVD.
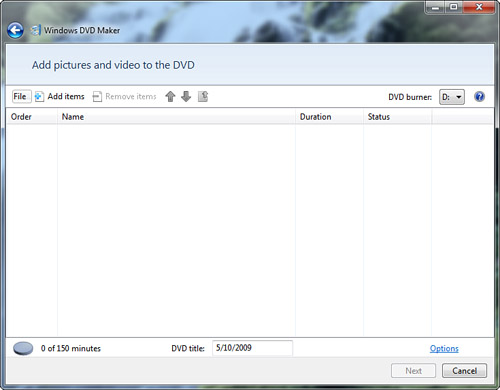
From this screen, you can click Add Items and browse for video files or still photographs. After you select the movie files or pictures, they appear in the main screen in the order in which they will be played on the DVD.
Tip
![]()
If you want to make a quick slideshow from pictures stored on your computer, click Add Items and Ctrl+click any pictures you want to add. Windows DVD Maker makes a slideshow out of the photos you selected; you can change the order in which the slides are presented in the main screen.
When you have the media elements in the order you prefer, you can change the advanced options for the DVD by clicking the Options link to open the DVD Options dialog box (see Figure 12.11).
Figure 12.11 Advanced DVD options.
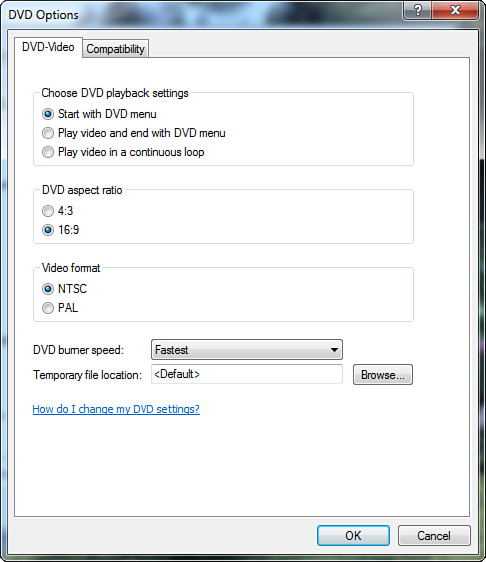
The first set of options on the DVD-Video tab controls how you see the video after the DVD is put in the DVD player—whether you start with a menu or start with the video.
The second set of options controls the aspect ratio for the DVD. Changing this option to 16:9 enables you to create widescreen DVDs suitable for playing on high-end TV sets. If you play a movie that was encoded with the 16:9 aspect ratio on a standard TV set (4:3), the movie will be “letterboxed” (have black bars at the top and bottom of the movie). This is to allow standard TV sets and computer displays to show all the content from a widescreen movie without losing any content.
The standard aspect ratio (4:3) allows standard TV screens to use the entire screen for displaying the movie, but on widescreen TVs the movie will be “pillar boxed” (have black bars on either side of the movie). The format you use depends mainly on your source media.
Note
![]()
The more common manner of referring to aspect ratio is either as standard definition (4:3) or high definition (16:9), more commonly known as HD. By the time this book is published, the United States will have passed the deadline for the official move to HDTV. This means that all U.S. broadcasters must send out their signals on the new HD bands. As a point of clarification, most HD content is broadcast or delivered via cable or satellite transmission in 16:9. Most modern laptop and widescreen computer displays have an aspect ratio of 16:10. There are also a number of models of HDTVs that use a 16:10 aspect ratio.
The third set of options enables you to use either the National Television System(s) Committee (NTSC) or Phase-Alternating Line (PAL) format for the video. NTSC video is the format of choice for the Americas as well as some Asian countries; PAL is used most everywhere else. Unless you need to play the movie you’re creating on a PAL-compliant DVD player, it’s generally best to leave the setting as NTSC.
You can also change the DVD burner speed. This should be set as high as you can without creating “coasters” (DVDs that had a failure during writing, rendering them useless). Another area where you may have problems is with plug-ins or filters that cause compatibility issues with DVD Maker. Under the new Compatibility tab, you can select which filters DVD Maker will use or try to access and, therefore, eliminate that one possible conflict. Of course, the only time you would experience this is if you had installed other DVD authoring software, and if that were the case you likely would not be using DVD Maker.
When you finish on the main pane, click Next. You are presented with the Ready to Burn DVD dialog box, shown in Figure 12.12.
Figure 12.12 The Ready to Burn DVD dialog box, where you can change display options for the movie.
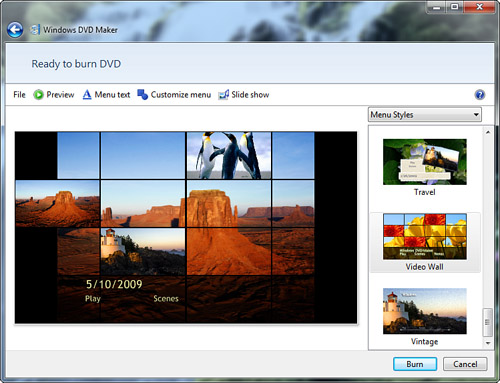
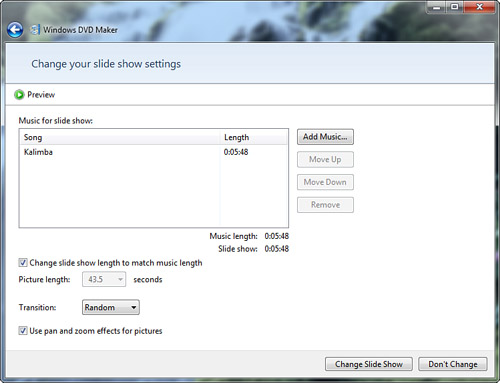
From this dialog box, you can change the style of the menus for the DVD movie, change the text and/or styles for the menu, or modify the settings for the slideshow in the movie. By clicking the Slide Show button in the toolbar, you can add audio to the slideshow or change the other settings for the slideshow (see Figure 12.13).
Figure 12.13 Slideshow options in Windows DVD Maker.
Tip
![]()
If you want to make multiple copies of the same movie, it is best to do it now; by burning multiple copies at once, you bypass the lengthy encoding phase. If you are unable to burn another copy, you can always create copies from the one DVD you did burn. You will require software like Nero Burning ROM or Roxio’s Easy DVD Copy 4.
After you add music to the slideshow, change the length of time between slides, and change the transitions, you can preview the slideshow by clicking the Preview button. When you’re satisfied with the show, click the Change Slide Show button.
When everything is completely ready to go, click the Burn button. If you don’t have a blank DVD in the drive, you’re prompted to insert one. From here, make a cup of coffee and go to lunch; burning a DVD generally takes much longer than burning a CD, not only because a DVD can hold more data, but primarily because it takes a long time for the software to properly encode your source media to work as a DVD.
The DVD Maker encodes the movie, which is very CPU intensive. After the movie is encoded, DVD Maker burns the DVD, ejects it, and gives you the option to burn another copy of the DVD you just created.
Errors Burning DVDs
![]()
I constantly get errors when writing DVDs in Windows DVD Maker, and the DVDs I create don’t play in either a standalone DVD player or my computer.
Writing DVD files can sometimes be a tricky and resource-intensive task. Many modern DVD drives have more than enough file cache to prevent buffer underrun errors but, as with CDs, sometimes problems happen. The best way to prevent underrun errors when burning a DVD is to choose a slower burning speed in the DVD Options dialog box of the movie in DVD Maker.