7. Gadgets and Other Supplied Accessories
Using Gadgets
As mentioned in Chapter 1, “Introducing Windows 7,” that old monster dubbed Active Desktop back in the Windows 98 days silently slipped away into oblivion and was dropped by Microsoft after we all realized that even the fastest computer could be brought to its knees when a few Active Desktop items were running. Add a weather map, stock sticker, and headline news ticker, and mysteriously, your computer would either lock up entirely or run so slowly that it might as well have. After you rebooted, you’d see a message such as this:
Internet Explorer has experienced a problem or error. As a precaution, your Active Desktop has temporarily been turned off. To start the Active Desktop again, use the following troubleshooting tips
Remember that? Enabling Active Desktop actually set Internet Explorer to be the system shell. Rather than your desktop essentially being a Windows Explorer folder, it was now much more, tying closely into Internet Explorer. If IE crashed, the house of cards came crashing down, including your interface with the operating system. The problem had to do with Active Desktop being ravenous for system resources. Add more than a couple Active Desktop elements, and the system would starve for resources, disabling other applications you might want to open or have open.
Again the question was raised: Can’t we do something useful with all that otherwise barren computer landscape, especially now that screens are wider than they used to be? Apparently we have become enamored with the idea of our laptop computers being even better than video games or movie theaters in some ways. We can isolate ourselves now, with our own personal laptop wide-screen movie theaters. Give me a stack of movies and a pair of headphones, and I’m gone for days, despite my heated complaints about the demise of the taller screens. I mean, what are computer makers and Microsoft—and even Apple—thinking? Do engineers think that most of us use computers to watch the latest Hollywood blockbusters that we’ve illegally downloaded from BitTorrent? No, we’re web browsing and writing documents in Office, such as PowerPoint presentations, Word docs, or Excel spreadsheets. These applications beg for taller not wider screens. If you’re a writer, good luck finding a laptop with an old-fashioned 4:3 aspect ratio. Everything is now “wide,” meaning also not as tall. Translate: more scrolling. (Incidentally, all the figures in this book are captured in 1024×768 resolution, which is a 4:3 ratio.)
But enough of my rant. In any case, we now have a generation of wide screen displays with gobs of extra unemployed pixels to both sides during most of the workday. That being the case, Microsoft was wise to exhume the concept of Active Desktop and give it another go, in the form of gadgets and Windows Sidebar. Gadgets are analogous to the Active Desktop add-ins or applets. If you’re familiar with Mac OS X, perhaps you are thinking of Apple’s Dashboard and Widgets right about now.
Windows Sidebar was the place on Vista’s screen (left or right side) where the gadgets typically lodged themselves. As mentioned in Chapter 1, Windows Sidebar has gone away in Windows 7, which is no big loss, since it used to mysteriously disappear from Vista for no good reason. Folks often pulled gadgets onto the desktop as a workaround, and to make them bigger or to show more text, as with a news feed. True, once they were on the desktop, they could become easily obscured by other windows, but the new Windows 7 desktop peek feature makes it so easy to check your gadgets and then flip right back to what you were doing that this doesn’t matter.
Note
![]()
Actually, sidebar.exe is still the application that is responsible for running and displaying gadgets on the desktop. There just is no longer a Windows Sidebar proper.
Although Windows Sidebar is gone, the Gadget Gallery that premiered with Vista remains and is now called Desktop Gadget Gallery. You reach the Desktop Gadget Gallery by clicking Start and typing gadget (which will find Desktop Gadget Gallery) or by right-clicking the desktop and choosing gadgets.
Note
![]()
For gadgets to show on your desktop, you have to turn on Desktop Items from the desktop context menu. Right-click the desktop and choose View/Desktop Items. Note that this is a toggle, so you can also easily hide all your desktop items (including shortcuts, folders, etc.) by using this command.
Gadgets have proven to be more stable than their predecessor Active Desktop. They should be, simply because they are built using either DHTML or the Windows Presentation Foundation. Gadgets in general perform well and do not appreciably slow down your computer the way Active Desktop used to. There is a host of third-party gadgets, many of them useful for businesspeople.
Which gadgets you put on your desktop depends on your needs, of course. Typically, you’ll add a clock and a calendar, a CPU and RAM gauge (to see how maxed out your computer is, sort of like having a tachometer in your car), and a notepad. If you work with international money exchanging, or travel frequently, the always up-to-date currency calculator is nice. The RSS feeds gadget connects to Internet Explorer and downloads headlines from your subscribed RSS feeds.
Tip
![]()
If you have multiple monitors, you can set which one will display your gadgets. You can put the gadgets on a second monitor and maximize your primary monitor for use with your main applications. As you’ll see later, you can even fill up the entire second monitor with gadgets by dragging them there.
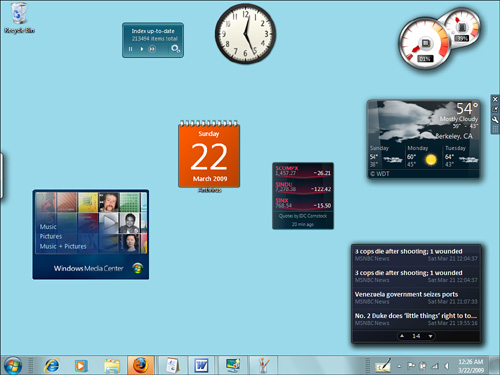
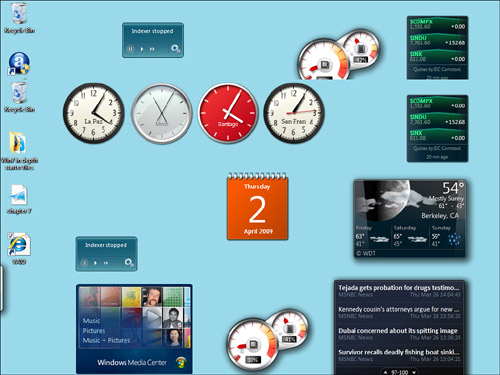
Figure 7.1 shows an example of a gadgets setup using some of the gadgets supplied with Windows 7. I have added a few other gadgets that I downloaded from various places on the Web. One is called Index Monitor, which lets you easily observe and control Window’s indexing service.
Figure 7.1 A typical desktop setup with several gadgets installed, including a local weather and temperature gauge.
Adding New Gadgets
Microsoft supplies a stock set of gadgets to choose from. Choosing and organizing them is self-explanatory and intuitive after you learn the basics:
1. Right-click anywhere on the desktop and choose Gadgets. A dialog box with available gadgets appears, as shown in Figure 7.2.
Figure 7.2 Adding gadgets to your desktop is done through this dialog box. Use the right and left arrows to scroll through available gadgets.
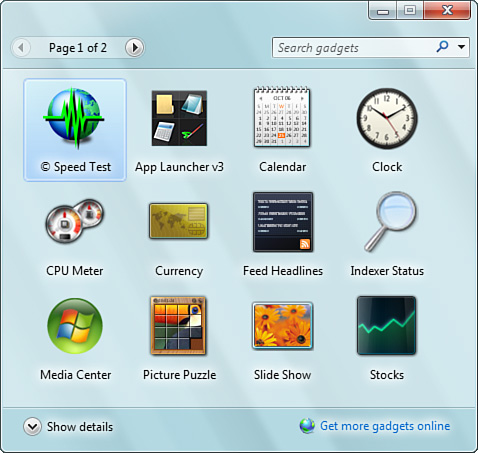
2. Click Show Details to open the details for any gadget that you click. Depending on the gadget, you might see a useful description. Leave the panel open, and any gadget you click will have its details shown there.
3. Double-click a gadget to add it to your desktop. Alternatively, you can drag it to the desktop and release it where you want it.
Downloading New Gadgets
Notice that, as with all Explorer windows, there is an as-you-type search box in the upper-right corner to help you find the gadget you are looking for. If you can’t find the tool for the job, try searching the Internet:
1. At the bottom of the Add New Gadgets dialog box, click Get More Gadgets Online. This will open a browser window in which you can download new gadgets.
2. To add a gadget from the web page, follow the instructions. The web page changes frequently, so we will not describe it here. Many gadgets have reviews so that you can read before trying.
3. After you decide you want to install or try a particular gadget, click Download. If it’s a third-party program (which is likely), you’ll see the dialog box shown in Figure 7.3.
Figure 7.3 You’ll see a warning like this, even for gadgets posted on Microsoft’s website. Make sure you know and trust the creator of the gadget before installing it.
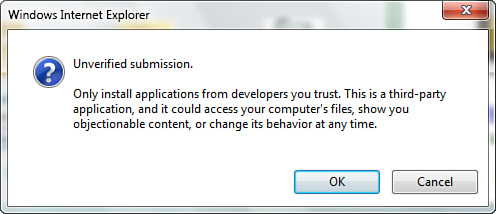
4. So, should you install a foreign gadget? Consider the source. Microsoft no doubt does not post downloadable gadgets that have not been tested and approved. I would not hesitate to install any gadgets found on the Microsoft web pages. Click OK to download the gadget.
5. When downloaded, click Open. You will see a dialog box asking for confirmation, as you see in Figure 7.4.
Figure 7.4 Confirm whether you want to install the downloaded gadget. Clicking Install will launch an automated installation.
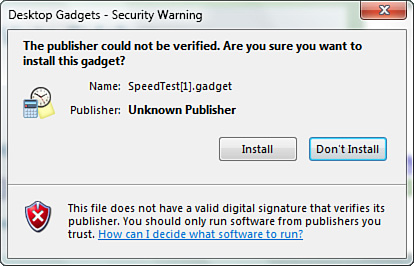
6. Click Install and the gadget is installed and added to your desktop automatically.
Tip
![]()
There are three types of gadgets in the current gadget universe: Windows Desktop gadgets, Windows Live gadgets, and Windows Sideshow gadgets. The Windows Live website offers gadgets that you can install on your Windows Live home page. Those gadgets won’t install into Windows 7—they are a different animal. Those are Windows Live gadgets as opposed to Desktop gadgets, and they install into a customized web page and thus only appear in a browser window. Just to confuse matters more, there are also SideShow gadgets. These gadgets are for displaying information on stuff like keyboards, laptop cases, remote controls, cell phones, and the like, without having to open the device.
One gadget I find useful is called Uptime. This gadget allows you to see how much time has passed since you last restarted your computer. Even though Windows 7 is stable, restarting once in a while is a good idea. I keep an eye on this gadget to help me keep track of when to reboot. I have made the mistake of letting my computer run for a month without rebooting, to the point that it began to act weirdly and slow down.
Peeking at Gadgets
If you are working on a document that obscures the gadgets, you might want to pop the gadgets forward to check the time, headlines, or whatever. Simply click or hover over the Desktop Peek button in the lower-right corner of the screen and the desktop and gadgets will pop into view, in front of your document. Then, click the button again and they will all disappear behind the document that was previously open.
Adjusting a Gadget’s Settings
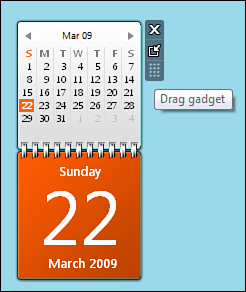
If you move the cursor over a gadget, a little control panel for it will pop up. Most gadgets have settings that you can control in this way, as shown in Figure 7.5.
Figure 7.5 Most every gadget has these control buttons for closing them or adjusting settings. These buttons appear only when you hover the mouse pointer over them.
Note
![]()
If you are running a 64-bit version of Windows, you can only use 64-bit gadgets. Some gadgets are written for 32-bit operating systems and will not work on the 64-bit version of Windows 7. Likewise, 64-bit gadgets will not work on a 32-bit operating system.
Tip
![]()
Pressing Windows+M minimizes any open windows so that you can view your desktop. Press again and your documents reappear.
Here’s how to adjust or close a gadget:
1. To close the gadget, click the X.
2. To adjust the settings for the gadget, click the wrench. (Some gadgets don’t have a wrench and adjustment dialog box but may have settings on the gadget itself.) See Figure 7.6 for an example of an adjustment dialog box.
Figure 7.6 Some gadgets let you make adjustments, which will vary from gadget to gadget. This set is for the Slide Show gadget.
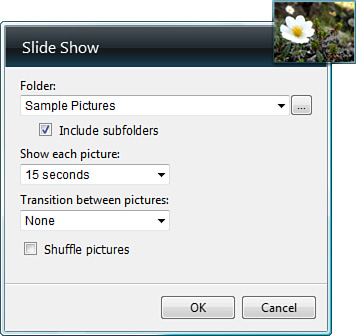
3. Adjust settings as necessary, and click OK.
Moving Gadgets Around
Gadgets are flexible and can be moved all around the screen. They can be dragged onto another monitor. To move gadgets:
1. Grab a gadget and drag it to the spot where you want it. To drag the gadget, click and drag the little Move Gadget button that looks like a grid. This shows up when you hover over the gadget. (See Figure 7.5, in which the grid or Move Gadget button is showing.) (With most gadgets, you can drag them from any spot on the gadget, but this is the official spot to drag with to avoid making other changes or clicking links on the gadget.)
2. Drop it where you want it. As you move a gadget around on the desktop, it can obscure another gadget. This is different from how gadgets worked in Windows Sidebar under Vista, where they automatically adjusted to make room for each other in a graphically smooth and groovy way. So you will have to manually position your gadgets. Unfortunately, the View, Auto arrange icons command reached by right-clicking the desktop doesn’t arrange gadgets, only icons.
Adding a Gadget More Than Once
There is nothing to prevent you from adding a gadget to the desktop more than once. Want a pile of notepads? Lots of slideshows running at the same time? A passel of stock tickers or news feeds all visible at once? No problem. Just add them, make the adjustments, and position them as you want.
If you deal with businesses or associates in multiple time zones, for example, it would be useful to have multiple clocks on your desktop, one for each time zone. Figure 7.7 shows an example. I named the clocks using the adjustment dialog box for each one.
Figure 7.7 Adding gadgets more than once is possible. Here I added four clocks set for different time zones.
Changing Opacity of Gadgets
When you right-click a gadget, the pop-up menu includes an Opacity option, which determines whether you can see through the object. This is a nifty feature, owing once again to the advanced video architecture of Windows 7. What do you do with a transparent gadget? Suppose, for example, that you don’t want to have to keep peeking at the desktop to see a clock but you don’t want that clock to completely obscure what is behind it, as shown in Figure 7.8. Here’s what you do:
1. Set the gadget to always be on the screen by right-clicking it and choosing Always on Top.
2. By default, the gadget is 100% opaque. You want to be able to see through it a bit, so opacity to the rescue. Right-click on the gadget, choose Opacity, and choose the desired level of opacity.
Figure 7.8 Use the Opacity setting to create transparent or semitransparent gadgets, such as this clock.

Note that even though a gadget is transparent, moving the cursor over the gadget makes it opaque, and you cannot click something behind it. You’ll have to move the gadget first.
Removing Gadgets
Gadgets you install will remain active until you close them and will persist on subsequent reboots. Likewise, if you log off and log back on, they will be reloaded.
Gadgets you download will be added to your Desktop Gadget Gallery. They will live there until you right-click them and click Uninstall. This makes it easy to activate and deactivate gadgets and still have them readily available.
As mentioned earlier, you can close an individual gadget by hovering over it and then clicking the X when its tool handle pops up. But for a more comprehensive approach that, among other things, allows you to see all the currently running gadgets and quickly remove selected ones, do this:
1. Click Start and type in gadgets. A series of gadget-related tasks appears.
2. Click View List of Running Gadgets. You’ll see the View Gadgets dialog box, shown in Figure 7.9.
Figure 7.9 Use the View Gadgets dialog box to see what gadgets are currently running and stop them if you want. Stopping a gadget does not uninstall it.
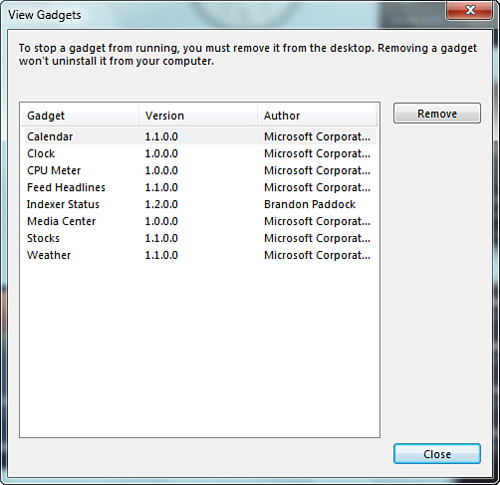
3. Click the ones you want to stop running and click Remove. Close the box when you’re finished.
Tip
![]()
The default gadget location is C:Program FilesWindows SidebarGadgets. Shared gadgets are located at C:Program Files (x86)Windows SidebarShared Gadgets.
Even after you remove a gadget, it’s not erased from your computer. It’s still in the list of available gadgets, and clicking the + (add) button at the top of the Sidebar will reveal it, if you want to use it later. You can safely remove gadgets without fearing that you’re obliterating them.
Installed gadgets do not appear in the Control Panel’s Programs applet, so you can’t remove them from your hard disk that way. You must right-click a gadget in the Desktop Gadget Gallery and choose Uninstall to remove it from your drive.
Tip
![]()
If you are interested in making your own gadgets go to Google and search for “make build Vista gadgets.”
Using the Snipping Tool
The Snipping Tool is an application included in Windows 7, Windows Vista, and Experience Pack for Windows XP Tablet PC Edition 2005. The first time it appeared was as a Tablet PC powertoy back in 2002.
No Tablet PC (or any PC for that matter) is complete without the Snipping Tool, which lets you use your mouse or stylus to snip any object on your screen. This program lets you capture portions of the screen (called snips), consisting of an open window, a rectangular area you choose, a freeform area, or the entire screen. You can then annotate snips using your mouse or a tablet stylus, and save them to disk or email them. Files can be saved as images (PNG, GIF, or JPEG image files) or as an HTML page.
To open the snipping tool, go to All Programs and choose Snipping Tool, or type snip into the Start Search field.
Using the Snipping Tool is easy and requires only a few clicks of the mouse. When you open the Snipping Tool, your entire screen will fade, a dialog box will appear (shown in Figure 7.10), and your mouse will turn into a pair of scissors. The dialog box offers a few options regarding snipping types that will become useful. Other, smaller options do exist as well in the Options drop-down list. These options refer to the cropping line color and other various tasks.
Figure 7.10 The Snipping Tool dialog box. The screen color level drops a bit when this dialog box appears. Select the area you want snip.
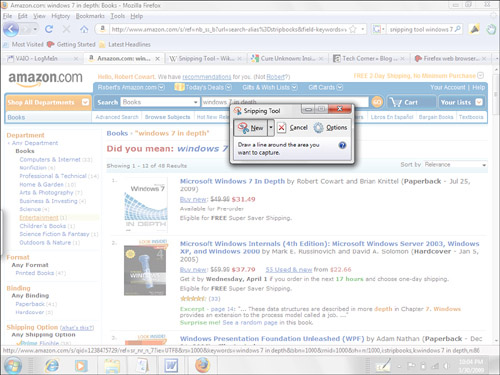
The different types of snips that you can do from the screen are as follows:
• Rectangular Snip—This is the most common snip. You take your stylus and make a rectangular box on the screen.
• Full-Screen Snip—A snip of the full screen is done quickly and with a tap of the pen or a click of the mouse.
• Window Snip—Snip any window that you have open on your screen. Simply select the window that you want, and it will automatically be snipped.
• Free-form Snip—Using the pen makes this snip a lot easier to use. This snip gives you any shape—for example, a circle—that you want to make into a snip.
Each snip will be shown in a red frame by default unless you change this setting in the options. This frame lets you see exactly which section you are snipping. The Snipping Tools dialog box will also disappear when selecting your snip. After you have decided how you want to snip the current screen, simply click and hold the mouse while dragging around the snipping areas. With the entire screen faded, the selected snip on the screen will be unfaded and outlined in red (by default), as shown in Figure 7.11.
Figure 7.11 Selecting the area using the Snipping Tool.
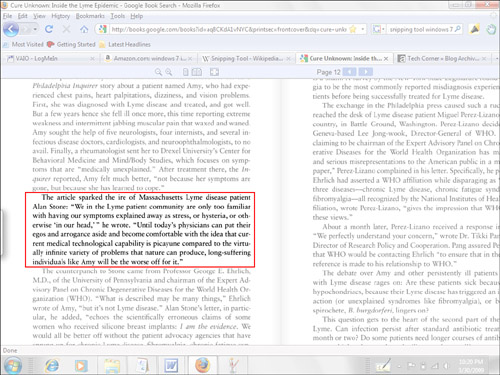
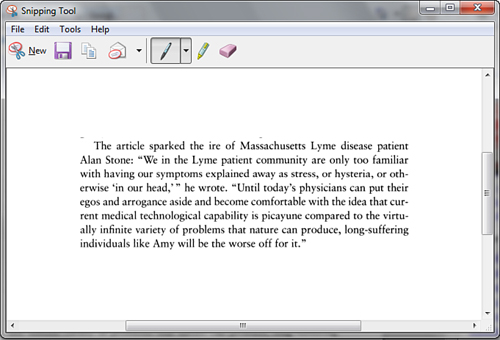
After you select the area, the snipped area will automatically be sent to a separate window, the Snipping Tool editing window, shown in Figure 7.12. This window will allow you to draw on, erase, highlight, and save the snipped area.
Figure 7.12 In the Snipping Tools editing window, make the edits you like before saving.
Tip
![]()
For quick access to the Snipping Tool, assign a shortcut key to it, such as Shift+Ctrl+S. To do this, right-click the shortcut in the Start menu and choose Properties. Click the Shortcut Key box and press any combination. (Some combinations will not register because they are assigned to other functions.)
When saving the snip, you are offered a variety of file extensions. You can save the snip as an HTML, PNG, GIF, or JPEG file.
Choose Tools, Options for some goodies. For example, if you choose Include URL Below Snips (HTML only), take a snip of an Internet Explorer page, and save the snip as a Single HTML or MHT file, the URL of the page will be displayed below the snip. This is an excellent way of sending bits of a web page to people without requiring that they view the web page in a browser. Simply paste the snip into an email message. This only works on HTML-formatted web pages, incidentally.
Tip
![]()
If you do a lot of partial screen capturing, the Snipping Tool is quite handy. If you are always capturing the whole screen, however, a quicker trick is to press Alt+Print Screen, which will capture the current active window only and send it to the Clipboard. Then switch to your target application (I use Paint, for example, for images in this book) and press Ctrl+V to paste it in.
Once a snip is saved, you can reopen the snip with your browser (for HTML files) or your Paint program (for files with picture extensions). You also can copy snips directly from the Snipping Tool window and paste them anywhere as a picture type. This is a great feature if you have to copy a few words out of a document that is in a picture format or PDF. Snipping tools really benefit tablet users because a stylus pen makes snips more precise.
Exploring the Other Accessories
As you likely already know from using Windows in the past, a number of other freebie accessories come with Windows. Some are useful and some end up lying fallow for many PC users who never even know they exist. These little apps have been carried forward from generations of Windows going back to when I started writing about it with Windows 3.0. Because they are so well known by this point, we won’t tie up book pages here with the detailed descriptions used in our past books. It will suffice here to briefly tell you what each does. Some of them, such as Calculator, Paint, and WordPad, deserve extra merit here because they were seriously updated for Windows 7.
The following sections provide a brief rundown of each program.
Narrator
This is an Accessibility tool that helps the visually impaired read text on the screen, because the computer reads aloud to you, in a synthesized voice. Obviously, you need speakers or a headset to hear this. Run Narrator by typing narr at the Start menu and clicking Narrator. Be careful, because the program will describe every item on the screen, and say the name of every key you press. Fine-tune the categories of events and text that this utility reads aloud via the Preferences menu.
Magnifier
This is an Accessibility tool that helps the visually impaired see a selected portion of the screen or all of the screen better by increasing the size of text and graphics. Simply press the Windows key (or click the Start button) and type mag and you will see the application name pop up. Click it. A small application window will appear, as shown in Figure 7.13.
Figure 7.13 The Magnifier application window is very tiny. From here, adjust settings as desired to magnify a portion of the screen or the entire screen, and set the magnification level. You can also choose how the magnification “lens” follows the mouse movements and text cursor.

There are two modes of operation: Full Screen and Lens. The first magnifies the whole screen, and the screen will pan and scan as you move the mouse beyond the edge of the screen. Lens mode will enlarge only the screen area under the mouse as it moves. See Figure 7.14 for an example. We have turned on the Color Inversion option in the Options dialog box for this effect.
Figure 7.14 The Magnifier in Lens mode with Color Inversion turned on.
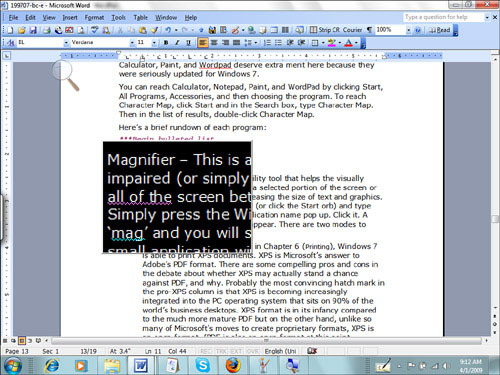
In Lens mode, there is a magnifying glass icon on the screen. Mousing over that will reveal a >> symbol. Click that to reveal the Magnifier window again in order to increase or decrease magnification with the + and − buttons. Click the gear icon to set options. Options include specifying the size of the lens (in height and width) and setting the multiplier for magnification when you click the + or − button. A nice feature for typists is that the magnifier lens can be set to follow the text insertion point.
Tip
![]()
With the advent of the little-screened “netbooks” that have become increasingly popular, Magnifier is a timely tool. Screens on netbooks are very small and often sport high resolution (translate: everything on the screen is miniscule!). Everyone who uses a netbook can potentially benefit from using this tool.
XPS Viewer
As was discussed in Chapter 6, “Printing,” Windows 7 is able to print XPS documents. XPS is Microsoft’s answer to Adobe’s PDF format. There are some compelling pros and cons in the debate about whether XPS may actually stand a chance against PDF, and why. Probably the most convincing hatch mark in the pro-XPS column is that XPS is becoming increasingly integrated into the PC operating system that sits on 90% of the world’s business desktops. XPS format is in its infancy compared to the much more mature PDF, but on the other hand, unlike so many of Microsoft’s moves to create proprietary formats, XPS is an open format. (PDF is also an open format at this point, although many people are under the misconception that PDF is a proprietary Adobe format.) This should assist XPS in getting a toehold in the otherwise PDF-dominated world of portable documents.
What this means is that you can simply print a document to the Microsoft XPS Document Writer and name the output file. You can then email or otherwise send that file to other computers or users who have the XPS Viewer installed (for XP users it is a download). In Vista, you were able to view XPS documents either in a viewer that was hosted within Internet Explorer 7 or in the supplied XPS Viewer. In Windows 7 the same is true except that the XPS Viewer has been updated. Not as sophisticated as Adobe Reader or Acrobat by far, the XPS Viewer in Windows 7 only allows you to search an XPS document for a word or phrase, zoom in and out, digitally sign documents, and set document permissions. Adobe isn’t quaking in its boots yet, but it took over a decade for PDF to mature, so XPS has some catching up to do.
To run the XPS Viewer, click the Start button and type XPS. You should see it listed. Alternatively, click All Programs and click XPS Viewer. Of course, because of the file association set up for XPS files, clicking one will open the document in the XPS Viewer. Trying to digitally sign a document will fail unless you own a digital signature. Choose Permissions, Set Permissions, and this will lead you to Windows Live ID and the Windows Rights Management Wizard, where you can sign up for one. This will activate your machine. You can then specify permissions for the file. If you are a viewer of the document, you can see what permissions you have been granted.
Calculator
Up until Windows Vista, Calculator was a quick-and-dirty onscreen version of two traditional pocket calculators: a standard no-brainer calculator (Standard mode) and a more complex scientific calculator (Scientific mode) used by statisticians, engineers, computer programmers, and business professionals. These two modes were good for calculating your lunch bill, a list of inventory items, or the mortgage payment on your office building, but neither sported a running tape that you could use to backtrack through your calculations. Now, in the new version of Calculator that is completely updated for Windows 7, there are additional modes, views, and options. While most users will only require standard calculations, there is the previously available Scientific mode as well as a Statistics mode and a Programmer mode. Calculator will also do unit conversions for you—both date conversions and measurement conversions. For example, you can enter two dates and the application will calculate the number of years, months, weeks, and days between them. Unit conversion is extensive, including options for angle, energy, length, power, pressure, temperature, time, velocity, volume, and weight. Each of these categories has between 5 and 14 different target conversion units. For example, you can convert between foot-pounds/min to watts.
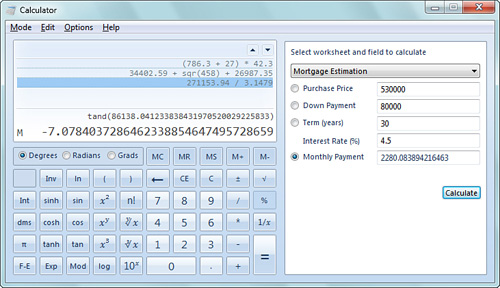
One of the best features of the new Calculator is that it has a larger screen that displays the history of calculi and lets you clear as well as edit them. We have all waited a long time for this. How many times have you been adding a list of numbers and wondered if you made an error in entry? One of the best features of the running “tape” is that you can backtrack and edit your entries after the fact by double-clicking that entry’s line on the tape. If you do so, the application will display the original calculation result and the altered result when you press Enter, so you can easily compare them.
Finally, there is a Template mode that offers three calculation templates: Gas Mileage, Lease Estimation, and Mortgage Estimation. Plug in a few variables and click Calculate and you have your result. For example, provide the values for distance and fuel consumption, and your miles per gallon is calculated. With Lease Estimation things are pretty much the same, only there are more fields to fill in: lease value, period of time, number of payments per year, residual value, interest rate, and periodic payment. The same principle applies for Wage and Mortgage Estimation. Figures 7.15 and 7.16 show examples of two Calculator modes and templates.
Figure 7.15 Calculator in Programmer mode with the Template set to Length conversion.
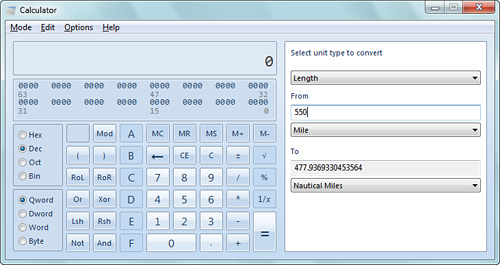
Figure 7.16 Calculator in Scientific mode and Template set to Mortgage Estimation. Notice the running “tape” in the left pane. Double-clicking an entry allows you to edit an entry to correct it or to do a “what if?” adjustment without reentering everything.
Character Map
Character Map is a utility program that lets you examine every character in a given font and choose and easily insert into your documents special characters, such as trademark (™ and ®) and copyright symbols (©); foreign currency symbols (such as ¥), accented letters, and nonalphabetic symbols (such as fractions, ¾); DOS line-drawing characters (+), items from specialized fonts such as Symbol and Wingdings; or the common arrow symbols (←, →, ↑, and ↓). Some fonts include characters not mapped to the keyboard. Character Map lets you choose them, too, from its graphical display. The Program Map displays Unicode, DOS, and Windows fonts’ characters. You can choose the character set, rearrange the items in a font (such as grouping all currency types together) to eliminate hunting, and search for a given character. Character Map works through the Windows Clipboard. You simply choose a character you want to use, click Copy, and it moves onto the Clipboard. Switch to your destination application (typically a word processing file), position the cursor, and choose Paste. To reach Character Map, click Start and in the Search box, type Character Map. Then, in the list of results, double-click Character Map.
Paint
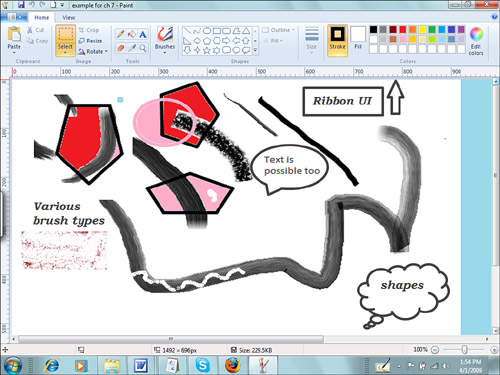
This is another perennial Windows accessory that, like Calculator and WordPad, Microsoft finally realized either had to be updated or put out to pasture. With so many free pixel editing programs around, one wonders why it is necessary to keep Paint out of the pasture, but perhaps it’s to show off the new “ribbon” interface and help Windows 7 look more unified. The ribbon was introduced and popularized by Office 2007. We personally dislike the ribbon because it uses up increasingly precious vertical screen real estate (as we see more wide screens on laptops and monitors) and because it rearranges itself and messes with what was a good thing—menus and commands that stay put. But alas. The version of ribbon integrated into Paint and WordPad with Windows 7 is called the “Scenic Ribbon.”
Essentially, Paint is a simple drawing program that creates and edits bitmapped images in a variety of formats. Using free-form drawing tools, text, and special effects, you can create projects such as invitations, maps, signs, and wallpaper for your desktop, and you can edit images linked into documents created by other programs. Paint is called a bitmapped image editor. Your computer’s screen is divided into small dots (pixels or pels) that are controlled by the smallest division of computer information—bits. A bitmap is a collection of bits of information that creates an image when assigned (mapped) to dots on the screen. This bitmap is similar to one of those giant electronic billboards in sports arenas that can display the score, a message, or even a picture by turning on and off specific light bulbs in the grid.
Being a bitmapped drawing program, rather than an object-oriented drawing program such as Adobe Illustrator or CorelDraw, Paint has some significant limitations to keep in mind—also some advantages. After you paint a shape, you can’t move it independently. You can use the computer to remove an area of the painting and place it somewhere else—as if you were cutting out a piece of the canvas and pasting it elsewhere. But all the dots in the area get moved, not just the ones in the shape you’re interested in. Paint can store output in a variety of formats: BMP, DIB, JPG, TIF, GIF, and PNG.
Paint for Windows 7 is the tenth iteration of Paint included in a Windows OS (originally called Microsoft Windows Paint in Windows 1.0) though it is dubbed version 6.1. (Vista’s version was 6.0.) In addition to the new toolbar previously mentioned, including a configurable Quick Access Toolbar (QAT), Paint now also has full PNG alpha channel compatibility. People who work with transparent color channels in PNG files will appreciate this, perhaps eliminating the need for an additional image editing program in their software suites. There are also now 9 brush types instead of 12 (as in the XP and Vista versions) but those brushes are much more expressive. Whereas they used to be just shapes, now they are textures such as waterbrush, crayon, oil brush, highlighter, and pencil. There are now 23 predefined smooth-drawing shapes instead of just 4. Figure 7.17 shows a screenshot of Paint.
Figure 7.17 The new Paint version 6.1 further promotes the Microsoft “ribbon” user interface and adds a few useful and expressive features.
Notepad
Notepad is a simple, no-frills text editor that does no fancy formatting (though it does enable you to change the display font) and is popular for composing “clean” ASCII (.txt) files. I use Notepad to jot down quick notes. You could say Notepad is a text editor, whereas WordPad (see the following discussion of WordPad) is a word processor. Unlike WordPad, Notepad cannot view or edit Microsoft Word (.doc) or Rich Text Format (.rtf) files. It’s a perfect tool to call up whenever you need to view a simple README.TXT file or fine-tune some program code (programmers like this tool). Although they’re visually boring and lackluster, text files do have some important advantages over formatted text documents. Most importantly, they are the lowest common denominator for exchanging text between different programs and even between different types of computers. Literally any kind of word processor and many other types of programs, from email tools to databases, can share textual information using simple text files, regardless of computer type or operating system. To be sure your recipients who are using other kinds of computers can read a text email attachment or a text file on a disk, stick with the simple text files such as the ones Notepad creates. Windows recognizes any file with a .txt extension as a text file and opens it in Notepad when you click it.
Sticky Notes
Using Sticky Notes is analogous to using physical Post-It Notes. You might take their function for granted because they look like simple Post-It Notes. However, they are quite sophisticated and can be a boon to Tablet users. As of Windows 7, Sticky Notes works with pen input (write directly on the notepad) as well as keyboard typing. When you reach the edge of the note using the stylus, the note will enlarge as necessary to accept your handwriting or drawing. Scratchout gestures have been implemented as well. Sticky Notes can be organized as a stacked pad of notes. So, instead of having many different notes stuck on your physical desk or on the edges of your computer monitor, you have just one little pad and can easily scroll through all the notes. This enables you to write whatever you want and even draw a small picture. Take Sticky Notes into consideration the next time you need to jot down a list of important items, such as a grocery list. Click the Sticky Notes icon on the taskbar to alternate between showing and hiding all your notes.
Another neat feature of Sticky Notes is its capability to record a sound. This sound is stored by the Sticky Note and can be played as many times as you want or need. Little verbal reminders can be a great way to keep you updated. To leave a short verbal reminder, click the red Record dot and Sticky Notes will start recording. Click the stop button when you are done recording or when the time of recording has run out.
To play the sound, click the Play button. The recording will be deleted only when you delete the note or record over the sound.
WordPad
For more capable word processing than Notepad can accomplish, you can use WordPad. Many people think they need to purchase Microsoft Office (which includes Microsoft Word) to do serious word processing, and Microsoft would love you to do so, but it is not necessary. Though it’s not Microsoft Word, WordPad works fine for most everyday writing chores. And now with the updated Windows 7 version that includes some tasty additions, this is even truer. As mentioned elsewhere in the book, WordPad also now includes the Scenic Ribbon that debuted with Office 2007, supposedly easing use.
Note
![]()
To get around the display issue stated above, you can download the free Word Viewer program from Microsoft. Search microsoft.com for Word Viewer. You want the download named “Word Viewer,” not “Word Viewer 2003.” Also download and install the Microsoft Office Compatibility Pack for Word, Excel, and PowerPoint 2007 File Formats. Together, these two downloads let you open, view, and print any Microsoft Word program with all formatting intact. (There are similar free viewer downloads for Excel and PowerPoint.) With the Word Viewer and the Compatibility Pack installed, you can open, view, and print any Microsoft Word document; you just won’t be able to edit or save it.
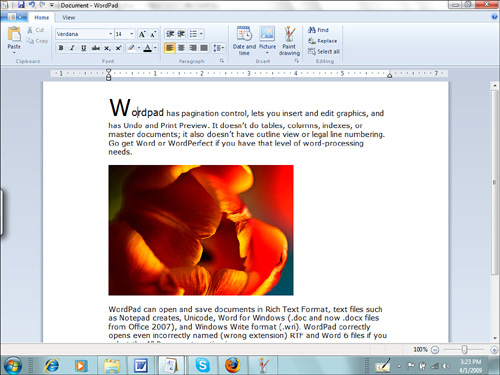
WordPad offers most of the formatting tools people need for typical writing projects, and the price is right. You can edit documents of virtually any length, it supports drag-and-drop editing, and it can accept graphics pasted into it from the Windows Clipboard. WordPad enables you to do standard character formatting of font, style, and size; paragraph formatting of line spacing, indents and margins, bullets, justification, and right and left alignment; adjust tab stops; search and replace; and insert headers and footers. It has pagination control, lets you insert and edit graphics, and has Undo and Print Preview.
WordPad doesn’t do tables, columns, indexes, or master documents; it also doesn’t have outline view or legal line numbering. Go get Word or WordPerfect if you have that level of word processing needs. WordPad can open and save documents in Rich Text Format, text files such as Notepad creates, Unicode, Word for Windows (.doc and now .docx files from Office 2007), and Windows Write format (.wri). WordPad correctly opens even incorrectly named (wrong extension) RTF and Word 6 files if you select the All Documents option in the Files of Type area in the Open dialog box or type the document’s full name. If WordPad doesn’t detect a file’s format, it opens it as a text-only file. Note that if a document contains formatting information created by another application, it will likely appear as garbage characters mixed with the document’s normal text.
As of Windows 7 (WordPad 6.1) it is now easier to insert pictures by simply clicking a Picture button on the Home ribbon. See Figure 7.18. However, the more-extensive Insert menu of version 6.0 is gone. In the old WordPad it was possible to easily insert all kinds of object items such as PowerPoint slides, Excel spreadsheets and charts, Word documents (if you had Office installed, obviously), and other OLE objects right into a WordPad document. With WordPad 6.1 your options (at least via the ribbon and menu) are limited to pictures and date/time, although the Paint Drawing button on the ribbon makes it very easy to cook up a graphic right there in your document. Just click the button, do your drawing in Paint, and click the red X to close the Paint window. Your image is dropped into the WordPad document. Resize and reposition as necessary.
Figure 7.18 WordPad 6.1 features the Scenic Ribbon and makes dropping in or creating pictures easier. But it still has its limitations.
