
35. Hitting the Road
Windows Unplugged: Mobile and Remote Computing
Some people predict that some day, a global Internet will cover every inch of Earth’s surface, giving us an always-on, always-available stream of data they call the “Evernet.” We’re not quite there yet, but today the Internet is available in pretty much any city you might visit, and it has become easy to stay in touch with home while you’re traveling.
Windows 7 supports you when you’re away from home or the office with some pretty spiffy portability and networking features, including these features that are covered in other chapters:
• Wireless networking support lets Windows 7 stay connected when you’re on the go. This was covered in Chapter 34, “Wireless Networking.”
• Windows 7 makes it easier to use a portable or laptop computer to make business or school presentations. Presentations are covered in Chapter 36, “Meetings, Conferencing, and Collaboration.”
• Windows 7 has a nifty Remote Desktop feature that lets you use your own computer from somewhere else, over the Internet. This is covered in Chapter 37, “Remote Desktop.”
This chapter covers several other Windows 7 features, which are mostly related to mobile (portable, laptop, notebook, or tablet) computers:
• For laptops, the Windows Mobility Center puts a bunch of important settings in one window so you can manage your computer’s display, power consumption, and networking features.
• Dial-up and VPN networking let you access a remote network when you’re traveling, and you can even set up remote access to your own home or office network.
• The Offline Files feature lets you automatically keep up-to-date personal copies of files that are stored on network folders, so you really can “take it with you.”
Let’s start with the Mobility Center.
Managing Mobile Computers
Mobile computers (which I also call laptops, notebooks, or portables) are no longer an expensive perk provided only to jet-setting executives. They’re now standard equipment for most people who work at least part time out of their office, and consumers now buy more portable computers than desktops for home and personal use. Consequently, portables have become powerful and inexpensive, and support for their special needs by Windows has grown considerably.
Windows Mobility Center
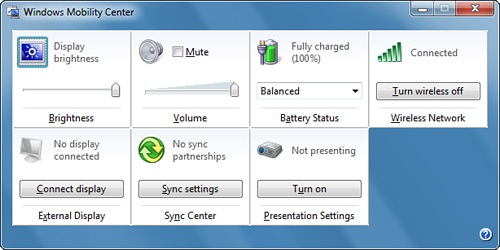
If you have a mobile computer (that is, a notebook, portable, tablet, or laptop computer), you’ll find that Windows 7 provides a tool called Windows Mobility Center and a special control panel that desktop computers don’t have. To open the Mobility Center, shown in Figure 35.1, click Start, All Programs, Accessories, Windows Mobility Center.
Figure 35.1 Windows Mobility Center is found in the Accessories menu.
Tip
![]()
You can bring up the Mobility Center by pressing Windows+X. If you use the Mobility Center a lot, you can open it, right-click its icon in the taskbar, and select Pin This Program to Taskbar so that it is easily accessible.
The Mobility Center is designed to bring together in one window most of the settings that you’ll want to change while using your computer remotely. The settings pertain mostly to power management, so you can make your laptop’s battery last as long as possible, and display management, because many people use their laptops to make business and school presentations. Your computer’s Mobility Center may display some or all of the following controls:
• Brightness—The slider lets you increase or decrease your screen’s backlight brightness. A lower setting should make your computer run longer on its battery charge. Windows remembers separate brightness settings for battery and AC-powered operation, stores them as part of a power profile, and resets the brightness when the power status changes. You can fine-tune the setting with this control.
• Volume—The slider controls your computer’s speaker volume and the Mute check box lets you instantly shut the sound off. This may be useful, for example, if you’re in a meeting and someone keeps sending you noisy IM pop-ups.
• Battery Status—The icon shows you whether you are running on AC or battery-only power. (The power plug in the icon shown in Figure 35.1 indicates that the computer is on AC power.) The battery icon and the text tell you the battery’s charge level. The drop-down list lets you select a power profile. Power profiles let you choose a balance between lower power consumption and greater performance. We’ll discuss power profiles in more detail in the next section, “Getting the Most Out of Your Battery.”
• Wireless Network—The icon shows whether you have an active wireless network connection, and the button can enable or disable your computer’s wireless adapter to conserve power or gain privacy. If your laptop has a physical switch that turns the wireless adapter on and off, it’s likely that both the switch and this setting have to be turned on for the wireless adapter to work.
• Screen Rotation—On tablet PCs, this control lets you switch the display between portrait (taller than wide) and landscape (wider than tall) orientation. Generally, in portrait orientation it’s easier to read documents, and in landscape it’s easier to watch movies.
• External Display—When an external display monitor or projector has been connected to your computer’s external display connector, this control lets you choose to turn the external display off, have the display mirror what’s on your laptop’s screen, or treat the display as an extension of your built-in display desktop space. This lets you control what attendees see when you’re making a presentation. We’ll discuss External Display in more detail in Chapter 36.
• Sync Center—The Sync Center is used to copy files to or from an external device like a Windows Mobile handheld device, or to update copies of network server files that you’ve obtained using the Offline Files feature. We’ll discuss Sync Center later in this chapter, under “Offline Files.”
• Presentation Settings—When you turn Presentation Settings on, Windows suppresses some behaviors that could disrupt your presentation. We’ll discuss Presentation Settings in Chapter 36.
Note
![]()
Your computer manufacturer may have added additional controls not listed here.
In addition, the Hardware and Sound Control Panel window has some sections that are especially helpful to know about if you have a mobile PC. Some of the settings you might want to remember are as follows:
• Power Options—Lets you select a power profile. We’ll discuss this in the next section.
• Change What the Power Buttons Do (under Power Options)—Lets you choose whether the computer shuts down or goes into Sleep, Hybrid Sleep, or Hibernate mode when you press your portable computer’s power button or close its lid while it’s running. We’ll discuss this in the next section, too.
• Adjust Settings Before Giving a Presentation—Lets you specify types of interruptions that you want to prevent during presentations. This will be discussed in more detail in Chapter 36.
Getting the Most Out of Your Battery
The central processor unit (CPU) chip and graphical processor unit (GPU) chip can be the two biggest energy guzzlers in a computer, but in most cases, they spend little of their time actually working. For example, as I type this chapter, my computer’s CPU takes less than a millisecond to react to each keystroke and update the display. The CPU and display processor might be occupied with useful work much less than 0.1% of the time. Laptop processors take advantage of the relatively long lulls by slowing their processing speed or clock speed way down between bursts of activity, and this significantly reduces power consumption.
Additionally, laptops can conserve energy by dimming the backlight lamp that illuminates the display, and by turning off hardware devices like the disk drive, DVD or CD drive, network adapter, and modem when they are not actively being used—even the devices’ interface electronics can be shut down.
Of course, when you’re watching a movie (which requires a lot of processor effort to decode the DVD’s data into millions of pixels per second) or performing heavy-duty calculations, power consumption can go way up.
On Windows 7, you can adjust how Windows manages hardware power consumption, and how fast the processor is allowed to run, by creating power profiles, which are collections of settings that can be applied in different situations. Out of the box, Windows 7 enables you to choose between three profiles:
• Balanced—Select this profile to strike a fair balance between power savings and performance. You’ll still get full processing power when it’s needed.
• Power Saver—Select this profile when you want to extend the battery life as long as possible, even if it noticeably slows the processor and eliminates some graphical effects.
• High Performance—Select this profile when you want maximum speed even when your computer is running on battery power. (This option might be hidden until you click the arrow next to Show Additional Plans.)
Note
![]()
If you have a scenario that’s begging for its own profile, you can add a new one to this list. To do so, view the Power Options control panel and click Create a Power Plan in the left pane.
To view the power profiles, click Start, Control Panel, Hardware and Sound, Power Options. This will display the Select a Power Plan screen, which lets you select the profile you want to use at any given time.
To select what settings are put into effect by each profile, click the phrase Change Plan Settings next to a profile name. This displays the window shown in Figure 35.2. Here, you can select how long Windows should wait before darkening the screen and putting the computer to sleep when idle, under AC power, and battery power. You can use the slider at the bottom to adjust the screen brightness for battery-powered operation.
Figure 35.2 On the Edit Plan Settings page, you can adjust various power-saving timers.
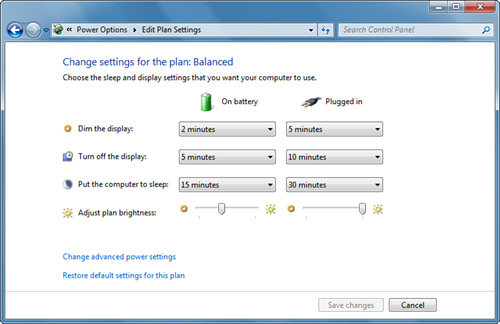
If you rarely stop while you are actually working, but tend to leave for a while when you do stop, you might gain additional battery life by reducing the time before turning off the display or shutting down when on battery power. Dimming the display can help, too, if you’re not working outdoors.
To really change the speed versus power compromise, click Change Advanced Power Settings to get the dialog box shown in Figure 35.3. Here, you can change quite a number of power-related delays and rates. Each setting has two values: one to use when on AC power, and another to use when on battery power. Start by clicking Change Settings That Are Currently Unavailable to gain access to the entire list of settings.
Figure 35.3 The Power Options Advanced Settings dialog box lets you adjust power management settings for a large number of specific devices.
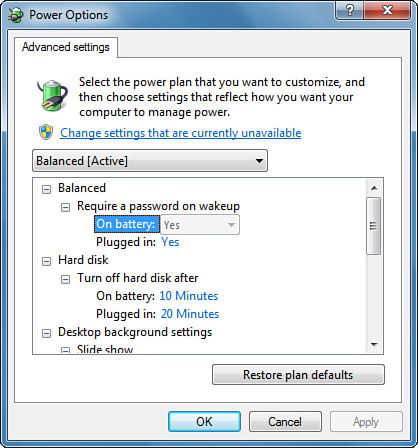
If you really do love tweaking, you might want to look at some of the more interesting advanced settings:
• Hard Disk—Set the time that the disk is allowed to spin after being used. The default time on battery is 3 minutes. If your usage pattern usually spins the disk right back up just after it shuts down, you might increase this time.
• Wireless Adapter Settings—You can choose any of four settings, from Maximum Performance to Maximum Power Saving (and presumably slower and less reliable data transfer). If your wireless access point is nearby, Maximum Power Saving might help extend battery life.
• Sleep—Hybrid Sleep is a mode in which Windows will wake the computer up after a certain time in Sleep mode (the Hibernate After time) and perform a full hibernate. You can extend battery life by reducing the Hibernate After time. The trade-off is that Windows takes longer to start up after hibernating.
• Processor Power Management—You can set the lowest and highest processor states (speeds), in terms of % of maximum speed. Setting a low minimum speed increases battery life without costing much in performance. Reducing the maximum speed helps battery life but also takes a bite out of performance.
• Multimedia Settings—If you use Windows Media Sharing, this setting can prevent Windows from going to sleep while it’s sharing media. Sleep cuts off your remote players.
• Battery—You can select the battery percentage levels at which Windows takes action to warn you about power loss or shutdown, and what actions to take at low and critically low power levels. You should not select Sleep as the Critical Battery Action, because Windows might not be able to keep system RAM alive when the battery level falls even further.
Note
![]()
When Hybrid Sleep is enabled (the default setting), the shutdown options on the Start menu and in the Change What the Power Buttons Do control panel applet list Sleep as a choice but not Hibernate, because hibernating is automatic in this case. If you want to manually control when Windows sleeps and when it hibernates, you must disable Hybrid Sleep. Then, the Start menu’s shutdown button and the power button setup applet will offer Hibernate as an option. If you disable Hybrid Sleep, you must remember to manually shut down or hibernate your computer if you’re not going to be using it for an extended time.
VPN and Dial-Up Networking
Windows can connect to a remote Windows network via a modem or via a protected connection that’s routed through the Internet called a virtual private network (VPN). Using these services, all file sharing, printing, and directory services are available just as if you were directly connected (albeit much slower in some cases). Just connect, open shared folders, transfer files, and use email as if you were “there,” and then disconnect when you’re finished.
The receiving end of a VPN or a Dial-Up Networking connection is usually handled by the Remote Access Services (RAS) provided by Windows Server or third-party remote connection devices manufactured by networking companies such as Cisco and Lucent. But Windows 7 (as well as Vista and XP Professional) comes with a stripped-down version of RAS so you can set up your own Windows computer to receive a single incoming modem or VPN connection. You can use this, for example, to get access to your office computer and LAN from home, provided that your company’s security policies permit this.
You learn how to allow incoming connections later in the chapter.
Virtual Private Networking
Most of us are familiar with using a modem to connect a computer to the Internet. Establishing a dial-up networking or VPN connection is no different; the remote network is just a bit smaller than the Internet.
Virtual private networking deserves a bit more explanation. In a nutshell, a VPN lets you connect to a remote network in a secure way. A VPN creates what is effectively a tunnel between your computer and a remote network, a tunnel that can pass data freely and securely through potentially hostile intermediate territory like the Internet. Authorized data is encapsulated in special packets that are passed through your computer’s firewall and the remote network’s firewall, and is inspected by a VPN server before being released to the protected network.
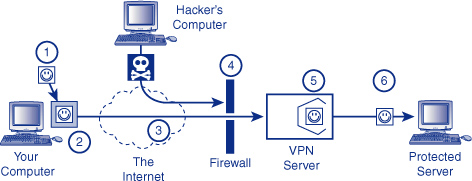
Figure 35.4 illustrates the concept, showing a VPN connection between a computer out on the Internet and a server on a protected network. The computer sends data (1) through a VPN connection that encapsulates it (2) and transmits it over the Internet (3). A firewall (4) passes VPN packets but blocks all others. The VPN server verifies the authenticity of the data, extracts it (5), and transmits the original packet (6) on to the desired remote server. The encapsulation process allows for encryption of your data, and allows “private” IP addresses to be used as the endpoints of the network connection.
Figure 35.4 A virtual private network encapsulates and encrypts data that is passed over the Internet.
VPN connections work like dial-up connections. After you have an Internet connection established (via modem or a dedicated service), Windows establishes the link between your computer and a VPN server on the remote network. After it’s connected, in effect, you are a part of the distant LAN. The connection won’t be as fast as a direct LAN connection, but a VPN can be very useful for copying files and securely accessing Remote Desktop connections.
Note
![]()
Several companies manufacture VPN software and hardware solutions, some of which are faster and provide better management tools than Microsoft’s VPN system. If your organization uses a VPN product purchased from a company such as Juniper Networks or Cisco Systems, you’ll have to follow their instructions for installing and using their VPN software.
Windows Server and Windows 7 come with VPN software built in. In the next section, I describe how to use Microsoft’s VPN system.
Setting Up a VPN or Dial-Up Networking Connection
To create a VPN or dial-up connection to a remote network or computer, you need a working Internet connection or modem, respectively. You learned how to install both of these in Chapter 13, “Getting Connected,” so if you haven’t done so already, start there to install and configure your modem and Internet connection.
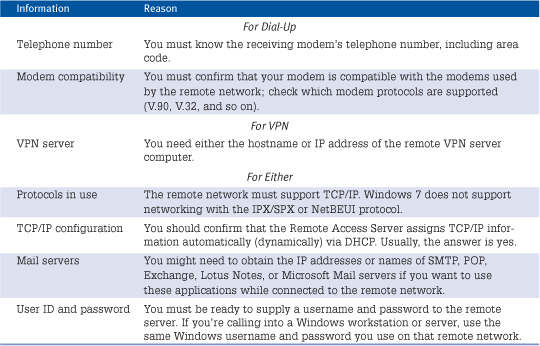
You also must get or confirm the information shown in Table 35.1 from the remote network’s or computer’s manager.
Table 35.1 Information Needed for a VPN or RAS Dial-Up Connection
Armed with this information, you’re ready to create a connection to the remote network. To do so, follow these steps:
1. Click Start, Control Panel, Network and Internet, Network and Sharing Center. Alternatively, click the network icon in the taskbar (near the time of day), and select Open Network and Sharing Center.
2. Under Change Your Networking Setting, select Set Up a New Connection or Network.
3. Select Connect to a Workplace and click Next.
4. Select No, Create a New Connection and click Next.
5. For a VPN connection, select Use My Internet Connection (VPN). For a dial-up connection, select Dial Directly.
6. If you are setting up a VPN connection, enter the hostname or the IP address of the remote VPN server.
If you are setting up a dial-up connection, enter the telephone number of the remote computer, including area code, in the appropriate format. For telephone numbers in the North American Numbering Plan, the format is (###) ###-####, where # represents a digit. Then click Dialing Rules to double-check that your current location and area code are set correctly. Change it if necessary, and click OK.
7. Change the Destination Name from “Dial-up Connection” or “VPN Connection” to something meaningful to you, such as “Dial-up office network” or “VPN to Big Client.”
8. If you want to make the connection available to other users of your computer, check Allow Other People to Use This Connection. If your network uses Smart Card authentication (your network administrator will tell you so), check Use a Smart Card. You will usually not need to check either of these.
9. Check Don’t Connect Now; Just Set It Up So I Can Use It Later. Then click Next.
Tip
![]()
Windows 7 makes it easy to establish network connections. As I just mentioned, you can open the Network Connections pop-up from the Network and Sharing Center. But you can also bring it up these ways:
• Click the network icon in the taskbar. This is the easiest way.
• You customize your Start menu to display the Connect To selection. Then, click Start, Connect To.
10. Enter the username and password that you use when logging on to the remote computer, or use the name and password assigned by your network administrator. If this is a Windows domain logon, enter the domain name in the Domain (Optional) field. You can check Show Characters if you want to be sure that you typed the password correctly.
If you want to have Windows remember the password so that you can connect without having to type it every time, check Remember This Password. However, if earlier you checked Allow Other People to Use This Connection, this would let others connect using your network credentials, so think carefully whether you want to allow that.
11. Click Create, then click Close.
Now, in the Network and Sharing Center window, click Connect to A Network. This opens the Network Connections pop-up window. There should now be an entry for the new connection. Before you use it, you should view and check its properties settings, as described in the next section.
Note
![]()
In most cases, the remote network will be a corporate network, so the connection’s Network Location should be Work. This was set when you used the Connect to a Workplace option to create the connection; the Connect to the Internet option makes a Public network connection. You shouldn’t need to change this setting, but if you do, oddly enough, you can’t change it until after you’ve established the connection. If you need to change the network location to Home (so that you can use a homegroup) or Public (to disable file sharing), establish the connection, then open the Network and Sharing Center. Click on the word Work under the established connection, then select a different location.
Setting a VPN or Dial-Up Connection’s Properties
To edit the properties of a VPN or dial-up connection, open the Network Connections pop-up window as discussed in the preceding paragraph, right-click a connection, and select Properties.
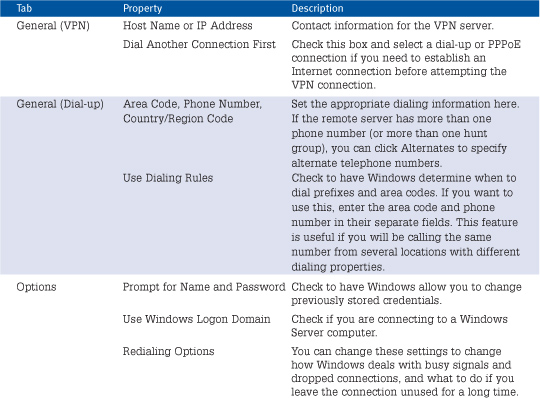
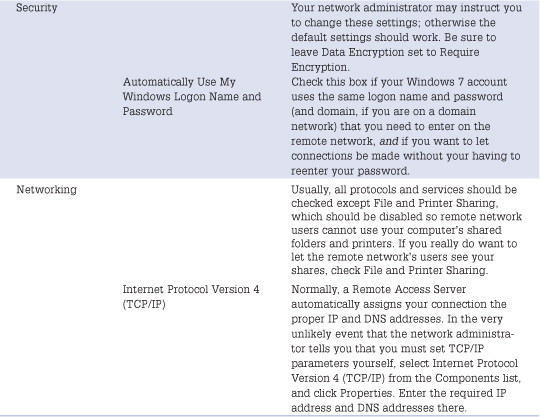
A connection’s properties dialog has five tabs and a heap o’ parameters. Most of the time, the default settings will work correctly, but you might need to change some of them. I’ve listed the most important parameters in Table 35.2.
Table 35.2 Important Dial-Up Connection Properties
Gateway Settings
If you are connecting to small network that has only one subnet (a range of network addresses), and if you want to browse the Internet while you’re also using the dial-up or VPN connection, you can change the connection’s gateway setting so that Windows won’t route connections to Internet hosts through the VPN or dial-up connection—this will speed up web browsing considerably. To change the gateway setting
1. Open the Network and Sharing Center. Click Change Adapter Settings. Right-click the VPN or dial-up connection and select Properties.
2. Select the Networking tab, select Internet Protocol Version 4, and choose Properties. Then click the Advanced button.
3. Uncheck Use Default Gateway on Remote Network.
You can make this change on more complex networks as well, but you’ll have to add routing information so that Windows knows which network addresses must be reached through the VPN connection and which are reached directly on the Internet. I explain how to make routing entries later in the chapter under “Advanced Routing for Remote Networks.”
After you’ve finished making any needed changes to the connection’s options, click OK. You can now double-click the icon to start the connection process. Or, just click the connection’s name in the View Network Connections pop-up window.
VPN Connection Fails Without Certificate
![]()
If you receive the message “Unable to negotiate the encryption you requested without a certificate” when you attempt to make a VPN connection, you are trying to connect to a VPN server with a higher level of encryption than your computer or the other computer is configured to carry out. Contact your network administrator to get the appropriate certificate installed.
Managing Dial-Up Connections from Multiple Locations
As you’ve seen already, Windows lets you enter your current telephone area code and dialing prefix requirements so that when you’re making modem calls, Windows uses the customs and prefixes appropriate for your local phone system. This capability is great if you use a portable computer. For example, at home, you might be in area code 415. At the office, you might be in area code 707 and have to dial 9 to get an outside telephone line. When you’re visiting Indianapolis, you’re in area code 317 and might need to use a telephone company calling card when making long-distance calls.
Tip
![]()
Set up and test the first access number you need. Then when you need to add a new access number, use this trick to copy the original connection’s settings: View the Network and Sharing Center, select Change Adapter Settings, right-click the original dial-up connection icon, and select Create Copy. Rename the new icon, and change its telephone number. I name my icons based on the location of the local number: Office-Berkeley, Office-Seattle, and so on.
When you travel and want to make a dial-up connection, select the appropriate dial-up icon and set your current Dialing Rules location before you click Dial.
Windows offers great support for these variations by letting you define “locations,” each with a separate local area code and dialing rules. As long as you’ve told Windows your current location, it will automatically apply the correct set of rules when making a dial-up connection.
![]() For instructions on establishing locations and dialing rules, see “Adjusting Dial-Up Connection Properties,” p. 340.
For instructions on establishing locations and dialing rules, see “Adjusting Dial-Up Connection Properties,” p. 340.
However, if you use an ISP with access points in various cities, or your company has different access numbers in various regions, you’ll find that this “locations” system does not let you associate a different dial-up number with each location. It would be great if it did, but no such luck.
Tip
![]()
If you travel, you’ll find that having your Internet Options set to dial a particular connection automatically is not a great idea. It would dial the chosen connection no matter where you were (and remember, if there’s a 50-50 chance of things going wrong, 9 times out of 10 they will). So, if you travel with your computer, you might want to open Internet Explorer and click Tools, Internet Options. Select the Connections tab and choose Never Dial a Connection. This way, you won’t be blindsided by an inadvertent call to Indiana while you’re in India.
If you use different “local” dial-up numbers for the various locations you visit with your computer, set up a separate Network Connections icon for each access number and use the appropriate icon when making a connection at each location.
Establishing a VPN or Dial-Up Connection
Making a remote network dial-up or VPN connection is no more difficult than connecting to the Internet.
Check Your Current Location
If you’re making a dial-up connection and you’ve changed area codes or phone systems since the last time you made a modem connection, check your location setting by following these steps before dialing into the network:
1. Open the Control Panel and type the word modem in the Search box. Then click Set Up Dialing Rules.
2. Check your current location in the list of configured dialing locations on the Dialing Rules tab.
3. Click OK to close the dialog box.
Windows should now use the correct area code and dialing prefixes.
Make the Connection
To connect to a remote network, follow these steps:
1. Click the network icon in your taskbar, or, alternatively, click Start, Control Panel, Network and Internet, Connect to a Network. Then, click on the name of the connection you wish to establish, and click Connect.
2. Windows will open the View Network Connections popup box, as shown in Figure 35.5. Enter your login name, password, and Windows domain name (if appropriate). You can also select Properties to adjust the connection’s telephone number or dialing properties. The Dialing From choice appears only if you checked Use Dialing Rules and have defined more than one dialing location.
Figure 35.5 In the View Network Connections popup box, enter your username and password for the remote network.
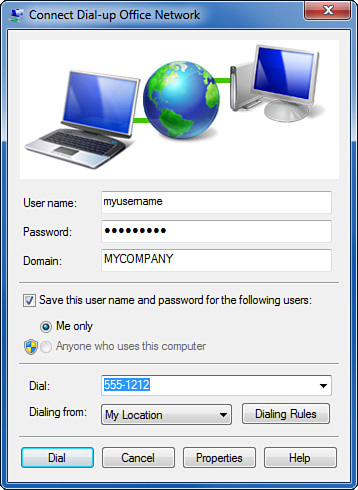
3. Click Connect or Dial. Windows shows you the progress of your connection as it dials or contacts the remote server through the Internet, verifies your username and password, and registers your computer on the remote network.
Tip
![]()
If you’re connecting to a remote Windows Server domain, if the Domain box doesn’t appear, enter domainusername or username@domain in the User Name field.
If the connection fails, unless you dialed the wrong number, you’ll most likely get a reasonable explanation: The password or account name was invalid, the remote system is not accepting calls, and so on. If you entered an incorrect username or password, you are usually given two more chances to reenter the information before the other end hangs up on you.
If the connection completes successfully, and you hover your mouse over the taskbar’s network icon, a small balloon will appear showing the active network connection. If you click on the network icon, you’ll see the dial-up or VPN connection in the list of active connections. To disconnect, just click the name, then click Disconnect.
You can now use the remote network’s resources, as discussed next.
VPN Connection Fails with Error Number 720 or 629
![]()
If you are trying to make a VPN connection to a computer you set up to receive incoming connections, and the connection fails with error 720 or 629, most likely the computer that you are using to establish the connection has an active LAN connection in the same network address range as the computer to which you’re connecting—even though the networks aren’t physically attached. It’s just an unfortunate coincidence. You must fix this at the VPN host computer. Right-click the Incoming Connections icon and select Properties. Select the Networking tab, highlight Internet Protocol Version 4, and select Properties. Uncheck Allow Callers to Access My Local Area Network, and check Select IP Addresses. Set the From value to 192.168.111.2 and the To value to 192.168.111.20.
Using Remote Network Resources
When you’re connected, you can use network resources exactly as if you were on the network. The Network folder, shared folders, and network printers all function as if you were directly connected.
The following are some tips for effective remote networking by modem:
• Don’t try to run application software that is installed on the remote network itself. Starting it could take quite a long time! (However, if you have previously connected directly to the network, and the Offline Files system is in use, you might have a cached copy of the application on your hard disk. Your network manager will set this up for you if it’s a reasonable thing to use.)
• If you get disconnected while using a remote network, it’s annoying to have to stop what you’re doing and reconnect. You can tell Windows to automatically reconnect if you’re disconnected while you’re working. To do this, open the View Network Connections popup by clicking on the taskbar network icon. Right-click the dial-up connection and select Properties. Select the Options tab, and check Redial If Line Is Dropped. Then click OK.
Tip
![]()
If you get disconnected while you are editing a document that was originally stored on the remote network, I suggest that you immediately use Save As to save it on your local hard disk the moment you notice that the connection has been disrupted. Then, when the connection is reestablished, save it back to its original location. This will help you avoid losing your work.
• You can place shortcuts to network folders on your desktop or in other folders for quick access.
• If the remote LAN has Internet access, you should be able to browse the Internet while you’re connected to the LAN. You don’t need to disconnect and switch to your ISP. You might need to make a change in your personal email program, though, as noted in the next section.
Email and Network Connections
If you use your computer with remote LANs as well as the Internet, or if you use different ISPs in different situations, you might need to be careful with the email programs you use. Most email programs don’t make it easy for you to associate different mail servers with different connections.
Although most email servers allow you to retrieve your mail from anywhere on the Internet, most are very picky about whom they let send email. Generally, to use an SMTP server to send mail out, you must be using a computer whose IP address is known by the server as belonging to its network. You can usually send mail out only through the server that serves your current connection.
See if your favorite email program can configure separate “identities,” each with associated incoming and outgoing servers. If you send mail, be sure you’re using the identity that’s set up to use the outgoing (SMTP) server that belongs to your current ISP, VPN, or dial-up connection.
Monitoring and Ending a VPN or Dial-Up Connection
To check the status of a dial-up or VPN connection, click the network icon in the taskbar, right-click the connection name, and select Status. This will display a dialog box showing the number of bytes sent and received.
To end a connection, click the network icon in the taskbar, click the connection name, then click Disconnect. Poof! It’s gone.
Advanced Routing for Remote Networks
As I discussed previously, if you use dial-up or Virtual Private Networking to connect to a remote network with more than one subnet, you usually must let Windows set the default gateway to be the remote network. Otherwise Windows won’t know which network hosts must be reached through the VPN or dial-up connection and which can be reached through your Internet connection. Unfortunately, all your Internet traffic will travel through the tunnel, too, slowing you down. The remote network might not even permit outgoing Internet access.
The alternative is to disable the use of the default gateway (as described previously under “Gateway Settings”), and then manually add routes to all subnets known to belong to the private network. To make these changes, you have to work in a Command Prompt window with elevated privileges: click Start, All Programs, Accessories. Right-click Command Prompt and select Run As Administrator. Then confirm the UAC prompt.
To add information about remote network subnets, use the route command, which looks like this:
route add subnet mask netmask gateway
The subnet and netmask arguments are the addresses for additional networks that can be reached through the gateway address gateway. To add a route, you must know the IP address and mask information for each remote subnet and your gateway address on the VPN.
You must get the subnet information from the network administrator on the remote end. You can find the gateway address from your own computer. Connect to the remote VPN and type ipconfig in the Command Prompt window. One of the connections printed should be labeled PPP Adapter, SSTP Adapter, or L2TP Adapter. Note the gateway IP address listed. This address can be used as the gateway address to send packets destined for all subnets on the remote network.
Suppose you’re connecting to a dial-up networking host through a connection named Client Net and you find these connection addresses:
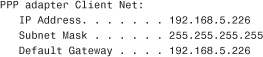
Now suppose you know that there are two other subnets on the remote network: 192.168.10.0 mask 255.255.255.0 and 192.168.15.0 mask 255.255.255.0. You can reach these two networks by typing two route commands:
![]()
Each route command ends with the IP address of the remote gateway address (it’s called the next hop).
Check your work by typing route print and looking at its output. In the IPv4 Route Table section, you should see only one destination labeled 0.0.0.0; if you see two, you forgot to disable the use of the default gateway on the remote network. Verify that the two routes you added are shown.
To avoid having to type all this every time, you can use another neat trick. You can put a rasphone command and route commands in a batch file, like this:

The rasphone command pops up the connection dialer. When the connection is made, the two routes will be added, and you’re all set. With this setup, you’ll need the network administrator to give you the real RAS gateway address of the remote VPN server to use as the “next hop” of the route commands. With a shortcut to this batch file, you can connect and set up the routes with just a click.
When you disconnect the VPN connection, Windows removes the added routes automatically.
Note
![]()
Setting up your computer to receive Microsoft VPN connections is fairly complex, as you can see from the following instructions. If you want to make VPN connections to your own computer, you might want to check out Hamachi, an alternative “zero configuration” VPN system, available at www.logmeinhamachi.com.
Incoming VPN and Dial-Up Access
Windows 7 has a stripped-down Remote Access Server (RAS) built in, and you can use it to connect to your computer by modem, or through the Internet, from another location using any computer running Windows 7, Vista, XP, or 2000. After you’re connected, you can access your computer’s shared files and printers just as you can on your home or office network. This incoming dial-up and VPN feature is available even on the Home versions of Windows 7. To use this feature, your computer must have a modem and/or a dedicated, always-on Internet connection. At most, one remote user can connect at a time.
Note
![]()
Windows Firewall doesn’t have to be told to permit incoming VPN connections, because it knows to let them in.
Setting up a modem to receive calls is straightforward: Just connect your modem to a phone line, and you can dial in from anywhere. Setting up an incoming Internet (VPN) connection is substantially more difficult because you need an always-on Internet connection, whose external IP address you know and can reach from the Internet at large. We talk about ways to establish an Internet hostname using static addressing or dynamic DNS providers in Chapter 37, so I won’t repeat that discussion here. Besides a discoverable IP address, you will also have to configure your Internet router or Windows Internet Connection sharing service to forward VPN data through the firewall to the computer that you’re going to set up to receive VPN connections. We’ll discuss this in more detail shortly, under “Enabling Incoming VPN Connections with NAT.”
Caution
![]()
Permitting remote access opens up security risks. Before you enable incoming access on a computer at work, be sure that your company permits it. In some companies, you could be fired for violating the security policies.
The process for enabling VPN access is the same as for enabling dial-in access. Let’s walk through that process now.
Note
![]()
The Add Someone button lets you create a username and password so that someone can connect remotely but not log on directly at the computer. The user will only be able to use network resources available to Everyone. You can only delete such an account using the Computer Management Local Users and Groups tool.
Setting Up VPN and Dial-Up Access
To enable VPN or dial-up access, follow these steps:
1. Open the Network and Sharing Center, and then click Change Adapter Settings.
2. If the standard menu bar (File, Edit, View, Tools, Advanced, Help) isn’t displayed, press and release the Alt key. Then click File, New Incoming Connection, and confirm the UAC prompt.
3. Select the user accounts that will be permitted to access your computer remotely. This step is very important: Check only the names of those users to whom you really want and need to give access. The fewer accounts you enable, the less likely that someone might accidentally break into your computer.
Caution
![]()
Under no circumstances should you enable Guest, HomeGroupUser$, IIS_USR, or a name that looks like IUSR_xxx, or IWAM_xxx for remote access. Check only the names of users who need access and who have good (long, complex) passwords.
4. After selecting users, click Next. Then select the means that you will use for remote access. Check Through the Internet to enable incoming VPN connections, and/or Through a Dial-Up Modem to enable dial-up access. If you enable dial-up access, you must also select the modem that is to be used. Then click Next.
Note
![]()
If you enable dial-up access, the selected modem will answer all incoming calls on its telephone line.
5. Windows displays a list of network protocols and services that will be made available to the dial-up connection. Select the Internet Protocol Version 4 (TCP/IP) entry, and click Properties. Uncheck Allow Callers to Access My Local Area Network, and then click OK.
6. Make sure that Internet Protocol Version 4 (TCP/IP) is checked and that Internet Protocol Version 6 (TCP/IP) is unchecked. Then click Allow Access. When the final window appears, click Close.
Note
![]()
Incoming connections could also be set up to allow remote computers to access other computers on your network, but this requires expertise in TCP/IP addressing and routing issues that are beyond the scope of this book.
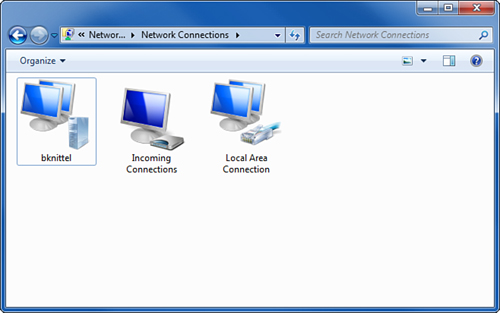
When the incoming connection information has been entered, a new Incoming Connection icon appears in your Network Connections window.
When someone connects to your computer, a second icon appears in the Network Connections folder showing their username, as shown in Figure 35.6. If necessary you can right-click this to disconnect them.
Figure 35.6 Incoming connections can be monitored in the Network Connections window.
Enabling Incoming VPN Connections with NAT
Microsoft’s Internet Connection Sharing (ICS) and DSL/cable sharing routers use an IP-addressing trick called Network Address Translation (NAT) to serve an entire LAN with only one public IP address. Thus incoming connections, as from a VPN client to a VPN host, have to be directed to a single host computer on the internal network.
If you use a shared Internet connection, only one computer can be designated as the recipient of incoming VPN connections. If you use Microsoft’s ICS, that one computer should be the one sharing its connection. It will receive and properly handle VPN requests.
If you use a hardware sharing router, the VPN server can be any computer you want to designate. Your router must be set up to forward the following packet types to the designated computer:
TCP port 1723
GRE (protocol 47. This is not the same as port 47!)
Unfortunately, many inexpensive commercial DSL/cable connection sharing routers don’t have a way to explicitly forward GRE packets. There are several ways around this:
• Some routers know about Microsoft’s Point-to-Point Tunneling Protocol (PPTP) and you can specify the computer that is to receive incoming VPN connections.
• If you enable Universal Plug and Play (UPnP) on your router, Windows can tell the router to forward incoming VPN connections. UPnP is discussed in Chapter 19, “Connecting Your Network to the Internet.”
• If neither of these options is available, you may designate the VPN computer as a DMZ host so that it receives all unrecognized incoming packets. This is relatively dangerous, however.
![]() To learn more about forwarding network requests on a shared Internet connection, see “Enabling Access with a Sharing Router,” p. 537.
To learn more about forwarding network requests on a shared Internet connection, see “Enabling Access with a Sharing Router,” p. 537.
Caution
![]()
If you designate a computer as a DMZ host, that computer can be vulnerable to hacker attacks. You must enable Windows Firewall on this computer’s network connection, and you must designate its network location as Public. You must also configure your router to block Microsoft File Sharing packets, at the very least. Set up filtering to block TCP and UDP ports 137 through 139 and port 445.
Disabling Incoming Connections
To disable incoming dial-up connections so that your modem will not answer the phone whenever it rings, or to disable incoming VPN connections, follow these steps:
1. Click the network icon in the taskbar and select Open Network and Sharing Center. Then, click Change Adapter Settings.
2. To temporarily disable incoming connections, right-click the Incoming Connections icon and select Properties. Uncheck the modem entry and/or the VPN entry, and click OK.
3. To completely disable incoming connections, right-click the Incoming Connections icon and select Delete.
Offline Files
You might recognize the “Offline” problem: If you have a portable computer that you sometimes use with your office network, and sometimes use out in the field, you probably make copies of important “online” documents—documents stored on the network server—on your laptop. But, if you make changes to one of your “offline” copies, the network’s copy will be out of date. Likewise, if someone updates the original on the network, your copy will be out of date. And, trying to remember where the originals came from and who has the most recent version of a given file is a painful job. I admit that more than once I’ve accidentally overwritten a file I’d worked on with an older copy, or worse, overwritten somebody’s work, because I wasn’t paying attention to the files’ date and time stamps.
Note
![]()
Offline Files are available only on Windows 7 Professional, Enterprise, and Ultimate editions. The Sync Center is present on Windows 7 Home versions, though, because it can also work with handheld devices such as PDAs and cell phones. If your version of Windows 7 doesn’t support Offline Files (or even if it does), you should know about Microsoft’s Sync Toy tool, which is a free program you can download from Microsoft.com (search for Synctoy; you want version 2.0 or later). Sync Toy can do a pretty good job of copying new and updated files back and forth between a network location and a folder on your portable computer. It’s not quite as seamless as Offline Files, but it can do just as good a job.
Windows 7 has a solution to this housekeeping problem: Offline Files and the Sync Center. Here’s the skinny: When you use a network folder and tell Windows to make it available for offline use, Windows stashes away a copy (caches) the folder’s files somewhere on your hard drive, but all you see is the original network folder on your screen. When you disconnect, the shared file folder remains on your screen, with its files intact. You can still add, delete, and edit the files. Meanwhile, network users can do the same with the original copies. When you reconnect later, Windows will set everything right again thanks to a program called the Sync Center.
You’ll find that the Offline Files system really works and is more powerful than it seems at first glance. The following are some of the potential applications:
• Maintaining an up-to-date copy of a set of shared files on both a server (or desktop computer) and a remote or portable computer. If you keep a project’s files in an offline file, Windows keeps the copies up-to-date on all your computers.
• “Pushing” application software or data from a network to a portable computer. If software or data is kept in an offline file, your portable computer can update itself whenever you connect or dock to the LAN.
• Automatically backing up important files from your computer to an alternative location. Your computer can connect to a dial-up or network computer on a timer and refresh your offline files and folders automatically.
It’s very easy to make folders available offline, as you’ll see in the next section.
Identifying Files and Folders for Offline Use
You can mark specific files, subfolders, or even entire shared folders from a “remote” server for offline use.
Note
![]()
The server I’m talking about might be in the next room, which isn’t very “remote” at all, but that’s what I’ll call it for simplicity’s sake. In this section, a “remote” server refers to some other computer that you access via networking.
While you’re connected to the remote network, view the desired items in Windows Explorer. If you’ve mapped a drive letter to the shared folder, you can select the mapped drive under Computer as well.
When you find the mapped drive, file, folder, or folders you want to use while offline, select it (or them), right-click, and select Always Available Offline. Be cautious about marking entire shared drives or folders available offline, though, unless you’re sure how much data they contain, and you’re sure you want it all. You could end up with gigabytes of stuff you don’t need.
Note
![]()
Before you mark a folder for offline use, check to make sure that you don’t have any of its files open in Word, Excel, or so on. Open files can’t be copied.
Can’t Make File Available Offline
![]()
If Always Available Offline isn’t displayed as an option when you right-click a file or folder, several things could be wrong. You must be using Windows 7 Professional, Enterprise, or Ultimate edition—the Home versions don’t have it. Also, the option isn’t available on network locations you’ve added to the Network list in Windows Explorer. To make an entire shared folder available offline, view the computer’s entry under Network and right-click the folder there, or map a drive letter to the shared folder and right-click the drive letter.
The feature might also be disabled. To check, click Start, All Programs, Accessories, Sync Center. Click Manage Offline Files, and view the General tab. If there is a button labeled Enable Offline Files, click it. Another cause could be that your network manager might have disabled Offline Files via group policy—in this case you’re out of luck.
Files of This Type Cannot Be Made Available Offline
![]()
If you mark files or folders for offline use, you might receive the error Files of This Type Cannot Be Made Available Offline. Some file types (for example, Microsoft Access MDB database files) usually should not be available offline because such files usually are used by multiple LAN users simultaneously, and there’s no way to reconcile changes made by offline and online users. Your network manager might have designated one or more files as being unavailable for offline for this reason. Ask your network manager to check Group Policy entry Computer ConfigurationAdministrative TemplatesNetworkOffline FilesFiles not cached.
The first time you mark a file or folder for offline use, Windows copies it, and all its contents, from the network location to a hidden folder on your hard drive. This may take a while if there is a lot to copy or if your network connection is slow. If any files cannot be copied, you can click the Sync Center link to see their names and the reasons for the problem.
When the file, folder, or folders have been copied, you will be able to use the network folders whether you’re connected to the network or not.
Note
![]()
The most common reason a file can’t be copied is that it is open and in use by an application. If this is the case for any of your files, close the application and perform another sync, as discussed later in this section. Another common problem is that thumbs.db, a hidden file Windows creates in folders that contain pictures, is sometimes in use by Windows Explorer and can’t be copied. You can ignore problems with thumbs.db—right-click the file’s name in the Sync Results window and select Ignore.
Using Files While Offline
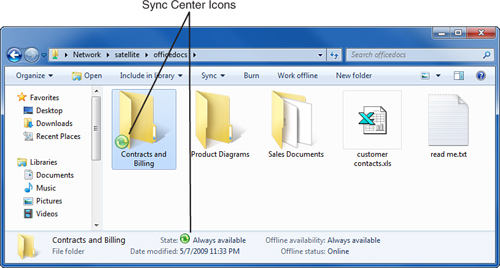
When you’ve marked a file, folder, or mapped network drive as Always Available Offline, a small green Sync Center icon appears on each folder and file icon to show that it’s been marked as available, as shown in Figure 35.7.
Figure 35.7 When a folder or network drive is Always Available Offline, a Sync Center icon is displayed on each icon.
Caution
![]()
If the files that you’re copying from your network contain sensitive information, you may want to ask Windows to encrypt the copies stored on your computer. To see how to do this, skip ahead to “Managing and Encrypting Offline Files” later in this chapter.
Notice that when you select the item, two new buttons are displayed in the Explorer window:
• Sync—Click this button after you’ve been disconnected from the network and have reconnected. This will reconcile any changes you have made to your copy of the files and changes others made to the originals on the network.
• Work Offline—You can click this button to disconnect this shared folder from the network (other network connections remain intact), so that you can make changes to files locally, without actually changing the network copies, and later sync them to the network.
Tip
![]()
If your network or VPN connection is unreliable, you may find that your applications sometimes hang when you’re trying to save your work to a network folder. If this happens to you frequently, the Work Offline button is your new best friend. With it you can force Windows to use a local, cached copy of a document while you edit it, then sync it back up after you’ve saved your changes. Here’s how to do it: Locate a network folder in Windows Explorer. Mark it Make Available Offline. Open the folder, and click the Work Offline button. Edit the file(s) you need to edit, then click Work Online. This should run the Sync Center, and copy your changes back to the network.
Now, if you disconnect from the network or use the Work Offline button, offline files and folders will remain in the Explorer display.
While offline, you can add new files, delete files, or edit files in a folder that you marked Always Available Offline. If you had mapped a drive letter to the network folder, the drive letter still functions.
Note
![]()
Folders and/or files that were not marked Always Available Offline will disappear from the display when you disconnect from the network.
Offline Files Are Missing
![]()
If you can’t find files or folders you know you clearly marked for offline use, you might not have synchronized after marking the file, its folder, or a containing folder for offline use. The solution is to go back online and synchronize. Then check the Sync Conflicts page to see if Windows says that it couldn’t copy your file for some reason.
You can also rename files, and the network copy of the file will be renamed the next time you connect and sync up.
This process works so well that it’s disconcerting at first because the effect is... well, because there is no effect at all. You can happily work away as if you were really still connected to the network. The only difference is that your changes won’t be visible to others on the network until you reconnect.
Note
![]()
In most cases, you cannot rename folders while offline.
On some corporate networks, you should be able to rename “redirected” folders if your network administrator has enabled this feature. In general, though, it’s best not to try to rename an offline folder while you’re offline.
When you do reconnect, you should synchronize your offline files and folders with the network folders so that both sets will be up to date.
Caution
![]()
If you delete a file from a network folder, while you are either offline or online, it will be deleted from your computer immediately and permanently. Deleted network files are not saved in the Recycle Bin.
Sync Center
You can synchronize files anytime you are connected to the network that contains the original shared folder, whether you connect by LAN, modem, or VPN. You can start a synchronization in any of several ways:
• Click Start, All Programs, Accessories, Sync Center. Then click Sync All.
• Right-click a specific shared file or folder and select Sync.
• Click the Sync button in Windows Explorer.
• If you have a portable computer, click the Sync button in the Windows Mobility Center window.
Synchronization can also occur automatically
• When you reconnect to the network and Windows is idle.
• When you click Work Online in the folder view.
• When you log on and off.
• At specified times and days of the week. For a scheduled synchronization, Windows can even automatically make a dial-up connection.
The Sync Center has the job of reconciling changes made to the online and offline copies of the files.
Reconciling Changes
The Sync Center will automatically copy new or changed files from your computer to the network, and vice versa. However, three situations exist in which it will need some help:
• If both you and another user have changed the same file, you’ll have to pick which version to keep.
• If you deleted a file while you were disconnected, you’ll have to decide if you want to also delete the network’s copy.
• If a network user deleted a file while you were disconnected, you’ll have to confirm that you want to delete your copy.
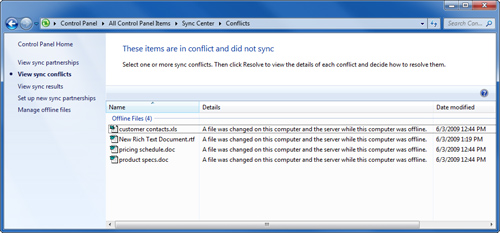
If any problems occur while syncing files, the Sync Center icon in the notification area on your taskbar will display a yellow warning triangle. Double-click the Sync Center icon to display the Sync Center, then click View Sync Conflicts in the tasks list. This displays the Conflicts page, as shown in Figure 35.8.
Figure 35.8 The Sync Conflicts page lists files that cannot be reconciled without help.
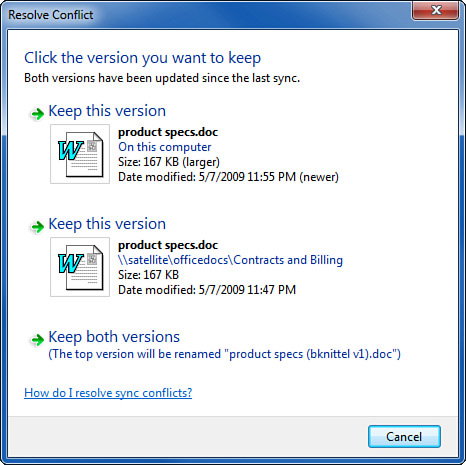
Double-click the first listed file. This displays an explanation of why Sync Center can’t update the file, and you see a selection of choices to resolve the issue. For example, if both you and a network user modified the same file while you were disconnected, the dialog box will look like the one shown in Figure 35.9.
Figure 35.9 When two users have modified the same file, you can choose to keep one or both versions. The selected version(s) will be copied to your computer and the network.
Caution
![]()
If the sync process fails because a file is in use, you should repeat the synchronization when no one is editing files in the shared folder; otherwise, you might lose changes to some files.
Continue through the conflict list to resolve each problem.
Managing and Encrypting Offline Files
To manage the Offline Files feature, open the Sync Center with Start, All Programs, Accessories, Sync Center. In the left pane, click Manage Offline Files. The following are tabs on this dialog box:
• General—Here you can enable or disable the Offline Files feature entirely. You can also see a list of all files that have been copied to your hard disk for offline use.
• Disk Usage—This tab lets you monitor or limit the amount of disk space used by offline file copies.
• Encryption—Here you can select to encrypt the network files that are stored on your hard disk. This makes them safe from theft should your computer fall into the wrong hands.
• Network—If Windows detects that you have a slow (dial-up, for instance) network connection, Windows can automatically elect to work with offline copies and will sync them up periodically while you continue to work.
Finally, remember that you can uncheck Make Available Offline on a file or folder anytime to remove it from the cached file list. This will delete the cached copies of the files in that folder.
Making Your Shared Folders Available for Offline Use by Others
When you’ve marked a network file for offline use, Windows makes a copy of the file on your hard disk. While you’re connected to the network, it would be faster to use the local copy to access the file; this could really save time, for example, if you are running an application from a network folder. On the other hand, this would not be appropriate for files that change frequently or for database files that are used by multiple users concurrently.
Windows has to know whether or not it’s appropriate to serve up the cached copy for online use, and it leaves the choice up to the person who shares the network folder. So, when you share folders on your computer, you can specify the way Windows will make this folder available for offline use by others.
Normally, Windows will not give users a cached file when the network copy is available. It’s useful to change the default settings when you are sharing a folder that has “read-only” documents that don’t change often, and application programs. In this case, you may be able to give users faster access by following these steps:
1. Use Explorer or Computer to locate the folder you’re sharing. Right-click it and select Properties.
2. View the Sharing tab. Click the Advanced Sharing button. If Share This Folder is not checked, check it now.
3. Click the Caching button.
4. Select one of the following caching options:
• Only the files and programs that users specify are available offline—Lets users make the choice of whether or not to make the folder contents available offline. This is the default setting.
• No files or programs from the share are available offline—Prevents users from making the folder contents available offline.
• All files and programs that users open from the share are automatically available offline—Makes other computers automatically make the contents of any file opened from the folder available for use offline. Furthermore, even while connected, if the user runs an application program from the network folder, their computer will use their cached copy for speedier performance. This is automatic for Windows 7 and Vista computers. Check Optimized for Performance to let Windows XP computers do this as well.
5. Click OK to close the Offline Settings dialog box, and then click OK to close the Advanced Sharing dialog box.
The amount of disk space allocated to “automatically” available offline files is limited to an amount set on the Disk Usage tab in the Sync Center’s Manage Offline Files dialog box.
Multiple LAN Connections
Most desktop computers sit where they are installed, gathering dust until they’re obsolete, and they participate in only one LAN. But portable computer users often carry their computers from office to office, docking or plugging in to several LANs. Although Windows 7 makes it very easy for you to manage different dial-up and VPN connections, it’s difficult to manage connections to different LANs if the network configuration settings are manually set.
IP settings are the difficult ones. If your computer and network are both set up to use DHCP for automatic TCP/IP configuration, you won’t encounter any problems; your computer will absorb the local information each time you connect.
If your TCP/IP settings are set manually, things aren’t so simple. Microsoft has come up with a partial solution called Alternate Configuration. You can configure your computer for automatic IP address assignment on most networks and manual assignment on one. The way this works is that Windows looks for a DHCP server when it boots up, and if it doesn’t find one it uses the Alternate Configuration. This can be a static IP address, or the default setting “Automatic Private IP Address,” whereby Windows chooses a random address in the 169.254 subnet.
This means that your computer can automatically adjust itself to multiple networks, at most one of which requires manual IP address settings.
To set up Alternate Configuration, open the Network and Sharing Center, select Change Adapter Settings, right-click your LAN icon and select Properties, and double-click Internet Protocol Version 4 (TCP/IP). Be sure the General tab uses the Obtain an IP Address Automatically setting—if not, this discussion doesn’t apply to your computer. View the Alternate Configuration tab and choose User Configured to enter the static LAN’s information.
If you need to commute between multiple networks that require manual configuration, you’ll have to change the General settings each time you connect to a different network. I suggest that you stick a 3-by-5-inch card with the settings for each network in your laptop carrying case for handy reference.