36. Meetings, Conferencing, and Collaboration
Windows 7 Plays Well with Others
Today’s computers are no longer seen as tools used in isolation. They’ve become portals through which people can communicate and work just as easily from across the globe as from across the room. Business users and students are increasingly relying on computers to make presentations and give reports (making them at least more colorful, if not more interesting).
In this chapter, we’ll cover several Windows 7 features that make it easier for you to work with others:
• When you use your laptop or tablet computer to display a business or class presentation, the Presentation Settings feature lets you tell Windows 7 not to disrupt your presentation with messages, noises, or the screen saver.
• If you use a laptop computer, the External Display tool makes it easy to control an external monitor or a projector.
• If you need help with your computer, or if you want to demonstrate some computer task or application to others using their computer, Remote Assistance may be just what you need.
We’ll start by looking at Windows 7’s support for making presentations.
Making Presentations with a Mobile Computer
If you use a mobile (laptop or tablet) computer, Windows 7 has two features that make giving presentations smoother and easier. The features are Presentation Settings and External Display, part of the Windows Mobility Center discussed in Chapter 35, “Hitting the Road.” External Display lets you manage an external monitor or a projector, and Presentation Settings keeps Windows from interrupting your presentation.
Adjusting Presentation Settings
One of Windows Vista’s more thoughtful additions was the Presentation Settings feature in Windows Mobility Center, and it’s available in Windows 7, too. When you indicate that you are making a presentation, Windows takes steps to keep itself out of your way. It can make the following accommodations:
• Display a screen background chosen to minimize distraction or promote your company logo.
• Disable the screen saver, so that if you leave the computer alone for a few minutes, your audience isn’t treated to an animated aquarium or a slide show that includes pictures of you getting dressed up for a Halloween party in really bad drag.
Note
![]()
Presentation Settings and the Windows Mobility Center are available only if you are using a mobile (laptop or tablet) computer. However, there is a Registry hack you can use to enable it on a desktop computer.
• Disable pop-up notifications and reminders from Windows services.
• Set the speaker volume so that you aren’t bothered by sounds associated with events like mouse clicks, Window resizing, and the like.
• Disable automatic shutdown so that your computer won’t go to sleep while you’re talking. (There is unfortunately no corresponding setting for the audience.)
To use the Presentation Settings, first select the accommodations you’d like Windows to make. To do this, click Start, Control Panel, Hardware and Sound, and then click Adjust Settings Before Giving a Presentation, found under the Windows Mobility Center heading. The Presentation Settings dialog box appears, as shown in Figure 36.1.
Figure 36.1 Presentation Settings lets you keep Windows quiet during a presentation.

Set the check boxes next to the desired accommodations, and preselect the sound volume and desktop background if desired.
If you use a certain external monitor or projector whenever you give presentations, you can instruct Windows to invoke Presentation Settings automatically whenever the display is connected. To do this, attach the display(s), click Connected Displays, and check I Always Give a Presentation When I Use This Display Configuration.
Save your presentation Settings Preferences by clicking OK.
Now, whenever you are making a presentation, open the Windows Mobility Center by pressing Windows+X, or by clicking Start, All Programs, Accessories, Windows Mobility Center. Then, in the Presentation Settings tile, click Turn On.
Tip
![]()
If you use the Mobility Center a lot, that Windows+X hotkey shortcut will save you a lot of time and clicking! You could also pin a shortcut to Windows Mobility Center in your taskbar to make it easily accessible.
Controlling External Display
The External Display tile on Windows Mobility Center lets you control what appears on any connected external display or monitor attached to your laptop or tablet computer.
To start, attach your external monitor or projector, or connect to a network-attached projector as described in the next section. Then, press Windows+P to bring up the External Display selection pop-up, shown in Figure 36.2. Alternatively, open the Windows Mobility Center as discussed in the previous section, then click the Connect Display or Disconnect Display button in the External Display tile.
Figure 36.2 Select whether to extend or duplicate your desktop on the new display.
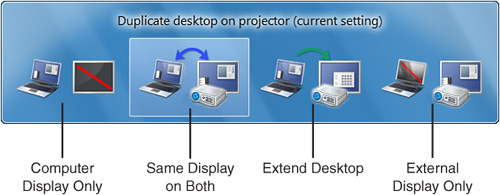
The External Display pop-up lets you choose how to use the added screen real estate.
Then use your mouse or the left and right arrow keys to select one of the four display options:
• Show computer (laptop) display only—External display will be blacked out.
• Duplicate the same display on both monitors—This option is useful if you need to see your own presentation and can’t see the external display.
• Extend the desktop across the computer and external displays—This option is useful if you want to make a presentation on the big screen and view your own notes or other programs on your laptop display. (This sounds good in theory, but for some reason, in practice, I’ve found that doing this is a lot like trying to rub my tummy and pat my head at the same time.)
• Use external display only—The computer display will be blacked out.
Note
![]()
If you select the Duplicate option, your screen’s resolution might be reduced. Windows will use the highest reasonable screen resolution supported by both monitors. If both displays don’t have the same shape, the external display might look pinched or stretched. If this happens, right-click the desktop, select Screen Resolution, and adjust the resolution slider to find a more acceptable setting. Click Apply after making each adjustment. You’ll have to find a compromise because you can’t select different resolutions for the two monitors when the Duplicate setting is in effect.
Later, when you disconnect the external display, Windows 7 should automatically reset your laptop’s screen resolution to its original setting. If it doesn’t, right-click the desktop, select Personalize, Screen Resolution, and move the Resolution slider to the laptop display’s native resolution—usually the topmost position.
Click one of the icons or press Enter to save the setting. You can press Windows+P to change it at any time.
![]() To learn about Windows 7’s other accessories for mobile computers, see “Windows Mobility Center,” p. 972.
To learn about Windows 7’s other accessories for mobile computers, see “Windows Mobility Center,” p. 972.
![]() For more information about managing external displays, see “Installing and Using Multiple Monitors,” p. 790.
For more information about managing external displays, see “Installing and Using Multiple Monitors,” p. 790.
Connecting to Network Projectors
Windows 7 includes support for connecting to video projectors that are reached over a network, rather than requiring them to be attached directly to your computer. Network-attached projectors are becoming a more common feature in corporate conference rooms that are also outfitted with wireless or Ethernet network ports.
To use a network-attached projector, follow these steps:
1. Ensure that you have an active wireless or wired connection to the network that leads to the projector.
2. Click Start, All Programs, Accessories, Connect to a Network Projector.
3. If Windows asks for permission to allow the network projector to communicate through Windows Firewall, click Yes. You might need to confirm a User Account Control (UAC) prompt.
4. Click Search for a Projector. If the projector appears in the list of available devices, select its name and click Connect. If the projector can’t be found, click the Back button (the left arrow in the upper-left corner of the window), and click Enter the Projector Address. Type in the projector’s network path, as provided by your network administrator. Enter the projector’s password, if a password is required. Then click Connect.
Next, follow any additional prompts to direct your presentation output to the connected projector. You can press Windows+P to change the way your laptop and the external display are configured, as discussed in the previous section.
Remote Assistance
Remote Assistance lets two people work collaboratively on one Windows computer—one at the computer and one remotely, over the Internet. Remote Assistance is designed to let a person get technical assistance from someone else at a remote location. It’s not so much a “let’s all work together” tool as a “let me help you with this” tool. In fact, some computer manufacturers advertise that they’ll use Remote Assistance to help you with your computer after you purchase it.
Remote Assistance is based on the same technology as the Remote Desktop feature we’ll discuss in Chapter 37, “Remote Desktop.” There are some similarities, and several significant differences, between the two:
• Remote Assistance is available on all versions of Windows 7 and XP, whereas Remote Desktop is available only on the higher-end Windows versions: Windows 7 Professional, Enterprise, and Ultimate, Windows Vista Business, Enterprise, and Ultimate, and Windows XP Professional.
• With Remote Assistance, both the local and remote users see the same screen at the same time, and both can move the mouse, type on the keyboard, and so forth. With Remote Desktop, when a remote user is working, the computer’s monitor displays just the Welcome screen.
• Remote Assistance doesn’t make the local computer’s hard drives available, nor does it transmit sound, as Remote Desktop does.
• Remote Assistance connections can’t be made ad lib. One Windows user must invite another through email or Windows Live Messenger. Or one user can offer assistance to another using Messenger. In any case, the procedure requires the simultaneous cooperation of users at both ends of the connection.
• Remote Assistance allows you to use a text chat window or voice chat while the desktop session is active.
Note
![]()
To take advantage of the new, more reliable connection method, both you and the person who is helping you—or the person you are helping—must be using Windows 7 or Windows Vista, and you must change a setting, as described in the next section. Any user running Windows Vista should have Vista Service Pack 1 installed, or any later service pack.
A big plus with Remote Assistance on Windows 7 and Windows Vista is that it should work even if you are using a shared Internet connection. This is a big improvement over Remote Assistance on Windows XP, which rarely worked over a shared connection. The reason is that on Windows 7 and Vista, Remote Assistance uses Internet Protocol Version 6 and Teredo tunneling to safely pass data through Internet connection sharing routers and firewalls.
Enabling Remote Assistance
Remote Assistance is usually enabled by default when you install Windows, but before you try to use it to get help, you should confirm that it is enabled. Furthermore, if you want to use the new, more reliable connection method to work with another Windows 7 or Vista user, you must change a setting by following these steps:
1. Click Start, right-click Computer, and select Properties.
2. In the Tasks list on the left, click Remote Settings. If a UAC prompt appears, click Continue, or enter an Administrator password, as requested.
3. Check to be sure that Allow Remote Assistance Connections to This Computer is checked. If it isn’t, check it.
4. Click the Advanced button.
5. If you use an Internet connection sharing router, check Create Invitations That Can Only Be Used from Computers Running Windows Vista or Later. You will only be able to invite other Windows 7 or Vista users to help you, not XP users, but at least it will work.
You can also change the number of hours that an invitation to help remains active.
6. Click OK to save your changes.
Requesting Remote Assistance
To invite a friend or colleague to work with you on your computer, first contact your friend and confirm that she is ready to work with you.
Note
![]()
You and your friend must both have a working Internet connection to use Remote Assistance.
1. If the other person is using Windows 7, skip to step 2.
If the other person is using Windows Vista, use the instructions in the previous section to check the box labeled Create Invitations That Can Only Be Used from Computers Running Windows Vista or Later.
If the other person is using Windows XP, use the instructions in the previous section to uncheck the box labeled Create Invitations That Can Only Be Used from Computers Running Windows Vista or Later.
Note
![]()
If your friend is using Windows XP and you are using an Internet connection sharing router, or if you are on a business network that uses a firewall, the odds of your friend’s computer being able to connect to yours are fairly slim. If you can, try to enable Universal Plug and Play (UPnP) in your router before you issue the Remote Assistance request. That might help. However, you’re probably better off trying one of the third-party tools I mention later in the chapter.
2. Select Start, All Programs, Maintenance, Windows Remote Assistance, and then click Invite Someone You Trust to Help You.
3. Windows needs to send an “invitation” to your friend. Use one of these four methods:
• If the other person is using Windows 7, click Use Easy Connect.
• If you are chatting with your friend using Windows Live Messenger, start a chat session with your friend and click Actions, Request Remote Assistance. When they accept your request, Windows will pop up a password, as described in step 4. You can give them this password over the phone or through the Chat window. Your friend should type the password using uppercase letters.
• If you have a standalone email program installed in your computer, select Use Email to Send an Invitation.
• Otherwise, if you use a web-based email program, select Save This Invitation As a File. Select a location to save the invitation file, and make note of it. You’ll have to send this file as an email attachment later on, or get the file to your friend some other way.
4. Windows will display a password composed of 12 letters and digits. The password is shown with three groups of letters shaded in different colors to make it easier to read; the shading isn’t important. Write the password down and give it to the person who you are inviting to help. It’s probably best not to put this password into the email, but to give it to them over the phone.
Note
![]()
If your friend uses Windows Vista or XP, tell them to be sure to type the password in uppercase, which is easiest by first pressing the Caps Lock key.
5. If you selected Use Easy Connect, just wait for your friend to start up Remote Assistance (using the steps in the next section) and type in the password you gave to her.
If you selected Use Email to Send an Invitation, your selected email program will pop up with an email ready to address and send. Enter your friend’s email address and send the email. The important part is the attachment, which is a file named something along the lines of Invitation.MsRcIncident. Don’t delete the attachment!
If you selected Save This Invitation as a File, use your web-based email system to send the invitation file you created in step 4 to your friend as an attachment. The file has a name along the lines of Invitation.MsRcIncident. Alternatively, get the invitation file to your fiend by other means, such as a flash drive or a network folder.
6. Windows will display a window that says Waiting for an Incoming Connection. Leave this window alone until your friend receives the invitation and responds.
Note
![]()
If you use a dial-up Internet connection or a DSL service that requires you to sign on, your Internet IP address changes every time you connect. The Remote Assistance invitation uses this address to tell the other person’s computer how to contact you, so it will work only if you stay connected from the time you send the invitation to the time your friend responds. If you have a fixed (static) IP address, this won’t be a problem.
If you sent your request via Windows Live Messenger, you should get a response within a few seconds. If you sent the request by email, it could be some time before the other party receives and reads it.
When your friend responds to your request for assistance, a dialog box will appear on your screen, asking if it’s okay for her to connect. Click Yes, and after a short while—perhaps a minute or so—a window will appear with which you can control the Remote Assistance session, as shown in Figure 36.3.
Figure 36.3 When your Remote Assistant has connected, use this window to chat and control the connection.

At this point, your friend can see your screen and can watch what you do with it, but she can’t actually do anything with your computer. She first has to ask to take control, and you have to consent. Then, either of you can type, move the mouse, and otherwise poke around and use your computer.
Note
![]()
If you don’t completely trust the person who’s helping you, make this setting change right away: Click Settings, check Use ESC Key to Stop Sharing Control, and then click OK. This way, after you’ve given the person control, if you don’t like what they’re doing, you can press the Esc key, and they’ll immediately be locked out. Unfortunately, if they press Esc while they’re working, the same thing will happen, so you’ll have to grant them access again. This can get irritating, but it does let you control what they’re doing.
When a friend asks to take control of your computer, a request will pop up on your screen. If she’s just going to work with a normal Windows application such as Word, just click Yes to let her take control. However, if she needs to manage Windows itself, you have to decide who is going to handle the UAC prompts that might appear. By default, your friend won’t be able to see or respond to them. You have two options:
• If you want to respond to any UAC prompts yourself, just click Yes to let her connect. If she performs an action that requires security confirmation, his screen will go black for a moment, and you’ll have to respond to the UAC prompt.
• If you want to let her change Windows settings without your intervention, check Allow Username to Respond to User Account Control Prompts, then click Yes. You will be asked to confirm a UAC prompt yourself at this point.
Note
![]()
If you don’t have Administrator privileges on your computer, you won’t be able to give your friend permission to perform administrative actions that require a UAC confirmation, either. There are two ways to work around this.
If the remote user knows an Administrator password and will tell you what it is, check Allow Username to Respond to User Account Control Prompts and click Yes. When the prompt appears, select the account and enter the password he gave you.
The second workaround requires some advance setup before you need to use Remote Assistance. An Administrator has to perform these steps: Click Start, All Programs, Administrative Tools, Local Security Policy. Under Local Policies, Security Options, enable User Account Control: Allow UIAccess Applications to Prompt for Elevation Without Using the Secure Desktop. Then restart Windows (on a corporate network, this option can be enabled through Group Policy). With this option enabled, the remote user will be able to respond to UAC prompts even if you don’t know an Administrator password.
Now your friend should be able to work your keyboard and mouse, and help you.
The Windows Remote Assistance toolbar has a few other features that you will find useful:
• If you want a moment of privacy, perhaps to read email or look at a sensitive file, click Pause. This will black out the other person’s view of your screen without disconnecting that person. Click Continue to restore the view.
• To communicate with your friend via text messaging, click Chat. The Remote Assistance toolbar will enlarge. Type your comments into the lower box on the window and press Enter (or click Send), and your friend will see what you type. You’ll see your friend’s responses in the upper part of the window. Click the Chat button again to shrink the toolbar back to its original size.
• To take control away from your friend, click Stop Sharing. Your friend will still be able to see your screen, but can only watch. He has to request control again to do anything.
When you’re finished, click Disconnect to end the Remote Assistance session.
Responding to an Assistance Request
On Windows 7, there are several ways your friend can invite you to provide Remote Assistance: using Easy Connect, Windows Live Messenger, or an invitation email or file. Use one of the following procedures to respond to their request.
Responding with Easy Connect
If both you and your friend are using Windows 7 (or some future version), you can use the new Easy Connect method. Your friend will use Easy Connect to invite you. To respond, follow these steps:
1. Select Start, All Programs, Maintenance, Windows Remote Assistance, Help Someone Who Has Invited You.
2. Select Use Easy Connect.
3. Type in the password they gave you. It consists of 12 letters and numbers and is not case sensitive (upper- and lowercase don’t matter). Then, press Enter.
When the connection is established, skip ahead to “Working with Remote Assistance.”
Responding Through Windows Live Messenger
If you and your friend are both chatting with Windows Live Messenger, your friend’s invitation will appear in a pop-up window. Just click Accept to begin the connection, follow the instructions, and skip ahead to “Working with Remote Assistance.”
Responding to an Invitation Email or File
Your friend might send you an email with an attachment containing an invitation file named something like Invitation.MsRcIncident. Alternatively, they might send you the file through a network or a portable drive.
Note
![]()
If your friend is using Windows Vista or XP, you must type the password exactly as they did—upper- and lowercase matter. If your friend is using Windows 7, the password consists of 12 letters and numbers. Upper- and lowercase don’t matter.
To accept an email invitation, open the message’s attachment. (How you do that depends on your email program. If you use web-based email, you might have to download the attachment separately.) Opening the attachment should activate the Remote Assistance connection. If you receive the invitation as a file, just double-click to open the file in Windows Explorer.
You will be asked to enter the password associated with the invitation. The person who invited you will have to tell you what it is.
Note
![]()
If Windows is unable to establish a connection to the person who invited you, ask her what operating system she’s using. If it’s XP and it doesn’t work the first time, the chances that it’s ever going to work are slim. If she’s using Windows 7, ask her to check the box labeled Create Invitations That Can Only Be Used from Computers Running Windows 7 or Later, as described in the “Enabling Remote Assistance” section earlier in this chapter. Then have her send you a new invitation.
Working with Remote Assistance
After you’ve responded to the assistance invitation, it can take more than a minute for the required software to load and for the other user’s desktop to appear on your screen, as shown in Figure 36.4.
Figure 36.4 The Remote Assistance screen has a control panel at the top and a view of the remote user’s screen underneath. Click Request Control if you want to manipulate the remote computer.
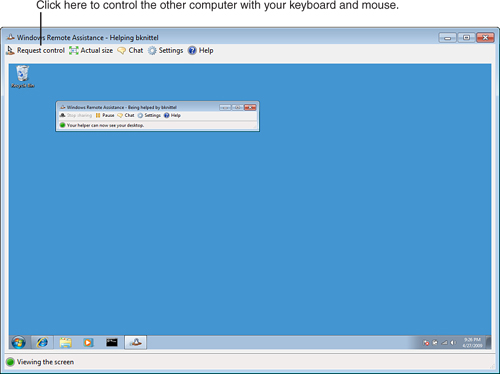
Across the top is a menu of controls. The choices are
• Request Control—Click to begin using the other computer’s mouse and keyboard. The remote user will have to grant permission. After you have control of the other computer, both of you can use your mouse and keyboard.
• Actual Size—Click to make the size of the Remote Assistance window exactly match the other person’s screen. You might have to scroll around to see all of his or her desktop. This choice alternates with Fit to Screen.
• Fit to Screen—Click to shrink the view of the other computer’s screen so that it fits perfectly in your Remote Assistance window. You won’t have to use the scrollbars to see the far corners anymore but the text might be tiny. Maximize your Remote Assistance window to improve the display.
• Chat—Click to open a text chat panel in the left side of the Remote Assistance window. Type your messages into the small box at the bottom of the Chat area.
• Settings—Click to turn off the recording of the remote session that Windows makes by default.
• Help—Click to display online help for Remote Assistance.
If your friend clicks the Stop Sharing button, you’ll lose control of the remote screen. Just click Request Control again to ask for permission to resume working.
Using Third-Party Tools
If you want to help someone with Remote Assistance but can’t get it to work, there are several third-party tools that are as good as or better than Remote Assistance (and Remote Desktop), and most of them work even when Remote Assistance and Remote Desktop won’t. I talk more about these tools in Chapter 37 under “Third-Party Remote Control Tools” (page 1027), so I won’t repeat that discussion here. Here, I’ll just mention that the free version of LogMeIn (http://secure.logmein.com) has saved the day for many of my friends and clients.
You might also try one of the online meeting tools described in the next section. They’re typically designed to let a group of people work together on a common project, but most of them could also let two people work together to solve a problem with Windows.
Online Meeting Tools
Many previous versions of Windows included collaboration tools that were designed to let several people work together on the same Windows desktop, with the same applications, even when separated by great distances. These tools let two or more people, say, edit a Word file or construct a PowerPoint presentation, as a collaborative effort.
Remote Assistance, described in the previous section, is a fine tool for this purpose for just two people. But previous versions of Windows included programs better suited to the task, such as NetMeeting and Windows Meeting Space, both of which let more than two people work together... and both of which are now “retired” and are not provided with Windows 7.
Microsoft does have a free replacement program called SharedView, which you can search for and download from microsoft.com. It can be used by people running Windows 7, Vista, and XP. The person who initiates a SharedView meeting can share his or her desktop, or individual applications, with other users, and can delegate control of the keyboard and mouse to any of the participants. The program also includes a tool that lets you copy documents and other files back and forth between participants.
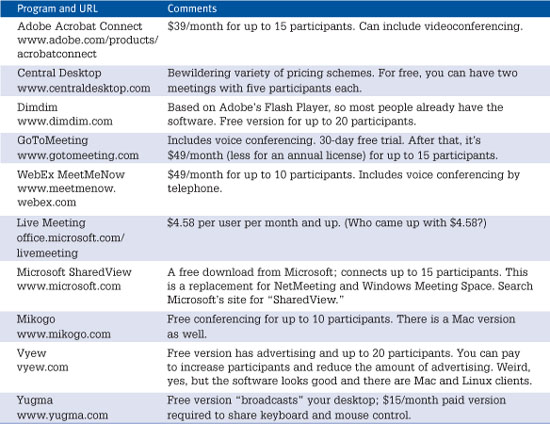
Table 36.1 lists some additional alternatives, third-party tools that you might want to investigate. There are numerous tools, and more are appearing all the time, so you might want to supplement this table with some Google searching.
Table 36.1 Third-Party Collaboration Tools