
26. Keeping Windows 7 and Other Software Up to Date
Introducing Updates
Windows 7 is an ever-evolving operating system that requires new updates and maintenance constantly. These updates benefit your computer and render it more secure and stable. Microsoft facilitates the process of keeping your computer system up to date via Windows Update. This built-in tool downloads the most current updates, fixups, hotfixes, drivers, and so on for your system and then commences an installation. Updating has never been so easy and so visual.
Over a period of time, your system will accumulate many updates and newly formed software that Microsoft supplies. As you probably know, Microsoft sometimes gathers a mess of these into one package or compilation and releases it as a service pack.
Later in this chapter, we discuss how to install and remove software applications, including issues of running older programs. As mentioned in Chapter 1, “Introducing Windows 7,” older (16-bit) software that you have been using for years will have compatibility errors with 64-bit Windows 7, and you’ll learn more about these 64-bit compatibility issues later in this chapter. Also included is a description of side-by-side installations in Windows 7, and how the OS uses virtual registries to run different versions of the same software on a PC.
Windows Update
Windows Update is an important built-in online tool that ensures your system gets all the latest software additions and bug fixes. Unlike the Windows Update version in Windows XP, Windows 7 supplies users an integrated update system that does not require the user to go to the Microsoft update website. Instead of opening a web browser, the new version of Windows Update opens in the same existing window.
Windows Update has been made to be seamless to its users. Let’s say a newly installed update requires a restart while you are in the process of doing important work. You can postpone that restart easily without any disruptions. Also a great feature to Windows Update is the way it handles updates for already running programs. If Windows Update has an update that needs to be installed on an already running program or service, Windows will safely stop the program or service, install the update, and then restart it. This doesn’t apply to every program, such as Microsoft Office applications or games, but it does cover antivirus software running continuously in the background and similar programs.
Windows Automatic Updates
Windows users all know how important critical updates are to a system. Windows Update downloads and installs updates automatically by default, guaranteeing your computer acquires all the newest important updates. The tool runs at a scheduled time daily, although you can change the setting to check once a week (which isn’t recommended). Windows Update’s default setting is to install important (critical and highest-priority) updates first, and then recommended updates. The tool lets you choose whether to install other updates that pertain to your computer but are optional, such as a driver update for your network adapter.
Note
![]()
The Windows Update technology is robust. Among other things, system administrators can use it to control updating many machines across a network.
Upon installing Windows 7, Windows Update is configured to check for updates daily at 3:00 a.m. If you open the Windows Update tool and click Change Settings in the Tasks list, you’ll see a prominent green shield icon with a check mark alongside a menu item recommending you leave automatic updates turned on (the default). Selecting Never Check for Updates (Not Recommended) from the drop-down list displays a red shield with an X in the middle.
Note
![]()
In Windows 7, you must be logged on as an Administrator, or provide an Administrator password in the User Account Control (UAC) dialog box that appears, to install components or modify Windows Update automatic settings.
With automatic updates enabled, information about your computer will be uploaded to the Microsoft Windows Update Database. Then security patches, critical updates, office updates, drivers, and operating system service packs will be automatically downloaded and installed to your computer. If you decide to deactivate automatic updates, you will be bugged incessantly about it, so why fight a good thing? We believe this is good thinking on Microsoft’s part.
Note
![]()
Windows does not use your name, address, email address, or any information that can be used to identify you or contact you.
Allowing Windows to download and install updates automatically keeps your system current without having to remember to initiate an update check. It does not matter whether you have a broadband or dial-up connection. Windows Update downloads just the files you need, or just the parts of the files you need, thereby keeping the downloads as small and fast moving as possible. The system is made additionally efficient by ensuring the system downloads and installs the most crucial updates before less-important patches. So when the next virus outbreak hits, Windows users will immediately be protected. To additionally make the most of your connect time, if you disconnect from the Internet before your updates are finished, nothing is lost.
Letting Windows automatically update can sometimes cause your computer to automatically reboot by itself—a few important updates require a restart to successfully install. That means if you leave Windows Update at its default settings, you could potentially lose unsaved work. For example, say you leave your computer to automatically update at 3:00 a.m. every day, and the previous night you worked on important Word documents and left your computer on. While those important documents are open on your computer (and unsaved), Windows downloads and installs an update that requires a restart. Windows will restart automatically, which could cause you to lose your work. This default selection might not be the best choice for you, and you might want to change these settings.
Caution
![]()
With Windows 7, keep in mind that with automatic updating turned on, Windows might restart your computer automatically after installing updates. Always save data and close programs if this option is activated. Otherwise, change how Windows controls automatic updates!
To alleviate this type of problem Windows 7 supports hotpatching, which enables Windows 7 to install most system updates without rebooting. This is a welcome feature, especially if you like the convenience of automatic updates but dislike having backups, remote access, or other tasks disrupted by system reboots after updates are installed.
Be aware that it is still possible that an update could damage your system. Windows Update creates a restore point for your system before installing the available updates. If a problem does occur, you can always roll back a system to its state before the update (see “Installing and Removing Software,” later in this chapter).
Windows Update Applet and Functions
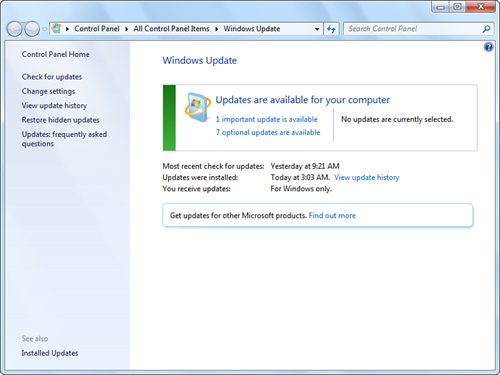
As you can see from Figure 26.1, the user has different options for updating her system. On the main Windows Update applet, you can see the basic settings applied, the last time the system was updated, and what kind of updates (for Windows only). On the left side of the window is a list of options that the user can select.
Figure 26.1 The Windows Update applet.
Manually Install Updates Using Windows Update
Tip
![]()
Another way of getting to the Windows Update page is to click Start, All Programs, Windows Update.
The process to manually update Windows is easy and user friendly. By manually updating your system, you can obtain various critical and noncritical updates. To use Windows Update manually, follow these steps:
1. Click Start, Control Panel, System and Security, Windows Update.
2. In the Windows Update window, click Check for Updates in the Tasks list. Windows Update will then look for all possible updates.
3. After a list of updates appears, you can select and install the updates you want. If you don’t install Important updates at this time, they will be installed during the next scheduled automatic update.
Manually updating your system allows you to decide which updates you want and lets you know which updates you need.
Updates Do Not Install Properly
![]()
If one or more of your Windows Updates did not install properly, or the program failed to install and/or produces an error, check the following:
• Is there enough free disk space on your computer? An update will not install if there is insufficient free space for it to install on. Free up space on your system and reinstall the update.
• Did you accidentally cancel an update while it was installing? If the update was not fully downloaded, run Windows Update again. If the update was downloaded but not installed, simply go back and reinstall the update.
• Was the Microsoft Software License Terms accepted? If an error code was created about licensing, review the error code and select Try Again. When the licensing agreement opens it will ask you to review the license and agree to the terms.
• If none of the preceding solutions works, review the error code that was created and search online for more help.
Other Windows Update Settings
You can also hide an update if you do not want to install it. If Windows consistently asks you to install an update and you have no desire to, just hide the update. To hide an update, right-click the update you want to hide and select Hide Update from the shortcut menu. Hiding an update is helpful because you essentially filter the list to display only those updates you’re interested in. If you want to see hidden updates again, click Restore Hidden Update in the Tasks list of the Windows Update applet. To install an update, it must not be hidden. If an update is hidden and you do want to install it, restore the update first and then install.
Can’t Find Hidden Update
![]()
You occasionally won’t be able to locate an update you unhid. The likely cause is that a newer update that addressed that problem has already been installed. Windows 7 will check whether a newer update has already been installed before it will allow you to install the older update.
Also, after every update, you can view the installed updates by clicking View Update History, which visually shows you all updates that were installed (or attempted), whether the update installation was successful, the priority of the update, and the date of installation.
Windows Update also allows you to change certain settings pertaining to updating. By clicking Change Settings, you will see options for Windows automatic updating, recommended updates, and which users can install them (see Figure 26.2).
Figure 26.2 Change Settings window in Windows Update.

The Important Updates section offers four drop-down menu items that affect automatic updates. The default setting is to install updates automatically at a set time. You may change this setting if you want to (1) choose which updates to install or (2) choose the updates before downloading. The ability to selectively install updates is valuable. Without choosing one of these options, Windows may automatically restart your system, in which case open or unsaved files could be damaged or lost. If you’re the type of user who always reads and responds to system messages, consider changing to one of these settings—automatic updates are important to your system, but you do not want them to ruin your important work. The last option, Never Check for Updates, is strongly discouraged by Microsoft.
When would you use the fourth option, to turn off updates altogether? In general, we’d rule that out as an intelligent option, with two exceptions:
• If you have a computer that is almost always off the Internet or a LAN, is “mission critical” (has to be up and running), and rarely if ever has new software (including email) added to it, this is a potential candidate. When we get such a dedicated system running, we don’t have much interest in tempting fate with software or system upgrades.
• If you’re running and maintaining PCs in a corporate setting. These PCs are connected to the Internet and probably on a corporate network. You want to rigorously test updates before you install them across the corporation’s PCs because Microsoft patches and updates can sometimes break your applications’ features in subtle ways.
Note
![]()
All updates that pertain to maintenance and support for Microsoft products are free.
New to Windows 7 is the Allow All Users to Install Updates on this Computer option, which is selected by default. Previous versions of Windows required the user to be logged on as Administrator to manually install updates. This new option lets standard users install all updates, including optional updates, without prompting for administrative credentials. We recommend leaving this option selected on standalone computers.
Finally, the Change Settings window also includes a Microsoft Update check box that enables you to receive updates for Microsoft products and check for new optional Microsoft software when you update Windows.
Viewing and Changing Installed Updates
As stated previously, some updates can cause system problems. By viewing which updates are installed on your computer you can repair critical updates and remove optional updates (see Figure 26.3).
Figure 26.3 Viewing installed updates.
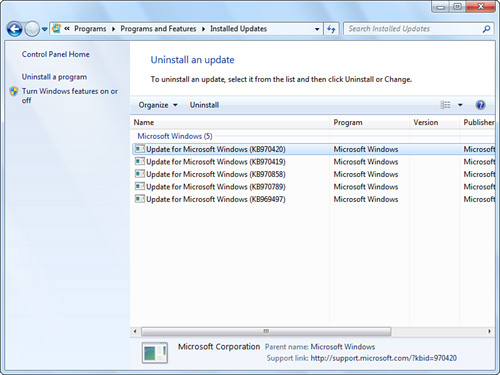
To repair or uninstall an update, follow these steps:
1. Click Start, Control Panel, Programs, Programs and Features, View Installed Updates.
2. Under Programs and Features select View Installed Updates.
3. A list of all updates displays. Click the update you want to change.
4. After selecting an update, you will see various details in the middle of the window. Also, on the top toolbar there will be an option to uninstall (see Figure 26.3). Uninstalling asks for an administrative confirmation before uninstalling.
Can’t Uninstall Current Update
![]()
If your current update is not uninstalling or Windows 7 reports that the update cannot be uninstalled or produces an error upon uninstalling, the problem might be that Microsoft is not allowing you remove that particular update.
If an update is an Important update and applies to the security of the OS, you cannot install it. Otherwise, if you’re on a network, make sure your computer is actually connected to the network. Uninstalling an update requires your computer to be connected to a network due to the Group Policy. Group Policy is a network administrative tool that will manage all settings for users and other computers.
If an update that you uninstalled keeps automatically installing on your computer, then the automatic updating feature in Windows could be the culprit. If you have Windows Update set to update automatically, you may experience this problem. To solve it, you do not have to shut off or change the setting to automatic updating. Instead of disabling features, uninstall the update, click Check for Updates, and then click the appropriate Updates are Available link. This will display a list of updates you may install and the update that keeps automatically installing. For the update you do not want installed, simply right-click the update and select Hide Update.
Updating Drivers
Keeping your system up to date also means that device drivers need to be kept up to date. Updated drivers allow your devices to work properly and will maximize compatibility. In Windows 7, updating hardware drivers is made simple and easy. Microsoft has greatly improved automatic driver selection in Windows 7 to be more accurate, to avoid the prompts plaguing past Windows versions, and to work even when a user isn’t logged on.
You might have to update a driver if you encounter problems with the device—for example, if there are printing glitches or if Windows crashes with the famous “Blue Screen of Death.” If you encounter this sort of problem, you may find that the support pages on the manufacturer’s website direct you to download and install an updated driver. They should give you clear instructions, but here is some additional advice:
• Do you have permission to upgrade drivers? It is necessary to be logged in as Administrator or at least to have an Administrator password when prompted by a UAC box to update drivers.
Tip
![]()
You might want to try running Windows Update and see whether Microsoft lists updated device drivers for your system.
• Is it really the latest driver? Check the manufacturer’s site and the Microsoft site to see what you can find.
• Does the “new” driver work with Windows 7? Make sure that the new driver is for Windows 7 because other drivers for other versions of Windows might not be compatible.
Tip
![]()
Windows 7 lets administrators set up in a Driver Store drivers that standard users can install when needed, even without administrative privilege. Windows 7 also gives standard users the flexibility needed to install permitted classes of devices even if drivers aren’t already in the Driver Store on the local machine. To give standard users this privilege, open the Group Policy Editor (gpedit.msc) and navigate to Computer Configuration, Administrative Templates, System, Driver Installation, Allow Non-Administrators to Install Drivers for These Devices. For more details about the Driver Store and User Access Control, search Microsoft TechNet at http://technet.microsoft.com/en-us/default.aspx.
Using Device Manager to Update Drivers
After you’ve downloaded new driver, it is time to install using the Update Driver Software window. To access the Update Driver Software window, follow these steps:
1. Click Start, Control Panel, Hardware and Sound, Device Manager. (If you are not logged in with Administrator privileges, the Device Manager box will not open without additional input.) You can also type device manager in the Start Search box and select it from the results list.
2. In Device Manager, locate the device, right-click it, and choose Update Driver Software.
The Update Driver Software window gives you two choices, as shown in Figure 26.4.
Figure 26.4 The Update Driver Software window with the list of options.

• Search Automatically for Updated Driver Software—Gives permission to Windows to search and locate any drivers on your computer and on the Internet. After Windows searches your computer and the Internet for drivers, if it finds a new driver, it automatically installs it. If no new drivers are found, Windows tells you that your current driver is the most up to date.
• Browse My Computer for Driver Software—If you’ve already downloaded the driver or want to use a specific driver, enables you to choose to browse and locate that selected driver. When you choose to find the driver by yourself, Windows again gives you options. The first option is to manually locate the driver. To locate the driver you can either type in the location or click Browse. The second option is to choose a driver from a list of device drivers on the computer. When selecting to choose the driver from the list, a selection of device drivers is generated. You can decide which driver you want and install it.
Tip
![]()
Downloadable drivers are usually stored in compressed form on the manufacturer’s website. If the file is an EXE (executable) file, you will need to open it before you can use its contents; opening it might also install the driver for you. If the driver is in a ZIP archive file, you will need to uncompress it. Fortunately, Windows 7 can uncompress ZIP files for you. You won’t need to download a separate unzipping utility.
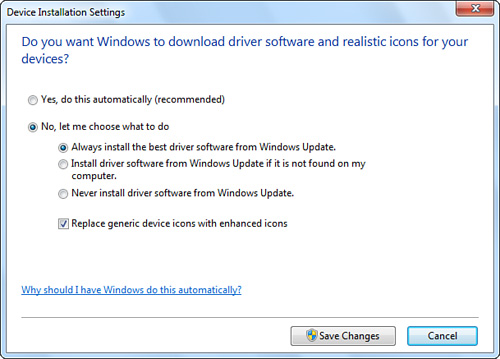
Windows Update Driver Settings
![]()
When installing a new device to your system, Windows 7 will usually automatically install drivers seamlessly. After installing these drivers, Windows 7 continually looks for newer drivers online by using Windows Update. These driver checks and updates happen without you even knowing about them. But in Windows 7 these settings can be changed. To alter these settings, follow these steps:
1. Click Start, Control Panel, System and Security.
2. Select System and click the Change Settings link located in the lower-right side of the page.
3. The System Properties dialog box opens; click the Hardware tab.
4. On the Hardware tab, open Device Installation Settings, and then click No, Let Me Choose What to Do.
You can choose from three settings to instruct Windows Update how to update your drivers (see Figure 26.5). The default and recommended setting is to allow Windows Update to automatically install updated drivers. Another option is to have Windows Update install a driver if the driver software isn’t found on your computer. Finally, you can choose to never allow Windows Update to install driver software, which means you must manually update drivers in the future.
Figure 26.5 Device Installation Settings window.
Service Packs
Windows 7 is part of Microsoft’s “New Technology” or NT family of OSs, along with Windows Vista, XP, NT, 2000 Professional, the various flavors of Windows 2000 Server, and Windows Server 2003. These OSs were designed from the ground up for stability, reliability, and security. To keep them in tip-top shape, Microsoft releases a constant stream of software updates as follows:
• Important updates—Fixes for bugs that are so severe or involve such serious security risks that you really have to install them. As you know, Windows 7 can automatically download and install these, or at least download and offer to install them, so you don’t miss out. Important updates can be listed by using Windows Update.
• Recommended updates—These are not security fixes but are updates to accessory programs such as Messenger and Media Player, new desktop themes, and the like. Recommended updates can be listed by using Windows Update.
• Hotfixes—Bug fixes that affect a small enough group of users that Microsoft doesn’t send them out to everyone. Instead, you have to hunt for them by searching online, or hear about them from Microsoft’s Tech Support department. They’re not widely advertised because if you’re running into a serious-enough problem, you’ll go looking for the solution, and hotfixes tend to be released in a hurry without extensive testing, so they sometimes cause new problems of their own. Hotfix users tend to be corporate IT people whose job it is to stay on top of these things.
Tip
![]()
Windows hotfixes are available from the Microsoft Download Center at www.microsoft.com/downloads. On the same web page, you can sign up for the Microsoft Download Notifications service, which sends you a weekly email listing downloads in the categories you choose.
Basic Service Pack Information
Periodically—it’s supposed to be every 12 months but in practice it’s less often—Microsoft gathers all the important updates, recommended updates, and hotfixes, tests them extensively, and releases them as a service pack (SP). Some service packs are a complete, cumulative set of fixes and additions made since the initial release of an OS, whereas others are incremental and can depend on the installation of a prior service pack. You can obtain service packs on media (discs) or download them from the Microsoft Download Center.
You might wonder whether you really need to install service packs, because you probably install the important updates that Windows 7 downloads and informs you of from time to time. The answer is emphatically yes, for two reasons. First, service packs fix those annoying but minor bugs that you may not even realize are there—that odd crash every other week, or that weird sound that Media Player makes once in a while. Service packs can also include numerous performance improvements and new features. Second, application programs will eventually appear that require a certain service pack level to run correctly. Windows evolves, so you need to keep up. Those two reasons alone are enough to warrant installing any service pack.
Here are some other things that you should know about service packs:
• They’re either incremental or cumulative. An incremental service pack usually requires the installation of a previous service pack, if applicable. A cumulative service pack includes the old service pack(s) and more.
• Starting about the same time that Microsoft releases a service pack to the public, new computers purchased from major vendors should come with the service pack preinstalled. (At least, it should be an option. If you’re buying a new computer, ask for the latest version.) To check the current service pack level of your Windows 7 computer, open your System Information screen.
• Shortly after Microsoft releases a service pack to the public, retail versions of the OS will include the service pack. If you are shopping for additional copies of an OS for upgrading existing PCs or for installation on new PCs, be sure to buy versions that include the latest service pack. A sticker or note on the package indicates whether a service pack is incorporated.
Note
![]()
In a corporate environment, your IT department will most likely control the installation of service packs.
• It’s likely the procedure for installation of previous service packs will be similar for subsequent service packs as well.
Installation of Service Packs
There is a variety of ways to install a service pack, as presented in the following list:
• Windows Automatic Updates—If your computer was set up to automatically download important updates, and you spend enough time connected to the Internet, a service pack will be downloaded automatically. All of the required service pack files will have already been downloaded by the time you get the notification to install them.
• Windows Manual Update—If the automatic updates feature is not enabled, you can install a service pack from the Windows Update window. Windows Update will download from Microsoft just those service pack components needed for your computer, saving some download time over the “standalone” method. However, if you have more than a few computers to update, you’ll save time by using the standalone method.
• Standalone—The standalone method is the traditional service pack format. It’s a compressed file that contains all of the updated files. If you have multiple computers to update, and Internet access is difficult or slow, perhaps the standalone method is the one to use.
Before installation of a service pack, follow these guidelines:
• If you use Fast User Switching, be sure all users are logged off. Then, log on as an Administrator. Close any running applications.
• We recommend you perform a full backup of the files you keep on your computer using Backup and Restore.
![]() To learn more about the Windows 7 Backup and Restore feature, see “The All New Backup and Restore,” p. 863.
To learn more about the Windows 7 Backup and Restore feature, see “The All New Backup and Restore,” p. 863.
• Check the websites of the manufacturers of your computer, your application software, and your antispyware and antivirus packages for updates or special instructions regarding the service pack. Some programs may need to be updated to work with the new service pack. For a list of programs with known compatibility issues with Windows 7 service packs, search the Microsoft Knowledge Base available at http://support.microsoft.com.
• If you suspect your computer may have viruses, spyware, adware, or other pestilential software, take steps to remove it before installing the service pack. These programs can cause serious networking and Internet connection problems after installation, and without a functioning Internet connection you may not be able to download the necessary clean-up tools. See Chapter 30, “Protecting Windows from Viruses and Spyware,” for details.
• Disable any real-time virus scanners; they can slow down and possibly interfere with the installation. Disconnect from the Internet first if you do this.
• You will need free space on your hard drive for installation.
After following these suggested guidelines, you will be ready to install your service pack.
Installing and Removing Software
Microsoft went the extra mile in working with software (and hardware) developers to ensure a high level of compatibility with Windows 7. The result is a streamlined, user-friendly installation process for thousands of software applications, without the glitches experienced when Windows Vista was released.
As you know, installation of new programs is usually as simple as inserting a media disc into the drive. The autorun program on most application discs does the rest. Or, when it doesn’t, you can run the Setup file on the disc, and the rest is automatic. Ditto for programs you download from the Internet. The following section explains how to install software in these different ways.
Note
![]()
If you are using a Standard user account, you will likely be prompted for an Administrator password when you try to add or remove software programs. If you are logged in as an Administrator, you will be prompted to click Accept or OK for the same procedures.
Installation via CD or DVD
Installing software from a disc is user friendly and easy. Here is what you do:
1. Insert the disc into your computer.
2. Follow the onscreen instructions.
3. Most programs will automatically try to start and begin the installation wizard. If this program automatically tries to install, you will be presented an AutoPlay dialog box that asks whether you want to run the installation wizard.
4. Some programs do not automatically run an installation wizard. In this case, check to see whether the disc comes with instructions or any information for installation. If the installation disc does not come with any instructions, open the disc to view its files. Try to find an install.exe or setup.exe (executable) file, and open that file. This should start the installation wizard and install the rest of the components.
5. The User Account Control dialog box appears, prompting for administrator confirmation that this install is allowed.
6. Enter a password, if prompted, and select Yes to the confirmation, and the software installation will begin.
Problem Installing from Disc
![]()
If you have inserted a disc into the drive but it is not installing, first make sure that you are installing the software correctly.
If there is still a problem with the install, check the disc to see if there are any scratches or blemishes that could create a problem. Scratches on discs can be a major problem and can make the disc reader fail to read the disc correctly. If the disc is okay, check your disc reader. If your disc drive is broken or is faulty, take your computer to a local computer technician.
Installation via Downloaded Program
Installing a program that was downloaded from the Internet is just as easy as installing a program from a disc. Before installing a program, do the following:
• Make sure you trust the publisher of the software.
• Scan the file for viruses. Sometimes antivirus programs can find harmful viruses that can disrupt your system.
• Beware, some programs contain spyware and other software that can be annoying or even harmful.
After you are prepared for installation of your software, follow these steps:
1. Open your web browser and determine where the software is located online.
2. After you find your software, you will be presented two choices: to open and run the program now or to run at a later time.
3. If you want to install your software immediately, click the link to the software. Select Run or Open and follow the instructions.
4. If you want to save the software and install later, click the link and select Save. When you are ready to install this program, find the file on your computer and double-click it.
Note
![]()
Sometimes, software can be downloaded as a ZIP or another type of compressed file. In this case, download and save the software on your computer, then right-click the file and select Unzip to uncompress. Windows 7 has a built-in function to uncompress ZIP files.
Viewing and Changing Programs
In Windows 7, you can monitor and change software that is currently installed on your computer. Windows 7 provides a helpful way to show you what software is on your computer.
As you can see in Figure 26.6, you can view information about all installed programs, including how many programs there are, who the publisher of each program is, when a program was installed, and how much space a program takes up. You can easily organize and change views however you please to better fit your preferences.
Figure 26.6 Viewing installed programs in Programs and Features.
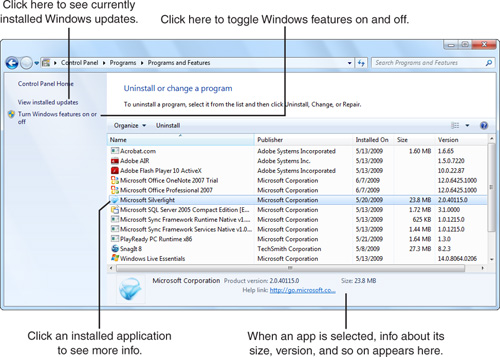
By clicking any of the installed programs on the list, you can view a program’s detailed information in the lower part of the applet. This can help you see what version of the program is installed and allow you to check whether the program is up to date.
On the left side of the window, Windows 7 gives you a few options. The first link lets you view installed updates; these are all the Microsoft updates your system contains.
![]() To learn more about how to view and change Windows updates, see “Viewing and Changing Installed Updates,” p. 763.
To learn more about how to view and change Windows updates, see “Viewing and Changing Installed Updates,” p. 763.
Also on the left side of the Programs and Features window is a Turn Windows Features On or Off link, which is described in detail in the next section.
Uninstalling Software
As you know, many programs come with their own installation (Setup) programs that handle all the details of installation, such as file copying, making Registry additions, making file associations, and adding items to the Start menu. An ever-growing number of applications even provide their own uninstall routine, which appears as a unique icon within their Start menu folder. But sometimes programs do not come with built-in uninstallers, or you just want Windows to handle these uninstalls.
Most modern applications are written in compliance with the Microsoft Windows standards for installation and removal. Thus, you see them in your installed applications list in the Programs and Features applet. This list is mainly the result of the PC software industry’s response to kvetching from users and critics about tenacious programs that are difficult to root out after they’re installed. Some ambitious programs spread themselves out all over your hard disk like oil on your garage floor with no easy way of reversing the process. Users complained about the loss of precious disk space, unexplained system slowdowns, and so forth.
Tip
![]()
Never attempt to remove an application from your system by deleting its files from the Program Files folders (or wherever). Actually, “never” may be too strong. Removal through manual deletion should only be a last resort. Always attempt to use the Programs and Features applet or the uninstall utility from the application first.
To uninstall software, follow these steps:
1. Click Start, Control Panel, Programs, Programs and Features.
2. Select the program you want uninstalled or changed.
3. Click the Uninstall button on the toolbar.
4. The Programs and Features dialog box appears, asking if you’re sure you want to uninstall the program. Click Yes.
5. UAC will ask for administrator confirmation if this uninstall is correct. Enter the password, if necessary, and select Yes to the confirmation. The software will uninstall automatically.
Uninstalling a Program
![]()
If the program you want to uninstall doesn’t appear in Programs and Features, check its All Programs listing to see if it comes with its own Uninstall program. You can also search for more information about the product. Programs usually come with ReadMe notes or have extra information online.
Also with Programs and Features, you can turn on or off any Windows feature, as shown in Figure 26.7. Turning off a feature can customize Windows 7 for you. For example, if you are running Windows 7 on your desktop and only use a mouse and keyboard for input devices, you can turn off the Tablet PC Components. You do have the option to turn on any feature that is available as well. It is up to you which functions you want to use.
Figure 26.7 Windows features can be turned on or off.
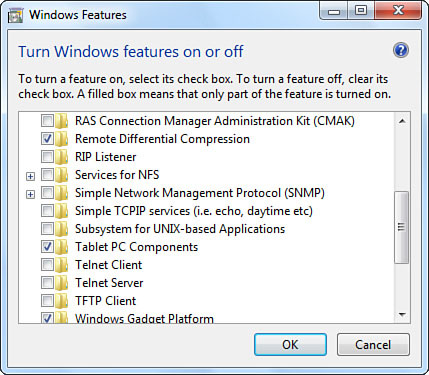
Enabling and disabling features is easy and self-explanatory. Click the Turn Windows Features On or Off link in the Tasks list. If you want to turn on a feature, select the check box next to it to fill in the box. If you do not want a feature, just click the check box to clear it. If you do want to turn off a feature, make sure that you know what you are turning off.
Note
![]()
Turning off a feature does not uninstall it completely off your computer as in Windows XP. Instead, it keeps the feature on your hard drive to give you the later option of turning it on. This allows you to turn on and off any feature quickly but does not free up any space on your hard disk.
Compatibility Issues in 64-Bit Version
Windows 7 64-bit is a unique OS that targets and utilizes 64-bit processors. It offers the main benefit of breaking the 4GB RAM limitation, enabling your system to run applications faster than 32-bit environments, and run a lot of applications simultaneously without any noticeable slowdown.
With these great benefits comes a downside. Windows 7 64-bit has some compatibility issues and other limitations. Old 16-bit applications, legacy installer applications and 16-bit DOS, and even 32-bit drivers (you must install x64-bit drivers) are not supported in Windows 7 64-bit.
Windows 7 incorporates Registry redirection and file redirection that is responsible for all the OS’s applications compatibilities. However, 64-bit Windows 7 does not incorporate this feature, and many legacy applications will not run or install.
Other Program Compatibility Issues
While running Windows 7, you might decide to install an older program or game. However, Windows 7 might not install the program or might not run the program correctly once installed. Windows 7 sports a new version of the Program Compatibility Wizard to help work around this kind of incompatibility.
The Program Compatibility Wizard is designed to change the compatibility of a certain program and allow that program to work in Windows 7. To open and use this wizard, follow these instructions:
1. Click Start, Control Panel and type Program Compatibility in the Search box at the top of the screen.
2. In the results pane, click the Run Programs Made for Previous Versions of Windows link.
3. Control Panel starts the Program Compatibility Wizard. If you’re not logged in as Administrator, click Advanced, click Run As Administrator, enter the password, and then click Next.
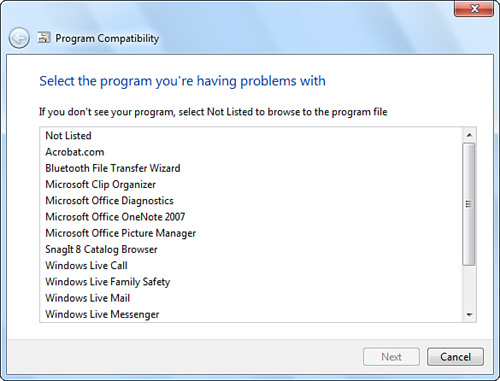
4. Windows 7 scans your computer for potentially incompatible programs and displays a list (see Figure 26.8). Select your desired program and click Next.
Figure 26.8 The Program Compatibility Wizard displays a list of programs you can troubleshoot.
5. In the Select Troubleshooting Option screen, click Troubleshoot Program.
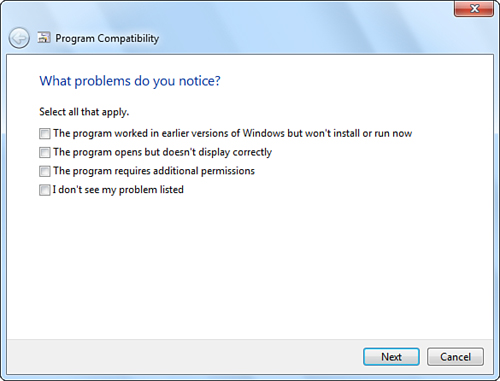
6. The wizard presents a list of problems you might have encountered (see Figure 26.9). Select The Program Worked in Earlier Versions of Windows But Won’t Install or Run Now. You can also select any of the other options listed, which might include problems displaying the program or getting permissions. Click Next.
Figure 26.9 The Program Compatibility Wizard displays a list of problems you might have encountered with a specific program.
Tip
![]()
If your program doesn’t appear in the list, click Not Listed, click Next, and then click Browse to locate the program on your hard disk, external drive, or CD or DVD.
7. The wizard asks you what prior version of Windows supported the program. Make a selection and click Next.
8. You have chosen all the basic options, so the wizard now asks you to test the program to make sure that it works correctly. Click Start the Program, and then return to the wizard and click Next.
9. After testing is completed, you are asked whether you want to save these settings, change the current settings, or report the problem to Microsoft and check for a solution online.
A new feature in Windows 7 Professional, Ultimate, and Enterprise editions is the capability to run legacy programs in Windows XP Mode. This is a virtual environment within Windows 7 that runs Windows XP with SP 3, enabling you to run all those Windows XP–based programs you can’t live without.
You can learn more about Windows XP Mode by visiting www.microsoft.com/windows/virtual-pc/features/default.aspx. Windows XP Mode is also covered in the “The Virtual Machine Approach” section in Chapter 2 and in Appendix A.
Side-by-Side Installs and Virtual Registries
Windows 98 Second Edition provided a feature called side-by-side DLLs. This feature allowed a developer to use the version of DLLs required by a particular program without overwriting system DLLs (those stored in the WindowsSystem folder). This feature worked only on Windows 98SE and only if the program developer took advantage of the feature.
Windows 2000 introduced Windows File Protection, which restored system files automatically if they were overwritten by an application when you installed it or ran it. This protected Windows from crashing but didn’t do anything about a program that needed a particular system file version to run.
Side-by-side installs enable users to install multiple versions of the same product on the same computer. For example, suppose Microsoft just released a new version of Office. You want to run a trial version of the new Office suite to learn about new features and test drive it, but you don’t want to uninstall the current, well-oiled version. However, multiple programs that use a different version of the same DLL sometimes cause complications—”DLL Hell.” When programs use the wrong DLL files, they crash and can take the whole OS down with them.
Windows XP Professional provided a way to handle DLL Hell. It was called Fusion. Fusion allowed programs to install whatever system files (DLLs and others) they needed and redirect any files that would replace system files to the program’s own folder. When such a program was run, Fusion created a memory-protected virtual machine to run the program with its own DLLs. The end result was that even if two or more programs were running at the same time, using different versions of DLL or other system files that would “break” the system in past versions of Windows, both programs would run properly. No other programs could touch the area of memory granted to each program. Nor could that program or other programs gain access to the area of memory in which the basics of the OS were running.
Windows 7 and Windows Vista contain a different method from the Windows XP solution. Instead of a single Registry, they use a virtual registry that contains multiple DLLs. A virtualized application registry eliminates any conflicts between software. So, if you want to have two versions of Microsoft Office available on the same computer, for example, the virtual registry lets you run them without conflicts.
Virtual registries also have one other important aspect. Because Windows 7 can create and use virtual registries for data, Microsoft applied this concept to users who do not have Administrator privileges. By using virtual registries, nonadministrative guests can use a virtual registry and will not disrupt the main Registry. Usually, only administrators have the rights that allow one to install software that writes to the Registry. But now nonadministrators can install software and other various programs onto the system without causing any harm. Windows 7 will continue to run and display all software installed but will not experience any permanent effect from the data on the virtual registry.
![]() To learn more about the Windows 7 Registry, see Chapter 28, “Editing the Registry.”
To learn more about the Windows 7 Registry, see Chapter 28, “Editing the Registry.”
Note
![]()
Windows Vista introduced virtual folders, which help users get data quickly and easily. This technology has been replaced with libraries in Windows 7. To learn how to use libraries and save searches, see Chapter 5, “Managing Files and Searching.”