
31. Protecting Your Data from Loss and Theft
The All New Backup and Restore
After years of providing slow backup and restore programs that ignored the widespread availability of rewriteable DVD and CD drives, Microsoft made its first big turnaround in Windows Vista with the introduction of the Backup and Restore Center (which is just called Backup and Restore in Windows 7). Although the features and functions of the Backup and Restore Center wildly vary by Vista edition, all Windows 7 editions provide a consistent, fast, and easy-to-use File and Folder Backup Wizard (occasionally referred to as SafeDocs backup) that supports rewriteable CD and DVD drives, as well as external USB and FireWire hard disks, internal hard disks, and shared network folders. However, the network backup option is not available in Windows 7 Home versions.
Users accustomed to Windows Vista’s Backup and Restore Center will appreciate the new features, functions, and format of the new Windows Backup applet. You’ll also instantly recognize subtle differences to the updated interface in Windows 7 Backup and Restore, which appears nothing like the original. The new Backup and Restore utilizes the same simple design principles but adds granular control over the files and folders you back up, giving you greater flexibility than ever before.
Improvements in the Backup and Restore Features in Windows 7
Windows Backup is structured differently in Windows 7 than in previous versions. The Volume Shadow Copy Service (VSS) is still present and maintains a historic timeline of file and folder changes (called shadow copies), so that you can revert back to previous file and folder states in case either becomes corrupted or damaged. System Restore, the convenient “undo” button for unwanted file and folder changes, is now divided into two parts: Restore My Files (for the current user) and Restore All Users’ Files (for everyone else on the system). Windows Backup also enables you to duplicate data for all users, and you’re given greater control over individual files and folders.
By default, your backups are created on a regular schedule, but you’re free to specify a custom schedule to better suit your usage needs. Windows backup keeps track of your backup preferences, so that whenever a file or folder is added or changed, it becomes incorporated into the scheduled backup. System Image backup (formerly Complete PC Backup) creates an exact duplicate of your working drive, so you can restore to “bare metal” operation whenever your system becomes damaged by malicious software or misbehaving users. Unlike file and folder backups, this is a complete and total restoration where all of your current applications, system settings, and files are replaced.
Note
![]()
Restore Previous Versions depends upon System Protection restore points (the same restore points used for System Restore). By default, System Protection is disabled for the system drive (usually, the C: drive). It must also be enabled manually for other hard disk drives. If you configure your system to store documents, photos, and other types of files on a different drive, then be sure to enable System Protection for that drive. See Chapter 25, “Troubleshooting and Repairing Problems,” for further details.
All Windows 7 versions support file and folder backup with the following options:
• Capability to back up to and restore from network shares
• Scheduled incremental file and folder backup
• Previous versions, which permits the user to revert to the previous version of a file or folder
• System Image Backup, which makes an image backup of a complete system and permits a “bare-metal” restore to the same hard disk, same-size replacement hard disk, or larger replacement hard disk
Table 31.1 lists the backup and restore features supported by each Windows 7 edition.
Table 31.1 Backup and Restore Features
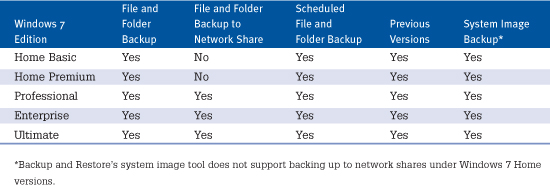
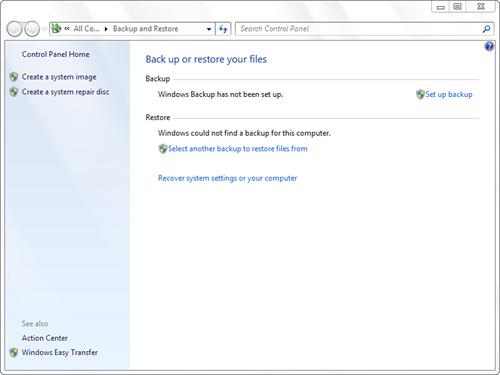
Figure 31.1 shows the all new Backup and Restore applet as it appears in Windows 7.
Figure 31.1 The Backup and Restore applet is simpler than ever before.
Although the Backup and Restore interface is the same in Home Basic and Home Premium, Home Premium has two additional backup capabilities:
• Home Premium can back up to a network share, whereas Home Basic can back up only to local devices.
• Home Premium’s file backup runs on a schedule, whereas Home Basic’s file backup runs manually.
Note
![]()
You must be an Administrator or provide Administrator-level credentials to perform backups.
File and Folder Backups Versus System Images
File and folder backups differ from System Image and System Restore image backups in several ways:
• You can restore individual files directly from a file and folder backup.
• File and folder backups are designed to protect an individual user’s data files, favorites, and settings (including email messages), but not the operating system.
• System images can be used to restore a system from a “bare metal” hard disk but are not designed to permit the restoration of individual files and folders.
Tip
![]()
If you need to restore a file from a system image, you can mount the VHD backup file created by Backup and Restore in Microsoft’s Disk Management snap-in on the Computer Management and retrieve individual files and folders, or you can use the command-line wbadmin tool. See “Using Disk Management with System Images,” in this chapter, p. 882.
Because of the differences in how file and folder backups, system images, and System Restore image backups work, your best backup strategy on systems that support system image and System Restore backups is to do the following:
1. Create a system image after configuring your system.
2. Set up automatic file and folder backups on a schedule that works for you.
By following this procedure, you can recover from a system crash by
1. Restoring a system image and System Restore image backup.
2. Restoring file and folder backups.
![]() To learn how to restore a system image backup from the Windows 7 Recovery environment (System Recovery Options), see Chapter 25.
To learn how to restore a system image backup from the Windows 7 Recovery environment (System Recovery Options), see Chapter 25.
Creating a File and Folder Backup
Windows 7 has vastly improved the native file and folder backup application and process. Backup and Restore is not set up by default, and you must first configure your backup preferences before proceeding, as follows:
1. Click the Set Up Backup button, shown in Figure 31.1, to get started. Windows Backup launches the Set Up Backup Wizard to guide you through each step.
2. In the next dialog box, select the location where you want to store the backup (see Figure 31.2). You’re given the choice of using a disk drive partition, rewriteable CD or DVD drive or hard disk, or a network share (Windows 7 Professional, Ultimate, and Enterprise only).
Figure 31.2 Selecting a destination drive or network share for the file backup.
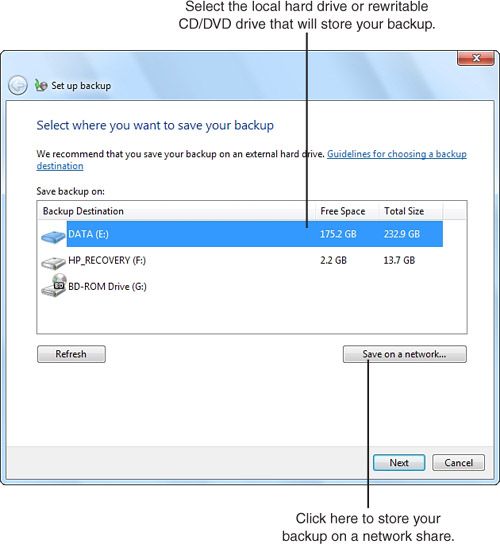
3. Choose the appropriate backup target. If you select a network share (Windows 7 Professional, Ultimate, and Enterprise only), you must log in to the network share if prompted, even if you are selecting a Public folder and Public Folder Sharing is turned on.
Tip
![]()
If you want to use network shares as backup destinations, set up the user(s) and password(s) on the network destination before you start the backup process.
4. By default, Windows Backup’s Set Up Backup Wizard backs up a wide range of user-created files (see Figure 31.3). The Set Up Backup Wizard enables you to selectively backup libraries, folders, and drives with the Let Me Choose option. There is also an option to include a system image of your drives, which is enabled by default and can be disabled with the Let Me Choose option.
Figure 31.3 Clear check boxes to skip backups of listed file types.
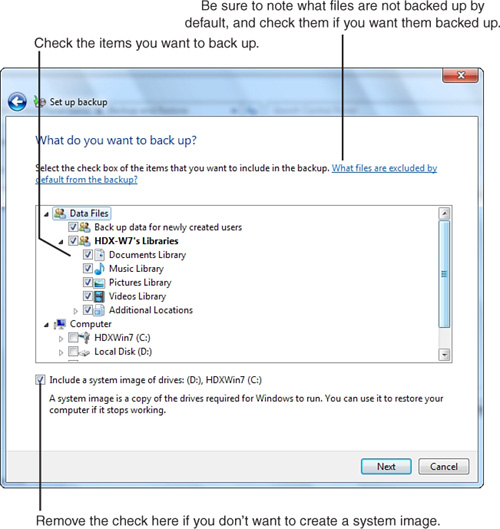
To avoid backing up a particular category, clear the check box.
Note
![]()
Use this feature to create backups of specific categories of files by clearing the check boxes for all but a particular category.
Note
![]()
The amount of space required for a full system image backup depends on the amount of data you’re duplicating. Windows keeps track of files that have been added or modified since your last backup and updates the existing image to save space. Microsoft recommends that you utilize a 200GB external storage device for creating system images, for two reasons: ample space and separate storage. Don’t keep system images on the same drive as the original system, because failures can complicate recovery in that situation.
5. Windows Backup then lets you review your backup settings, as shown in Figure 31.4.
Figure 31.4 The Set Up Backup utility lets you review your settings.
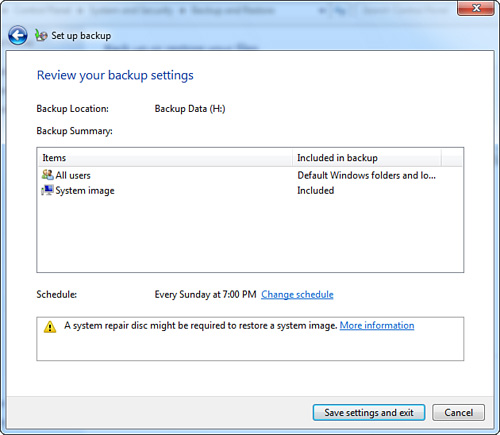
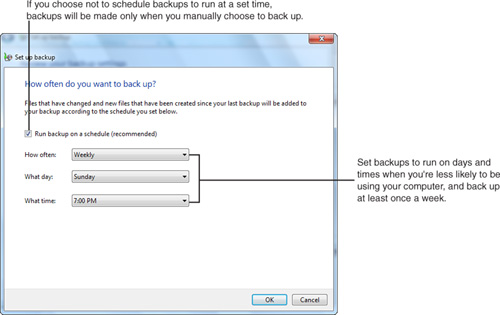
6. Select a schedule by clicking the Change Schedule link to open the Set Up Backup scheduling options dialog as shown in Figure 31.5, and then click OK when you’re done. Click the Save Settings and Exit button to begin copying your data to the designated backup target.
Figure 31.5 The Set Up Backup scheduler helps you automate your backups.
7. A progress dialog box displays the progress of the backup. At the end of the backup, a dialog box appears indicating whether the backup was successful. Click Close.
Note
![]()
The Windows Backup schedule can be manually specified by clicking the Change Schedule link at the Review Your Backup Settings prompt of the Set Up Backup Wizard. Otherwise, it will default to On Demand, which means backups occur only when you manually invoke the Windows Backup program.
Working with Removable Media During Backups
You can use removable-media drives such as Iomega REV or DVD-recordable drives with either Windows Backup or system image backups (Windows Backup can also use CDs). You must format each disc (unless it’s already formatted), and if you use CDs or DVDs with the scheduled backup, the backup will fail if the medium is not in place when the backup starts.
If you use DVDs for system images, you’ll probably be using a handful of DVDs for your backup. Instead, consider dedicating an external USB hard disk for backups. You can use the same hard disk for both Windows Backup and system image files, provided that it is large enough to accommodate both.
If you use CDs or DVDs for backups, you will see dialog boxes similar to the following during the backup process when it’s time to insert the medium:
• Label and Insert a Blank Disk—A dialog box displays the label format to use: computername, date, time, disk #. Click OK.
• Are You Sure You Want to Format This Disk?—You’ll see this dialog box unless you previously formatted or used the CD or DVD. Click Format.
Tip
![]()
To save time during the process, click the empty Don’t Ask Again for This Backup check box. When this box is checked, unformatted media is formatted automatically.
A format process bar appears, and the backup continues until it’s time for the next disc. If you use any type of supported DVD or CD-R, the format should take less than a minute. A CD-RW might take much longer. I recommend using DVDs instead of CDs to save time and disc swaps, but external hard disks make for faster and easier backups.
How Backups Created with Windows Backup Are Stored
Windows 7 uses an entirely different method to catalog, format, and store Windows Backup data than was used in previous editions. You can no longer directly access backup data; instead, you must go through the Restore Files Wizard of the Backup and Restore console. From here, you can select Browse for Files or Browse for Folders and view backup contents through a Windows Explorer interface.
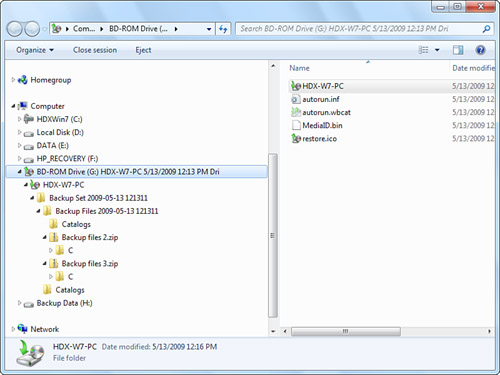
Figure 31.6 shows the internal structure of a Windows Backup archive, as shown in Windows Explorer. The first-level folder is the computer name, followed by nested folders listing the backup set name and date. The actual backup file is listed next, along with a catalog folder.
Figure 31.6 The folder structure of a typical archive created with Windows Backup.
Restoring Data from a File and Folder Backup
To restore data files from your backup, click Restore My Files from the Backup and Restore applet, which appears only when a valid backup file exists. The Restore My Files dialog box prompts you to select whether you want to restore the most recent backup or an earlier backup and permits you to make specific file and folder selections.
Restoring the Current User’s Data
Select Restore Files and choose whether to restore files from the latest backup or an earlier backup. Click Next to continue. In the next dialog box, click
• Browse for Files to specify individual files to restore
• Browse for Folders to specify folders to restore, or
• Search to specify search terms to locate items to restore
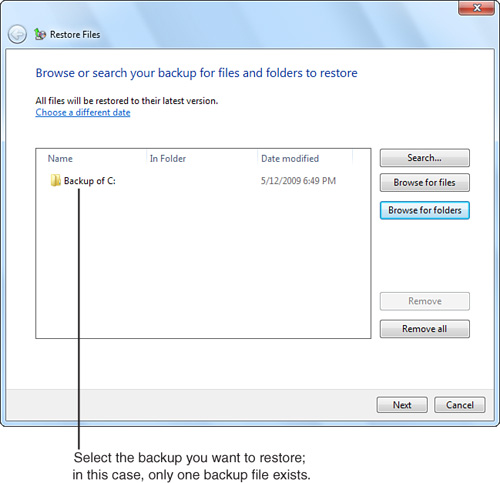
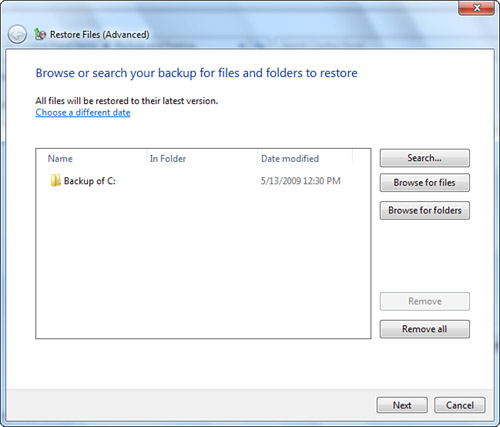
The backup catalog stored with the backup (refer to Figure 31.6) enables you to navigate your backup as you would use Windows Explorer to navigate a drive. After you navigate to the appropriate location and select Add Files or Add Folders, the files or folders are listed (see Figure 31.7). Click Next to continue.
Figure 31.7 Selecting a folder to restore with Restore Files.
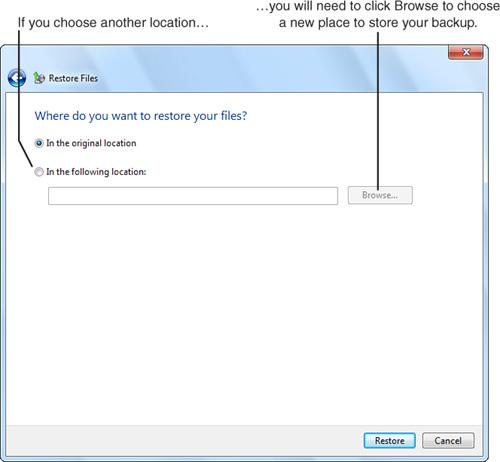
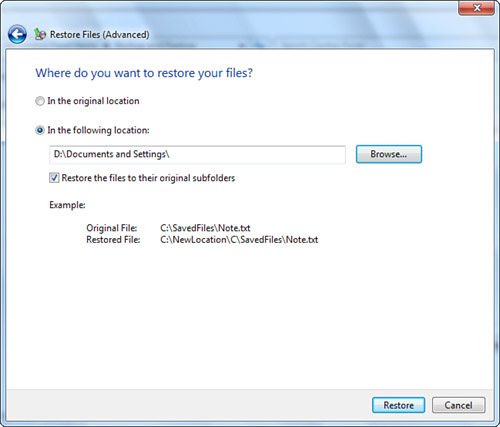
Specify where to save the restored files (see Figure 31.8). By default, the files are returned to their original location. However, you can also use the Browse button to specify a particular location (a helpful feature for testing a backup). If you select the option to choose a location, you can also specify whether to restore the files to their original subfolder and whether to create a subfolder for the drive letter. After specifying options, click Restore.
Figure 31.8 Preparing to restore a folder with Restore Files.
If the backup drive or removable medium is not already present, connect the backup drive or insert the appropriate medium when prompted. Click OK to continue the restore. At the end of the process, a dialog box appears indicating whether the restore was successful. Click Finish to close the dialog box.
USB Backup Device Not Recognized
![]()
If a USB-based hard disk or other backup device is not recognized, try a different port. On some systems, you can control the number of active USB ports in the system BIOS/CMOS setup. Thus, it’s possible that a port that’s physically present might be disabled.
If you plug the drive in to a front-mounted USB port and it is not recognized, try a port on the rear of the system. Front-mounted USB ports must be connected to the motherboard, and some motherboards might not have the connections needed to support front-mounted ports, the connections on the port might be disabled, or the ports might be miswired.
Finally, make sure Group Policy options are not preventing USB drives from working. If your company has standardized on a particular brand and model of USB external hard disk, a Group Policy setting can be created to permit those drives to work, while blocking unauthorized models.
If the drive plugs in to a USB port and works, but runs very slowly, a USB 2.0 (Hi-Speed USB) port might be configured as a USB 1.1 port in the system BIOS/CMOS program, or the system might have a mixture of USB 1.1 and USB 2.0 ports. Use only USB 2.0 ports for best performance (USB 2.0 runs at 480Mbps, while USB 1.1 runs at a top speed of 12Mbps). You will normally see a warning that you have plugged a Hi-Speed USB device into a low-speed port, but if USB warnings are disabled, you won’t see such a warning.
The process is quick and easy because the backup catalog on the system is used to select the files or folders to restore. If the backup catalog is lost, the files can still be restored by using the Advanced Restore option (next section).
Note
![]()
If you click Stop Restore after the system has started copying files to your system, the files that already have been restored remain on the system.
Not Enough Room for Backup on Target Drive
![]()
The Windows 7 system image and Windows Backup Wizards are easy to use for basic backup and restore, but if you use advanced options such as network shares or restores from a different system, the potential for problems increases. Make sure users check the target location for adequate space for a backup. If a drive has only a bit more space than the backup requires, the backup might fail or might run very slowly, especially if the drive has not been defragmented lately. Defragment the target drive before using it for backup storage. On a network drive, verify that the user has Read/Write access to the drive. If storage quotas are in use, verify that the user has been provided with an adequate amount of storage on the network drive.
Performing an Advanced Restore
The Advanced Restore option available in Professional, Enterprise, and Ultimate editions supports restoring all users’ data or data from a different computer. It can also be used to restore data from the same computer if the backup catalogs were lost. To perform an Advanced Restore, follow these steps:
1. Click the Restore All Users’ Files link on the Backup and Restore dialog box. This link is located below the Restore My Files button, both of which do not appear until a valid backup file exists.
2. The Restore Files (Advanced) dialog box opens, shown in Figure 31.9, presenting you with several options.
Figure 31.9 Selecting a backup source for an advanced restore.
3. Click the Choose a Different Date link to open the Restore Files history dialog and select whether to restore files from the latest backup, a previous backup, or a backup from a different computer. Choose Search to search for a restore file by a given keyword. You can also separately browse for files and folders. Click Next to continue.
4. Specify the location of the backup (see Figure 31.10). To enable the system to detect the backup source, be sure to insert the backup medium or connect the backup hard disk. Click Restore to continue, then click Finish on the next dialog box.
Figure 31.10 Specifying an alternative destination for an advanced restore from a different drive path.
Backup Hardware Not Working
![]()
The easiest way to determine whether your backup hardware (hard disk or CD/DVD drive) is failing or has failed is to swap the unit for another unit. During the writing of this chapter, I had a number of problems working with rewriteable DVDs during backups. I swapped drives with another system, and the problems went away. The result: I now have a dead DVD rewriter on my junk shelf.
If the problem happens only after an update to Windows, try using System Restore to revert your system to its condition before the update. Use the drive’s properties sheet in the Device Manager to roll back to a previous driver version if you suspect that an updated device driver isn’t working as well as the old driver.
If you are restoring data from a different computer, the original user account might not match any user on your computer. In such cases, a Missing User Account dialog box appears. You have two options for restoring the data:
• Create a user with the same name on your system before continuing.
• Click the check box to restore files without reassigning security permissions.
Note
![]()
If the files are being transferred to a computer that will be used by the owner of the original files, create a user with the same name so the files can have that user’s permissions. However, if file ownership is not important, click the check box and assign the files to a particular owner later.
It would be a good idea to test your backup before things go wrong. Create a new folder and restore selected files or folders to it. If they restore correctly, you know your backup works. If not, you’ve discovered a problem before it’s too late.
Follow the option that makes the most sense in your situation, and click Continue. The restoration begins immediately. Swap media, if prompted. Click Finish at the end of the restoration process.
Can’t Locate File to Restore from a Multidisc Backup Setup
![]()
If the user needs to restore a multidisc (CD or DVD) file backup from a different computer, insert the last backup disc first when prompted for media. This ensures that the catalog will be read properly. Because file backups are stored in separate ZIP files of no more than 200MB each, each disc can be restored separately.
Creating a System Image (Complete PC Backup)
You should create a system image backup as soon as you have installed Windows 7 and configured it to your liking. By doing so, you create a baseline configuration that you can return to in case of a major system crash. From this base configuration you may then add later backup data from your personal collection (documents, pictures, and so forth). We recommend you create a complete system image when you first configure your computer, and then every six months afterward, and back up your personal files regularly with Windows Backup.
Note
![]()
A system image file is stored as a virtual hard disk (VHD) image of the entire disk, excluding some files such as the page file, hibernation file, and so on. For subsequent backups, system images use the persistent VSS mechanism to retain a snapshot of the initial VHD image, and then do a block-by-block image update of the VHD. The VHD now has the most recent disk image, and the shadow copy presents the earlier image (that is, Windows retains the original versions of all changed blocks). System image backups can keep quite a few backups of previous versions this way, depending upon available disk space. In each case, the disk image copy is performed on a temporary VSS snapshot of the live hard disk.
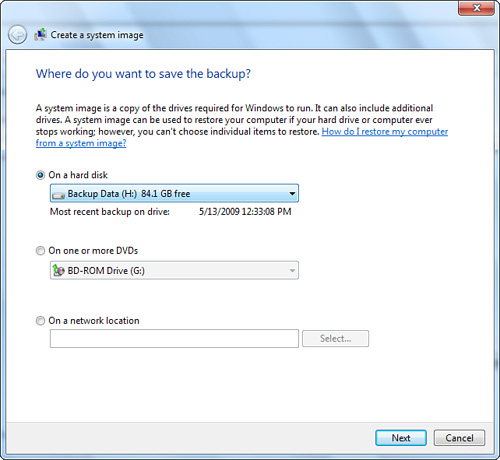
To create a system image and System Restore image backup, click the Create a system image link from the Backup and Restore control panel (refer to Figure 31.1). Select the location for the backup—a hard disk, DVD or to a network location (see Figure 31.11). Click Next. Choose the appropriate files and folders to back up from the What Do You Want to Back Up? window and click Next. Review the backup location, the amount of space needed on the target drive, and the drive to be backed up, and click the Save Settings and Exit button to begin (refer to Figure 31.4).
Figure 31.11 Specify where Windows Backup should save the system image.
If you back up to an external hard disk (my recommendation for reliability and easy restoration), just sit back and watch the progress bar.
Tip
![]()
Before you start the system image process, insert the medium or connect the external drive (and make sure Windows 7 recognizes it). Backup and Restore’s system image process ignores empty removable media or optical drives, and can use removable hard disks only if they are formatted using the NTFS file system.
If you use DVDs, follow the prompts to label and format the medium when it is inserted. After the medium is formatted, the backup process continues. When a backup to DVD is complete, you are prompted to insert each disc to verify the backup. This feature is designed to protect you against backup failures caused by scratched or otherwise defective media.
Tip
![]()
Click the Don’t Ask Again for This Backup option to avoid being asked to format your medium each time. You can also format your media in advance with Windows Explorer to avoid backup failures if one or more of your discs fail to format correctly. DVDs are formatted using the widely supported UDF disk format.
When you store a system image on a hard disk, the backup is not compressed. However, DVD backups are compressed. The backup is stored in a folder called WindowsImageBackup.
If you decide to create another system image in the future, you can use the same target drive, and Windows will back up only the files that have changed since the original image backup.
WBADMIN Command-Line System Backup and Restore
To use a network share or to use other advanced system image and System Restore options, including scripted restores, use the command-line backup tool WBADMIN. Originally developed for Windows Server, WBADMIN provides many options for backing up and restoring a system image. You can also use WBADMIN to restore files from an image backup.
• Use the WBADMIN START BACKUP command to start a backup.
Usage:
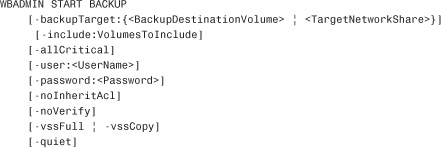
Runs a backup immediately using the specified options:
• Example:
![]()
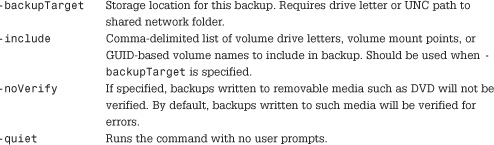
• Use the WBADMIN GET command to list items in a backup set.
Usage:

Lists items contained in the backup based on the options specified:
WBADMIN GET ITEMS -version:03/31/2005-09:00
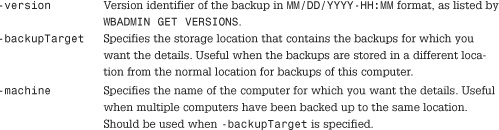
• Use the WBADMIN STOP command to stop a backup.
Usage:
WBADMIN STOP JOB [-quiet]
Cancels currently running backup or recovery. Canceled jobs cannot be restarted.
![]()
• Use the WBADMIN START RECOVERY command to restore files, volumes, or apps.
Usage:
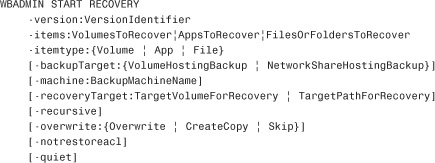
Runs a recovery immediately based on the options specified:
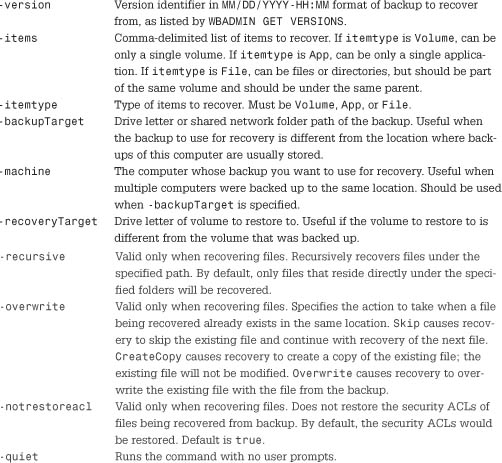

Remarks: To view a list of items available to recover from a specific version, use WBADMIN GET ITEMS. When the itemtype is App, you can use ADExtended to recover all the related data needed for Active Directory.
Using Disk Management with System Images
As you learned in the previous section, WBADMIN (the command-line counterpart to Windows Backup) can be used to create both system images and System Restore backups. It can also restore backup images or select files and folders. However, because WBADMIN works from the command line and features a complex syntax, it can be a challenging tool to use for restoring individual files and folders from a backup image.
You can also individually view the contents of your backup images by opening the Restore Files Wizard and browsing for individual files or folders. However, there is a new option for managing the VHD images created by Windows Backup: Disk Management. As part of the Computer Management console, Disk Management is an administrative tool for managing and modifying your disk drives and partitions. To mount and browse your VHD backup images with Disk Management, perform the following steps:
1. Click the Start icon, right-click Computer, and click Manage. Supply administrative credentials if prompted.
2. In the left window pane under Computer Management, select Storage and then Disk Management. Once selected, the options for Disk Management are enabled under the Action menu item.
3. Choose Action, Attach VHD.
4. Browse to the appropriate backup file location, select a suitable entry, click Open, and then click OK.
5. Disk Management creates an attachment point with the next available drive letter. You can begin accessing files and folders in the backup image by using Windows Explorer.
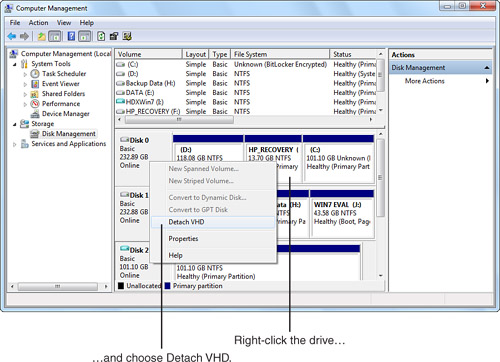
When you are finished browsing the image, you can detach the VHD backup file by right-clicking the drive entry and choosing Detach VHD, as shown in Figure 31.12.
Figure 31.12 Detaching VHD backup images with Disk Management.
Restoring a System Image
You should restore a system image only in drastic circumstances, such as a complete system failure. Basically, if Windows won’t start and you’ve already tried everything else and you’ve made a system image, it’s time to restore it. A complete PC restore (or system image) sets your system to its exact condition at the time of backup. Unlike System Restore, which leaves current data files behind although it resets the Windows Registry to the specified earlier time, a complete PC restore formats your hard disk, wiping out any remaining information and replacing it with whatever you backed up. It’s not called a “bare metal” restore for nothing!
Note
![]()
After you restore a system image, restore all the file and folder backups available to bring your system as close to its prefailure condition as possible.
To restore a system image from within Windows Backup and Restore, click the Recover System Settings link, and then click the Open System Restore button from the Recovery control panel applet. This will launch the System Restore Wizard. However, if you need to restore your system from outside the Windows GUI, use the Windows Recovery Environment, which is accessed by booting from the Windows DVD and selecting Repair Your Computer.
![]() To learn more about restoring a system image, see Chapter 25.
To learn more about restoring a system image, see Chapter 25.
Encrypted File System (EFS)
If you need to protect files on your system from being read by unauthorized users, you can use the Encrypted File System (EFS) feature that works independently of the NTFS permissions. Note that Windows 7 Home Basic, Home Premium, and Starter Edition do not fully support EFS (search Windows Help and Support for information on using EFS data with these versions). When a file is encrypted, the data stored on the hard disk is scrambled in a very secure way. Encryption is transparent to the user who encrypted the file; you do not have to “decrypt” an encrypted file before you can use it. You can work with an encrypted file just as you would any other file; you can open and change the file as necessary. However, any other user or an intruder who tries to access your encrypted files is prevented from doing so. Only the original owner and the computer’s designated recovery agent can get into encrypted files. Anyone else receives an “Access Denied” message when trying to open or copy your encrypted file.
Folders can be marked as encrypted, too. This means that any file created in or copied to an encrypted folder is automatically encrypted. The folder itself isn’t encrypted, though; anyone with the proper file access permissions can see the names of the files in it.
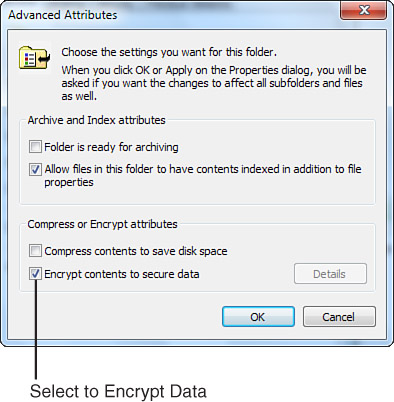
You encrypt or decrypt a folder or file by setting the encryption property for the folder or file just as you set any other attribute (such as read-only, compressed, or hidden), through a file or folder’s Advanced Attributes dialog box (see Figure 31.13). Right-click the desired file or folder, choose Properties, and from the General tab click the Advanced button to open the Advanced Attributes dialog box.
Figure 31.13 Setting encryption for a specific folder.
Note
![]()
EFS is not supported in Home versions of Windows 7, so this option will be grayed out in the Advanced Attributes dialog box.
After you set the option to encrypt a folder and click OK in a folder’s Properties dialog box, you are prompted to confirm the attribute change. From this dialog box, you can set the option to encrypt all the subfolders and files within the folder you are encrypting. Once all folders, subfolders, and files are encrypted an Encrypted File System dialog box appears reminding you to back up your file encryption certificate and key. You’re given three options: Back Up Now (Recommended), Back Up Later, or Never Back Up. We suggest you take care of this now so you never have to worry about it later. Back Up Now takes you to the Certificate Export Wizard, which gives you step-by-step instructions.
Unable to Encrypt Files or Folders
![]()
If you are unable to use EFS on a particular drive, make sure that it is not compressed and that the drive uses the NTFS file system. Compressed files and folders are displayed in blue; encrypted (EFS) files and folders are displayed in green in Windows Explorer. A file on an NTFS drive can be encrypted or compressed (or neither), but not both. To check the file system used by a drive, right-click the drive in Computer, select Properties, and view the General tab. A FAT or FAT32 drive must be converted to NTFS to support encryption or compression. Keep in mind that Home editions (and Starter) of Windows 7 do not support EFS, although they do use NTFS as their native file system.
It is recommended that you encrypt at the folder level rather than mark individual files, so that new files added to the folder will also be encrypted. This point is crucial because most editing programs write a new copy of the file each time you save changes and then delete the original. If the folder containing an encrypted file isn’t marked for encryption, too, editing an encrypted file results in your saving an unencrypted version.
You can use EFS to keep your documents safe from intruders who might gain unauthorized physical access to your sensitive stored data (by stealing your laptop, for example).
Encrypting Offline Files
Offline files are stored local copies of network files provided so that you may work with certain types of information when you’re offline or disconnected from the network. These files are not encrypted by default, but you can enable a new feature in Windows 7 that provides this added safety measure.
File encryption provides another level of access protection that—like EFS—operates independently of NTFS permissions. This safeguards your files in the event your drive is removed or the entire system is stolen. You should especially encrypt offline files if you suspect they will contain confidential, private, or sensitive information.
You can enable encryption of offline files by clicking the Encrypt button on the Encryption tab of the Offline Files dialog box, shown in Figure 31.14. To encrypt offline files, you must first enable offline files on the General tab of a given folder or launch Manage Offline Files from the Start menu using the Search box.
Figure 31.14 Setting encryption for offline files and data.
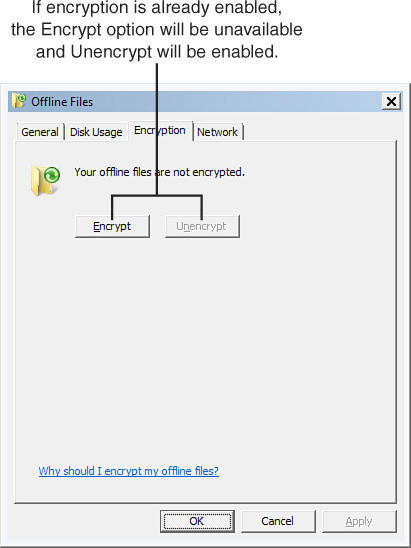
When encryption is enabled, the Encrypt button will be grayed out and only the Unencrypt button will be active.
Using CIPHER
You also can encrypt or decrypt a file or folder using the command-line program CIPHER and the following syntax. If you’ve previously used CIPHER on a Windows XP system, keep in mind that the syntax that CIPHER uses in both Windows Vista and Windows 7 is almost entirely new. Several existing parameters have been removed (/F, /I, and /Q), many new parameters have been added (/B, /C, /W, /X, /Y, /ADDUSER, /REKEY, and /REMOVEUSER), and, by default, CIPHER runs even if an error is encountered, unless you use the new /B parameter. In Windows XP, CIPHER stopped on error.
The following is not an exhaustive list of the CIPHER syntax; execute CIPHER /? at a command prompt for the complete list of parameters and syntax.
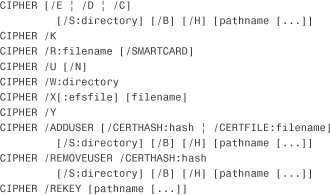
The arguments (parameters) are as follows:
• /B Abort if an error is encountered. By default, CIPHER continues executing even if errors are encountered (new option).
• /C Displays information on the encrypted file (new option).
• /D—Decrypts the folder and halts any further encryption on that folder until reactivated.
• /E—Encrypts the specified directories. Directories are marked so that files added afterward will be encrypted.
• /H—Displays files with the hidden or system attributes. These files are omitted by default (new option).
• /K—Creates a new certificate and key for use with EFS. If this option is chosen, all other options are ignored (new option).
• /N—Works only with /U. Prevents keys from being updated. This is used to find all the encrypted files on the local drives (new option).
• /R—Generates an EFS recovery agent key and certificate, and then writes them to a PFX file (containing the certificate and private key) and a CER file (containing only the certificate). An administrator can add the contents of the CER file to the EFS recovery policy to create the recovery agent for users and can import the PFX file to recover individual files. If SMARTCARD is specified, it writes the recovery key and certificate to a smart card. A CER file is generated (containing only the certificate). No PFX file is generated.
• /S—Performs the specified operation on directories in the given directory and all subdirectories.
• /U—Tries to touch all the encrypted files on local drives. This updates the user’s file encryption key or recovery agent’s key to the current ones if they are changed. This option does not work with other options except /N.
• /W—Removes data from available unused disk space on the entire volume. If this option is chosen, all other options are ignored. The directory specified can be anywhere in a local volume. If it is a mount point or points to a directory in another volume, the data on that volume will be removed (new option).
• /X—Backs up the EFS certificate and keys into file filename. If efsfile is provided, the current user’s certificate(s) used to encrypt the file will be backed up. Otherwise, the user’s current EFS certificate and keys will be backed up (new option).
• /Y—Displays your current EFS certificate thumbnail on the local PC (new option).
• /ADDUSER—Adds a user to the specified encrypted file(s). If CERTHASH is provided, CIPHER will search for a certificate with this SHA1 hash. If CERTFILE is provided, CIPHER will extract the certificate from the file (new option).
• /REKEY—Updates the specified encrypted file(s) to use the configured EFS current key (new option).
• /REMOVEUSER—Removes a user from the specified file(s). CERTHASH must be the SHA1 hash of the certificate to remove (new option).
• directory—A directory path.
• filename—A filename without extensions.
• pathname—Specifies a pattern, file, or directory.
• efsfile—An encrypted file path.
Used without parameters, CIPHER displays the encryption state of the current directory and any files it contains. You can use multiple directory names and wildcards. You must put spaces between multiple parameters.
CIPHER Produces Unexpected Results
![]()
Although using encryption (EFS) via the right-click menu works the same way as in previous NT-based versions of Windows, changes in the CIPHER command-line encryption tool can cause problems, particularly for users who are accustomed to how CIPHER worked in Windows XP. As with wbadmin, some practice time with noncritical files is a good idea.
Rules for Using Encrypted Files
When you work with encrypted files and folders, keep in mind the following points:
• Only files and folders on NTFS volumes can be encrypted.
• You cannot encrypt files or folders that are compressed. Compression and encryption are mutually exclusive file attributes. If you want to encrypt a compressed file or folder, you must decompress it first.
• Only the user who encrypted the file and the designated recovery agent(s) can open it. (You’ll learn more about recovery agents shortly.)
• If you encrypt a file in a shared directory, it is inaccessible to others.
• Windows 7 displays encrypted files and folders in green (compressed files and folders are displayed in blue).
• Encrypted files become decrypted if you copy or move the file to a volume or partition that is not formatted with NTFS.
• You should use Cut and Paste to move files into an encrypted folder. If you use the drag-and-drop method to move files, they are not automatically encrypted in the new folder.
• System files cannot be encrypted.
• Encrypting folders or files does not protect them against being deleted, moved, or renamed. Anyone with the appropriate permission level can manipulate encrypted folders or files. (These users just can’t open them.)
• Temporary files, which are created by some programs when documents are edited, are also encrypted as long as all the files are on an NTFS volume and in an encrypted folder. I recommend that you encrypt the Temp folder on your hard disk for this reason. Encrypting your original files keeps them safe from prying eyes, but programs often leave behind temp files—usually in the Temp folder—and these files remain vulnerable.
• The page file (used for virtual memory) can be encrypted in Windows 7 through Group Policy settings. You can also configure the Local Security Policy to clear the page file when you shut down the system. Just enable the Shutdown: Clear Virtual Memory Pagefile policy under the Local Policies, Security Option section.
• On a domain network, you can encrypt or decrypt files and folders located on a remote computer that has been enabled for remote encryption. Check with your system administrator to see whether your company’s servers support this capability. Keep in mind, however, that opening an encrypted file over a network still exposes the contents of that file while it is being transmitted. A network administrator should implement a security protocol such as IPSec to safeguard data during transmission.
• You should encrypt folders instead of individual files so that if a program creates temporary files and/or saves new copies during editing, they will be encrypted as well.
• Encrypted files, like compressed folders, perform more slowly than unencrypted ones. If you want maximum performance when folders or files in the folders are being used extensively (for example, by database programs), think twice before encrypting them. You might want to perform benchmark tests using encrypted and unencrypted folders with similar data to determine whether your system can handle the performance hit.
Suggested Folders to Encrypt
I recommend that you encrypt the following folders:
• Encrypt the Documents library if you save most of your documents there. Encrypting this folder ensures that any personal documents saved there are automatically encrypted. However, a better alternative would be to create a subfolder under Documents library for personal files and encrypt just this folder. This approach relieves you from having to track which files are encrypted and which are not.
• Encrypt your Temp folder so that any temporary files created by programs are automatically encrypted.
Caution
![]()
If someone steals your laptop computer or gains physical access to your desktop computer, it’s possible that even with all of Windows 7’s file access security and file encryption, that person can gain access to your files. How? A trick allows this to happen, and you should guard against it. Here’s how it works: By reinstalling the OS from a DVD drive, a thief can set up himself or herself as the system administrator. If the default file recovery certificate is still on the computer at this point, the intruder can view encrypted files. To guard against this situation, you should export the file recovery certificate to a floppy disk or other drive and remove it from the computer. I show you how in the next section.
Another method you can use is to configure your system to use BitLocker full drive encryption (available on Windows 7 Ultimate and Enterprise editions). To learn more about BitLocker, see “BitLocker Disk Encryption,” later in this chapter.
Protecting and Recovering Encrypted Files
Encrypted files are supposed to be very secure; only the user who creates an encrypted file can unscramble it. But this security hangs on your own personal file encryption key, which is stored in the Windows Certificate database (see the sidebar “How File Encryption Works,” earlier in this chapter). Where would you be if you accidentally deleted your file encryption certificate, or if your user account was deleted from the system? Could the secret recipe for Aunt Dottie’s zucchini fritters be lost forever this way? Probably not. EFS has a “back door” that lets designated recovery agents open any encrypted file.
The availability of this back door is both good news and bad news. The good news is that encrypted files can be recovered when necessary. The bad news is that this capability opens a potential security risk, and you need to be sure you take measures to protect yourself against it.
Securing the Recovery Certificate
Your capability to recover encrypted files hinges on two factors:
• Being listed by the Windows Local or Group Security Policy as a designated recovery agent
• Possessing the file recovery certificate that holds the recovery key data
With a few dirty tricks, it’s possible for someone who steals your computer to get himself or herself in as an administrator and pose as the recovery agent. If you really want to ensure the privacy of your files with EFS, you have to save the file recovery certificate on a floppy disk or other removable medium and remove the certificate from your computer.
To back up and remove the recovery certificate, do the following:
1. Click the Start button and type mmc in the Search box.
2. When the Console appears, select File, Add/Remove Snap-In.
3. When the Add or Remove Snap-Ins dialog box appears, double-click Certificates, select My User Account, then click Finish.
4. Click OK.
5. In the left pane, expand the Certificates – Current User, Personal, Certificates.
6. In the middle pane, you should see a certificate listed with its Intended Purposes shown as Encrypting File System, as shown in Figure 31.15. If this certificate is not present and you’re on a domain network, your domain administrator has done this job for you and you don’t need to proceed any further.
Figure 31.15 The EFS certificate manager stores keys and certificates to an external location for safekeeping.
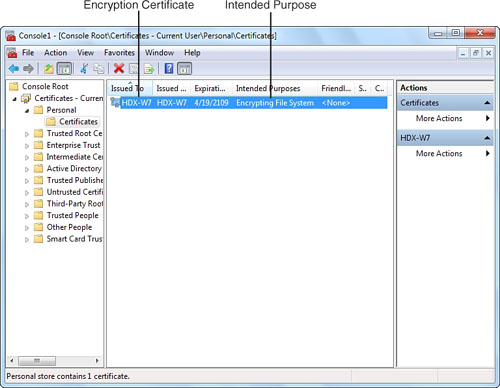
7. Right-click the EFS certificate entry and select All Tasks, Export to launch the Certificate Export Wizard.
8. Click Next and then select Yes, Export the Private Key, and click Next.
9. Select Personal Information Exchange and click Next.
10. Enter a password twice to protect this key. (You must remember this password!)
11. Specify a path and filename to be used to save the key. If your system has a floppy drive, insert a blank, formatted floppy disk and type the path and filename, such as a:
ecovery.pfx (not case sensitive). Otherwise, you can insert a writeable CD or DVD (recommended) or a USB flash memory drive (not recommended for permanent storage) and type the path and filename. If you use CD or DVD media, click Next and then Finish. A dialog box appears stating that the export was successful; click OK.
12. Click Finish.
Note
![]()
Unless User Account Control (UAC) has been disabled, you must be an Administrator or provide Administrator-level credentials to back up the recovery certificate.
Caution
![]()
You should back up and delete the Administrator’s recovery certificate (that’s the procedure you just performed), but don’t delete Administrator as the recovery agent from the Local Security Policy. Leave the Local Security Policy alone. If you delete the entries there, you’ll disable EFS.
Protecting Your Own File Encryption Certificate
If your user account is lost or you accidentally delete your own file encryption certificate some day, you might lose access to your own files. The recovery agent could still help, but you can protect yourself by exporting your own personal EFS certificate. Basically, follow the same procedure as for the local administrator while logged in as a user. Just be sure to have at least one encrypted file before starting the process. Once complete, label the disk EFS for UUU on XXX, where UUU is your user account name and XXX is your computer name. Store it in a safe place.
Recovering Encrypted Files on Your Own Computer
If your user account is deleted or you end up reinstalling Windows from scratch, you’ll lose access to your encrypted files because the Encryption database will be lost. You can log on as Administrator and reinstall the encrypted file recovery certificate, or you can log on as yourself and reinstall your file encryption certificate to get the files back with the following procedure:
1. Open the Microsoft Management Console (MMC), select File, and select Add/Remove Snap-In. Next, highlight the Certificates snap-in and click Add. Select My User Account and click Finish. Finally, click Close and then click OK.
2. In the left pane, expand Certificates – Current User, Personal, Certificates.
3. In the Actions pane, click More Actions and select All Tasks, Import to start the Certificate Import Wizard.
4. Click Next.
5. Enter the name of the certificate file—for example, a:
ecovery.pfx. Otherwise, you can click Browse and navigate to the drive and folder containing the certificate. To see it, select Personal Information Exchange (*.pfx, *.p12) as the certificate type. Select it and click Open. Click Next.
6. Enter the password for the certificate, and check Mark the Private Key as Exportable. Click Next twice, and then click Finish.
7. Click OK on the status box.
Note
![]()
If you use a migration utility to move EFS-encrypted files and folders from a Windows XP system to a Windows 7 system, be sure to export your EFS certificate from the Windows XP system and import it to the Windows 7 system as described here. Otherwise, you will not be able to access your files.
You should now be able to access the encrypted files. I suggest that you remove the Encrypted check mark from these files. Log on again as the Normal user of these files, and re-encrypt them if you want.
Disk Organization for Data Safety
RAID arrays are no longer exotic. Most late-model desktop computers have provision for RAID 0 or RAID 1 arrays, and many systems have four or more SATA host adapters, making RAID 0+1 arrays possible. Which are the safest types of RAID arrays in common use?
RAID 5 provides maximum safety. With RAID 5, which requires the use of three or more hard disks in a single array, you can rebuild the contents of the array even if one drive fails. RAID 5 sets aside space on each drive for the information needed to rebuild the array in case of drive failure. However, RAID 5 is not yet implemented in desktop computers’ onboard host adapters. You must purchase a RAID 5 host adapter and compatible SATA or SCSI hard disks.
RAID 0+1 combines data striping (for performance) and mirroring (for safety). It requires four drives and is supported on many recent desktop computers. It provides a high level of data safety against failures and is inexpensive to implement with SATA or ATA/IDE (PATA) drives.
RAID 1 mirrors the contents of one drive to a second hard disk. It is supported on many desktop systems that are up to several years old, through either a motherboard RAID host adapter chip or the motherboard’s integrated chipset. It is inexpensive to implement with SATA or IDE drives.
RAID 0 stripes data across two drives to improve read/write performance. If either drive fails, the array is wiped out. Thus, RAID 0 actually has no redundancy. It should be used only on drives that do not contain data.
To learn more about implementing RAID arrays in Windows, see Chapter 24, “Managing Hard Disks.”
BitLocker Disk Encryption
With the widely reported loss or theft of laptops containing sensitive personal and financial information in the last year, hundreds of thousands of people have been forced to change credit card information and worry about identity theft. Thus, the time is ripe for a new approach to protecting hard disk contents from unauthorized use: BitLocker.
BitLocker, available on Enterprise and Ultimate editions, encrypts the entire system hard disk. Originally known as Secure Startup, BitLocker stops unauthorized access, even if the hard disk is moved to a different computer.
BitLocker System Requirements
BitLocker in Windows Vista requires that your hard disk have a second partition of at least 1.5GB that is used for the BitLocker encryption tools. You must also have a way to provide credentials to permit the system to recognize you as the authorized user, such as a Trusted Platform Module (TPM) microchip and BIOS or, for systems that lack onboard TPM 1.2 support, a USB flash memory drive.
Customers that didn’t deploy Windows Vista with the required two-partition configuration found that enabling BitLocker was entirely too cumbersome. Windows 7 automatically creates the necessary disk partitions during installation and now includes the ability to right-click a drive to enable BitLocker protection. BitLocker also adds a supportive Data Recovery Agent (DRA) for all protected volumes, allowing IT administrators to dictate that all such volumes are appropriately encrypted.
Unable to Use BitLocker
![]()
If you are unable to use BitLocker, check the following:
• Is the hard disk properly partitioned? The hard disk must have a 1.5GB primary partition and a separate system partition for Windows (it can be any size above the minimum requirements for Windows 7). You cannot enable BitLocker on a system with a single hard disk partition.
• If the system has a TPM chip, is the feature enabled in the system BIOS? If it is, check with the system or motherboard vendor for a BIOS upgrade.
• If the system does not have a TPM chip, follow the procedure to enable BitLocker in the Group Policy Object Editor.
• If you get the error message BitLocker could not be enabled. The system firmware failed to enable clearing of system memory on reboot after restarting your system during the BitLocker setup process, it means that BitLocker has determined your system does not clear out memory during the reboot process. Hackers could analyze the contents of memory for the BitLocker encryption key and use it to bypass BitLocker encryption.
To enable your system to run BitLocker, contact your system vendor for a BIOS upgrade that includes the clearing of system memory upon reboot option. If this option is not available, you cannot run BitLocker on the system.
BitLocker To Go
Windows 7 introduces a subset of the BitLocker Drive Encryption technology with BitLocker To Go, which extends BitLocker Drive Encryption to USB storage devices. Designated USB drives can be passphrase-protected with controllable length and complexity, and IT administrators can set user policies to apply BitLocker To Go protection on removable drives before they are made usable.
Microsoft permits Windows XP SP3, Windows Vista SP1, and Windows Vista SP2 users to read BitLocker To Go devices using the passphrase. Plugging a BitLocker To Go encrypted USB storage device into Windows 2000 or Windows XP SP2 computers shows an inaccessible unformatted volume.
To encrypt your removable USB media with BitLocker To Go, follow these steps:
1. Open the System and Security category in Control Panel and click BitLocker Drive Encryption.
2. Locate the desired drive entry and click Turn On BitLocker.
3. Choose either a password or smartcard to unlock the drive. For simplicity, we recommend using a reasonably long passphrase—something memorable (to you) but not easily guessable (to others). Enter it twice and click Next.
4. Determine where to store the recovery key. You’re given the option of saving it to a file (recommended) or printing the key (not recommended). We suggest you save the key to a file that will be kept on a separate storage volume from the USB drive and the computer itself. Save the key and then click Next.
5. The last dialog box gives you a final option to cancel out of this process. Click Start Encrypting and wait for the process to finish, which takes longer for large storage volumes.
Once the USB storage volume is encrypted, you can unlock and utilize it using the passphrase you entered earlier. Every time the USB drive is inserted, the BitLocker Drive Encryption password dialog box appears. Should you forget the passphrase, BitLocker To Go’s recovery key method enables you to access the storage volume. Remember not to leave this recovery key accessible to anyone but yourself, because otherwise the passphrase is ineffective in safeguarding your protected files and data.
Enabling the TPM
The easiest way to use BitLocker is to use your computer’s TPM microchip (if it has one). To determine whether your system supports TPM 1.2 and to learn how to enable this feature in the system BIOS, see your system’s documentation. A lot of 2006 and newer laptops have onboard TPM 1.2, but older laptops (and most desktops) don’t support it.
After you enable TPM in the system BIOS, use the TPM Management Console (tpm.msc) to turn on TPM support in Windows (use the Turn On the TPM Security Hardware dialog box) and set up a TPM password (use the Create the TPM Owner Password dialog box). A TPM password is saved as computer_name.tpm. Thus, if your computer is named WildThing, the password is stored as WildThing.tpm.
Tip
![]()
Be sure to print your TPM password using the Print option and save it to a location you can access later, such as a CD or DVD.
If your system doesn’t support TPM, you can still use BitLocker. However, to use BitLocker without a TPM, you must use a USB flash memory drive to store your credentials, and it must be plugged into the system to permit the system to boot. You must also enable BitLocker Drive Encryption with the Group Policy Object Editor:
1. Click Start, All Programs, Accessories, Run.
2. Type gpedit.msc and click OK to open the Group Policy Editor. Click Continue or provide Administrator-level credentials (if prompted by UAC) to continue.
3. Open Computer Configuration, Administrative Templates, Windows Components, BitLocker Drive Encryption, Operating System Drives: Require Additional Authentication at Startup.
4. Select Enabled. Under Options, verify that the option Allow BitLocker Without a Compatible TPM is checked (see Figure 31.16).
Figure 31.16 Enabling BitLocker support on a system that does not have a compatible TPM.
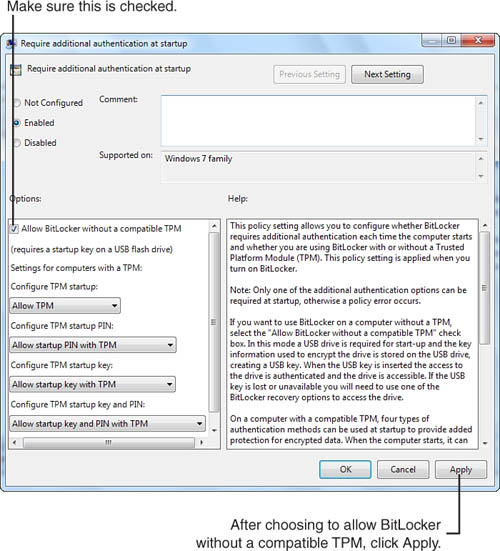
5. Click Apply, then OK.
6. Close the Group Policy Object Editor.
Encrypting the Drive with BitLocker
To start the encryption process, open the BitLocker Drive Encryption applet in the Control Panel (via either the System and Security category or the BitLocker Drive Encryption entry in Small Icons or Large Icons view) and select Turn on BitLocker next to the appropriate drive entry (if there are several). The BitLocker Drive Encryption Wizard walks you through the paces of setting up necessary drive layout. It starts by establishing space on an existing drive partition or unallocated space on the existing partition. There are really only two quick steps: drive preparation and drive encryption. Upon reboot, the system drive goes through a lengthy encryption process that takes longer for larger drives than for smaller-capacity volumes.
If your system has a TPM, you can choose either to use the TPM chip along with your logon password to access an encrypted BitLocker volume or to assign a PIN that is used along with the TPM. If your system does not have a TPM, you must use a Startup USB key. Make sure you have a USB flash drive available to use for BitLocker key storage. The BitLocker Drive Encryption Wizard provides three options for TPM-enabled systems, and a single option for those without—Require a Startup Key at Every Startup. This is where your Startup USB drive comes into play. You’ll also be asked where to store the recovery key, which can also go to the flash drive. Finally, a BitLocker system check ensures that everything is functioning properly, which requires a restart with the drive key plugged in.
When you create the BitLocker volume, you must create a recovery key password, in case BitLocker enters a locked state. If you lose the password, you can be locked out of your data; be sure to save the password to an accessible location and print it for safekeeping. Note that this is not the same as the TPM management password discussed in the previous section.
If you choose to store the recovery key password on a USB drive or in a folder, it is stored in a plain text file. The name of the file matches the administrative password ID: four hex digits, followed by three groups of two hex digits, followed by six hex digits:
aabbccdd-ee-ff-gg-001122334455.txt
The password recovery key file contains the name of the disk volume, the drive letter, and the date of encryption, as well as the password itself, which is stored as eight groups of six digits each:
000000-111111-22222-333333-444444-555555-666666-777777
Recovery keys can be stored on Active Directory servers for systems that are members of a domain.
After you store and print the recovery key password, BitLocker performs a system check to ensure that the recovery and encryption keys can be read before it begins the encryption process. If you use a USB device to enable BitLocker, insert it when prompted. After the system check is performed successfully, BitLocker restarts your system and encrypts your system drive. During the encryption process, an icon in the notification area appears. Hover your mouse over the icon or double-click it to see encryption progress. You can pause encryption if necessary, but you can use your computer normally while encryption progresses. When you start your system, you must provide the appropriate credentials (entering the PIN when prompted or inserting the USB flash drive before starting the system or when prompted). Otherwise, the system will not boot.
In Windows 7, after BitLocker encrypts the system volume and you restart your system, you can encrypt any other volumes on the system drive. To encrypt additional volumes, open the BitLocker Disk Encryption tool in Control Panel and turn the encryption status from Off to On for other system drives you want to encrypt.
![]() If you are unable to use BitLocker, see the “Unable to Use BitLocker” troubleshooting note, p. 896.
If you are unable to use BitLocker, see the “Unable to Use BitLocker” troubleshooting note, p. 896.
BitLocker Drive Encryption Recovery
If you do not provide the appropriate credentials when you attempt to boot a BitLocker-encrypted volume, you are prompted to press the Enter key to enter into the Windows BitLocker Drive Encryption Password Entry dialog box. The drive label, system drive letter, BitLocker encryption date, and key filename are provided so you can locate the correct recovery key password.
Instead of using the normal 1–9 keys on the keyboard, use F1–F9 for digits 1–9, and F10 for 0. If you use the normal 1–9 keys, the password will not work. As soon as you correctly enter the recovery key password, the system starts normally.
How BitLocker Protects Your Information
During normal use, a BitLocker-encrypted volume appears as a normal drive using the NTFS file system, and you can use EFS or disk compression on individual files and folders as with any normal NTFS volume.
Note
![]()
Backups made of a BitLocker-encrypted drive with Windows system image or other backup utilities are not encrypted. Keep them in a safe place.
Once data is transferred from a BitLocker-encrypted drive to any other nonencrypted storage media, it is no longer encrypted.
However, if you attempt to bypass BitLocker security by booting the system from a Windows DVD and using the Recovery Environment, BitLocker Drive Encryption Recovery will prompt you to provide the password from removable media or by entering it. When you provide the password, you can access the volume for repair or data-recovery processes.
If you cancel the recovery process, the Recovery Environment will continue, but you will not be able to access the drive without providing the recovery password.
If you attempt to access the drive from the Recovery Console command prompt, you will see this message: “This volume is locked by BitLocker Drive Encryption. Return to the control panel to unlock volume.”
If you connect a BitLocker-encrypted volume to another computer running Windows and attempt to access its contents, the volume shows up as a drive letter in Windows Explorer with a size of 0MB, no disk label, and no file system.
Note
![]()
By default, BitLocker’s AES encryption method uses a 128-bit key and uses the Diffuser algorithm, which protects against ciphertext manipulation key-cracking methods while providing excellent performance. Through the Group Policy Object Editor, you can select other options, including 128-bit without Diffuser, 256-bit with Diffuser, and 256-bit without Diffuser. To select other options, open Computer Components, Administrative Templates, Windows Components, BitLocker Drive Encryption, Configure Encryption Method. Click the Enabled radio button, and select the desired encryption method. Click Apply, then OK.
If you connect a BitLocker-encrypted volume to another computer running Windows XP or other operating systems, the file system is listed as RAW (unformatted). Third-party data-recovery programs are unable to determine the file system or other information about the drive. The drive can be formatted, but its contents cannot be accessed.
BitLocker prevents access to the drive by unauthorized Windows systems, and prevents other OSs from detecting the file system. BitLocker does this by encrypting the drive with a full volume encryption key using AES encryption, and then encrypting that key with a volume master key, also using AES encryption. The volume master key is unlocked when you provide the proper credentials at boot time, and it, in turn, unlocks the full volume encryption key that is used by a file system driver to decrypt the volume. In recovery mode, the recovery password (eight groups of six digits) unlocks the volume.
Differences Between BitLocker and EFS Encryption
Although EFS encryption is familiar to many Windows users because of previous experience with Windows 2000, Windows XP, and Windows Vista, it may be useful to review the differences:
• In the initial version of Windows Vista, BitLocker secures the entire system volume, but not other volumes (drive letters) on a system, while EFS encryption can be used on any volume formatted with NTFS. However, Windows Vista SP1’s version of BitLocker can secure additional volumes on the system drive at the user’s option.
• BitLocker uses a TPM chip or a USB flash memory drive to provide credentials, while EFS uses a personal certificate stored as part of the OS to provide credentials.
• Neither EFS nor BitLocker encryption protects files once they have been copied to another drive. However, when EFS files are transferred via a file migration program, they retain their encryption attributes, and the original user’s EFS certificate must be exported from the source system and imported to the target system to enable encrypted files to be opened on the target system.
Note
![]()
Use the Windows command-line utility robocopy.exe with the /EFSRAW option to migrate EFS-encrypted files from Windows to another system.
• EFS encryption is retained when files are backed up, but BitLocker volume encryption is not retained on a backup of a BitLocker volume.
Tip
![]()
Although Previous Versions can be a lifesaver, it’s no replacement for making backup copies of important files or saving different versions of a file in progress. The last-available previous version might be days or weeks old in some cases, so you might need to reconstruct changes you performed on the current version. In such cases, you may want to use the Open or Copy option, rather than the Restore option, with the most recent previous version.
If you use a drive other than the system drive for data, be sure to enable restore points (System Protection) on that drive if you want shadow copies. A drive without restore points cannot provide shadow copies. In such cases, only backup copies (if they exist) will be available as previous versions. System Restore uses up to 15% of each NTFS drive of at least 1GB in size for restore points. On systems with limited disk space, Windows 7 removes older restore points, which can also cause shadow copies to be lost. If you upgrade to Windows 7 on a system with limited disk space, all existing restore points will be removed and replaced with a single restore point. See KB945681, available at http://support.microsoft.com.
• EFS encryption can be used by Windows editions that do not support BitLocker, and on systems that are not compatible with BitLocker.
• BitLocker encryption cannot protect files on systems in Sleep or Hibernate mode, although EFS encryption can protect files on systems in these modes provided that the user has configured the system to request a strong password when waking up the system.
As you can see, BitLocker and EFS are complementary security features. You can use EFS to protect files on removable hard disks that are not secured with BitLocker, but you can use BitLocker to prevent anyone from using a stolen laptop or desktop computer.
Recovering Previous Versions of a File
Windows 7 Professional, Enterprise, and Ultimate editions enable you to restore a previous version of a file. This is handy if a data file has been edited and the changes are not an improvement, or if a user who intended to save a new version of a file with File, Save As accidentally clicked File, Save instead and overwrote the previous version.
There are two sources for previous versions:
• Backup copies (created with the Windows Backup Wizard)
• Shadow copies (created as part of a volume restore point)
If you have overwritten a file and want to retrieve a previous version, right-click the file and select Properties. Click the Previous Versions tab to see what backup or shadow copies may exist (see Figure 31.17).
Figure 31.17 Viewing the previous version of a file.
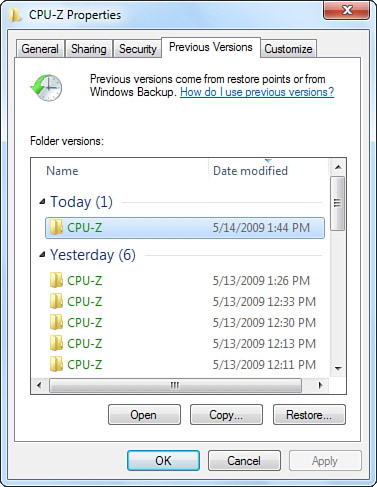
If more than one previous version exists, select the one you want to use, and choose from the following options:
• Open—The previous version is opened by the default application for the file type. The current version is retained.
• Copy—The previous version is copied to the destination you specify.
• Restore—The previous version replaces the current version. After selecting this option, you must click Restore to confirm the operation.
NTFS File Permissions
All versions of Windows 7 use the NTFS (NT File System) directory structure, including Home Basic and Home Premium. NTFS enables you to assign control of who is permitted to access files and folders on a per-user or per-group basis. NTFS permissions can be used to control access for either local folders or network shares.
Windows XP Home Edition and Professional supported installation on disks formatted with the FAT32 file system or the NTFS file system. Many users of XP did use NTFS formatted disks, either by choice or because their computer manufacturers set their computer up that way. The user-based file permission system was in effect, but usually without the users even knowing it—on XP Home Edition, NTFS permission settings were hidden from the user, and on XP Professional, you had to disable Simple File Sharing to see them.
On the other hand with Windows 7 NTFS is mandatory for installation (and also restoration), and the security settings are available to see and modify on all versions of Windows 7. Therefore, all Windows 7 users should understand how NTFS file permissions work.
To display or modify NTFS permissions, select a file or folder in Computer or Windows Explorer, right-click Properties, and select the Security tab. You can use the NTFS Permissions dialog box to designate a folder to restrict access toc both network and local users.
In the top part of the Security tab is the list of users or user groups with access to the file or folder. You can select any of the names in the list to view their associated permissions in the bottom half of the tab.
To add users to a file’s or folder’s permissions list, follow these steps:
1. Right-click the file or folder in explorer and choose Properties, then open the Security tab.
2. Under the Group or User Names list, click the Edit button. The Permissions dialog box opens to a new Security tab.
3. Under the Group or User Names list, click the Add button. The Select Users or Groups dialog box appears.
4. Enter the desired username(s) into the input box provided. You can check your names against the computer’s user accounts by clicking the Check Names button. Hint: Use full names like “Bob Cowart” instead of just “Bob.” Click OK.
5. With the newly added user account(s) highlighted in the Group or User Names list, select the desired permissions. You can choose to allow or deny a variety of actions for a given user or group. Click Apply and then click OK.
6. Click OK again to close the Properties dialog box.
The permission properties can each be granted or revoked individually. The permissions and their properties are listed in Table 31.2.
Table 31.2 NTFS File Permission Settings and Their Functions
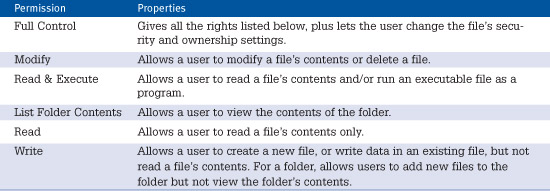
Note that each permission has both Allow and Deny check boxes. To get access to a given resource, a user must be explicitly listed with Allow checked or must belong to a listed group that has Allow checked, and must not be listed with Deny access or belong to any group with Deny marked. Deny preempts Allow.
All these permissions are additive. In other words, Read and Write can both be checked to combine the properties of both. Full Control could be marked Allow but Write marked Deny to give all access rights except writing. (This permission would be strange but possible.)
The most productive use of NTFS file permissions is to assign most rights by group membership. One exception is with user home directories or profile directories, to which you usually grant access only to the Administrators group and the individual owner.
Tip
![]()
If you edit Permissions, before you click OK or Apply, click the Advanced button and view the Effective Permissions tab, as discussed later in this chapter. Enter a few usernames to see that the permissions work out as you expect. If they do, only then should you click OK.
Editing NTFS file permissions is protected by UAC (unless you’ve disabled it). So, expect to see a lot of prompts to Continue (if you’re an Administrator) or to provide an Administrator password (if you’re a standard user) when you perform these operations.
Administrator Can’t Delete File or Folder
![]()
You might encounter files or folders that can’t be deleted even by the Administrator account. They don’t have the Read-Only attribute set, but Windows informs you that access is denied.
Sometimes a file or, more often, a folder is set with access controls such that even Administrator can’t access or delete it. To erase such a file or folder, take ownership of it as described earlier in this chapter. Give Administrator full access rights. Use the Advanced Security button to view Advanced Permissions, and check Replace Permission Entries on All Child Objects. Click OK or Apply (then click OK), and then try to delete the folder again.
Inheritance of Permissions
Normally, permissions are assigned to a folder (or drive), and all the folders and files within it inherit the permissions of the top-level folder. This makes it possible for you to set permissions on just one object (folder), managing possibly hundreds of other files and folders contained within. If necessary, explicit permissions can be set on a file or subfolder to add to or override the inherited permissions. Permissions displayed in the Security tab will be grayed out if they have been inherited from a containing folder.
You can view or change the inheritance setting for a file or folder by clicking the Advanced button on the Security tab. In Figure 31.18, the folder has a check in Include Inheritable Permissions from This Object’s Parent.
Figure 31.18 The Advanced Permissions dialog box lets you control the inheritance of permissions and set detailed permissions for user and groups.
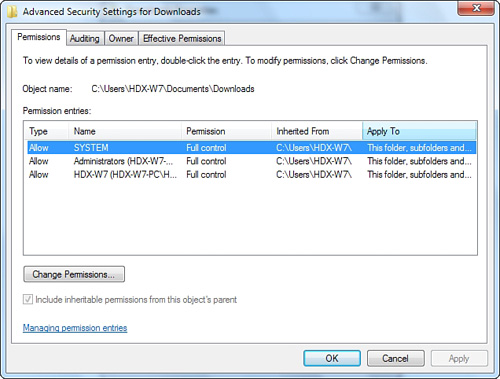
To change inheritance settings, click Change Permissions. You can then uncheck the Include Inheritable Permissions from This Object’s Parent box. If you uncheck the box, Windows gives you the option of starting with a blank permissions list (Remove) or keeping a copy of the settings it had before (Copy). In either case, the item now has its own independent list of access rights, which you can edit at will.
When you change permissions on a folder, you may want to cancel any manually added permissions set on the files and folders it contains. Checking the Replace All Child Object Permissions With Inheritable Permissions From This Object option will reset the permissions on all files in this folder and in subfolders, and will force all subfolders to inherit permissions from this folder.
Caution
![]()
Changing the permissions of the root folder of the drive containing Windows may make your system unusable. It’s best not to mess with the permissions of your boot (usually C:) drive.
Advanced Security Settings
If you edit access permissions in the Advanced Security Settings dialog box, you can exercise more “fine-grained” control over permissions. It’s rarely necessary, but for your reference, Table 31.3 lists the available permission settings.
Table 31.3 NTFS Advanced File Permission Settings and Their Functions

Viewing Effective Permissions
The Effective Permissions tab of the Advanced Security Settings dialog box lets you enter a username and see what privileges the user will have as a result of the current security settings on the file or folder, as shown in Figure 31.19.
Figure 31.19 Effective Permissions shows you how edited Permissions settings will work before they’re actually applied to the file.
This dialog box displays the effective permissions as edited, before they are applied to the file folder. This lets you verify that the permissions you have set operate as desired before committing them to the file by clicking OK or Apply.
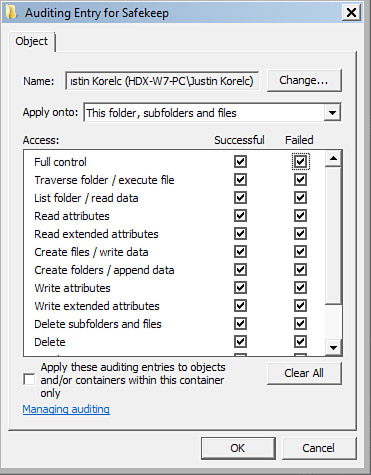
Access Auditing
The Advanced Security Settings dialog box provides a way for you (if you are an Administrator) to monitor access to files and folders through the Event Log. The Auditing tab lets you specify users and access types to monitor, and decide whether to record log entries for successful access, failure to access, or both. Auditing can be set for the use of each access attribute that you can set with Permissions: List Folder, Write Data, and so on.
Auditing is useful in several situations:
• To determine what files and folders an errant application program is attempting to use
• To monitor users for attempts to circumvent security
• To keep a record of access to important documents
To enable auditing, locate the folder or file you want to monitor, view the Security tab of its Properties dialog box, click Advanced, view the Auditing tab, click Continue, and click Add. On the Object tab of the Auditing Entry dialog box, select a specific user or group (or Everyone), click OK, and check the desired events to audit from the Access options, and click OK again. You can prevent a new audit setting from propagating into subfolders by checking Apply These Auditing Entries to Objects and/or Containers Within This Container Only. You can enable the resetting of audit properties of all subfolders and files by checking Replace All Existing Auditing Inheritable Auditing Entries on All Descendants With Inheritable Auditing Entries From This Object on the Auditing tab of the Advanced Security Settings dialog box.
An entry is made in the Security Event log for each audited access, so be careful if you are enabling auditing on the entire hard drive!
Taking Ownership of Files
Sometimes files or folders have security attributes set so stringently that even Administrator can’t read or modify them. Usually this occurs when the file has permissions set only for its owner and not the usual list: Owner, Administrator, System. This can occur when a user account is deleted. It can also happen when you have reinstalled Windows or are using a disk drive taken from another Windows computer. Whatever the cause, the symptom is that even an Administrator user is not able to access the files in some folder. If you absolutely need to access such files, you can take ownership of the file or folder, and then assign permissions to read and write as appropriate. To take ownership of a file or folder:
1. Log on as Administrator.
2. Right-click the file or folder in Explorer and choose Properties.
3. View the Security tab and click Advanced.
4. View the Owner tab, and click Edit.
5. Select Administrator (the user) or Administrators (the group) from the list. You may want to check the Replace Owner on Subcontainers and Objects box to change subfolders as well.
6. Click OK.
7. Add privileges as necessary to grant access to the desired user(s).
Assigning Permissions to Groups
It’s common in an office environment to want shared folders that are accessible by some users and not by others. For instance, you may wish to put payroll information in a shared folder and grant access only to certain administrative employees. In a school environment, you might want some folders that are accessible only by teachers, and others accessible only by members of a particular class. At home, you might want to prevent the children from getting access to the parent’s folder. The best practice in this case is to create local user groups, which are collections of users that can be given privileges that carry over to the group’s members. You can add the group and assign permissions for specific folders and files without having to list each of the qualified users separately. Another benefit is that you can add and remove users from the group later on without having to modify the settings of the various folders.
Note
![]()
You cannot create local user groups with Windows Home Basic, Home Premium (or Starter Edition) using the Local Users and Groups tool. If you’re a hard-core Windows hacker, you can use the command-line technique explained in the tip at the end of this section. This applies equally to Windows 7 and Windows Vista computers.
To create local user groups, follow these steps:
1. Right-click Computer, click Manage, and open Local Users and Groups; or, on a domain computer, click the Advanced button on the Advanced tab of the User Accounts Control Panel applet.
2. Right-click the Groups entry in the left pane and select New Group.
3. Enter a name for the new group, such as Accounting.
4. Click Add and select users to add to the group.
5. Click create, and then click Close.
To grant the group permissions to specific folders:
1. Right-click the folder or file in Windows Explorer and select Security.
2. On the Security tab and click Edit, and then click Add.
3. Select the group name (on a domain computer you may select domain groups or local groups by selecting Location and choosing a domain name or the local computer name).
4. Click OK, and then check the appropriate permissions for the group to have under Permissions.
5. If Everyone or other groups are listed as having rights to this folder, you may want to select the group(s) and uncheck any undesired privileges. If the entry is grayed out, the privileges are inherited from a containing folder. In this case, when you’re finished applying group permissions for this folder go back to the Folder Permissions dialog box and select Advanced, select the desired group, click the Change Permissions button, uncheck Include Inheritable Permissions From This Object’s Parent, and click Remove. Click Apply, then click OK. After that, you can remove the permission entries you don’t want.
6. Important: Before you click OK to commit the changes, use the Effective Permissions tab in the Advanced Security Settings dialog box to check the effective rights of a few different users to be sure that the rights are what you intend. Be sure that Administrator has at least taken ownership privileges.
Tip
![]()
On Windows 7 Home versions, if you’re willing to work with the command-line interface, you can create local groups. Open a Command Prompt window and type the command net localgroup groupname /add, but in place of groupname type the name of the group you’d like to create. Then, to add a user to the group, type the command net localgroup groupname username /add and again, in place of groupname, type the name of the group you created, and in place of username, type the name of a user on your computer. Repeat this command as necessary to add other users. The same command with /delete at the end instead of /add removes a user from the group.
A User Has Access to a Restricted Object
![]()
A user in the Users local group has access to an object that the Users local group is not assigned permissions for.
Check to see whether the user belongs to any other groups that have been assigned permissions. Remember that permissions accumulate through groups. If necessary, you can remove groups from those listed as having access to the file, or you can list specific users and/or groups and check the Deny boxes to remove access rights.
Securing Your Printers
If you have a printer that uses expensive paper or ink, and are concerned that guests, kids, or unauthorized persons might use your printer, you should know that printers can be secured in the same way that access is controlled for files and folders: through user and group privileges. In the case of printers, the privileges allow users to add jobs to the printer, delete other people’s jobs, and so on.
On a domain network, the network manager usually takes care of this. And on a workgroup it’s generally not important to restrict access to printers. If you are using Simple File Sharing, it’s not even possible to set up specific printer access privileges.
If you decide to, however, you can set printer access permissions by right-clicking a printer in your Printers folder and selecting Properties. The Security tab resembles the Security tab for files and folders, and can be modified in the same way.
Security Policy Configuration Options
USB flash memory drives are becoming ubiquitous. I carry one around most of the time for quick and easy file transfers, and they’ve found their way onto many keychains and even a few ballpoint pens and Swiss army knife models. Although USB flash memory drives are handy for data transfer, for improving Windows performance with ReadyBoost, and as a method for providing BitLocker credentials, they are a two-edged sword: They can also be used to steal confidential data, even from systems that use BitLocker or EFS encryption. After all, these encryption methods block unauthorized users from gaining access to data, but they can’t stop the authorized user from walking off with data.
In the past, institutions have used fairly crude methods for blocking access by USB devices, even to the point of literally gluing USB ports closed. However, in an era in which parallel, serial, and PS2 devices have been relegated to the boneyard by USB devices, more intelligent management of USB device security is needed. In Windows 7, you can use various Group Policy settings, including the following, to prevent removable-media drives, including USB flash memory drives, from being used to snatch data, while still permitting legitimate uses for printing, input devices, and so forth:
• Removable Disks Deny Write Access
• All Removable Storage Classes Deny Write Access
You can also block installation of unapproved devices, such as USB flash memory drives, or permit only installation of approved devices. For details, see “Step-By-Step Guide to Controlling Device Installation and Usage with Group Policy,” at the Microsoft TechNet website.
Third-Party Disc-Backup Tools
Although Windows 7 breaks new ground for Microsoft in its support for both image and file/folder backups, you might still prefer to use third-party backup tools, for the following reasons:
• Support for existing backup file types—If you want to be able to access existing backups with Windows 7, you need to use a version of your existing backup software that works with Windows 7. Consult your backup software vendor for specific recommendations.
• Capability to extract files from an image backup without scripting—The most recent versions of leading image-backup programs such as Acronis True Image and Symantec Norton Ghost also support individual file/folder restoration from an easy-to-use GUI. Windows 7’s system image can be used for file/folder restoration only through the use of the wbadmin command-line tool.
• Support for advanced backup options such as compression, splitting of a backup into smaller files, password protection, and others—If you want these or other advanced options, you must use a third-party backup program.
• Support for tape backups and tape libraries—Windows 7’s backup features do not include support for tape backups and tape libraries, although many third-party backup programs support tape as well as external drives, network shares, and CD or DVD backups.
Because of the extensive changes Windows 7 makes to the structure of user file storage and how the OS works, you will probably need to upgrade existing backup programs to versions made especially for Windows 7. Contact your backup vendor for details.