
24. Managing Hard Disks
The Nature of Hard Disks
For many users and system administrators, intelligent hard disk management forms the core of efficient system management. Until solid-state drive (SSD) technology becomes truly affordable, we’re stuck with the problems and limitations created by a crude system of motors, spinning platters, and delicate parts, such as read/write heads floating microns above a flying surface that can be easily ruined by particles as small as those found in a puff of cigarette smoke.
Perhaps someday, hard disks will be relics of the past, useful only for industrial art or bookends flanking tech books on a shelf. (They’ll make good doorstops, too.) Until that time, we’re stuck with the peculiar vagaries of hard disks. The good news is that high-capacity drives are cheap and plentiful.
No doubt the majority of Windows 7 users will never set up RAID arrays, multiple-booting arrangements, or dynamic disks; use encryption; or do any remote disk administration. Perhaps they will perform occasional disk cleanups and defragmenting, or learn to share folders over the network. These tasks are enough to get them by. Yet with a bit more knowledge from reading this chapter, you can learn how extensive Windows 7’s hard disk configuration capabilities really are.
Note
![]()
RAID is short for Redundant Array of Independent (or Inexpensive) Disks. In this hard disk scheme, two or more drives are connected for higher fault tolerance and performance. RAID arrangements are used frequently on servers, but aren’t generally necessary for personal or client computers.
Windows 7 File and Storage Systems
Windows 7 supports two types of storage models: basic disks and dynamic storage. Windows 2000, Windows XP Professional, and Windows Vista also support dynamic storage. When you prepare a hard disk for use, you can choose between these storage models. The following sections explain how they differ and when to use each type.
Basic Disks
The traditional storage model of disk structure uses partition tables. Each hard drive can hold up to four primary partitions or up to three primary partitions and one extended (secondary) partition. Within this extended partition, you can create logical drives. The total number of primary partitions and logical drives cannot exceed 32 per hard drive. This disk structure is understood and can be accessed by MS-DOS, all versions of Windows NT, as well as Windows 2000, XP, Vista, and Windows 7. When viewed in Disk Management, a disk drive prepared in this fashion is known as a basic disk.
Note
![]()
Storage types are separate from the file systems they contain. Both basic and dynamic disks can contain any combination of FAT16, FAT32, NTFS v4, NTFS v5, and NTFS v6 partitions or volumes. All drives are either basic or dynamic. You might occasionally run across a format called exFAT, but it works only on USB flash drives (UFDs) and isn’t relevant to hard disks.
The annoyances and limitations of this partition table methodology are artifacts of Microsoft operating systems, incidentally, not something imposed by hard disks themselves or their manufacturers. Some other OSs don’t suffer the same peculiarities.
The major reasons to continue using basic storage include
• Support for all versions of Windows that can read the file system used on the drives. For example, if you need to support dual-booting with Windows XP Home Edition and Windows 7, you must use a file system that both OSs support. XP Home does not support dynamic disks, so you must use basic disks.
• Support for multiboot configurations. Dynamic disks don’t use boot loaders, so you cannot select between OSs; therefore, you cannot use this type of storage as your only drive in a multiboot configuration.
Tip
![]()
If you need to convert a dynamic disk to a basic disk without data loss, use Avanquest Software’s Partition Commander Professional 10 (www.avanquest.com).
You can convert basic to dynamic disks without data loss, but to convert a dynamic disk back to a basic disk using the Windows 7 Disk Management tool, you must delete the disk structure (and, of course, the data).
Dynamic Storage
With dynamic storage, the restraints of primary and extended partitions are gone. Under this storage model, free space on a hard drive is divided into volumes instead of partitions; these volumes can be noncontiguous and can span one or more disks. In addition, volumes on a dynamic disk can be configured as simple, spanned, mirrored, striped, or RAID-5, as described next. Basic storage partitions can be configured only as simple partitions, unless they are remnants from a previous OS retained during an upgrade.
• Simple volume—Uses free space available on a single disk. This space can be a single contiguous region or multiple concatenated regions. Under the basic storage model, each partition or logical drive is assigned a separate and distinct drive letter, and functions as a distinct region of disk space. Dynamic storage can be configured to see multiple regions of a disk as a single volume, accessed with a single assigned drive letter.
Note
![]()
A mirrored volume contains two disks; if either one fails, the OS goes to the other for data access.
A RAID-5 volume contains three or more disks, any of which can fail without the system halting. The OS then reconstructs the missing data from the information contained on the remaining disks.
• Spanned volume—Extends the concept of a simple volume across multiple disks (up to a maximum of 32). All joined regions on these disks are seen as a single volume to programs accessing them. However, if a single unit in a spanned volume fails, the entire set is lost.
Caution
![]()
Converting a hard disk to dynamic storage is a one-way process unless you use a third-party utility such as Partition Commander Professional 10. To change a dynamic disk back to a basic disk using the Windows 7 Disk Management tool, you must delete all volumes before converting the drive back to basic storage. Also note that dynamic disks can be read by Windows 7, Windows Vista, Windows XP Pro, Windows Server 2003, Windows Server 2008, and all versions of Windows 2000. Windows XP Home, Windows NT, Windows 98/SE/Me, and all earlier versions of Windows cannot access dynamic storage volumes.
When you change the boot disk to dynamic, you can no longer multiboot into another OS because the familiar boot loader screen disappears. Only one installation of Windows can own a set of dynamic disks, so if you are planning to use dynamic disks as your RAID solution on a multiboot computer, think about investing in a hardware-based (SCSI or SATA) RAID solution.
• Mirrored volume—A volume in which data from one disk is mirrored or duplicated on a second disk. This process provides for data redundancy, often called fault tolerance. If one disk fails, the data can be accessed from the second disk. A mirrored volume cannot be spanned; each volume must be contained on a single disk. Programs see only one volume, and Windows ensures that both disks are kept in sync. Mirroring is also known as RAID-1.
• Striped volume—A volume in which data is stored across two or more physical disks. When data is written to a striped volume space, it is allocated alternately and evenly to each of the physical disks. A striped volume cannot be mirrored or spanned via Windows 7. (It is possible on hardware-based RAID.) Striping, often termed RAID-0, is used to increase storage system throughput. If a single unit in a striped volume fails, the entire set is lost.
• RAID-5 volume—A fault-tolerant version of a striped volume. When data is written to a RAID-5 volume, it is striped across an array of three or more disks, and a parity value is added. If a hard disk belonging to a RAID-5 volume fails, the remaining drives can re-create the data using this parity value. Note the difference here between a mirrored volume and a RAID-5 volume.
What are the advantages of dynamic storage?
• First and foremost, noncontiguous regions of multiple disks can be linked so that they appear as one large region of disk space to any program. By linking them, you can increase the size of a disk volume on-the-fly, without reformatting or having to deal with multiple drive letters.
• Second, and perhaps more important, from an administrator’s point of view, disk and volume management can be performed without restarting the OS.
However, on a multiboot system, OSs other than Windows 7, Windows Vista, Windows 2000 (Server and Professional), Windows XP Professional, Windows Server 2003, and Windows Server 2008 cannot see dynamic storage drives. Unlike NTFS, which applies to only the formatted partition, dynamic storage affects the entire hard drive. So if you plan to use dynamic storage, plan ahead and keep other OSs on different hard drives. In addition, you must ensure that the boot drive is a basic storage drive so that the boot menu will function.
Organizational Strategies
Although the disk systems described in the preceding section are interesting, especially to power users and system administrators who have multiple drives available, most Windows 7 users set up their systems with standard partitions (that is, basic storage) and the NTFS file format. But what about other file systems? How should you organize multiple disks? What about preparing your disks, and what kinds of strategies should you consider?
If you’re not going to stick with the straight and narrow of running only NTFS on your hard disk, consider following these alternative strategies and rules:
• Whenever possible, create a separate partition for your data files. This tip has particular relevance to users who test new software or OSs. If you store your data on a separate partition, reinstalling an OS is a simple matter of formatting your system partition and starting from scratch. Although you still need to reinstall your programs, using a separate data partition ensures that you didn’t miss a data file somewhere along the line. It also makes backups simple and straightforward. You can image your system partition; you then need to update this image only when you add a new device or software program (see the next paragraph). Data backups can be run on a daily or weekly basis (determined by how often your data changes) and can be set to run on your data partition. Even if you use Windows 7’s much-improved backup software, it’s still easier to make backups if you separate your OS and applications from your data.
• Use the Windows 7 Backup and Restore utility to create an image of your system. Just click the Create a System Image link in the Tasks list. Having such an image is worth its weight in gold if you like to “tinker” with your system and program configurations. When you have your OS set up, your principal applications installed, and everything tweaked and configured to perfection, you can create an image of your system on a separate drive or partition. If you need to reinstall your OS for whatever reason, the complete process—from beginning to end—should take no more than 20 minutes. When you add, delete, or reconfigure a program, or make changes to the hardware configuration of your disk subsystem, be sure to update your disk image.
• The easiest way to maintain a disk image is to buy a separate hard disk just for image storage. A 500GB external hard disk is appropriate for most image storage needs, but smaller and larger sizes are available.
• Many of today’s PCs use Serial ATA (SATA) and/or SCSI host adapters exclusively, whereas older systems use ATA/IDE host adapters. Some “tweeners” offer one ATA/IDE host adapter with four or more SATA adapters. If you have two ATA/IDE drives (a hard disk and a DVD drive), you should not put both of them on the same host adapter. DVD drives transfer data at slower rates than hard disks, slowing down OS and application installations as well as backups to CD or DVD media. With second-generation, high-capacity SATA drives selling for very reasonable prices, it’s time to bite the bullet and switch to SATA. The disk-installation utilities provided by many drive vendors can copy your entire existing IDE drive to a new SATA drive during the installation process.
Tip
![]()
If the Administrative Tools menu selection is not displayed on the Start menu, right-click the Start menu button and select Properties, click Customize, scroll down to the System Administrative Tools items, and then select the Display on the All Programs Menu and the Start Menu radio button.
If you enable the Control Panel to act as a menu, you can access Administrative Tools through it off the Start menu as well.
Disk Management
Now that we’ve covered the essentials of basic and dynamic disks, and tips for optimizing and organizing storage, this section focuses on managing your computer’s disks.
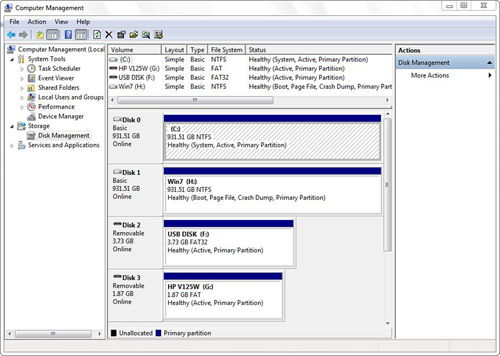
The Disk Management utility (shown in Figure 24.1) is responsible for the creation, deletion, alteration, and maintenance of storage volumes in a system. This tool is located within the Computer Management interface of Administrative Tools (accessed through Start, Control Panel, System and Security, Administrative Tools, Computer Management, Disk Management). It is protected by User Account Control. Another access method is right-clicking Computer and choosing Manage. Using the Disk Management utility, you also can assign the drive letters used by your DVD and hard disk drives.
Figure 24.1 The Disk Management tool is part of Computer Management.
Tip
![]()
You can change the way specific types of volumes are displayed in Disk Management. To do this, click View, Settings. From there, you can select the color you want to use to represent any of the various disk states shown by Disk Management. By selecting the Scaling tab from the Settings dialog box, you can also change the way in which Disk Management shows the scaling of each disk. This capability is particularly useful if you want the scale display to be more representative of the actual physical sizes of your disks.
As discussed in Chapter 22, “Windows Management and Maintenance,” this single interface lets you manage both local and remote computers using the various administration utilities shown in the left pane. Using this interface, I’ll show you shortly how to perform different procedures on your existing and new hard disks. The process is quite simple for most of the operations because you will be presented with a wizard to complete them.
Most operations on disks can be performed by right-clicking the disk or volume you want to affect. As usual, you are presented with a context-sensitive menu from which you can perform any actions relating to the volume or disk you click. From the graphical layout in the Disk Management utility, you can also see what is going on with your disks at any given time. As always, you can select the Help option from within any right-click context menu or the menu bar along the top of the window to get an explanation of the operations available to you.
Assigning Drive Letters and Joining Volumes
Windows automatically assigns letters to the drives. However, this assignment might not suit your system; for example, you might have already mapped a network drive to the same letter that Windows assigns to a new drive.
Caution
![]()
Many MS-DOS-based and Windows-based programs make references to a specific drive letter (for example, environment variables). If you modify the drive letter of a drive with these programs installed, they might not function correctly.
Using Disk Management, you can easily assign logical drive letters to your hard disks and removable drives such as DVD or Iomega REV. You can’t change the drive letter of your boot drive (usually the C: drive), but you can change any of the others.
To change the letter, right-click the disk volume or drive in the bottom-right pane of Disk Management, and select Change Drive Letter and Paths. A dialog box appears, listing the current drive letter assignment. Click Change. Under Assign the Following Drive Letter, choose the desired new letter. Click OK and confirm that you really do want to make the change.
In addition to or instead of assigning a drive letter to a disk drive or partition, you can “graft” the disk volume onto another. Windows lets you specify a folder that will become the mount point for the new drive. For example, let’s assume you create a folder named C:TEMP, and you want it to have a lot of drive space. You could install a new hard drive and, instead of assigning it a drive letter, tell Windows to access it through C:TEMP. Your C:TEMP files and subfolders are then stored on the alternate drive.
Tip
![]()
By using a mount point, you can add space to the folders under the mount point folder using an available drive. This is a good way to add space in a controlled fashion for a specific purpose, such as to store scratch files or web page images.
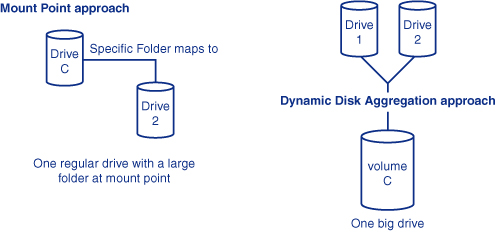
Grafting Versus Dynamic Disks
Assigning mount points is different from what happens when you aggregate dynamic disks into one large volume. Although dynamic disks and regular (basic) disks both support the use of mount points, dynamic disks can create one large, apparently contiguous disk space. Mount points graft subsequently added drives at a folder, similar to grafting two trees by tying together a branch from each tree. Figure 24.2 illustrates the differences between the two approaches.
Figure 24.2 You can join drives two different ways: using mount points or using dynamic disk aggregation.
Note
![]()
You can graft new volumes or disks onto a folder only on an NTFS-formatted drive. The new volume can have any format, however.
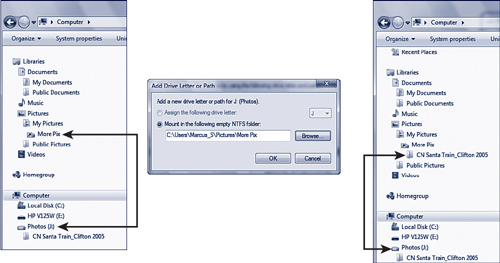
In Figure 24.3, I’ve grafted a hard disk containing digital photos (J:) into the mount point on drive C:UsersMarcus_SPicturesMore Pix.
Figure 24.3 Assigning a partition or volume to a folder rather than a drive letter joins the volume to an existing volume. The contents of the added volume appear as subdirectories of the mount point folder.
Note
![]()
If the folder you specify as the mount point already contains files, these are inaccessible as long as the drive-to-path mapping exists because that folder is now remapped into the new location. The original files reappear if you delete the drive path. Therefore, it’s usually a good idea to create a new folder as a mount point or delete all the contents of an existing folder before establishing the mount point.
Even if you have several hard drives and DVD drives, you can graft them all together onto your C: drive, making it appear as one big file system. It’s a great management concept: You can add space to your file system by attaching new disk volumes directly into the original folder structure. (UNIX users are probably smirking at this point because the UNIX OS has worked this way since it was written in the 1970s.)
Tip
![]()
When Windows Explorer shows you free disk space on the original drive, it measures only the space on the physical drive, not space on any grafted drives. You’ll actually have more space than you think because files on the grafted folders are stored on another volume. If you want, you can also assign a drive letter to the added volume so that you can view and monitor its free space directly.
Alternatively, you can use the command prompt, change to the folder in the grafted volume, and use the DIR command, which lists free space on the actual current volume.
If you mount a drive and assign it a drive letter, you can access it through both pathways.
To graft a disk volume to an existing file system, follow these steps:
1. Create the folder that is to serve as the mount point for the new drive or volume.
2. Highlight the new drive or volume in Disk Management.
3. Right-click, select Change Drive Letter and Paths, and click Add.
4. Select Mount in the Following Empty NTFS Folder.
5. Enter the folder’s pathname, or click Browse to locate it.
6. Click OK to save the path.
7. Click OK to close the dialog box.
You can assign a given drive or volume to only one drive letter but to an arbitrary number of paths. (It’s a little strange to see the same files appear in several different places, so we recommend that you not go nuts with this feature.)
Tip
![]()
If you’re running out of room on your C: drive, decide whether it makes sense in your situation to add lots of space to just one folder (for example, Documents). If it does, install and format a new hard drive, and assign it a letter. Copy the original folder to the new drive; then add a path to the new hard drive using the name of the original folder. This way, you can preserve your original data and have room for.
By the way, this “grafting” technique works with both basic and dynamic NTFS disks. Only Windows dynamic disks can be “grown” by changing their partition size on the fly. If you use a basic-formatted disk, as most users do, the grafting trick is a good one to know.
Dynamic Disk Management
If you are using only Windows 7 on a system, upgrading your storage devices to dynamic disks is usually the best way to go because of the many advantages of the dynamic disk storage system. Remember, though, that you can’t boot into or read your dynamic disks from any other OS after you upgrade them. You can upgrade a disk through Disk Management, right-clicking the drive’s icon in the bottom pane (click the part of the graphical display that reads “Disk 0,” “Disk 1,” and so on, not on the volume), and choosing Convert to Dynamic Disk. Then, choose the disk and click OK. Next, just select the disk to convert from the list that appears and click Convert.
Tip
![]()
Another good time to use this feature is when you’ve backed up application data onto a CD or DVD disc. If you want to use the backed-up data in an emergency, you can add a path for your DVD drive to make its files appear in the original data location your application expects. That way, you can use the data off the media without restoring it to disk or reconfiguring your application. Later, you can delete the path to regain access to the “real” folder.
If you don’t have the option of upgrading to dynamic disks, one of two possible issues might be the cause. First, the disks might have already been upgraded to dynamic disks. Second, the disk might not be a hard drive, but rather a CD, DVD, or removable media device.
Extending a Disk
One of the cool options available in Disk Management is the option to extend the volume on a dynamic storage drive. Extending is actually another way of “stretching” a simple volume to a specified size when unallocated space is present on the disk. Sometimes, you might want to rearrange the way you’ve set up your disks, so this option can come in handy.
Caution
![]()
As you learned earlier in this chapter, dynamic disks cannot be changed back to basic disks using Windows 7’s Disk Management without completely destroying any partitions and reformatting the disk, so back up all data first. When you’re ready, right-click the volume and select Delete Volume.
From there, you can re-create your simple volume by right-clicking a disk and going through the applicable steps.
To perform the actual extend operation on a disk, you need to have an area of the disk that is unallocated. From there, right-click an existing partition and select Extend Volume to bring up the Extend Volume Wizard. The wizard enables you to specify the size you want to extend the volume to. Finishing the operation leaves you with a disk that is now larger than before. This operation is not limited to volumes that are mounted as drive letters; you can also perform this task on volumes that are mounted into directories.
Note
![]()
You can also extend a basic volume; however, it must be raw (not formatted with a file system) or formatted with NTFS.
When Disk Management extends a disk, it is actually creating a new partition and mapping it to the same drive letter as the partition to be extended. It is, in effect, a spanned volume. Although this approach is a bit different from the traditional method performed by disk utilities, such as PartitionMagic, the upside of the Disk Management approach is that you can extend your disk without needing to wait for the volume to be resized and data to be shuffled around. The Disk Management approach happens very quickly, without even rebooting your system.
Caution
![]()
If you shrink your system’s boot volume, you cannot extend it (unless you want to connect your system’s hard disk to another system running Windows 7). Before you shrink a boot volume, be sure you calculate how much room you’ll need for future data, programs, and updates to Windows 7.
Shrinking a Disk
Windows 7 supports shrinking a basic or dynamic disk volume as well as extending it. When you shrink a volume, the space removed from the volume becomes unallocated space. You can use it for another volume or save it for a future multibooting OS. To shrink a volume, right-click it and select Shrink Volume. The system calculates the amount of space that can be removed, and you can use all or part of this amount.
Creating a Spanned Volume
A spanned volume is a volume in which the disk space spans multiple partitions and disks. Using a spanned volume is a handy way of turning a couple of small disks into one large disk, mounted under one drive letter or folder. Simple volumes can also be extended using spanned volumes, as shown in the previous section. Spanned volumes can be created only on dynamic disks. A spanned volume basically is the same as an extended volume, except that the former adds drive space from other hard drives and the latter adds drive space from the same drive.
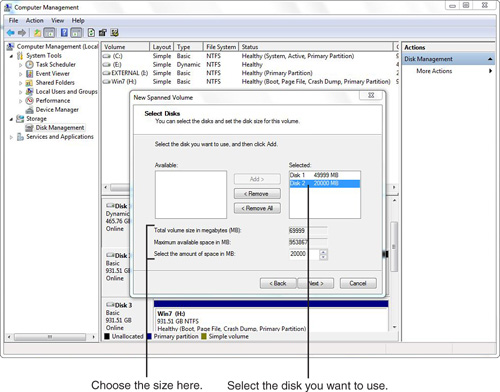
Creating a spanned volume is just a matter of right-clicking an empty partition and selecting New Spanned Volume, which starts the New Spanned Volume Wizard. This wizard enables you to select which disks to include in your spanned volume from the Available box and click Add. They then appear in the Selected box (see Figure 24.4). At this point, you also can select the amount of space to use for each disk. The total size of your spanned volume is the cumulative total of the space you select on each disk. After clicking Next, you are prompted to assign a drive letter or drive path (mount point) for the new spanned volume. Click Next. Choose whether to format the new volume and, if you choose to do so, select a file system and allocation unit size, enter a volume label, and choose whether to enable file and folder compression. Click Next. In the summary screen, if no changes are necessary, click Finish to create the spanned volume.
Figure 24.4 Selecting disks to create a new spanned volume.
Creating a Striped Volume
One of the procedures you can perform with Disk Management is to create a striped volume. Creating such a volume is often desirable simply because of the ease of administration and the substantial gain in speed. To create a striped volume, you must have more than one disk. For the definition of a striped volume, see “Dynamic Storage,” earlier in this chapter.
When you’re creating a striped volume, you are creating partitions of the same size across two or more disks. Bear this point in mind as you plan your implementation because you need to have the same amount of space available on each disk that you want to use for your set.
To create a striped volume, follow these steps:
1. Right-click one of the disks to be used in the striped volume set, and select New Striped Volume. The New Striped Volume Wizard starts. Click Next.
Note
![]()
Notice that the wizard automatically sets the size for all selected disks to the largest amount of free space that is equally available on each disk.
2. Select the disks you want to include as part of a striped volume. The wizard automatically selects the first free disk as the first in the striped volume. You can select the remaining disk(s) from the left column and add them to the right column for the set. When you are done adding disks, click Next.
3. You are prompted to assign a drive letter or drive path for the new striped set. Choose from the following three options:
• Assign the Following Drive Letter—This option assigns your set one drive letter, as with any normal drive. Selecting this option is the most common method of mounting a striped set, and it suffices for most purposes.
• Mount in the Following Empty NTFS Folder—By mounting a striped set to a folder, you are effectively creating a mount point within another disk. The mount point isn’t actually on another disk, in the physical sense. The folder you use just has the amount of storage equal to the size of your striped set. This approach is more closely related to the UNIX approach, in which the actual drive letter is not used but the folder is referred to as the mount point. (Mount points were discussed earlier in this chapter.)
• Do Not Assign a Drive Letter or Drive Path—This option creates the striped set and leaves it for you to allocate later, using either of the two methods mentioned previously.
Note
![]()
In Windows Explorer, notice that the icon for the folder mount point shows up as a hard disk. This icon appears simply so that you can differentiate between a mounted folder and a plain folder.
4. Click Next.
5. Select the volume format options and click Next.
6. When you are presented with a summary of the actions to be performed by the wizard, click the Finish button so your new striped volume will be created and mounted under the path you chose in step 3.
Creating and Attaching VHDs
New to Windows 7 is the capability to create and attach (or mount) virtual hard disks (VHDs) and treat them like a removable disk without the need to use virtualization software such as Microsoft Virtual Server or Virtual PC. A VHD is a type of file that contains everything a physical drive offers—file system, structure, and so on. You can load nearly any type of operating system into a virtual disk, and load multiple virtual disks on a single physical host. Virtual disks can help you save money and effort as an alternative to installing multiple hardware drives in a computer. Regardless of the ability to create and use VHDs directly in Windows 7, you can also run Virtual PC if you want.
Creating a VHD
To create a VHD in Windows 7, follow these steps:
1. Open the Disk Management window.
2. Click the Action menu item, and click Create VHD. The Create and Attach Virtual Hard Disk dialog box opens.
3. Click Browse and navigate to the folder that will hold your VHD file.
4. Enter a name for the VHD in the File Name text box, and then click Save.
5. You can control the size of the VHD by entering a maximum size in the Virtual Hard Disk Size box and selecting MB, GB, or TB from the drop-down list.
6. Finally, you can select the size of the virtual disk, either fixed (default) or dynamically expanding (see Figure 24.5). A fixed size VHD file doesn’t increase or decrease in size regardless of the data it holds. A dynamically expanding VHD file starts small and grows as the amount of the data it holds increases, but only to the maximum specified size.
Figure 24.5 Creating a new VHD file from the Disk Management tool in Windows 7.
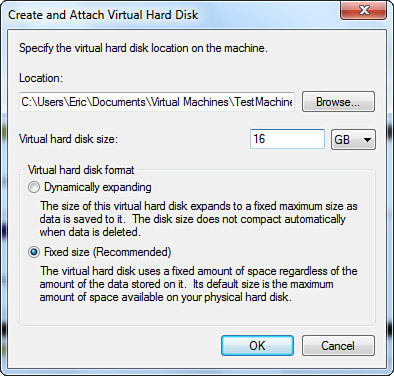
7. When you’re finished, click OK. Your VHD file is created.
To initialize your new VHD, follow these steps:
1. Right-click the new unallocated VHD disk number (on the left) in the Disk Management utility and select Initialize Disk.
2. In the Initialize Disk dialog box, select a partition style—MBR (Master Boot Record) or GPT (GUID Partition Table). Use the GPT partition style if your disk is larger than 2TB or is on an Itanium-based computer, but be aware that this partition might not work with all previous Windows versions.
3. Click OK.
4. To create a volume, right-click the new unallocated disk (with the hatched background) in Disk Management and select New Simple Volume.
5. The New Simple Volume Wizard starts and walks you through volume creation, including the selection of the file system (NTFS or FAT32). When you’re finished, the new VHD is attached and ready for use.
Attaching an Existing VHD
To attach an existing VHD, such as a demo VHD file you download from the Microsoft Download Center, follow these steps:
1. Select Action, Attach VHD. The Attach Virtual Hard Disk dialog box prompts you for the location of the VHD file.
2. Locate the file and highlight it.
3. Click Open, and then click OK.
For basic information about virtual machine technology and Windows 7, refer to the “Taking the Virtual Machine Approach” section in Chapter 2. For details about working with VHDs in Windows 7, read the “Frequently Asked Questions: Virtual Hard Disks in Windows 7” TechNet article at http://technet.microsoft.com/en-us/library/dd440865(WS.10).aspx.
Convert from FAT to NTFS
Aside from managing drive volumes in the Disk Management utility, you can also change a partition’s file system using a built-in Windows 7 tool. Convert is a command-line program that converts an existing FAT16 or FAT32 partition to NTFS.
Caution
![]()
This conversion process is a one-way street. The only way to revert an NTFS partition back to a FAT partition with the native tools is to reformat the drive. To revert and not lose your data, you have to use a program such as PartitionMagic (from Symantec; www.symantec.com) or Partition Commander Professional 10 (www.avanquest.com).
The command-line syntax for the Convert program is as follows:
CONVERT volume /FS:NTFS [/V]
![]()
Considering the work the Convert program has to do, it’s surprisingly fast, even on a well-populated disk.
Windows 7 Disk Maintenance Tools
As you’ve learned in previous sections, the Disk Management utility provides all the essential tools for creating, sizing, converting, and deleting drives and partitions. There are, however, other disk maintenance tools in Windows 7 that help you keep disks clean and healthy. We cover many of the most frequently used tools of this type throughout this section.
You’ll find that several disk maintenance tools are available through a drive’s Properties dialog box. To reach the dialog box, right-click a drive in the Computer window and select Properties. Figure 24.6 shows the properties for both an NTFS drive and a FAT drive. Notice the difference in the number of tabs—NTFS has more options because of its support for security and quota management.
Figure 24.6 Properties tabs for NTFS and FAT volumes.

The following sections explain how to use many of the disk maintenance tools included in Windows 7.
Disk Cleanup
In the course of daily use, Windows 7 generates thousands of temporary files to aid in system operation. These files are critical to the operation of the programs that use them. However, as most people are well aware, temporary files have a habit of being much more persistent than their name implies. And over the course of time, these files add up and consume large amounts of valuable disk space. The Disk Cleanup utility provides you with a safe and reliable way to delete these temporary files from all their various hiding spots and thus free up disk space on your hard drive.
To access this utility, do the following:
1. Start Disk Cleanup from the General tab of a drive’s Properties dialog box; from the Accessories, System Tools folder; or from the Performance Information and Tools applet in Control Panel, among other methods.
2. Specify which drive you want to clean up (if you have more than one drive installed). Disk Cleanup calculates your disk space, searching for files that can be safely deleted or compressed. The details of this analysis are then displayed in a dialog box similar to the one shown in Figure 24.7.
Figure 24.7 A Disk Cleanup analysis report.
3. If you agree with the items Disk Cleanup has chosen for deletion, click Clean Up System Files.
Understanding Disk Cleanup Options
Near the top of the Disk Cleanup dialog box is the total amount of disk space you can free on this drive by accepting the selected recommendations listed shortly. You can exclude or include file groups from the cleanup process by removing or placing a check mark in front of the types listed. When you select an entry, you see a description of which files that group contains and what their purpose is. By selecting a group and then clicking the View Files button, you can see in the resulting folder window exactly which files are slated for death. Use this option if you have any doubts about a group of files, where they reside, or what they do.
Note
![]()
Agreeing to delete temporary Internet files does not delete your cookies (personalized settings for websites), so don’t worry about needing to re-enter user ID information or other such information for sites you frequently visit. Cookies and temporary Internet files are stored by default in x:Users<username>AppDataLocalMicrosoftWindowsTemporary Internet Files (where x: is the volume the system is installed on).
If you’re concerned about web-surfing privacy, including electronic commerce and banking or confidential business matters, you should delete temporary Internet files frequently.
The following file groupings might be listed:
• Downloaded Program Files—These files are ActiveX controls and Java applets used by web pages you have visited. If you delete them, they will be reloaded the next time you visit the pages.
• Temporary Internet Files—This one is a biggie. Every time you access a web page, your browser stores or caches the various elements of that page on the hard disk. When you revisit a page, any elements that have not changed since your last visit are reloaded from the hard disk instead of the site itself, to speed the rendering process. Deleting these temporary Internet files frees the largest amount of disk space of any of the group lists. However, if you use a modem to access the Internet, you will notice longer rendering times the next time you return to one of your favorite sites.
• Offline Webpages—These files are web pages you’ve visited that are stored on your PC so you can access them when you’re not online. Deleting offline web pages doesn’t affect your personalized settings for web pages.
• Recycle Bin—Clearing this folder is the same as manually clearing your Recycle Bin. It is a good idea to have a quick look at the files stored there before choosing this option. Select this option and click the View Files button under the group description; a folder window then opens, listing the contents.
• Temporary Files—Similar to cached web pages, when you connect to a network location and access a read-only file, a temporary copy is sometimes stored on your hard drive. Clearing these temporary copies does not erase the files you explicitly marked as available for offline use, so this is a safe choice.
• Offline Files—If you use the Windows 7 Sync Center (see Chapter 35, “Hitting the Road”), selected files and folders from a network connection are stored locally for access while you are disconnected. Do not delete these files unless you’re sure you can work without the local copies. You’ll lose any changes you made to offline files if you delete them here, so don’t make this choice without synchronizing first.
• Thumbnails—Thumbnails are generated automatically by Windows 7 for picture, video, and document files. Deleting thumbnails forces Windows 7 to re-create thumbnails when you open a folder.
• Per User Archived Windows Error Reporting—Windows Error Reports are used when reporting errors and checking for solutions.
After running Disk Cleanup initially, a tab named More Options appears in the Disk Cleanup dialog box. The Programs and Features Clean Up button opens the Uninstall or Change a Program window, so you can uninstall programs you no longer use.
Tip
![]()
Running Disk Cleanup weekly can do wonders to improve a system’s performance, especially if you are using a hard disk that has less than 25% of its space available at any given time. The first time you run it, the program might take quite a while to run, but with regular exercise, this program speeds up because the disk stays cleaner. Once a month—after you check the contents of the individual folder groups carefully—you should empty all folders of all temporary files.
You can use the System Restore Clean Up button to delete all but the most recent restore points. This might free up a significant amount of drive space, but it will eliminate your capability to roll back to previous states of the system, and it also eliminates file shadow copies and older system images that are part of restore points. Use this option only if you are desperate for additional space on your drive, because deleting this information could prevent you from recovering from a system problem later. (See Chapter 25, “Troubleshooting and Repairing Problems,” for information on System Restore.)
Using Internet Explorer’s Cache Cleanup
If you would prefer not to use the Disk Cleanup utility, you can choose a second option for clearing out those disk-hogging cached Internet files.
To access it, open Control Panel, Network and Internet, Internet Options. On the General tab of the Internet Properties dialog box, you will find a section titled Browsing History (see Figure 24.8).
Figure 24.8 The Internet Properties dialog box lets you control most aspects of Internet browsing.
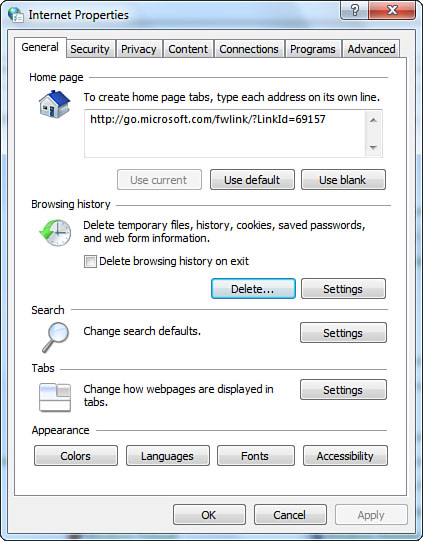
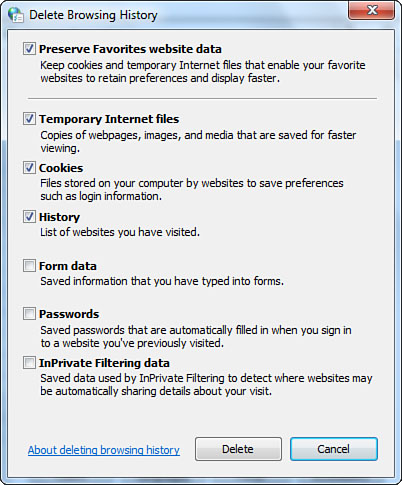
The Delete button opens a Delete Browsing History dialog box (see Figure 24.9). Here you can selectively delete temporary Internet files, cookies, history, form data, passwords, or InPrivate Filtering data. The Preserve Favorites Website Data option at the top of the dialog box helps you ensure your Favorites list is preserved, regardless of other files you choose to delete.
Figure 24.9 The Delete Browsing History dialog box lets you selectively delete categories of files used for Internet browsing.
Clicking the Settings button in the Browsing History section of the Internet Properties dialog box opens the Temporary Internet Files and History Settings dialog box (see Figure 24.10). You can configure options for how often cached files are checked against their original counterparts, how much disk space these cached files are allowed to take up, and in which folder they are stored.
Figure 24.10 The Temporary Internet Files and History Settings dialog box.
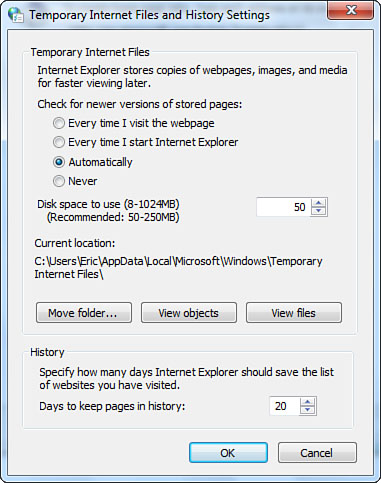
When the disk space setting is exceeded, files are removed on a “first in, first out” basis; that is, the oldest files are deleted to create space for newer ones.
Tip
![]()
Changing the location for the storage of temporary Internet files is especially a good idea if the system is a client on a domain network and roaming profiles are in use. By storing the temporary files outside your profile, it will take less time to log in and log out, plus your profile will consume less space on the network server.
Clicking the Move Folder button lets you specify a location where these temporary files will be stored. You can, for example, change this path to a temporary folder or a drive with lots of free space. (The authors of this book usually redirect Internet Explorer to deposit its temporary Internet files into a emp folder we’ve created on one of our drives.) If you do a lot of web surfing, you’ll want to map this temp location to a fast volume that is not on the same physical hard drive as your main Windows partition.
Clicking the View Objects button opens the Downloaded Program Files folder, and clicking the View Files button opens the Temporary Internet Files folder. You can also control how many days Internet Explorer saves items in your History folder from this dialog box.
Detecting and Repairing Disk Errors
NTFS was introduced and billed as a “robust and self-healing” file system, as opposed to FAT, which is not. All in all, we have to agree with Microsoft on this one. We have yet to see an NTFS partition go “sour” in any way, shape, or form. We’ve had NTFS partitions that would not boot and key system files that would not run, but for the most part, these errors were self-inflicted and usually brought on by playing with fire.
The disk repair program in Windows 7’s GUI is called Error Checking. These are the command-line versions (stored in the %SystemRoot%System32 folder):
• chkntfs.exe—Works with NTFS volumes and drives
• chkdsk.exe—Works with FAT/FAT32 partitions and drives
For a description of how each works, just add the normal /? switch or see Windows online help. The available commands enable you to turn automatic checking on and off, and repair a “dirty” (improperly shut down) drive at bootup.
Error Checking reviews the file system for errors and the drive for bad sectors (bad spots). To run the program, do the following:
1. In Computer or Windows Explorer, right-click the drive you want to check.
2. On the context menu, choose Properties.
3. Click the Tools tab.
4. In the Error-Checking section, click Check Now. A dialog box appears, as shown in Figure 24.11.
Figure 24.11 Checking a disk for errors in the file system.
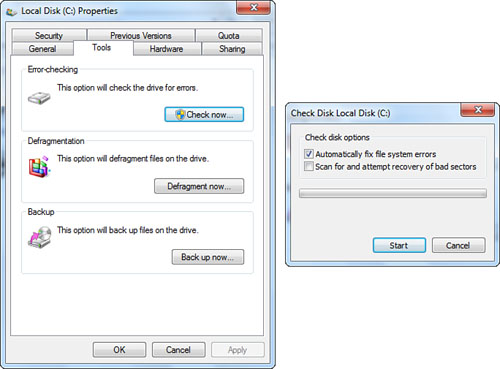
The meaning of the options is as follows:
• Automatically Fix File System Errors—If file directory errors (for example, lost clusters, files without end-of-file markers, and so on) are found, this option specifies whether the program should fix them.
• Scan for and Attempt Recovery of Bad Sectors—This option specifies whether the program should attempt to locate bad sectors, mark them as bad, and recover data from them by writing it in a known, good area of the disk. If you select this option, you do not need to select Automatically Fix File System Errors; Windows fixes any errors on the disk.
Tip
![]()
If your volume is formatted as NTFS, Windows automatically logs all file transactions, replaces bad clusters, and stores copies of key information for all files on the NTFS volume.
You can run the error check with neither of the option boxes turned on, and you are not required to close all open files and programs. However, if you check either of the boxes, you are told that Windows can’t check the disk while it’s in use. You are given the option of deferring the check until the time you restart your system.
Disk Defragmenter
When an OS stores data on a hard disk, it places that information in the first available “hole” it can find that isn’t already occupied by another file. However, if the disk already contains several other files, that location might not be large enough for the complete file. When this happens, the OS places as much of the file as it can in the space available and then searches for another open hole for the balance of the file. This process continues until the entire file has been written to disk. Any files that are not written to a contiguous disk location are considered “fragmented.”
The problem with fragmentation is that it slows down the rate at which your hard disk can retrieve information and supply it to the requesting program. Hard disks remain largely mechanical devices and are governed by the laws of physics. To access files stored on a disk, the drive must physically move a small arm to the correct location on a spinning platter. These movements are measured in milliseconds, but milliseconds add up, especially when a file is spread over a hundred unique locations.
Fragmentation is not always a bad thing. If an OS had to find a contiguous section of disk space for every file it stored, your system would slow down as your drive filled up. Eventually, your system would reach a point at which the disk still had ample free space, but none of this space would be in contiguous blocks big enough to hold a file.
Disk Defragmenter addresses this fragmentation problem by reorganizing all the files on your hard disk so that they are stored as complete units on a single area of the disk. To do so, it identifies any remaining free areas, moves small files there to open up more space, and uses this newly opened space to consolidate larger files. This shuffling process repeats until all the files are moved around in this manner and the entire disk is defragmented.
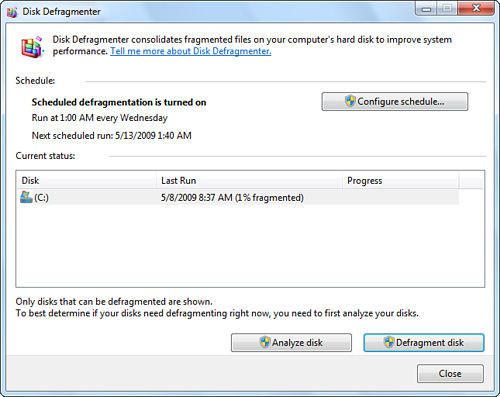
In Windows 7, unlike Windows XP, the Disk Defragmenter process is automated. You configure when it takes place, and it does the rest.
Configuring Defrag
The fastest way to open Disk Defragmenter is to click Start, type disk in the Search box, and select Disk Defragmenter from the results list. You can also open Disk Defragmenter from All Programs, Accessories, System Tools, Disk Defragmenter. By default, Disk Defragmenter (Figure 24.12) runs on a weekly schedule. Click Configure Schedule to specify a frequency (daily, weekly, monthly), a day of the week, a time, and which disks to defragment if your system has two or more disks. To defragment your hard disk immediately, click Defragment Disk.
Figure 24.12 The Disk Defragmenter window in Windows 7 can schedule a defragmentation session or run the utility immediately.
Compression: How It Works, How to Use It
Windows 7 ships with built-in provisions for file compression that is implemented via NTFS. File compression works by encoding data to take up less storage space. Digital data is compressed by finding repeatable patterns of binary 0s and 1s. The more patterns found, the more the data can be compressed. Text can generally be compressed to approximately 40% of its original size and graphics files from 20% to 90%. Some files (namely EXE files) compress very little because of the lack of repeating data patterns within the program. The amount of compression depends entirely on the type of file and compression algorithm used.
Compressing a file or folder in Windows is a simple process:
1. Open Windows Explorer and select the file or folder you want to compress.
2. Right-click and select Properties from the context menu.
3. Click the Advanced button at the bottom of the Properties dialog box.
4. In the Advanced Attributes dialog box that appears, check the Compress Contents to Save Disk Space box (refer to Figure 24.13).
Figure 24.13 Compressing a folder with Windows 7
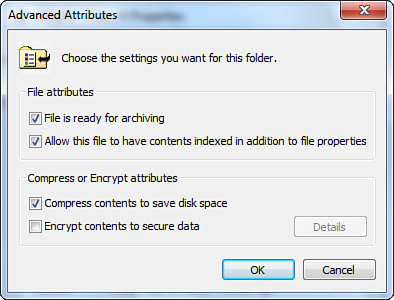
5. Click OK, and you are prompted to choose whether you want to compress files and folders (if you’re compressing a folder) recursively. Doing so is generally desirable and a safe bet.
Two caveats are in order with compression:
• A file or folder can be compressed or encrypted, but not both. These options are mutually exclusive.
Caution
![]()
When using compression, keep in mind some disk space requirements. If you try to compress a volume that’s running extremely low on free space, you might see this error message:
Compression Error
File Manager/Explorer cannot
change compress attributes for:
"pathfilename"
This error message indicates that the system needs additional free space to perform compression. The system is not designed to manipulate the data in place on the disk. Additional space is needed to buffer the user data and to possibly hold additional file system metadata. The amount of additional free space required depends on the cluster size, file size, and available space.
• By default, compressed files are shown in blue and encrypted files are shown in green. If you choose Control Panel, Folder Options and select the View tab, you can find an option to display compressed and encrypted files or folders in an alternate color.
![]() To learn more about file encryption on NTFS volumes, see Chapter 31, “Protecting Your Data from Loss and Theft.”
To learn more about file encryption on NTFS volumes, see Chapter 31, “Protecting Your Data from Loss and Theft.”
Use compression only when expressly needed. Compression causes significant performance reduction if a sizeable number of commonly accessed files are compressed, due to the CPU processing required to decompress them for use.
Third-Party Management Tools
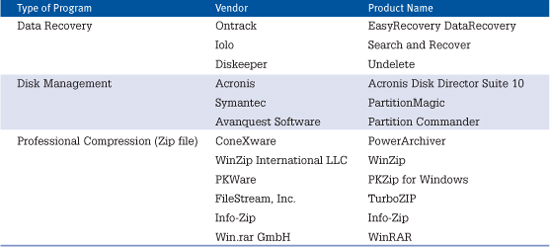
Table 24.1 provides a list of tools that you should not be without if you are serious about hard disk tweaking, backup, and recovery. By searching on the Web, you can easily find any of these popular programs. To determine which versions of a particular tool are compatible with Windows 7, contact the software vendor.
Table 24.1 Third-Party Disk Management Tools
Hard Disk Troubleshooting
If you work with computers long enough, you will face some form of hard disk problem. It’s not a matter of if; it’s a matter of when. The laws of statistics apply to everyone and everything—and that includes hard drives. In the following sections, when I speak of hard drive problems, I’m not referring to a software program that is acting petulantly or a DLL that has been overwritten by a poorly designed installation routine. I’m talking about the inability to access a critical file, a hard drive that will not boot, or one of those cryptic “Fatal Error—Cannot access hard disk” messages that cause the blood to drain from the face of even the hardiest administrator.
These sections are not meant to be comprehensive—full books have been written on solving hardware problems, and thousands of individual chapters have been written about hard drives and the multitude of problems they can exhibit. These sections will give you some tried-and-true starting points if your hard drive starts to give you grief.
Hard drive problems range from file system structures that have been twisted out of shape to catastrophic, dead-in-the-water hard drive failures. And as any seasoned administrator will tell you, the catastrophic failures are the easy ones to diagnose and fix. More often than not, the inconsistent “What the heck?” problems are the real “head-scratchers.”
To keep it simple, let’s begin with the most important factor in troubleshooting problems of all shapes and sizes—be it a car that will not start or a computer that will not boot. And that is....
Take the Mental Approach First
I come from a long line of tradesmen who made a living getting their hands dirty and solving mechanical problems. As a writer and computer consultant, I rarely get my hands dirty anymore, but I have discovered that the principles of problem solving that I learned when I was young are the same across all fields. You need to be methodical, and if you are going to make assumptions, they had better be good ones; otherwise, you just might steer yourself down the wrong garden path.
The very first step to take when you have a disk access problem is to stop, sit down, and think. Although this advice might seem obvious, it is seldom realized in practice. People experience what they conclude is a hard drive problem, open their case, and start ripping out components when, in fact, they have a file system problem that could have been easily resolved by running Error Checking on their drive. Similarly, others start reinstalling OSs when the problem is not software, but a failing CMOS battery or a loose cable that is causing the motherboard to lose sight of the hard drive.
None of this exposition is meant to imply that I’m smarter or better at diagnosing problems than the next guy, and in the end, I might come to the same conclusion as the person who leapt in and started ripping his case apart. What separates us, in my humble opinion, is that the steps I use to solve a problem today will apply equally well to a completely different problem I encounter a week from now.
So when you have a hard drive problem—or what you think is a hard drive problem—before you pick up a DVD or a screwdriver, get yourself a cup of coffee and take a few minutes to get a clear picture of the nature of the problem in front of you. The following are some questions you might want to ask yourself:
• When did the problem start?
• What was I doing when I first noticed the problem?
• Is the problem consistent? If so, how? If not, what is missing from the puzzle?
This last point bears some elaboration. Computers, as a whole, are extraordinarily consistent devices. Input goes in here; output comes out over there. In the case of hard drives, you lay out structures on them, and the OS uses these structures to tell programs where their data is located. When you have inconsistencies, one of two forces is at work:
• You’re not seeing or you’re overlooking something.
• You could have more than one problem on your hands.
The key to this forced reflection is to have a “plan” before you react. And the cornerstone of that plan must be to do no further harm, and to figure out what the problem is without complicating matters further.
After you’ve pondered and had a cup of coffee, the next highly recommended tools to pick up are a notepad and a pencil. Begin by jotting down some notes on what happened, what you think the problem is, and what might be a good course of action to solve that problem. Use your notepad to reason out the problem; more often than not, eliminating a piece of flawed logic with an eraser is easier than restoring all the programs to your hard drive.
Problems and Solutions
Hard drive problems fall into two general categories:
• Hardware
• File structure
Hardware-related problems involve the hard drive itself, cabling, power, connections, or the motherboard.
File structure problems involve the tracks and partitions on the hard disk, the boot records, or the files the OS uses to initialize itself.
If you power up your computer and the BIOS cannot find the attached hard drive, chances are, you have a hardware problem. On the other hand, if the BIOS finds and recognizes your hard drive but fails to boot, you likely have a file structure problem. Note the “chances are” and “likely” qualifiers in these sentences. As you read through the following scenarios, bear in mind the complications that can be brought on by compounded problems. In other words, file structure problems and hardware problems can sometimes overlap. For example, a damaged master boot record (MBR) might be the result of a failing hard drive; repairing the MBR might fix a consequence of the problem, but not the problem itself.
System Starts but Cannot Find the Hard Drive
If the computer fires up (the BIOS information appears and the floppy drive is accessed, but nothing more), you have some sleuthing to do. Follow these steps:
1. Turn off the computer, open it, and check the cables. Are the power and data cables attached to the drive? On SATA drives, be sure the SATA data and power cables are firmly attached to the drive. First-generation SATA drives don’t use locking mechanisms on these cables, and they can be easily removed. If you recently installed a new piece of hardware or were mucking around inside your computer case, it’s very possible that you unintentionally jiggled a connection loose. If you use an ATA/IDE drive, be sure pin 1 (marked as a red or speckled stripe on the edge of the cable) is lined up with pin 1 on the hard disk and motherboard. If you use only 80-wire cables, the cable is keyed, so it can’t be installed wrong. However, older, 40-wire cables (often used on CD and DVD drives) are not always keyed.
2. Check the settings on the drive to be sure they are correct. If you have a SCSI drive, check the ID number and termination, per the instruction manual for the drive. If you have an ATA/IDE drive, check the master/slave settings and channel assignment. If you have two devices on the same ATA/IDE channel, both set to master or both set to slave, there will be a conflict. You can have only one master and one slave per ATA/IDE channel. You typically change the setting by using a little jumper block on the back of the hard drive, next to the data and power connectors (ditto for ATA/IDE-based DVD drives). Many recent systems use the CSEL or Cable Select setting for both drives. When used with an 80-wire 40-pin cable, the blue end of the cable plugs into the motherboard, the drive on the middle of the cable (gray connector) is slave, and the drive on the far end of the cable (black connector) is master. Note that many Western Digital hard disks do not use a jumper block if they are the only drive on the cable.
3. Check the BIOS settings by pressing the appropriate key during POST (Power-On Self Test) and having the computer autodetect the drive type. Be sure the drive is listed and recognized. If you have just upgraded to SATA hard disks, be sure the SATA host adapters on the motherboard are enabled in the system BIOS. On many systems, SATA functions are disabled by default. If you use an SATA host adapter card, or if the SATA ports on your motherboard use a third-party chip rather than being controlled by the motherboard chipset, you will need to install the appropriate third-party driver file before you can use SATA drives.
Tip
![]()
Most modern PCs and BIOSs autodetect the hard drive that’s connected to the data cable after the drive gets power. You no longer need to enter all the explicit information about the drive, such as the number of heads, the sectors, the landing zone, and so on. Just set the BIOS to Autodetect.
Hard Drive Initializes but Will Not Boot
Windows 7 makes it easier than ever to repair a system that will not start or will not load Windows 7. These features are useful if some of your system files become corrupt or are accidentally erased, or if you have installed software or device drivers that cause your system to not work properly. However, these features are used more to restore a system with a damaged Registry or destroyed system files than to resolve hard drive–specific problems. If you’ve already tried the actions listed in this section, to no avail, flip over to Chapter 25 for details on numerous other recovery techniques that might be of benefit to you. Be sure to check out Startup Repair, Safe Mode (in the “Boot Options” section), and System Restore.