
14. Using Internet Explorer 8
What’s New in Internet Explorer 8?
If you have used Internet Explorer 5, 6, or 7, then IE8 will be mostly familiar to you. Some of its new features are behind the scenes—not readily apparent, but designed to make IE run more smoothly and reliably than ever. Others are enhancements that you will see, including these:
• The interface is streamlined; the menu and links are no longer visible by default (although you can still activate them, if you want).
• The Search Companion in Internet Explorer 6 is long gone; it was replaced by the Live Search box at the upper-right corner of the window (underneath the Minimize, Maximize, and Close buttons) in IE7 and remains in IE8. The Live Search box makes it faster and easier for you to search for items on the Web.
• The toolbar appears below the Address box, and Internet Explorer presents web pages in tabs. You can open a new page in your current tab, or you can open a new tab and have any number of web pages open at one time, all contained within a single browser window. You just click on tabs to switch between each web page. The Favorites and Add Favorites buttons appear to the left of the tab.
• IE8 introduces the concept of Tab Groups. If you’re the type of web surfer who enjoys tabbed browsing, you’ll really enjoy Tab Groups that combine and color code related tabs. As you close tabs within a group, the next active tab is shown constantly keeping you within context of the current task.
• The right side of the toolbar contains easily accessible task menus, including the capability to obtain RSS feeds automatically from sites that IE8 recognizes as having them available.
Tip
![]()
When you open a website, IE8 automatically looks for web feeds that are available on the page. A web feed is content that is published frequently by a website. That content can include text, graphics, audio, and video. You may have heard of RSS, or Really Simple Syndication, which is the leading system for creating and delivering web feeds (commonly used for blogs). If IE8 finds a web feed on the page, the Web Feed button changes color from gray (no web feed) to orange (web feed available) so you can download and view and/or listen to the content as well as subscribe to the feed so you can receive new content from the website automatically.
• As with IE6, playback support for Flash and Shockwave files is built into IE8.
• IE8 provides enhanced navigation with Compatibility View. As with all new browser releases, some websites cease to function or render properly, and IE8 addresses this issue to display pages as designed for IE7. No more misaligned text or text boxes and misplaced images. Plus you can specify Compatibility View settings on a per-site basis. Is that cool or what?
• Suggested Sites (off by default and disabled during InPrivate viewing or secure SSL and intranet connections) makes site suggestions based on your viewing habits. IE sends information to Microsoft via a secure connection, where it is stored temporarily per session with a uniquely generated identifier.
• InPrivate is a new security mode that consists of private browsing, blocking, and subscription. This privacy protection mode does not retain browsing or search histories, site cookies, form data, or login passwords and automatically clears the browser cache.
• Accelerators perform selection-based searches so that users can invoke an online service from any page with a simple mouse gesture. Selecting text and objects reveals access to available Accelerator services, which eliminates the need to cut and paste between web pages.
• Web Slices are updated snippets of an entire page that users can subscribe to based on developer-designated page portions. Web Slices are automatically updated by the browser to present visual representations for websites viewable directly from the Favorites bar in a convenient flyout window.
• AutoComplete in IE8 has changed considerably. Inline AutoComplete is gone, but the Address bar now features domain highlighting for added security. Only the top-level domain is visible in black while the remaining URL is grayed out—a feature that cannot be disabled by users or the sites they visit—to simplify the task of spotting site spoofers. Furthermore, the Address bar is no longer a location for typing URLs: it’s a fully fledged search entry tool that scours the Web, visited sites, Favorites, and RSS feeds.
• SmartScreen Filter is an extension of IE7’s phishing filter that prevents harmful or imposter sites from duping users. IE8 will produce a prompt reporting that a given site should be avoided, giving the user safe alternative options (visit the home page, previous site, or continue on to the designated-unsafe destination).
• The Favorites bar now replaces the Links bar in both form and function. It hosts content from Web Slices, RSS feeds, documents, and site links. You can view snapshots of pages that developers design specially for this purpose.
Note
![]()
A Department of Justice Consent Decree has caused some changes in the way that middleware applications are handled. In Windows Vista, you can configure your computer to show only Microsoft middleware applications (Windows Mail, Internet Explorer, and so on), to show only non-Microsoft middleware applications (Mozilla Firefox, Mozilla Sunbird, Eudora, and so forth), or to show some combination of both. Microsoft has removed Windows Mail (along with Photo Gl downloads.
• Performance and stability has increased considerably in IE8. The integrated HTML processor, CSS engine, mark-up tree manipulation, and JScript runtime environment have been vastly improved. IE8 also uses a loosely coupled architecture that runs the browser frame and its tabs in separate process spaces so that glitches and hang-ups don’t crash everything. ActiveX permissions are designed with greater granularity so that, instead of global disablement, users can now exercise discretion on a per-site basis.
Among the more noticeable and noteworthy IE8 features are Accelerators and Web Slices. Together, these two features enable you to glean information from sites and services without directly visiting them.
An Accelerator delivers data from the Web to your browser in summarized form. Suppose you visit a contact page that displays a physical address: highlight the information, select a maps Accelerator, and the relevant information appears in a pop-up window or new tab, depending on the Accelerator’s design. Microsoft Accelerators take advantage of Live Maps, Bing (formerly Live Search), and Windows Live Spaces services. Others are designed specifically for other popular sites and services, including Amazon, eBay, Facebook, and Yahoo.
Tip
![]()
Check out the variety of Microsoft’s Accelerator Add-ons Gallery at www.ieaddons.com/en/accelerators. You can find Accelerators for many popular sites and services to improve your browsing results and enhance productivity levels.
Web Slices deliver dynamic page content to your browser via the Web from pages you’re not even visiting. You can keep up-to-date tabs on changing stock prices or pricing bids without directly accessing financial sites and auction pages. When you visit a site that is capable of delivering Web Slice content, the Web Slice icon (located on the Favorites bar) turns green. As content changes, the title changes to bold. Click the Web Slice, and a flyout window appears to display relevant content. Click the flyout window and IE automatically brings the full page within focus of your browser—or you can just preview data in the drop-down window pane.
Internet Explorer 8 Quick Tour
Web browsers have become so ubiquitous that we assume you are already comfortable with the basics of web browsing. And because many Windows 7 elements such as Windows Explorer, the Control Panel, and Network use the background code of IE7, you are probably already familiar with the location of common toolbar buttons, menus, and other screen elements.
Still, IE8 does have some new features, so we provide an overview of how to use some of them here. This overview will be especially useful if you are switching from an even earlier version of Internet Explorer or another web browser, such as Netscape Navigator.
![]() You must have a connection to the Internet configured on your computer before you can connect to the Web. See Chapter 13, “Getting Connected.”
You must have a connection to the Internet configured on your computer before you can connect to the Web. See Chapter 13, “Getting Connected.”
You can begin browsing the Internet by launching Internet Explorer from the Start menu, or more conveniently from the Windows 7 taskbar.
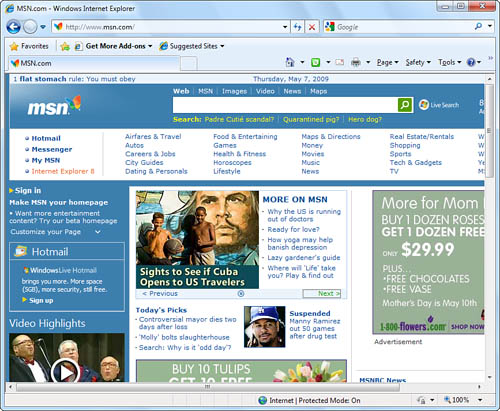
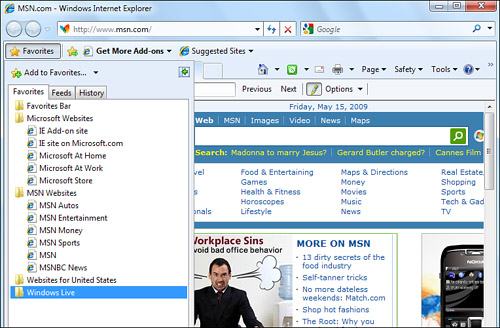
If you connect to the Internet via a dial-up connection, you might be prompted to connect. When the connection is established, Internet Explorer probably opens by default to the Windows Bing home page, as shown in Figure 14.1, so you can search the Web. Some PC manufacturers, such as Compaq, customize IE before delivery so that you see their home page instead.
Figure 14.1 Internet Explorer opens with MSN as the default home page; however, you’re free to change this to any website you prefer.
![]() To change the home page so that you see a personal favorite when IE opens, see Chapter 23, “Tweaking and Customizing Windows.”
To change the home page so that you see a personal favorite when IE opens, see Chapter 23, “Tweaking and Customizing Windows.”
Internet Explorer Crashes on Certain Web Pages
![]()
You might find that IE8 occasionally fails to properly render a page or appears incompatible with certain page content or site scripting. When visiting a site built for IE7, the browser automatically offers you Compatibility View. You’ll know it’s in effect because an informative balloon tip appears along with an icon of a broken page that lights up on the right side of the Address bar. To enable this workaround, click the icon to activate Compatibility View; click again to disable it. IE8 remembers this mode for the pages you revisit so you won’t have to keep engaging it, but you can also opt out of this feature for certain pages. IE8’s Compatibility View only appears upon detection of an incompatible site.
Web pages change frequently, so the page you see will probably look different than Figure 14.1. The general layout of the IE8 window might also be different from what is shown here, although if you have performed a standard installation of Windows 7 and have not done any customizations, it should look like this.
Tip
![]()
Want even more space to view web pages? Press F11 to change the view and remove some screen elements to make more room for web documents. If you don’t like what you see, press F11 again to toggle back.
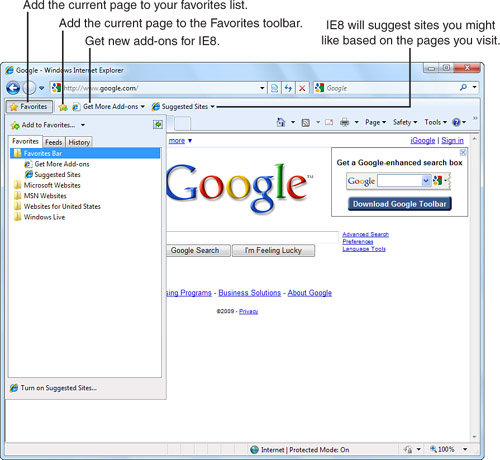
In IE7, the Links bar provides users with one-click access to their favorite sites; however, in IE8 this has undergone complete renovation and is now the Favorites bar. Consider creating buttons on the Favorites bar for the web pages you visit most frequently—page links, RSS feeds, Web Slices, and even Microsoft Office documents. To see the Favorites bar (enabled by default), right-click on an empty area of the toolbar and click Favorites from the pop-up menu. The Favorites toolbar appears, as shown in Figure 14.2. Before you customize the Favorites bar, keep these tips in mind:
• The star icon just to the right of the Favorites button adds the current page to the Favorites toolbar.
• The Get More Add-ons button opens a Web Slice where you can explore and obtain IE8 add-ons.
• The Suggested Sites Web Slice enables you to receive website suggestions based on your browsing interests. Turn on Suggested Sites so that IE8 can better assist your web surfing habits.
• You can remove unwanted Favorites buttons by right-clicking them and choosing Delete from the menu that appears. Alternatively, you can click the Favorites button and delete Favorites entries in the Favorites management window.
• Make space for more Favorites (and Internet Explorer’s toolbar area) by right-clicking the Favorites button and uncheck Lock the Toolbars from the menu that appears. Click the dotted handle on the left side of the toolbar and drag it down to the Tabs level, then reenable the Lock the Toolbars option.
• To create more room, reduce the length of your Address box and move it to share a “line” with another toolbar. (The main toolbar, on the top line, is a good place for the Address box.) Experiment with the placement of all toolbars so that you have as much space as possible to view web pages.
• The easiest way to add a web page to the Favorites bar is to click the star and arrow icon or drag the icon for the page from the Address box and drop it onto the Favorites bar.
Figure 14.2 The Favorites bar is a handy place to store your most frequently visited websites.
You can navigate around the Internet by typing web addresses into the Address box or by clicking hyperlinks on a page. The mouse pointer changes from an arrow into a hand whenever it is located over a link. Among the most useful features of the IE8 interface are the Back and Forward buttons. When you click the Back button, you return to the previously visited page. Clicking Forward moves you ahead once again. (To move around even faster, Alt+left arrow and Alt+right arrow produce the back and forward functions; if you have a new mouse, it might also have special Back and Forward buttons on it.)
What Happened to the Website?
![]()
If you receive a lot of “Page not available” errors, even on major commercial sites, the most obvious suggestion is to check your Internet connection. Your server might also be having a temporary problem, or high Internet traffic might be preventing your access. Another thing to consider is whether the page you are trying to visit is on a secure web server. Click the Tools button in the toolbar, click Internet Options, and then click the Advanced tab. Scroll down to the group of security settings and see whether any of the encryption protocols supported by IE are disabled. For example, if you are trying to visit a page that uses PCT encryption but Use PCT 1.0 is disabled, that page will not open.
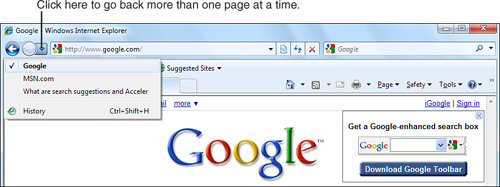
Notice that next to both the Back and Forward buttons are downward-pointing arrows. If you have been browsing several web pages, click the Recent Pages button, which is the down-arrow button next to the Forward button. A menu similar to that shown in Figure 14.3 should appear, showing a backward progression of the web pages you have visited. Click a listing to move back several pages simultaneously instead of one at a time.
Figure 14.3 To move back several web pages instead of to the previous one, click the Recent Pages button next to the Forward button.
Tip
![]()
Type a term in the Address box and IE8 performs a search using your default search engine selection. AutoComplete produces an immediate list of hits drawing from your History and Favorites, all organized categorically. Search terms aren’t isolated to word beginnings, either—portions of page titles and URLs are also included. Highlight a list entry and press Enter to visit the page.
If you want IE8 to include RSS feeds, click Tools, open the Internet Options dialog box, and open the Content tab. Under the AutoComplete heading, click the Settings button. Check the box next to Feeds, click OK to accept the changes, and then click OK to close the Internet Options dialog box. That’s it!
Browsing in Tabbed Pages
If you open several different pages at once and you don’t want multiple Internet Explorer buttons to clog your taskbar, you can view multiple pages from within the IE8 window by creating new tabbed pages and then opening a new website in each page. Tabbed pages have been around for a long time in other web browsers such as Firefox and add-ons to IE such as Avant Browser, but now Microsoft has finally caught up with the times in IE7, thank goodness.
IE8 introduces the concept of color-coded Tab Groups for at-a-glance visualization of related browser tabs. Though subtle, this improvement can significantly impact your productivity levels by logically grouping related tabs. For example, in IE7 if you write a blog or update page content and preview changes before posting to the Web, the content often appears in a new tab to the far right—far removed from the current working tab. You could easily get confused with multiple open tabs with no visual indication as to how those tabs relate to each other—there was simply no at-a-glance contextual information to distinguish between tabs.
New to IE8, however, are color-coding and grouping options, which eliminate all that guesswork. You can even move tabs between groups by simply dragging the desired tab into a designated group, at which point it assumes the appropriate color coding. Right-click any tab to control the entire group, including closing the group, closing all tabs except those in a given group, and ungrouping select tabs from a chosen group. You can also perform actions to individual tabs. And if you accidentally close the wrong tab or tabs, you can recover by pressing Ctrl+Shift+T. You can also right-click any tab and select Recently Closed Tabs to pick from a list of associated tabs. IE8 has adopted and embraced all the features of competing browsers to ensure it maintains all the best-of-breed options right at home.
New tabs open to present multiple links that allow you to open recently closed tabs, an InPrivate browsing session, and the Accelerator that makes selection-specific searches and page content grabbing easier. Each tab is perfectly isolated to prevent browser crashes when a single page blows up—a previous sore spot for IE browsing. Now you can restore the crashed tab and reload exactly the information when it crashed, including unfinished blog entries, interrupted email correspondence, or interrupted streaming video.
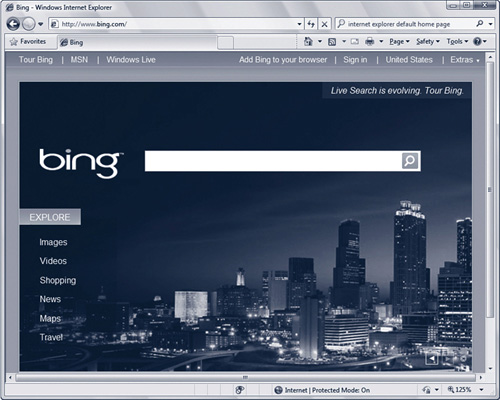
When you open IE8, your home page appears in the default tab. As mentioned earlier, the default home page is MSN, as shown in Figure 14.4.
Figure 14.4 Internet Explorer displays Microsoft’s Bing search engine in the Search tab.
The name of the page appears in the tab. Next to the tab is a second, smaller tab. When you click this tab, a new tabbed page appears to the right of the first tab and displays the New Tab page, as shown in Figure 14.5.
Figure 14.5 The New Tab page provides convenient links to get you going.
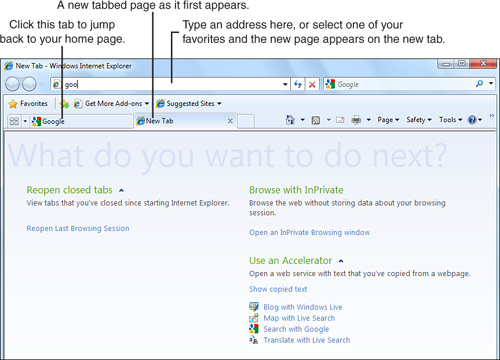
The New Tab page provides information about how to get started with tabbed browsing and to learn more about tabs. The tab at the top of the window (with the title “New Tab – Windows Internet Explorer”) is raised and appears in a different color, to let you know that the tabbed page is the one you’re viewing. Now that the new tabbed page is open, you can open a website in the page by typing the URL in the Address box.
You can create a new tab by clicking the small tab to the right of the new tab you just created. If you want to close your current tab, click the X to the right of the tab title.
Tip
![]()
Tabs also have pop-up menus that you can access by right-clicking a tab that has a web page. This pop-up menu lets you close the current tab, close all other tabs except for the current one, refresh the page in the tab, refresh the pages in all tabs, and create a new tab.
Each tab has a set width, and all the tabs must fit between the Add Favorites button and the buttons on the right side of the toolbar. If the page title in the tab is too long to fit in the width of the tab, the title is truncated with ellipses at the right side of the title. You can view the entire name by moving the mouse pointer over the tab; about a half-second later, a pop-up menu appears that displays the full name of the tab. Unless the name of the page is extremely long, the full name appears in the Internet Explorer title bar as well.
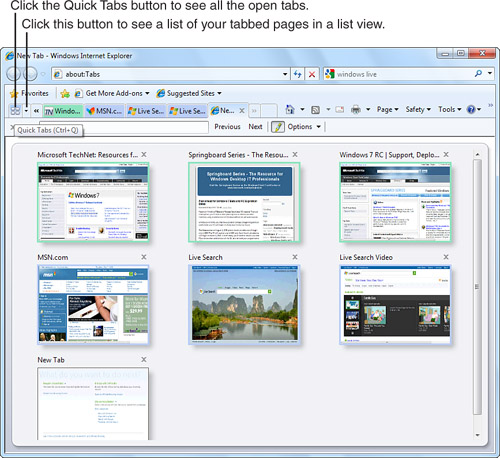
When you create more than one tab, two small buttons appear to the left of the first tab. When you click the Quick Tabs button, a list of all your open web pages in tabs appears in the Quick Tabs page, as shown in Figure 14.6.
Figure 14.6 The Quick Tabs page is a great jump-off point for your most frequented sites.
Note
![]()
A shortcut for accessing the Quick Tabs page quickly is to press Ctrl+Q.
The Quick Tabs page shows thumbnails of all the web pages in all the tabs. The page titles and the Close (X) button appear above the thumbnails. Click a thumbnail to open the tab, or click the Close (X) button to close the tab.
Tip
![]()
Some other tabbed-browser programs give you more extensive tabbing features, such as setting up favorite groups of websites as related tabs that you can open up all at once—a great feature for doing research on specific topics where you have a load of web pages open at once. Check out Avant Browser or Firefox.
You can also view a list of all the tabs in list form by clicking the Tab List button. A list of open tabs appears underneath the button. Open a tab by clicking the tab name in the list; the currently open tab has a check mark to the left of the tab title.
If you close Internet Explorer while you have more than one tab open, a dialog box appears and asks if you want to close all tabs. When you click the Close Tabs button, IE8 closes and only one tab appears the next time you open IE8. You can click the Show Options button to tell IE8 to reopen all the currently open tabs the next time you open Internet Explorer, and then click the Close Tabs button to close IE8.
Browsing with Enhanced Privacy and Security
The Internet is becoming an increasingly rich connective space where much personal information is given and sometimes taken. Users aren’t always aware that when they browse the Internet the websites they visit might be tracking their browsing habits. IE8 safeguards your personal browsing information from other people entrusted with access to your computer and from sites you aren’t aware are attempting to pilfer your data.
IE8 includes a series of security and privacy features, one of which is called InPrivate Browsing. An InPrivate session captures all traces of your personal browsing activities—including those deemed Not Safe For Work (NSFW)—and erases those details when you close the browser. All cookies, temporary Internet files, browsing history, form information, submitted usernames, and typed passwords simply vanish. To enable InPrivate Browsing, either click the Safety button in the toolbar and select InPrivate Browsing or press Ctrl+Shift+P.
New malware protections such as the SmartScreen antiphishing filter prevent those most prolific online scams from fooling you into revealing sensitive information to unauthorized parties. SmartScreen warns you when you select a site deemed harmful (for example, known to harbor malware or to be posing as a false front for a financial institution) with a constantly updated database of bad sources.
InPrivate Filtering is designed to deter sites from sharing your browsing habits without your knowledge. InPrivate Filtering enables selective site blockage so that the places you visit cannot harvest your information and pass it along to third parties. A small lock icon with an arrow (at the lower right of the browser window; see Figure 14.5) indicates that InPrivate Filtering is active. To enable InPrivate Filtering, either click the Safety button in the toolbar and select InPrivate Filtering or press Ctrl+Shift+F. You can also access InPrivate Filtering settings from the Safety menu. If InPrivate Filtering blocks from display third-party data that you need, you can specify custom feature settings as a workaround.
Microsoft also includes additional safety features. IE8 blocks common forms of cross-site scripting attacks and provides better protection against malicious ActiveX controls. It also attempts to prevent click-jacking, which is when an attacker places invisible buttons above or below legitimate buttons, thereby duping unsuspecting users into activating malicious code or revealing private information. And unlike previous browsers, IE8 offers the Delete Browsing History screen so you have granular control over cookies and temporary Internet file deletions. To access IE8’s improved browsing deletion tools, click the Safety button and choose Delete Browsing History or simply press Ctrl+Shift+Del. If you check the box titled Preserve Favorites Website Data, no information related to your bookmarked sites will be erased.
Adding Sites to Your Favorites
It’s very inefficient (not to mention annoying) to type the URL in the Address box every time you want to access your favorite sites. It’s also difficult, if not impossible, to remember all your favorites. Fortunately, IE8 lets you add, save, and categorize your favorites so you can access them in the Favorites pane, which now entirely replaces the Links bar (and all related functionality). The Favorites Bar contains the Favorites button, a quick Add To Favorites button, the Suggested Sites Web slice, and a Get More Add-Ons Web slice.
The process of adding a favorite is fairly simple. Your first step is to browse to the website you want to make one of your favorites. For best results, open the main or index page of the website first. Now try the following:
1. Click the Add to Favorites button in the Favorites Center on the toolbar (the side window that appears when you click the Favorites button), and then click Add to Favorites Bar.
2. In the Add a Favorite dialog box, type the name of the favorite in the Name box, as shown in Figure 14.7. You can also change the name so that you will be able to easily identify the page. Whatever name you enter is shown in your Favorites list.
Figure 14.7 The Add a Favorite dialog box.
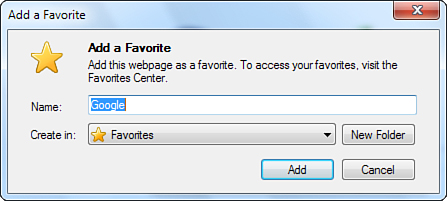
3. From the Create In list, select the folder where you want to save the favorite. IE8 contains five folders by default: the home (Favorites) directory, Microsoft websites, MSN Websites, and Windows Bing.
4. If you want to create a new folder or subfolder within one of the current folders, click the New Folder button. The Create a Folder window appears, as shown in Figure 14.8.
Figure 14.8 The Create a Folder window.
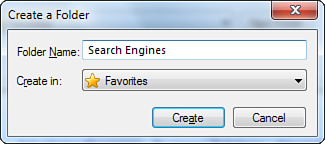
5. Type the folder name in the Folder Name box.
6. From the Create In list, select the folder where you want to create the new folder. The default is the home (Favorites) directory.
7. Click Create. The new folder you created appears in the Create In list.
8. Click Add. IE8 adds your favorite to the list.
Now that you’ve added a favorite to the list, you can view the favorite by opening the Favorites Center pane. Here’s how:
1. Click the Favorites button in the toolbar. The Favorites Center pane appears on the left side of the window, as shown in Figure 14.9. Notice that the Favorites Center pane overlaps the web page you’re viewing.
Figure 14.9 The Favorites pane keeps your most favored websites in order.
2. Click the folder that contains the favorite. The favorite appears underneath the folder name.
3. Click the favorite name to open the web page in the right pane.
4. Close the Favorites Center pane by clicking the Favorites button.
Using Multimedia Browsing and Downloading
When the Web first debuted as a method for sharing scientific data among physicists, the hypertext format of the data was specifically chosen to enable sharing information in many different formats. For early Internet users, the ability to download pictures and other graphics in conjunction with web pages was both exciting and profound.
Today, web pages containing pictures are the norm. Web developers continue to push the multimedia horizon, with many sites now featuring audio and video. You can even listen to radio stations and watch other broadcasts live over the Web.
In addition to multimedia-rich websites, you’ll find that the Web is a good place to download software. You can find many places to download freeware, shareware, and software updates, and sites to purchase and download full versions of programs.
Images
Believe it or not, graphics-rich websites were once controversial. Some people believed that graphics would put too much strain on the bandwidth capacity of the Internet, but those gloom-and-doom predictions have not become a reality. Backbone improvements have helped the Internet keep pace with the ever-growing appetite for multimedia on the Web, and images are now both common and expected.
Internet Explorer supports three basic graphics formats used in web pages:
• JPEG—Short for Joint Photographic Experts Group, this format enables pictures to be significantly compressed (reducing download time and bandwidth, but also image quality), so this is often used for photos on web pages.
• GIF—Short for Graphics Interchange Format, this format is often used for buttons and other simple icons used on web pages.
• PNG—Short for Portable Networking Graphics, this format was developed to help images load faster and keep them looking the same on different platforms.
The exact format used for each image is not apparent when you view the page. Normally, the specific format used is not important unless you plan to copy the graphics and use them for some other purpose. For web use, the formats are essentially interchangeable.
Caution
![]()
Before you use any graphics you find on the Web, check the website for a copyright statement or other information about terms of use. You should obtain permission before you use any copyrighted material.
By default, IE8 displays graphics used in web pages. Although the idea of disabling this feature to enable speedier downloads might seem appealing, many web pages now rely so heavily on graphics that they do not include text links. This means you cannot navigate the site without the images. Don’t disable this feature unless you deem it absolutely necessary.
Audio and Video
A growing number of websites offer audio or video content in addition to standard text and graphics. When used in conjunction with web content, the terms audio and video can mean a few different things:
• Basic audio files, such as MIDI music files, that play in the background while you view a web page.
• Video files on websites that download and play automatically or play when you click a Play button.
• Video media that plays using Windows Media Player (WMP).
• Animated GIFs that give the appearance of a video signal but have a significantly reduced bandwidth requirement. They display a series of static GIF frames that simulate video and are often used in logos and those annoying home mortgage ads with someone dancing.
• Flash movies that also appear to be video but are actually vector-based instructions requiring very little bandwidth. “Vector-based” simply means that they have small mathematical descriptions (much the same way fonts do in Windows) that can be manipulated to animate the objects.
• Streaming audio or video that you choose to open and listen to or watch.
Note
![]()
To disable audio, video, or other multimedia from automatically downloading when you visit a website, see Chapter 23. By disabling these “features,” you also might notice that web pages will load faster. Note that some web pages use media-playback programs that IE settings won’t control. For example, if a page has a RealMedia or QuickTime sound or video file in it, automatic playback of those files will commence regardless of IE settings.
You might have noticed that when you visit certain websites, a song starts to play while you read the page. Audio isn’t nearly as common as graphics in web pages because some people find it annoying. If you come across a web page that contains a song you would rather not hear, the most obvious solution is to turn down your speaker volume or mute the Windows volume control. If you’re listening to music on your computer (such as from a CD or MP3 file) and you don’t want to end your entire audio experience by turning off the speakers, see the note.
Likewise, some websites contain video files and animations set to download and play automatically. MPEG and AVI video files are usually very large; if you have restricted bandwidth capacity, you might want to consider disabling them.
Web-based video seems to be improving almost daily, but most broadcasts are still lower in quality than that produced by a plain old television set. Whereas a broadcast TV signal typically delivers about 30 frames per second (fps), typical web-based streaming videos provide just 5–15fps. In contrast to streaming, many sites give you the option of downloading a video clip before playing it. Usually the clip in this format is much larger and of a higher quality than the streaming video. After the entire clip has been downloaded, it can be played and might appear as a high-quality image, depending on how it was produced. Playback typically is in Windows Media Player, QuickTime Player, or RealPlayer. The ranges of file sizes, frame sizes, and compression techniques—all of which affect the quality of the picture—abound. Unlike the TV standard we are all accustomed to, the Web is the wild, wild West of video nonstandards.
![]() To learn more about using the Windows 7 audio controls, see Chapter 12, “Sound Recorder, DVD Maker, and Other Multimedia Tools.”
To learn more about using the Windows 7 audio controls, see Chapter 12, “Sound Recorder, DVD Maker, and Other Multimedia Tools.”
MPEG, AVI, and WMV Videos
By default, MPEG, AVI, and WMV (Windows Media Video) files are played using Windows Media Player (WMP). Windows Media formats are sort of the new kid on the block and are Microsoft’s attempt to be a big player in the Internet multimedia market. Just as movies encoded in Apple’s QuickTime format or RealNetworks’ RealPlayer format require those companies’ proprietary player, Microsoft’s proprietary format plays only in the Microsoft player.
![]() WMP is covered in depth in Chapter 8, “Windows Media Player,” but because how you deal with online video is relevant to mastering web browsing, I briefly mention its use in this context. Be sure to check Chapter 8 for more information about WMP.
WMP is covered in depth in Chapter 8, “Windows Media Player,” but because how you deal with online video is relevant to mastering web browsing, I briefly mention its use in this context. Be sure to check Chapter 8 for more information about WMP.
Most web pages that feature videos online give you links for RealPlayer, QuickTime, or WMP, and let you choose your preference. Some sites give you links for downloading MPEG or AVI files. These don’t stream, so you must first download them. Depending on your connection speed, downloading could take a while because these files tend to be very large. Just be prepared for a long download, especially if using a dial-up connection.
You might notice that WMP opens as soon as you click the link. Earlier versions of WMP (prior to version 8) remained blank until the entire file was downloaded. Now, with some types of files such as WMV files, movies can start playing more quickly even though they are not technically streaming. (See the next section to read about streaming.) Instead, they are doing a progressive download. This is less reliable than streaming, but at least you don’t have to wait until the movie is completely downloaded before you start seeing it. The download might stop a few times, though, if your connection speed is slow. QuickTime movies have had this feature for some time; now WMP does, too.
If you click the Media button in the toolbar, a miniature version of WMP opens in the left pane of your IE window, along with links for supposedly interesting media. When you click a web page link for an audio or video file, you are asked whether you want it to play in this tiny Media Player or open in a regular WMP window. The choice is up to you. The advantage of opening in the small window is that it lets you neatly play some tunes, movie trailers, or whatever in the left pane while you continue your web surfing.
Streaming Broadcasts
As mentioned earlier, another type of sound or video that you might play over the Internet is streaming audio or streaming video. Streaming audio/video is a format in which a signal “plays” over your Internet connection, starting a few seconds after you click, instead of playing from a file that was first downloaded to your hard drive.
When you first click a streaming signal, a portion of the signal is buffered in RAM on your computer. This buffer helps provide a steady feed if connection quality wavers. If the signal is received faster than it can be played, the additional data is buffered. However, if your connection deteriorates significantly, the video might not play smoothly. Streaming broadcasts are not written to the disk, so retrieving the signal later from your own PC will be impossible.
Although the minimum requirement of many streaming audio signals is typically 56Kbps, a quicker connection is desirable. A lower speed delivers a lower-quality broadcast, skipping and jumping of video, or stopping altogether.
Streaming audio signals are often used to play various types of audio signals over the Web. For example, most online music retailers offer you the capability to listen to sample audio tracks from many of the CDs they sell. In addition, you can listen to many radio stations and programs—such as those on National Public Radio (www.npr.org)—over your Internet connection instead of a radio.
A number of information providers use streaming video to send newscasts and other broadcasts across the Web. You can watch news stories online through many news sites, such as www.cnn.com. You’ll notice that you can continue to surf the Web while a current audio or video is playing.
MSN (www.msn.com) provides links to a number of online video resources, streaming and otherwise.
To access streaming audio or video signals, you need to have an appropriate plug-in program for IE8, such as RealPlayer from RealNetworks (www.real.com), QuickTime from Apple (www.apple.com/quicktime), or WMP 12, included with Windows 7. After you have downloaded and installed the appropriate streaming player (following the installation instructions provided by the player’s publisher), you can access the streaming signals over the Web.
Although WMP can handle many formats, most broadcasts require a specific player. Check the website that hosts the streaming media you want to play for specific requirements. Some websites offer a choice of player formats, and often the website will have a convenient link for downloading the necessary freeware. RealPlayer is a common application used for streaming audio, and many streaming video providers use QuickTime. Although the look might be different because of custom “skins” used on flashier sites, the basic functions are similar. If you look closely, you can tell whether it’s WMP, RealPlayer, QuickTime, or another player.
Sometimes you need to wait for the file to download; other times it streams right away. QuickTime gives you the choice to download the entire file first so you can avoid glitches when you watch it. Notice that the play slider can go at a different rate than the progress bar, which indicates how much of the file has been downloaded. When it’s downloaded, you can easily replay the clip without interruption. Note that WMP can be encoded right into a web page, so the video might begin playing when you hit a particular URL.
![]() To learn about downloading programs from the Web, see “Downloading Programs,” p. 373.
To learn about downloading programs from the Web, see “Downloading Programs,” p. 373.
To use a streaming media player, follow these steps:
1. Locate a link to an audio clip or video signal that you want to access, and click it.
2. Your streaming media player should open automatically. RealPlayer, WMP, and QuickTime include standard Play, Pause, and Stop buttons.
3. When you are finished listening to the streaming signal, click the Close (X) button for the player.
MP3 Audio
MP3 is an audio file format whose name refers to files using MPEG Audio Layer 3, an encoding scheme for audio tracks. MP3 files are small (about 1/12 the size of CD audio tracks), but they maintain a high sound quality. A minute of CD-quality MP3 music requires only 1MB of storage space.
Controversy has surrounded MP3 since its introduction. The small size of MP3 files makes it easier for people to slide behind copyright laws, pirate music, and illegally distribute them over the Internet. Authorities are currently working on ways to prevent these actions. However, this has only led to Napster spin-offs that are harder to control and much more difficult to track down or prosecute. It will be interesting to see how the Justice Department handles the impending and unavoidable new age of intellectual property protection.
The bottom line is this: Distributing or downloading MP3 files from any artist without permission is technically a violation of the law. Although some artists (particularly new ones) willingly provide audio tracks for free download as a means of building a fan base, many MP3 sites contain audio files that have been pirated. If you have questions about the legality of MP3 files you find on the Internet, you need to be the judge. Probably the most ethical approach is not to download them, but I don’t want to sound like a prude. As I said, it’s a brave new world out there in copyright protection. I believe that free music on the Web probably drives the purchase of new CDs and concert ticket sales. I’m a musician myself, and although I would want my music (and my books) protected, I also wouldn’t mind more people becoming acquainted with my works—it could pay off in the long run. In any case, you might want to be careful sharing your MP3s of other people’s music on the Web because it could be deemed illegal.
The MP3 format has become extremely popular, with tiny portable players (such as the iPod from Apple) available that can store endless hours of music. It is possible to load all your music into your computer and create your very own jukebox. Software for recording and organizing your music is available at www.real.com/player, www.itunes.com, www.winamp.com, and new.music.yahoo.com, to name a few. Many different applications can download MP3 files, including WMP, RealPlayer, and QuickTime. A number of consumer electronics companies are also now producing devices that allow you to play MP3 files away from your computer. Samsung makes a single device (called a Digimax) that functions as three: a digital camera, a PC camera to use for video conferencing, and an MP3 player. A wide variety of MP3 players is available, with varying storage capacities—some units as small as a pen. You can transfer MP3 files to the player’s storage via a USB or a parallel or serial port connection.
Tip
![]()
Sound quality is affected not only by your hardware, but also by the player application. Experiment with several different programs to find the one that works best for you.
For a good resource and free downloads, and to learn a bit more about the MP3 format, go to www.mp3.com. After you have downloaded an MP3 file, you can play it using WMP, RealPlayer, QuickTime, or any other MP3-compatible player.
When you click a web page link for an MP3 file, your default MP3 application will probably open, which might not be the application you want to use. In addition, the MP3 file will be inconveniently saved in IE’s cache. You can exercise more control over the process by following these steps:
1. When you see a link for an MP3 file, right-click the link and choose Save Target As.
Note
![]()
Another product called mp3PRO is an audio format that uses half the storage space per minute, allegedly without reducing quality. You can learn more about mp3PRO at www.mp3prozone.com.
2. Select the location where you want to save the file download.
3. When the download is complete, open the desired player application manually and choose File, Open to listen to the file. If you click Open in the File Download dialog box, your default MP3 player opens.
Downloading Programs
Although the Web is most often thought of as a source of information and entertainment, it is also an excellent—and often only—place to obtain new software or updates for existing programs.
You can find numerous excellent resources for downloading free or trial versions of software. Good sources are www.tucows.com and http://download.cnet.com/windows/. Follow the specific instructions for installation provided by the software publisher (and offered on most download sites), but when you’re downloading, these general rules apply:
• Some websites require you to choose from a number of “mirror sites” for your download. Mirror sites are servers in different parts of the world that have the same files on them. The redundancy prevents traffic jams on a single server when many people access it for the same program downloads. You are asked to select a location that is geographically close to you, but you’re usually free to choose any site you want. The closer ones are sometimes faster, but not always. Sometimes I get quicker downloads from a mirror site in another country whose citizens are likely sleeping.
• To begin the download, typically you click a link that says something similar to “Download Now.” This should open a dialog box asking you if you want to open or save the file. Choose to save. Select a location that you will remember for saving the download files—it is a good idea to create a Downloads folder. Within the Downloads folder, I create a new subfolder with the name of the program and then switch to that folder and save the program there. This way, all my downloads are organized.
• At the office, check with your network administrator before you install any new software to find out what your company policies are. In fact, if you are in a corporate environment, you probably won’t be able to install new programs unless you are one of the lucky few with Administrator privileges. Most corporations limit users installing software, for obvious security reasons.
• Scan all downloads with virus-scanning software before you install them. Pay particular attention to archives and ISO image files, which are often carriers of software viruses regardless of whether or not the software comes from legitimate channels (though there’s less likelihood than with peer-to-peer and free hosting sites).
• Many downloads come in a compressed ZIP format. If you download such a file, you can run it easily in Windows 7 because ZIP files are supported without needing to install a ZIP program such as WinZip or TurboZIP. Just double-click the ZIP file, and it will open in a folder window. Then examine the contents. You probably need to double-click the installer or Setup program to begin installing the program into Windows 7.
Tip
![]()
Downloads are fastest when Internet traffic is low, such as late at night. If you are given a choice of mirror sites for a download, keep in mind the local time for each site and choose a server located where current traffic is likely to be lower.
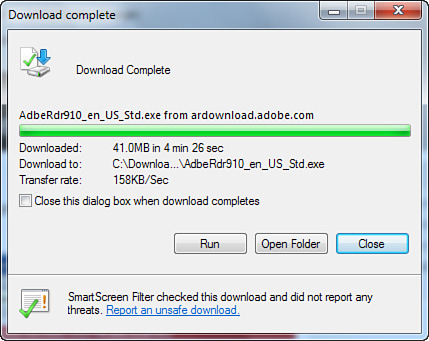
During the download process, a window appears showing the download progress and the estimated time remaining. The estimates are helpful, but thanks to fluctuating transfer speeds, these estimates also can be extremely unreliable. You might want to watch the window for a moment to see if the estimate changes in your favor. If you can’t wait that long, click Cancel and try again later.
Tip
![]()
Create a Software folder in your Favorites list, and add to it the manufacturers’ websites for software you own. Doing so will make it easier to periodically check for updates.
In addition to downloading new software, you can download updates to software you already own. Check the manufacturer’s website occasionally to see whether new updates, patches, or bug fixes are available (this is especially important for entertainment software).
Protecting Against Bad Downloaded Programs
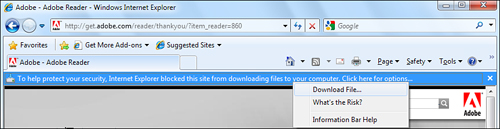
IE helps protect your computer from potentially malicious software. When you use IE to download a file, a message might appear in the information bar just below the Address box saying this:
To help protect your security, Internet Explorer blocked this site from downloading files to your computer. Click here for options.
Clicking the information bar opens a drop-down list of options (see Figure 14.10).
Figure 14.10 IE offers to block downloads from pages until you specify otherwise.
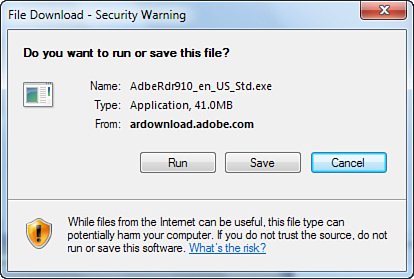
If you choose to allow the page to download a program, you’ll see another dialog box warning you about downloaded programs and asking whether you want to run the program from its remote location across the Web or save it to your hard disk, as shown in Figure 14.11.
Figure 14.11 If you decide to accept downloads from that page, you’ll see another warning and some options at the bottom of the dialog box.
If you choose to run the program from the site rather than save it, you’ll likely see the dialog box shown in Figure 14.12. All executable files that are downloaded are checked for publisher information using a scheme called Authenticode. Authenticode checks the digital signature of the file against a database of known good software publishers, and gives you some advice about the file. After being presented with the information, you can make a more informed decision about running the file.
Figure 14.12 If a publisher is not verified, you will be prompted if you try to run the program from the web page.
Some program publishers have been “black listed,” and Windows 7 prevents them from running in your PC under Windows 7. Executable files with blocked publishers are not allowed to run.
Tip
![]()
You can unblock a publisher by using Manage Add-Ons in Internet Explorer. This is explained later in this chapter, in the section “Viewing and Managing Your IE Add-Ons.”
Protecting Against “Drive-By” Downloads of IE Add-Ons
A recurring cause of instability in Windows machines is attributable to what’s sometimes called “drive-by” downloads from the Web. How many times have you visited a website only to see a pop-up dialog box saying you need to install software for the website to work on your browser? Sometimes it’s clearly stated why this is necessary (for playing a video, a proprietary sound file, or Flash animation, for example), and other times, the reason is not so clear. All you know is that you are faced with the decision of letting some (typically) unknown source install software on your computer so you can enjoy the web page, or opting out and moving on. Maybe you assume it can do no harm because it’s only an addition to IE and not to your operating system. But because IE is often the back door through which viruses, adware, spyware, Trojan horses, and other malware infect your computer, being cautious at this juncture is extremely important.
These spur-of-the-moment additions that websites can push at you are called IE add-ons, and they are typically ActiveX controls (although not all are). ActiveX controls and active script (sometimes called script or JavaScript) are small programs used extensively on the Internet. Without scripts, websites would be much more static and boring. Script and ActiveX controls allow all sorts of animation and other entertaining features on the Internet. Websites become more interactive by offering customized content based on information about your computer, your browser, and so on. Common add-ons include extra toolbars, animated mouse pointers, stock tickers, and pop-up ad blockers.
Add-ons can be installed from a variety of locations and in several ways, including these:
• Download and installation while viewing web pages
• User installation via an executable program
• As preinstalled components of the operating system
• As preinstalled add-ons that come with the operating system
A risk of add-ons is that these programs can also be used to collect information from your computer for harmful purposes. After 6 months or a year of surfing the Web with IE, many users don’t recall what add-ons they authorized and don’t know what those add-ons might be doing to compromise the stability of their systems.
You could unknowingly have many add-ons installed. This can happen if you previously gave permission for all downloads from a particular website, or because the add-on was part of another program that you installed. Some add-ons are installed with Microsoft Windows.
You’ll sometimes be given more information about potentially damaging add-ons so you can make an informed decision about installing one. Some add-ons have digital signatures that verify who wrote them. This is called a certificate. IE verifies a signature and can tell you if it’s valid. If a signature is reported as invalid, you definitely shouldn’t trust the publisher as asserting a truthful identity. Allowing installation of ActiveX controls that have invalid signatures obviously is not recommended and introduces additional risk to your computer.
IE blocks file downloads in these circumstances when you are using the default security settings:
• When a file has an invalid signature on its certificate
• When a file has no signature on its certificate
• When you or someone else who uses your computer has blocked the source of the file
Even if an add-on has a legitimate certificate, it doesn’t mean the program won’t mess up your computer. In the end, it is your decision whether to install an add-on. Make the decision based on whether you know the source to be trustworthy. After installing an add-on, if your system or IE becomes unstable, use the information in the following section to track and remove the add-on.
Note
![]()
Certificates provide authoritative proof of identity to establish trust between two parties in an online transaction.
Allowing Add-Ons with Invalid Signatures
Some add-ons are known to be bad; Microsoft has blocked these intentionally. You can’t install or run add-ons from blocked publishers on the computer. If you really want to, you can force the use of an add-on that has an invalid signature:
1. In IE, click the Tools button, click Internet Options, and then click the Security tab.
2. In the Security Level for This Zone box, click Custom Level.
3. Scroll down to Download Unsigned ActiveX Controls and choose Enable or Prompt.
Another approach is to unblock a specific publisher. This is a safer approach because it doesn’t open you up to all invalid signatures. To do this, follow these steps:
1. Click the Tools button, click Manage Add-Ons.
2. Select the publisher you want to unblock and then click Enable (you can also right-click the add-on entry and click Enable from the context menu that appears).
3. Some publishers’ add-ons have related add-ons that are affected when you enable or disable them. From the Enable Add-Ons dialog box that appears, select any related add-ons and click Enable.
Viewing and Managing Your IE Add-Ons
You can review all your add-ons, update selected ones, choose ones to remove, and, if you’ve been having IE crashes, potentially see which one was responsible for your last IE crash. (Crashing can happen if the add-on was poorly built or was created for an earlier version of IE.) You work with your add-ons using the IE Add-On Manager, which even shows some add-ons that were not previously shown and could be very difficult to detect.
To see all add-ons for Internet Explorer, follow these steps:
1. Click the Tools button, and then click Manage Add-Ons. You’ll see the Manage Add-Ons window, shown in Figure 14.13.
Figure 14.13 The Manage Add-Ons window lets you see and control the IE add-ons you’ve either wittingly or unwittingly downloaded and installed.

2. In the Show drop-down list, select the set of add-ons you want to see.
Add-ons are sorted into four groups in the Show list. All add-ons represent a complete list that includes all the add-ons that reside on your computer. Currently loaded add-ons are only those that were needed for the current web page or a recently viewed web page. Choosing Run Without Permission shows add-ons that do not explicitly require permissions to run. Choosing Downloaded Controls lists all browser-based controls (such as Java plug-ins).
Some add-ons can crash your IE session. If you experience a system crash after you’ve installed an add-on, you have two options:
• Disable it—If an add-on causes repeated problems, you can disable the add-on. Click the add-on you want to disable and then click Disable. Some web pages, or IE, might not display properly if an add-on is disabled. It is recommended that you disable an add-on only if it repeatedly causes IE to close. Add-ons can be disabled but not easily removed.
• Report it—When prompted, you might want to report the glitch to Microsoft. This is completely anonymous and requires nothing from you but your permission. Microsoft claims the info is used improve its products and to encourage other companies to update and improve theirs.
Note
![]()
If you disable an add-on and then realize it was needed, click the add-on you want to enable, select the entry in Manage Add-Ons and then click Enable.
Internet Explorer Add-On Crash Detection attempts to detect crashes in IE that are related to an add-on. If IE identifies the faulty add-on, you’ll be informed. You then have the option of disabling add-ons to diagnose crashes and improve the overall stability of IE.
Customizing the Browser and Setting Internet Options
One of the most important features of Internet Explorer is the capability to tailor it to your specific needs. Every user sets up IE differently based on programs used, favorite websites, bandwidth capability, security needs, and so on.
You can make most customizations in the Internet Options dialog box, which you can access either through the Control Panel or by clicking the Tools button and then clicking Internet Options. The dialog box contains seven tabs, each holding a number of unique preference settings. Figure 14.14 shows the General tab.
Figure 14.14 On the General tab, you can set general preferences for your home page, browsing history, search settings, tab options, and appearance properties.
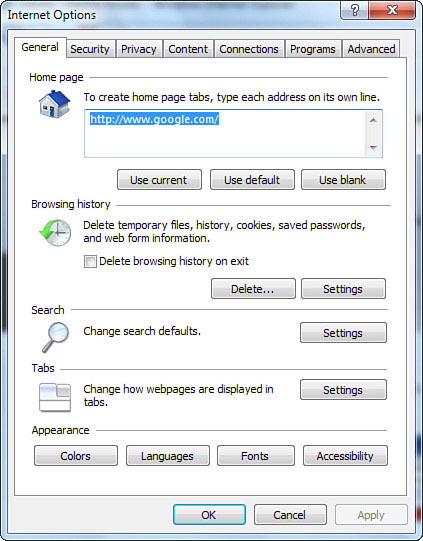
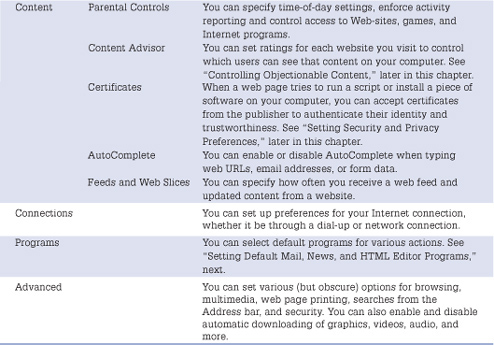
Check each tab in the dialog box to customize your own IE8 settings. Table 14.1 describes some of the key Internet Options settings you can change.
Table 14.1 Important Internet Options

Setting Default Mail, News, and HTML Editor Programs
Windows 7 has consolidated much of this information for setting defaults in the Set Default Programs window, which you can access through the Control Panel. You can also access the default program settings in the Programs tab of the Internet Options dialog box.
The Programs tab still lets you set your preferred HTML editor for editing HTML files. If you have not installed any other Internet-related software packages, such as Microsoft Word, you probably won’t have many choices here, but if you use different programs, these options can be useful. Figure 14.15 shows the default program settings you can make on the Programs tab, and Table 14.2 describes the various options you can set.
Figure 14.15 On the Programs tab, you can choose the default HTML editor.

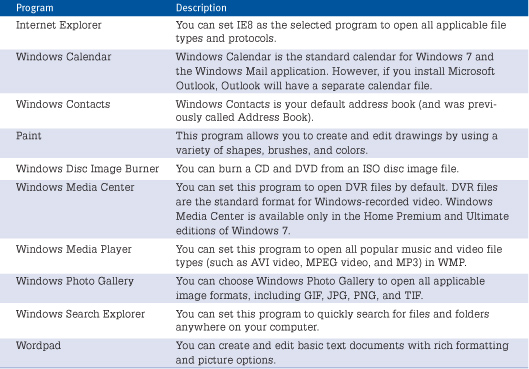
Table 14.2 Default Internet Programs
If you are a web developer, make sure the correct editor is listed here. This will simplify editing during your testing process. The list might include Word, Notepad, FrontPage, or another installed editor.
If you want to view and change Internet programs, click Set Programs. In the Default Programs window, click Set Your Default Programs. The Default Programs window then appears, as shown in Figure 14.16.
Figure 14.16 The Default Programs window.
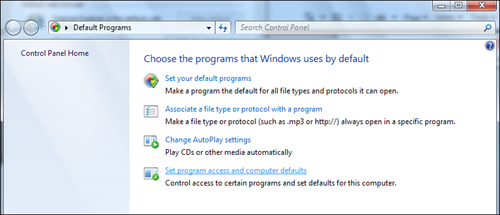
The Programs list displays all the IE-related programs you can set. If you haven’t installed very many programs, only one option likely will be available in the Programs list. After you click a program in the list, the program description appears to the right of the Programs list. Table 14.2 lists the default Internet programs in Windows 7.
You can set the program as the default for all the file types and protocols it can open by clicking the Set This Program As Default button. You can also choose which file types and protocols the selected program opens by default by clicking the Choose Defaults for This Program button.
Email Link Troubles: Changing the Default Email Program
![]()
Microsoft ships Windows 7 without a default email client. You can still download and install Windows Mail, but there are also several useful alternative email clients available online. To specify a default email client that you’ve installed, click the Tools button, click Internet Options to open the Internet Options dialog box, and then select the Programs tab. Click the Set Programs button to open the Control Panel’s Default Programs window and click the Set Your Default Programs link. You should be able to select any installed email client (such as Outlook, Windows Mail, Eudora, Mozilla Sunbird, and so on) here.
Setting Security and Privacy Preferences
In many ways, the Web is a safer place than the “real” world, but it does present its own unique dangers. The greatest hazards involve sensitive and private information about you or your company being compromised, or having your computer infected with a software virus. IE8 incorporates a number of security features to protect you from these hazards, and you can customize those features to suit your own needs, browsing habits, and company policies.
Begin by clicking the Tools button and opening the Internet Options dialog box. Click the Security tab. Click Default Level in the lower-right corner of the dialog box to show the slider that allows you to set a security level for each zone, as shown in Figure 14.17.
Figure 14.17 On the Security tab, you can customize security settings for various web zones.
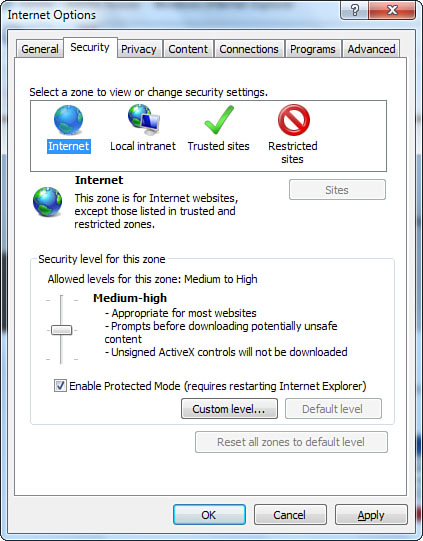
You first need to select a zone for which you want to customize settings. Figure 14.17 shows the four zones, described here:
• Internet—This zone applies to all resources outside your LAN or intranet.
• Local Intranet—This zone applies to pages available on your company’s intranet. These pages are usually more trustworthy and can justify less-restrictive settings.
• Trusted Sites—You manually designate these sites as trusted. To designate a trusted site, browse to the site, open this dialog box, select the Trusted Sites zone, and click Sites. Here you can add the site to your Trusted Sites zone list. Trusted sites usually allow lighter security.
• Restricted Sites—Designated in the same manner as Trusted Sites, websites listed here are ones you specifically find untrustworthy. They should have the strictest security settings.
Caution
![]()
Before you designate a web page as trusted, remember that even the most diligently maintained sites can be compromised. Recent “hacker” attacks at websites of the FBI, U.S. Army, and others might make you question the practice of designating any website as “trustworthy.”
Each zone has its own security preferences that you can set. The easiest way to set preferences is to choose one of the three basic levels offered in the dialog box. The default level is Medium, and for most web users, this setting works best because it provides a good balance of security and usability. The High setting offers the greatest possible security, but you might find that the level is so restrictive that it’s difficult to browse your favorite websites.
In contrast, the Medium and Medium-Low levels make browsing much easier because you aren’t presented with dialog boxes and warnings every time a potentially hazardous activity begins. Because these two levels leave too many doors open to virus infection and other dangers, they are not advisable in most situations.
Besides setting a basic security level, you can customize individual settings. First, choose a basic level (such as Medium) and then try these steps:
1. Click Custom Level to open the Security Settings dialog box, shown in Figure 14.18.
Figure 14.18 You can scroll through this list to make custom security setting changes.
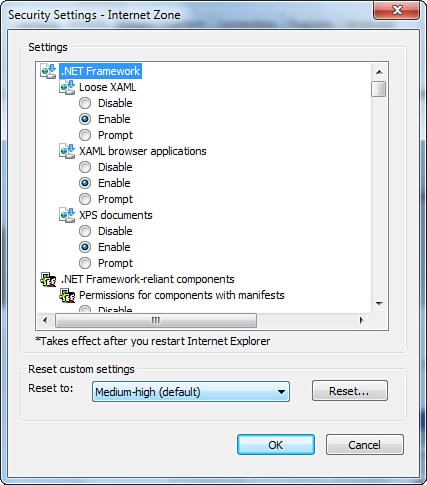
2. Browse the list of options and apply custom settings as you see fit.
3. Click OK when you’re finished. A Warning dialog box appears, asking whether you really want to apply the changes. Choose Yes.
Review the items in the Security Settings dialog box that pertain to ActiveX controls and Java applets. Assess these settings carefully, especially those for ActiveX controls, because of the unique hazards they can present. The ActiveX standard contains loopholes, so unsigned controls can run virtually any OLE-compliant operation on your system. Java, on the other hand, is relatively—but not entirely—secure.
You should also consider your desired level of cookie security. Because cookies are text only, they cannot contain a virus or other harmful content. However, they can contain personal information, such as a record of web pages you have visited, how long you spent at a page, how many times you have visited, personal preferences for a web page, and even user IDs and passwords. For these reasons, many people regard cookies as an invasion of privacy.
You can disable cookies, or you can choose to have IE prompt you every time a site attempts to leave a cookie in your cache. However, keep in mind that some websites make such heavy use of cookies that you could find it difficult—if not impossible—to browse the Web normally.
To set your cookie preferences, click the Tools button, click Internet Options, and then click the Privacy tab. The Settings area enables you to determine how and when cookies are sent. Choose a level you are comfortable with, or click the Advanced button to select the Override Automatic Cookie Handling option and specify whether IE will always accept, block, or prompt you before enabling first-party or third-party cookies. (For more on first- and third-party cookies, see “Getting a Microsoft Live ID,” later in this chapter.)
You might want to override your normal cookie settings for certain websites. If so, go to the Websites area of the Privacy tab and click the Edit button. In the text box, enter a complete website address. Then click the Block or Allow button to specify websites for which you want to never or always allow cookies.
Blocking Pop-Ups and Pop-Unders
Pop-up windows are an intrusive means for advertisers on the Web to ensure that you see their plug. We’ve all seen pop-up windows that appear unexpectedly, sometimes blaring music or flashing to catch our attention. Usually they pop up when you’ve clicked a link to go to another page. A less intrusive, though a little more insidious, window is called the pop-under window. You don’t discover it until you close the window you’re looking at. This way, it’s harder to tell which site actually spawned the pop-under, so you don’t know who to blame.
Tip
![]()
You can stop the pop-ups dead in their tracks with this quick solution: turn off Active Scripting (JavaScript). This works because pop-up windows require Active Scripting to launch. Even though other browser functions need Active Scripting, you can surf quite effectively on most sites without it. To turn off Active Scripting, click the Tools button, click Internet Options, select the Security tab, change your Internet security level to High, and click OK. Five quick steps, no pop-ups, and you haven’t spent a dime on a blocker or upgraded to the latest version of IE. Of course, using the latest IE is a better idea because of the improved security features and add-in management.
Many power users have figured out ways to prevent pop-ups, such as by installing the Google toolbar or one of the many add-ins, or installing some other browser, such as Opera, that blocks pop-ups. AOL’s browser does this, as does Mozilla’s Firefox. Oddly enough, 70% or more of web surfing is done with IE, even though prior versions didn’t contain the modern nicety of pop-up blocking. The good news is that IE8 has a pop-up blocker built in.
IE’s pop-up blocker is turned on by default. When a pop-up window tries to launch, you’ll receive notification in the IE yellow information bar (just below the Address box). It will inform you that that a pop-up has been blocked and list steps you can take to show the pop-up, if you want. Click on the information bar to see the options (see Figure 14.19).
Figure 14.19 IE8 blocks pop-ups. When a pop-up is blocked, you can click on the information bar for options.
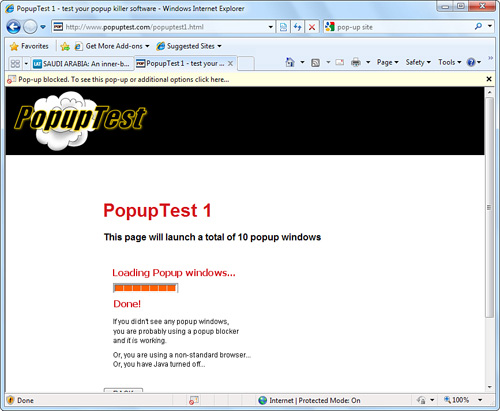
Sometimes it’s useful to see blocked pop-ups. Just follow these steps:
1. Click the information bar.
2. From the menu, choose Show Blocked Pop-ups.
Note
![]()
The Information Bar for Pop-Ups is enabled by default in IE8, but you can decide to turn it on or off manually. Click Tools, Internet Options. Select the Privacy tab from the Internet Options dialog box, and click the Settings button. Under Notifications and Blocking Level, check the box next to Show Information Bar When a Pop-Up Is Blocked.
Some sites won’t work properly with pop-ups disabled, such as shopping sites. If you want to always allow pop-ups from one or more specific sites, you can authorize this by adding those sites to an exception list:
1. Click the Tools button, choose Pop-Up Blocker, and then choose Pop-Up Blocker Settings.
2. In the Pop-Up Blocker Settings window, type the URL of the website, and then click Add.
3. Repeat step 2 for as many sites as you want to add. When you’re finished, click Close.
A Few Notes About Pop-Up Exceptions
Sometimes the pop-up blocker won’t be able to preclude a pop-up from appearing, for several possible reasons. First, you might have software on your computer that is launching pop-ups. To stop these pop-ups, you have to identify the software and remove it or change its settings. Try installing an adware and spyware sleuthing program such as Spybot Search & Destroy, Ad-Aware, or Microsoft’s own Windows Defender (another free real-time monitoring program for blocking pop-ups and spyware).
Second, some pop-ups are written cleverly enough that they can circumnavigate the IE pop-up blocker.
Third, Internet Explorer will not block pop-ups from websites that are in your Local Intranet or Trusted Sites zones. If you want to specifically remove such a site from your trusted zone, you can do that from the IE Settings dialog boxes:
1. In IE, click the Tools button, click Internet Options, and then click Security.
2. Click the zone from which you want to remove a website, and then click Sites.
3. Skip this step unless you chose the Local Intranet zone in the last step. Click Advanced and then go to Step 4.
4. In the Websites box, click the website you want to remove, and then click Remove.
Controlling Objectionable Content
The Web holds the most diverse range of information and content of any library in the world. That diverse range includes a great deal of material that you might deem objectionable, and there is no perfect way of protecting yourself from it—short of never going online. However, IE incorporates two features, called Parental Controls and the Content Advisor, to help you screen out many of the things you or the other people using your computer would rather not see.
Parental Controls
Parental Controls is a new feature, introduced in IE7, that remains in IE8. If your children often use your computer and you don’t want them seeing some material on the Web, or even using a certain program, you can set up Parental Controls to block access to those websites.
You must set up a System Recovery Account password before you can use Parental Controls. The System Recovery Account is an administrator account that is built into Windows 7, in case problems arise with your account. You’ll learn more about the System Recovery Account for recovery purposes in Chapter 25, “Troubleshooting and Repairing Problems.” However, this account password serves a second purpose: You can use the password to disable Parental Controls. Without this password, any user on your computer can disable Parental Controls.
After you set up the System Recovery Account password, click the user picture or name in the list to set up Parental Controls for that user. The User Controls window allows you to enable Parental Controls, as shown in Figure 14.20.
Figure 14.20 Set Parental Controls for the selected user in the User Controls window.
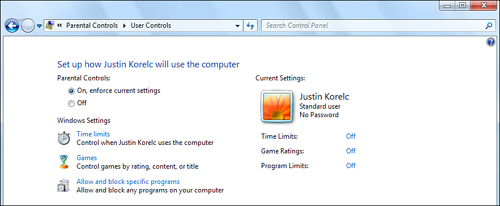
In this window, you can also collect information about the user’s activity on your computer; determine the websites, games, and other programs you don’t want the user to access; and control how long the user can use the computer.
The Content Advisor
The Content Advisor evaluates web content based on a rating system. The included rating system was originally developed by RSACi (Recreational Software Advisory Council on the Internet) and is now handled by the Internet Content Rating Association (ICRA), but you can add other rating systems, if you want.
You must manually enable the Content Advisor, but after it is set up, you can password-protect the Advisor so that only you can adjust the settings. To enable the Content Advisor, open the Internet Options dialog box and do the following:
1. Click the Content tab and click Enable to open the Content Advisor dialog box. (You may be asked to allow this operation via the familiar User Account Control dialog box.)
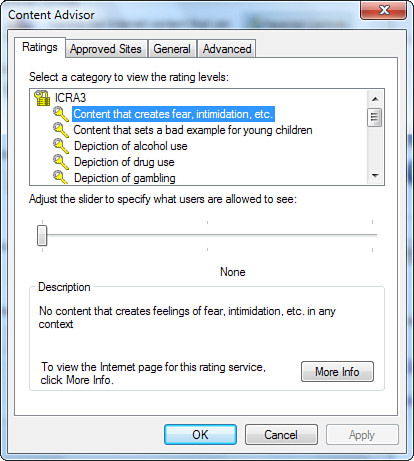
2. The Content Advisor dialog box contains four tabs, as shown in Figure 14.21. On the Ratings tab, you can move the slider to set a rating level in each of the categories presented.
Figure 14.21 On the Ratings tab, you can move the slider to change the rating level.
3. Click the Approved Sites tab. List specific websites here to control access to them. Click Always to make it easily acceptable, or click Never to restrict access.
4. On the General tab, choose whether unrated sites can be viewed. Keep in mind that many objectionable sites will not be rated. You can also set a password to let users view unrated or restricted sites on a case-by-case basis, or you can add another rating system here.
5. Click the Advanced tab. If you plan to use a ratings bureau or PICSRules file that you obtain from the Internet, your ISP, or another source, add it here. Click OK when you’re finished.
RSACi and other organizations provide content-rating systems based on the Platform for Internet Content Selection (PICS) system developed by the World Wide Web Consortium, or W3C (www.w3.org/PICS). The systems work by using metatags in the code of a web page. The tags are usually generated by the rating organization after a site developer follows a brief rating procedure. Developers can then place the PICS metatag in the header of their HTML code, where it is identified by IE’s Content Advisor when you try to open the page. The tag identifies the types and levels of content contained in the site, and the Content Advisor allows or disallows the site based on the content settings you have chosen. If you want to screen websites using a system other than RSACi’s, you must install an appropriate PICSRules file provided by the rating organization.
Of course, rating is voluntary. Developers set the rating levels in the metatags based on their own evaluation of the site content, so you don’t get a surefire guarantee that the tag accurately represents the site. RSACi periodically audits rated sites, and web developers generally try to rate their sites as accurately as possible. Because it is a voluntary system, providing inaccurate ratings defeats the purpose.
Effectively Searching the Web
You’ve probably heard that you can find virtually anything on the Web, and if you’ve spent much time online, you might be left wondering where it all is. Finding information on the Web is a fine art, but IE8 makes the process much simpler than before.
Tip
![]()
With IE8, you can type your search keywords directly into the Address bar, which will take you to the search results page of your default search engine.
IE7 first streamlined the search approach by dropping the Search Companion found in IE6 and replacing it with the Search box to the right of the Address box, which remains in IE8, as shown in Figure 14.22.
Figure 14.22 The Search box enables you to search for several different kinds of information.

If you haven’t typed anything in the Search box, the name of the search engine appears in the box. By default, the search engine name is Bing, Microsoft’s search engine. To begin searching, enter a word, phrase, or even question in the Live Search box, and then click the Search button. Your results will appear in the Live Search page, with nine links appearing on each page. If you type a single word—such as “antiques”—the search will probably yield a list of results too big to be useful. Using more words, and more descriptive words, will narrow your search. You probably will get better results by searching for “antique furniture” or “antique French furniture” instead. You can click directly on a search result to link to that site, or you can click Next to see the next 15 results.
To start a new search, type another word, phrase, or question in the Live Search box. If you want to go back to the results from a previous search, click the Back button.
You can also refine and expand your search using the Live Search box. Click the down-arrow button to the right of the Search button to open the Search menu. This menu enables you to modify your search in three ways:
• Find on This Page opens the Find dialog box so you can find a word or phrase in the current web page.
• Find More Providers opens the Add Search Providers to IE8 page on the Microsoft website so you can add a search engine to the Search menu. When you search in the Live Search box, you can open the Search menu and select the search engine you want to use.
• Change Search Defaults opens the Change Search Defaults dialog box so you can set one of the search providers you have added as the default search engine.
When you’re finished searching, close the Search Companion. To revisit a previous search, click the History button on the IE toolbar and go to the Search folders. Depending on the search engines you used, you could find information in folders labeled bing.com, search.yahoo.com, and google.com. Another way to find previous search results is by clicking the Search button at the top of the History pane and entering a word to search among the pages you’ve visited recently.
As helpful as the Search box in IE8 can be, when you’ve become familiar with the Internet, you are likely to discover your own favorite search engine. You could add it to your Favorites bar for easy access. Many search engines have advanced options that enable you to perform a more directed search.
Try these helpful search engines by entering them directly from a web page:
• www.lycos.com (includes tabbed categories more effective searching)
• www.google.com (includes category links and a drop-down list for refined searches, and Google Groups, which searches newsgroups)
• www.webcrawler.com (combines results from top search engines for combined search power)