
A. Using Virtualization on Windows 7
As mentioned in Chapter 2, a virtual machine (VM) program simulates the hardware functions of a PC within a process running on another PC. Virtualization is a handy way for individuals and organizations to run multiple operating systems without having to set up dual- or multi-boot environments or purchasing additional hardware. IT departments use virtualization to test software updates and patches before rolling them out to end users, and developers use virtualization when creating new software programs. End users most commonly use virtualization to run older Windows operating systems and applications that require such operating systems on newer versions of Windows. (This is where Windows 7 XP Mode usually comes into play, as described later in this appendix.)
In general, Windows 7 behaves more or less the same with virtualization software as did earlier versions of Windows. You can run Virtual PC 2007 on Windows 7, and create and manage virtual machines using that program. You can also use other packages that are compatible with Windows Vista or Windows 7, including various VMware versions, VirtualBox, and so forth.
Note
![]()
Windows 7 introduces a new version of Virtual PC. While you can run Virtual PC 2007 on Windows 7 and use it to run existing VMs you may have set up using that program on Windows XP or Vista, you can’t use Virtual PC 2007 to host the free VM that Microsoft supplies for its Windows XP Mode. See the next section for details.
In keeping with other usage scenarios, Windows 7 appears to be more stable and less resource-hungry when running VMs than Vista. As we researched this book, we also couldn’t help but notice that Microsoft Virtual PC—which sets up only single-core VMs, no matter how many cores your host PC may possess—runs much faster and better on Windows 7 than it does on Windows Vista.
Windows XP Mode in Windows 7
The Windows 7 Professional, Enterprise, and Ultimate licenses enable users to install and use Windows XP Mode, a free set of downloads from Microsoft that provides an updated version of Virtual PC and a prefabricated virtual hard disk (VHD) for Windows XP SP3, with all the licensing information necessary to run and use this guest operating system on Windows 7. Visit the Microsoft Download Center at www.microsoft.com/downloads/en/default.aspx and search on Windows XP Mode to find the version that’s right for your PC.
Note
![]()
If you already have Microsoft Virtual PC 2007 installed on your Windows 7 PC, you must uninstall this version before downloading and installing the various Windows XP Mode components (which include a newer version of Microsoft Virtual PC). Otherwise, you will neither be able to install nor be able to use Windows XP Mode. Also, this new Microsoft Virtual PC software requires processor-based virtualization support, which means it might not work on older Intel or AMD CPUs.
Windows XP Mode, also known as Virtual Windows XP, lets you install and run software in a VM that runs Windows XP SP3 as its guest OS—remember, the XP runtime environment supports 16-bit Windows on Windows for much older Windows applications, and offers a range of compatibility modes to support programs written for older Windows versions. Windows 7 is 32-bit (or 32- and 64-bit) only, depending on which version you use. XP Mode offers a way for users to continue using older Windows applications that may not have worked with Vista, and that definitely don’t work with Windows 7. To use them on a Windows 7 machine, you must first install Microsoft Virtual PC, then Windows XP Mode, and then finally install those applications inside the Windows VM that Windows XP Mode makes available.
Installing Microsoft Virtual PC
If you visit the Microsoft Virtual PC home page at www.microsoft.com/windows/virtual-pc, you will find links to download the latest version of that program. The version that supports Windows XP Mode also offers easy, one-click install and setup for Windows XP Mode, plus one-click launch for Windows XP Mode applications using virtualized icons. It also offers USB support, which means you can plug a USB drive into the host machine, and it will be recognized and read inside the Windows XP VM (a big improvement over previous versions, which didn’t recognize any drives except the optical disk and whatever virtual hard disks you may have set up for any given VM).
Tip
![]()
You don’t want to run any version of Virtual PC on a machine with less than 2GB of RAM, and 3GB or more of total RAM is better still. Each VM you create, even for Windows XP, needs at least 512MB of RAM to operate, and 1GB or more is likewise better. As I worked on this book, I used a test machine with 8GB of RAM so that I could run two or three XP, Vista, or Windows 7 VMs in parallel.
Once you download the program, it’s trivially easy to install. Simply double-click the Microsoft Update Standalone Package (MSU) file, follow the prompts through the rest of the installation process, and then reboot your computer when prompted. There are no gotchas along the way, and it shouldn’t take more than 5 minutes on most PCs.
Installing Windows XP Mode
You can also download Windows XP Mode files from the Virtual PC home page if you like. This comes in the form of a Microsoft Installer (MSI) file that only runs on Windows 7 Professional, Enterprise, or Ultimate licenses. Here’s a pictorial review of the installation process:
1. Double-click the MSI file. In the welcome screen that appears, click Next.
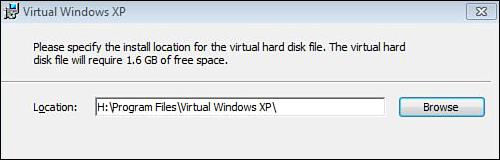
2. Specify a target directory for the install (the default appears in Figure A.1). Click Next. Click Yes or enter administrative credentials in the User Account Control window if prompted for permission to continue.
Figure A.1 By default, Virtual Windows XP files go under Program Files.
Note
![]()
Remember, Virtual Windows XP and Windows XP Mode refer to the same program.
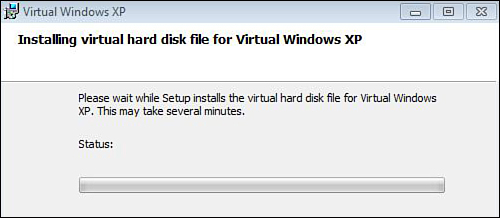
The install process begins and works through a sequence of activities that lasts 5 to 10 minutes. Figure A.2 shows the initial Status window, but you will also see status updates about copying files, updating the Registry, and so forth, as the install process progresses.
Figure A.2 At the outset, the progress bar is empty, but it fills up as installation proceeds.
When the sequence of activities ends, the Windows XP Mode installation completes. Click Finish.
3. Accept the Virtual Windows XP License Agreement. Click Next.
4. Establish a password for the default User account that the ongoing setup script establishes on your behalf (see Figure A.3). Click Next.
Figure A.3 Enter a password twice to secure the default User account.

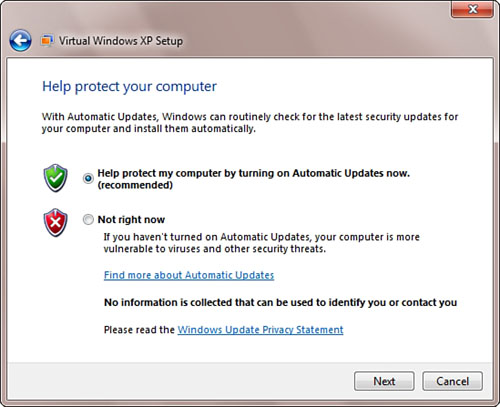
5. You can elect to turn on Automatic Updates (recommended) or leave them off (see Figure A.4). Click Next.
Figure A.4 Turn on Automatic Updates in the Help Protect Your Computer screen.
6. Provide a name and location for the Windows XP Mode virtual machine. (By default, it appears in the logged-on user’s My Virtual Machines folder inside the Documents library.)
7. The Windows XP Mode VM starts. This involves a sequence of activities that includes startup, setup for first use, update downloads and installs, OS startup, and enabling integration features. It can take 2 or more minutes to complete. Finally, you’ll see the familiar XP desktop inside a Virtual Windows XP VM (see Figure A.5). You’re done with the OS portion of the install.
Figure A.5 A typical Windows XP desktop inside a Virtual PC window on Windows 7.

8. Your usual OS completion steps should occur next. At a minimum, this means installing antivirus and antispyware software. But you wouldn’t install this VM without also wanting to install a Windows application, as covered in the next section.
Installing Applications into the XP VM
When you’re inside the Windows XP VM, you can interact with that virtual desktop just as if it were a real desktop. To install an application, open its installer file on your virtual hard disk, optical, or USB drive inside the VM. Follow your usual installation maneuvers.
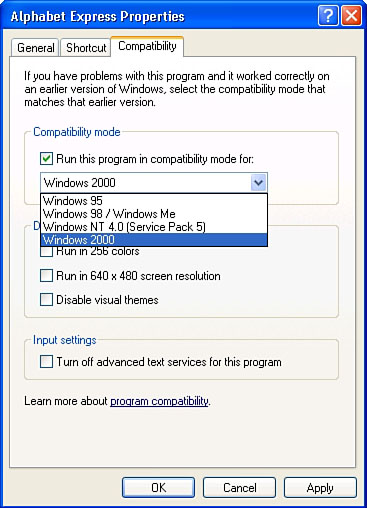
Just for grins, I set up a copy of my son’s “Alphabet Express” software, a vintage 2001 Windows application. It ran perfectly inside Windows XP Mode, but Figure A.6 shows what the application compatibility window for that program looks like. (To access this control, right-click the EXE file and select the Compatibility tab.) It shows Windows 2000 chosen as a specific compatibility mode, with other selections listed as well.
Figure A.6 A Windows 2000 application gets the matching compatibility mode selection.
Tip
![]()
If you are an IT professional, you can customize the VHD for Windows XP Mode to include applications your users will want to run within that environment. In fact, you can set up as many VHDs as you like, and make them available for users to grab from servers on an as-needed basis.