
38. Tablet PC Features
Importance of Handwriting
Nowadays, the old “pencil and paper” approach to creating documents has certainly gone the way of the dinosaur. If you’re like me, without a keyboard you’re lost. I can barely remember how to sign my name on a check. The use of electronic file editing has almost totally put an end to basic handwriting. But what about the times you have to write in longhand? We need longhand when taking basic notes at home or at a business meeting, developing a quick graph or sketch, or even jotting down a shopping list. With these thoughts in mind, how can we connect the digital world with the analog world?
One way has been through Pocket PCs—those little PDAs that sport handwriting recognition and turn your scribbles into text. I use one daily, and it’s pretty amazing how good the recognition is. Still, it’s just a little PDA, not a full-blown computer. I can scribble into Pocket Word or Pocket Excel, which is pretty cool, but the screen is small, and I mostly use it for email, contacts, and organizing my calendar. But while the PDA was evolving in the foreground and capturing our attention as it merged with cell phones, the Tablet PC was quietly climbing out of the water onto dry land and growing legs.
History of Tablet PCs
Believe it or not, the technology behind Tablet PCs goes back to 1888, with a U.S. Patent granted to Elisha Gray for a device that electronically captured handwriting with a stylus. There have been a handful of patents awarded to inventors who dreamed of an “electronic tablet” with magical computing powers that could interpret handwriting and do useful work with the input. With the advent of powerful portable computers, the idea of a fully functional tablet-style PC crystallized as a specific focus for computer engineers and a select group of computer users ever since the 1980s. In the ‘80s, due to availability of miniaturized CPUs and their computational capabilities, handwriting recognition began taking strides as a developing technology. Numerous companies developed basic handwriting recognizers that could interpret simple text and numbers.
A decade later, in 1991, the pen was seen as a major competitor to the standard mouse. At this time, Microsoft developed Windows for Pen Computing, an elementary pen extension for Windows 3.1. Figure 38.1 shows some examples of different kinds of tablets that were pioneers in Tablet PC history.
Figure 38.1 From left to right, Fujitsu Stylistic 3500 Tablet PC and the Newton MessagePad 2000.

Around 1993, the Apple Newton was released, stuffed with handwriting recognition technology claimed by Apple to be truly workable. Although the Newton was clever and innovative in many ways, and filled a void between the PDA and the laptop, its handwriting recognition was flawed too, and it soon fell prey to critical reviews.
During the early ‘90s, pen-based computers from EO, GRiD, Samsung, NEC, Fujitsu, NCR, TelePad, and others arrived and then quietly sank into the sunset with little fanfare. Tablet PCs languished for the rest of the decade but were not giving up the ghost yet. In 2000 at Comdex, keynote speaker Microsoft CEO Bill Gates excitedly presented a webpad and reintroduced the Tablet PC almost as a new technology. Those in the know could see this was hype, but Gates did spark a new flurry of interest in the technology. Pen computing trudged along its evolutionary timeline adding bits and pieces and dropping vestigial ones. Now pen-based XP, Vista, and now Windows 7 computers are readily available and they actually work. The moniker Tablet PC actually started sticking in the popular trade press as of about 2005, despite the fact that it was in 2001 that Gates and company office christened the term and created a standard for the Tablet PC that specifies the hardware and software components. As you would expect, a bona fide Tablet PC must run a Microsoft operating system.
Tablet PCs come in two varieties, the slate and the convertible, as shown in Figure 38.2. The slate Tablet PC is a basic no-frills tablet that requires you use handwriting because there is no keyboard. By contrast, the convertible Tablet PC has both a keyboard and a pen. By having a laptop with a keyboard, you can, if a proficient typist, enter basic documents quickly and easily. But then by converting that laptop into a flat slate (either by removing the keyboard or rotating and flipping the screen down on top of the keyboard), you are then fully pen-enabled. Windows 7 employs the full functions of the Tablet PC. A variety of programs and functions are at your pen (or finger) tip.
Figure 38.2 HP tx2500 convertible Table PC with Motion Computing LE1700WT slate Table PC to its right.

Slates and convertibles subdivide further into two subcategories, based on screen type. Some screens only accept stylus (pen) input while others allow you to interact with the screen using touch as well as the stylus. The screen input driver is smart enough to know whether you are touching the screen with the stylus or with your finger, and behaves accordingly.
Some of the new breed of tiny “netbook” computers are now beginning to sport tablet-like features such as touch screens, finger and pen input, and convertible (rotate-and-flip) screens. In fact, touch has become so central to many devices such as iPhones, PDAs, and even all-in-one desktop PCs such as HP’s TouchSmart desktop PCs that we are certain to soon be seeing tablet-like features on many more computers. In this chapter, we’ll discuss the benefits of owning a Tablet PC, and learn the basics of using one.
Who Needs a Tablet?
Is a Tablet PC in your future? Possibly. Some would argue that a Tablet PC is for everyone, whereas others are too addicted to the keyboard to let it go. However, even being a keyboard fan myself, as a writer, after I got get used to touching the screen instead of pointing with the mouse, I may never go back because this approach is so much more direct and intuitive. I have been using one for a year or so now, and find myself touching regular laptop and desktop screens to choose dialog box options or move the insertion point in a document, reflexively. I am surprised when it doesn’t work!
Tablet functions are easy to use and great for work, school, or personal use. Because they are so portable, almost like a sheet of paper, and because you can easily draw pictures, diagrams, and maps, as well as write longhand text that translates into typed text, a Tablet PC can replace scratch paper, Post-It notes, and other desk-cluttering trivia. Eliminate that mess and invest in a Tablet PC. With Windows 7, a Tablet PC can be an efficient means of staying organized.
What Does a Windows 7 Tablet PC Have That Regular PCs Don’t?
The most obvious answer to this question is that Tablet Windows 7 enables you to use handwriting on your computer. Using a pen both as a mouse and for writing increases your computer options. The Handwriting Recognizer can distinguish your handwriting and transform that writing into typed text. The Handwriting Recognizer in Windows 7 adds some very nice features over that in Vista, including Asian language recognition, mathematical equation recognition, and much easier input correction.
With Windows 7, users who have a Tablet PC get extra fun goodies as well. These include special software and hardware that a normal PC does not have. A few basic extras include
• A stylus pen (or simply “stylus”), shown in Figure 38.3, that acts like a mouse and keyboard. Use the stylus to click and accomplish other functions just like a mouse. A stylus has many improved functions over a mouse, discussed later in this chapter.
Figure 38.3 Wacom stylus pen with multiple functionalities.

• Pressure-sensitive touch screens that offer more than a normal monitor. The Tablet PC screen recognizes how hard you push and displays that as a lighter or darker line.
• A swivel screen, in the case of convertible Tablet PCs such as shown in Figure 38.2. This swivel screen can be rotated and closed flat to cover the keyboard and provide a full-layout tablet.
• Buttons on the edge of the screen that are available when a convertible screen covers the keyboard, typically for options such as rotating the screen image, opening the Mobility Center (Tools menu for laptops), or playing a DVD.
• New software that can only be fully utilized by using a pen or finger.
What’s New in Tablet Windows 7?
All the existing items for tablets in the previous XP and Vista OS versions are included in Windows 7, and then some. (If you are upgrading to Windows 7 from Vista, not all of these will be new, but if you skipped Vista and joined the party coming from XP, you will mark a few more of these items as “new” in Windows 7):
• Enhanced stylus graphics—New visual effects are added in Windows 7 that XP did not have. As you can see when using Windows 7, your computer will recognize the stylus and create a new pointer for your pen. Clicking has also been enhanced to present a ripple effect and a halo for right-clicks.
• Pen flicks—Increasing your usage yet again with great added functionality, pen flicks improve how you browse online and how you can edit documents. Flicks are powerful and convenient and can be customized.
• Better handwriting recognition—Windows 7 improved the Recognizer so that it is more capable of accurately recognizing different handwriting styles. No longer will you have to comply with a standard writing style. Why change your style when you can just change how Windows 7 understands it? Recognition can “learn” how you write based on your corrections, and also can predict what you are trying to write, based on sentences you have written before.
• Improved Tablet Input Panel—There are several improvements to the Tablet Input Panel that make handwriting sentences much easier. In Vista the handwriting recognition results are shown under the area where you write, in text bubbles. To verify correct recognition you need to look down at the bubbles, which might even be hidden by your hand. To correct an error, you tap on a bubble to bring up a secondary window for correction. In Windows 7, after you write a word and lift the pen, recognition occurs and your writing is replaced by the perfectly formed word in a script-like font. The size of the type automatically approximates your writing size. Furthermore, there are new gestures that make it easy and intuitive to enter, correct, insert, and split words and delete text using the pen. Significant improvements were made to handwriting recognition on the four East Asian languages Windows 7 supports: Traditional Chinese, Simplified Chinese, Korean, and Japanese.
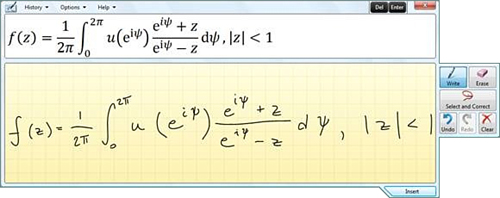
• Math Input Panel—The new Math Input Panel (MIP) recognizes even complex mathematical notation (high-school and college level) for easy insertion into programs such as Word. See Figure 38.4.
Figure 38.4 Math Input Panel is new in Windows 7. It can easily transform your math scribbles into typeset equations.
• Multitouch capabilities—With a tablet or monitor that supports it, Windows 7 will do nifty multitouch tricks that were first made popular with the iPhone. Microsoft throws in a few gee-whiz apps to show this off, including a virtual piano program, a mapping and directions program, and a touch-aware version of Paint. Vista added Tablet PC support for Business, Enterprise, Home Premium, and Ultimate Editions. Tablet Windows 7 builds on this platform with support for multitouch, a way to use visual gestures on touch screens to instruct Windows 7 what to do, and how to behave. To better understand this capability, watch this Microsoft video demo at http://video.msn.com/video.aspx?vid=8700c7ff-546f-4e1d-85f7-65659dd1f14f.
• The Windows taskbar has seen its most significant revision since its introduction in Windows 95. The taskbar is 10 pixels taller than in Windows Vista to accommodate touch screen input and a new, larger default icon size.
These are but a few improvements that Microsoft created in Windows 7. Later in this chapter, you see in depth what Windows 7 has done with the Tablet PC.
Choosing a Tablet PC
Choosing a Tablet PC can be difficult for new buyers. Everyone has his own distinct likes and dislikes of certain PC styles and layouts. Add to that the quirks of a tablet, and the choice becomes a conundrum. Here are two things to consider when looking for a Tablet PC:
• Most stores do not have Tablet PCs displayed because of the fragility of the swivel screen of the convertible type. Lately, a few stores—Best Buy, for example—have let you touch one before you buy it. Go to these stores and play around with the Tablet to see whether a Tablet PC is for you.
• Tablets come in two different types, and it’s your choice which one to buy. Beware that most slate Tablet PCs are not sold in local stores. If having a keyboard is a must for you, but you like the lighter weight and size of the slates (for example, Motion Computing makes a nice small one), consider a fold-up Bluetooth or infrared (IR) keyboard made for PDAs. If the tablet you want has Bluetooth or IR, you can carry a keyboard in your pocket.
Using Your Tablet PC—Differences and Similarities of Functions
Using a Tablet PC can be very different from using a regular PC, depending on the type. With slate design Tablet PCs, you are required to use only the pen for every function (unless you are using voice input). After you become accustomed to a slate Tablet PC, you will not miss a keyboard. If you do miss a keyboard, you can obtain an external one and plug it in via USB or wirelessly with Bluetooth, as I mentioned.
Convertible Tablet PCs are just like a normal laptop but with the added feature of the stylus pen. Unlike slate Tablet PCs, convertibles have a built-in keyboard. One downfall to the built-in keyboard is that it will add more weight and bulk to the computer.
Either design of Tablet PC comes with a stylus and all the tablet functions. Using a pen on the screen is no different from using a mouse—you simply point and click, but in this case, a click is done with the pressure of the pen or a switch on the side of the pen. It could be argued that using a pen is actually faster and more immediately intuitive. Pens vary somewhat in their design but often are set up to cause a left-click when you press the screen and a right-click when you click the button on the pen’s side. A right-click also results from pressing the pen (or finger) on the screen and holding it down for a second or two. This typically brings up the context menu of the item being clicked.
As icing on the cake, Windows 7’s tablet features include some shortcuts called flicks and gestures that make tablet computing even more efficient. As mentioned in Chapter 4, Windows 7 has some mouse gestures as well that work on non-tablets. For example, when you drag a window’s title bar to the top of the screen and release it, the window maximizes. But on a tablet, there are gestures for things such as going “back” or “forward” between web pages, or for scrolling pages of a document.
Input Methods Using the Input Panel
As with a Pocket PC (if you have used one), Tablet PCs offer a variety of ways to input data and text. In Windows XP Tablet Edition, Microsoft introduced three new ways for a user to input text and phrases. This was refined in Vista. Now in Windows 7, the newest iteration of the Input Panel simplifies input matters further.
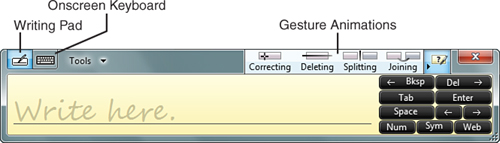
The basic Input Panel contains a variety of functions and extras. The Input Panel lets you choose where to dock it—it can be docked anywhere on the screen. When you are not using the Input Panel, it will quietly minimize where you docked it and be ready for you to use whenever you click it. This is a bit like the taskbar on any XP, Vista, or Windows 7 computer when set to auto-hide. The Input Panel usually hides itself behind the left or right side of the screen, with only its edge (tab) showing. Tapping the tab causes the Input Panel to slide out onto the screen. You can open the Input Panel without having to go to the tab on the side of the screen, however. Simply hold the stylus over a text box or text area, and a little Tablet Panel icon will show next to your stylus. Clicking this icon will open a floating Input Panel for you to quickly and easily input text. Figure 38.5 illustrates the basic Input Panel. As you can see, it has a nicely sized text frame for you to write in. Windows 7 gives you a large enough text frame to input a decent-sized sentence. As you near the end of the line, another blank line appears below it, so you can keep writing if you want to, before clicking the Insert button to paste the text into whatever app, window, or text field you are using.
Figure 38.5 The Tablet Input Panel has many new features and abilities.
The Windows 7 Input Panel has some flashy new features that you might not be able to use, but they are worth mentioning. Specifically, it can recognize mathematical equations and has support for several Asian languages (more on this later in the chapter).
Writing Methods Using the Input Panel
In Figure 38.5, you can see two different boxes on the top left of the Input Panel. These boxes are the two ways that you can input your handwriting and transform that into typed text. (Previous versions of the Input Panel also had a Character Pad for entering individual letters, much like filling in a printed government form or writing in “graffiti” on a PDA, but this option was moved to an option on the Tools menu.) Briefly, the boxes work as follows:
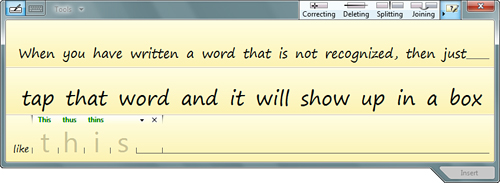
• Writing Pad—The left button presents a free-form-based writing field. You can write longhand or print full words and sentences, and Windows 7 will do its best to transform that into text. Windows 7 will recognize words fairly well even without training and will display each word right in the Input Panel after you lift the pen. It is pretty magical to watch this happen. Suddenly you have excellent handwriting. If a certain word you wrote is not recognized correctly, you can click that word on the Writing Pad and edit it. The word opens up as separate letters in what is called the Character Pad (see Figure 38.6). In the Character Pad, you see a slot for each character. If a character is wrong, simply write over it with the desired character until it is correct. You can use the strikeout, split, and join gestures, too. (See the last item in this list, “Gesture Animations.”) Suggested words appear in small print above the Character Pad. Tap a word to select it. Click the x to close the Character Pad and accept the current spelling. The Character Pad also features Smart Corrections. All you have to do is start correcting the word from the left and it starts suggesting words that match. Keep updating until you get the word you want, then close the Character Pad by clicking the little x.
Figure 38.6 Multiple lines open up as you write, and tapping on a word lets you respell it.
• Onscreen Keyboard—Windows 7 incorporates a standard onscreen QWERTY keyboard to fit your needs for using a stylus or finger, if your tablet has touch input ability. This includes all the basic keys situated in the same spot as a normal keyboard. On-Screen Keyboard is a handy tool that will help you with such things as creating a certain password or ID name that may likely include a mix of letters and numbers. With a dual-mode screen, pressing the edge of the docked input panel with your finger will bring out the larger, finger keyboard. Pressing on the tab with a stylus brings out a smaller keyboard for use with a pen. However, the new Windows 7 keyboard can be resized to as large as the entire screen, so you can even do touch typing on it. There is no tactile feedback, but it is still pretty cool. Size the keyboard by dragging its lower-right corner. The keyboard has an intelligent visual feedback scheme to let you know which key you pressed (the key you pressed has a glow fadeout after you release it). Also, the keyboard supports multitouch, so you can type faster without dropping keys and can press two keys at once (for example, Shift+ a key, Ctrl+ a key, and so on). Your screen has to be multitouch capable, though.
• Gesture animations—A slick new feature of the Input Panel in Windows 7 is the inclusion of a set of easy-to-use pen gestures for such frequently needed tasks as splitting words and joining words. Tap one of the gesture animation buttons to see how each gesture works. A little video animation will play, illustrating exactly how to move the pen and what the effect is. Use each of the gestures on the Writing Pad to get the hang of them. These new Input Panel gestures are a godsend while handwriting.
Notice that in Figure 38.5 there are buttons on the right side of the Input Panel in freeform-writing mode, whereas in Figure 38.6 there are not. When you first open the Input Panel, these buttons appear so that you can easily enter web addresses, symbols, or numbers. Very handy. Tap the Num, Sym, or Web buttons to see the additional, related keys that pop up. Once you start writing with the stylus rather than tapping these buttons, they vanish to make room for writing.
Tip
![]()
A Tablet Input Panel icon can be inserted into your taskbar. Just right-click the taskbar and click Toolbars, Tablet PC Input Panel.
Using the Stylus Pen
The stylus is an essential tool for tablet use and will likely never leave your computer. (If it does, you’re up the creek, because it’s essential to tablet use, unless you have a touch screen. Some tablets come with a string that you can use to leash your stylus to the tablet with. I suggest using it.) Even with touch capability, a stylus is essential for certain chores that require exactitude. Briefly, here’s how it works.
Windows 7 detects that you are using a pen automatically and will change the cursor from an arrow to a small dot when you are writing or pointing and clicking icons, buttons, and other interface items. With some styli, simply pointing at an object such as a menu choice will highlight it, equivalent to dragging the mouse pointer over an item (or hovering over it). That is, you do not actually have to touch the screen.
Pen Cursor Problem
![]()
If your pen cursor is off-center, you will quickly find that clicking the onscreen items you want will be difficult. The Tablet PC stylus pen needs to be recalibrated after a period of time. To recalibrate the pen, go to Control Panel, Hardware and Sound, Tablet PC Settings and on the Display tab click Calibrate.
Windows 7 detects pen clicks and will display a neat ripple effect. One tap on the screen with the stylus will create one ripple and represents an onscreen (left) click. So, one ripple equals one click and two ripples equal a double-click. Now if that weren’t neat enough, Windows 7 incorporated an even neater right-click.
As you know, the right-click on a mouse is a highly needed function. Most styli incorporate this right-click as a button on the side of the actual pen. If you press this button and tap on the screen, the result is a right-click. Windows 7 will automatically recognize the pen and the right-click and will open the right-click menu. You will also see a lighted halo at the spot you right-clicked. As mentioned before, pressing the stylus to the screen and holding it still for a second or two will result in a larger circle appearing. When you release, the right-click menu appears.
Windows 7 utilizes not only the front of the stylus but also the back end. When writing a note, you may want to delete a small mistake in your text. Instead of clicking the onscreen eraser, erasing with the stylus, and then clicking on the pen button again to continue writing, you can just flip your pen backward and erase. The end of the stylus (shown in Figure 38.3) serves as an onscreen eraser, just like on a real pencil. Windows 7 and apps will often recognize the back end of the pen as the eraser—very slick and intuitive.
Input Panel Options
The Input Panel has a Tools drop-down menu that opens a world of options if you drill down a bit by opening the Options dialog box. But let’s look at the menu itself, first.
You can toggle the Input Panel between individual character entry and longhand writing. These differences were explained briefly a bit earlier. Next, you can choose to personalize handwriting recognition (described later in this chapter). Finally, you can declare where you want the Input Panel to dock (also described later in this chapter). There was a Help menu on the Vista version of the Input Panel but that has now been integrated into the Tools menu.
Regarding docking styles, you have a few options. Docking simply means where the Input Panel will hang out on the screen once you open it. You can dock it at the top or bottom of the screen, or have it float on the screen. Floating the Input Panel is great when you want to write small, quick text, such as a username and password. Most tablet users will agree that docking on the bottom of the screen is the best strategy, because it not only allows you to write but also is least invasive of other documents that are likely to be on your screen. If you choose to float the Input Panel, its width is manually adjustable. If you dock at top or bottom, it extends fully across the screen.
Choosing Tools, Options opens a complex dialog box with six tabs. Some of those settings are covered later in this chapter. They are all worth exploring.
Gestures and Pen Flicks
Gestures and pen flicks are basic stylus options that let you write and browse even faster and easier. Gestures are quick scribbles with the stylus that effectively scratch out text, or enter the keyboard keys of Backspace, Delete, Space, and Enter. Using pen flicks makes scrolling through documents and browsing the Internet easy. With pen flicks, you can scroll up and down and go back and forward in your current web browser with just a few quick motions of the pen.
Scratch-Out Gestures
The most important gesture of all the tablet stylus options is the Scratch-out gesture. With a Tablet PC, you will be doing a lot of writing with the stylus, and sometimes you will misspell words and make mistakes. Instead of using the back end of the pen to erase an entire word, you can use a Scratch-out. Simply draw a line through the words you want to erase, preferably draw the line from right to left. You can scratch out not only words but also entire sentences.
Pen Flicks
The stylus pen enables you to view and scroll through documents and web pages easier than you can with a touchpad. With a stylus, you are free to touch anywhere on the screen with the pen and instantly click where you need to go. Windows 7 now makes browsing even faster with the introduction of pen flicks.
Pen flicks are common actions that can be done using the stylus pen. For example, suppose you are browsing the Internet and want to go back a page. You could click the Back button once or scroll through the list of web pages you visited to get there. A faster way is to just touch the screen at any spot with the pen and flick the pen toward the left direction. With one flick of the wrist, you will automatically go back to the previous web page. Conversely, flicking to the right moves forward, analogous to clicking the Forward button on the browser toolbar.
If you think going back and forward is simple, scrolling up and down in a web page is just as easy. Scrolling in a web page using the stylus used to require you to hold your pen on the scrollbar on the screen just as you would do with a mouse. With pen flicks, instead of holding the scrollbar, you can flick up or down to scroll in the respective direction.
Tip
![]()
Flicking is a little tricky at first. To use pen flicks correctly, you may need to practice. Windows 7 supplies a pen flick trainer, located in the Tablet PC folder under All Programs, Tablet PC. Also, if flicks are not working correctly, perhaps they are turned off. Check the Pen and Touch dialog box’s Flicks tab and, if necessary, turn them on.
To see the list of flicks, make adjustments, and practice using flicks, open Control Panel, Pen and Touch. Or click Start and enter Flicks. Then choose Set Flicks to Perform Certain Tasks. Read more about customizing flicks at the end of this chapter.
Handwriting Recognition
Just as with the Speech Recognition feature, we have found the Handwriting Recognition feature in Windows 7 to be very good, even without training. Training will always improve your success, however. When you first start using your Tablet PC in Windows 7, it is possible that it may not recognize certain words or phrases correctly. This can be a software issue, or, as with a few of us, your handwriting just stinks. This can easily be solved by using the Handwriting Recognition tool that allows you to teach the Recognizer how you write. Because everyone has a distinct handwriting style, teaching Windows 7 how to recognize your style can help it better read and understand what you are writing. Windows 7 also uses the system Indexer data as a source of clues to help it predict which words you regularly use. (The System Indexer regularly sifts through all your hard disk files and creates an index of all the words in them so you can quickly find files, emails, photos, and so on.)
To teach Windows 7 about your handwriting, use the Handwriting Personalization window (see Figure 38.7).
Figure 38.7 Handwriting personalization.
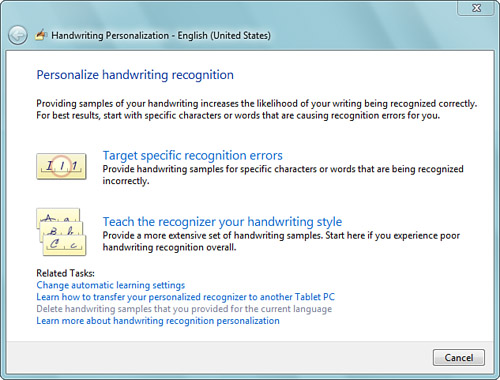
The Handwriting Personalization window will ask you to demonstrate your handwriting to allow Windows 7 to understand your handwriting better. To open the Handwriting Personalization window, follow these steps:
1. Click the Start button and type Handwriting in the search box.
2. Select Personalize Handwriting Recognition. (You can also get to Personalize Handwriting Recognition from the Tools menu of the Input Panel.)
Specific Handwriting Recognition Errors
With the Handwriting Personalization window open, you are given two options. The first option is to target specific handwriting errors that constantly occur. The second option is to allow Windows 7 to better learn how you write.
Automatic correction of common errors in Windows 7’s Handwriting Recognition can save you time. Constantly fixing that one word that is always misrecognized can be really annoying. You can force the Recognizer to correct those mistakes and improve how it reads your handwriting with the Handwriting Recognition tool.
Teach the Recognizer Your Style
Teaching the Recognizer how you write can improve its accuracy significantly, especially if your handwriting is sloppy. This process lets you keep your current handwriting style and changes how Windows 7 reads it. If you have trained a speech recognition program to understand your vocal patterns, you’ll be familiar with the concept. There are two basic ways that you can change the Recognizer to improve its capability to understand your writing:
• Numbers, Symbols, and Letters Recognition—Teach the Recognizer how to read your handwriting by individual words and numbers. The Handwriting Personalization applet will ask you to write the entire alphabet in caps and lowercase, and write all numbers from zero to nine. This way of teaching the Recognizer is basic and quick.
• Sentences Recognition—When using this option, you will be asked to write a variety of sentences so that the Recognizer can get better recognition of your style and sentence compilation. Beware, though, Windows 7 will want you to write a total of 50 sentences for it to fully understand your handwriting. But instead of writing all 50 right away, you can save and do this incrementally. Spend the time to finish this setting. It will save you a lot of time correcting words later.
AutoComplete
The AutoComplete function for tablets is the same as the AutoComplete function used on a regular PC, such as in Internet Explorer or Office. Windows will suggest what word or URL you are typing and give you the option to select it without typing the entire word or URL. With the Tablet Input Panel, you have the same power with your stylus.
Most people log in to an email account or type a URL in their browser everyday. Browsers commonly use the AutoComplete function due to the length of the URL. The stylus input works the same way as if you were typing that URL on your keyboard.
Note
![]()
You might have noticed that if you highlight a phrase such as a URL and then open the Input Panel, the word will appear in the Input Panel. If only small changes are needed, you can enter them in that Character Pad. This helps decrease the amount of writing that you have to do.
To write a URL in your browser, open the Tablet Input Panel and select the address line. Instead of a keyboard, you are left with the option of handwriting the URL in the Tablet Input Panel. While you are writing the URL into the text field, Windows creates a list of suggestions for you, based on recent entries you have made. Choose one of the suggestions if it is what you are writing. The same will be true with email addresses and filenames.
AutoComplete can be turned off from the Options dialog box if you find it annoying.
Note
![]()
Windows 7 Tablet Edition includes two tools quite useful for the tablet operating edition: Sticky Notes and the Snipping Tool. These two tools are covered in Chapter 7.
Similar to AutoComplete is Predictive Text. This anticipates what you’re trying to type or write, based on what you’ve entered so far. Keep your eye peeled for suggestions that show up near the Input Panel. Tap the one you want to insert into the input area.
Windows Journal
If you like to keep notes or even a diary, this is the program for you. Windows Journal looks like a basic sheet of paper but on your tablet (see Figure 38.8). You can write anything you want, draw graphs and charts, or just doodle. You can insert pictures, drag items around, add or remove empty space on the page, convert handwriting to typed text, and even search through your handwritten notes using a Find command that does handwriting recognition. It’s a pretty spiffy program whose price is right (free) and is a fun way to show off your tablet. It’s a great brainstorming tool while in a meeting, while riding on a bus, or in place of the proverbial back of a napkin.

At first blush, Windows Journal might look like Microsoft Word. True, it is similar, but the primary difference is that you can use handwriting instead of just plain text. You can easily change the colors of the pens or the highlighters if you take notes. Actually, Journal is more like a little brother to Microsoft One Note, which is the ultimate tablet-centric tool, particularly popular among students.
When you first open Windows Journal, you may wonder why the page is so small. Not a problem. You can easily change the page size via File, Page Setup.
Two options in particular are worth checking out:
• Convert Selection to E-mail
• Convert Handwriting to Text
Both of these options are useful. After scribbling up a set of notes, you may want to consider converting it to text so that you can place it in a Word or other text-based document. To do so, follow these steps:
1. Complete the handwritten text that you want converted.
2. Select the Lasso tool and select all the text that you want converted. The Lasso tool has a weird pivot system that is at first awkward to use. Instead of the red dots being the selector of the text, the Lasso tool uses the white dotted line that comes from the focus point. Also, if the white dotted line selects about 70% more of the handwriting, it figures out what you are trying to select and will select all of that content.
3. After you select the text you want converted, select Actions in the toolbar and then select Convert Handwriting to Text.
4. A new window appears asking you whether the words that it recognized are correct. You can then change any words that are incorrect.
Converting handwriting to text is a useful function that you will do a lot. You can also convert your text to an email if you want. Follow the preceding steps, but at step 3, click Convert Selection to E-mail. This will open the same window and send the data to your profile mail account.
Tweaking Your Tablet PC Settings
In this section, I will briefly discuss the most important tablet, pen, and touch settings you should know about if you are going to use a tablet with Windows 7.
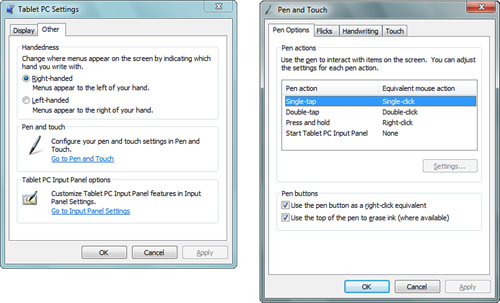
Tablet PC Settings Dialog Box
The Tablet PC Settings dialog box, shown on the left in Figure 38.9, is a primary applet that offers many handwriting and display settings. It is the central location to adjust tablet settings, including those for the Input Panel. This applet is easily accessible from the classic view Control Panel (click Tablet PC Settings), or from the Category view by going to Control Panel, Hardware and Sound, Tablet PC Settings.
Figure 38.9 From these two dialog boxes, you can make the most significant settings for a Tablet PC.
The first thing you will want to do is configure your screen so that Windows 7 knows that you have a pen and/or touch screen. Click the Display tab, then click Setup in the Configure section and follow the prompts.
Next, you should calibrate the screen for accuracy; otherwise, your pen and finger will be clicking things on the screen that you do not intend them to. Having the pointer uncalibrated can cause annoying pen misbehavior such as the inability to grab the scrollbar. Again, on the Display tab, Click Calibrate and follow the prompts. If you have a dual-mode screen (pen and touch), you will do the calibration for each mode. Note that, compared to Vista and XP, calibration now involves more steps, presumably making it more accurate, through redundancy of taps of the screen and averaging the data points. From time to time, you will have to recalibrate your stylus with your tablet. Every few months, take the time to recalibrate your pen (and touch).
Are you left-handed? If so, you have not been forgotten. Click the Other tab of the Tablet PC Settings dialog box and choose Left Handed. As a result of your choosing Left-Handed or Right-Handed, the Tablet Input Panel will either appear on the left or right side of the screen.
The next option worth futzing with is the Buttons tab. Most tablets come with a set of buttons on the side or next to the screen. These buttons perform certain shortcut actions such as rotating the display or bringing up the Mobility settings, and can save you pen strokes or taps. Take the time to set each button to what you want. Setting a button to a function such as opening Windows Journal can be a huge benefit. Obviously, you’ll want to set your buttons to launch programs or execute functions that you use most frequently. If the software driver for your buttons is missing, or your PC is not a bona fide tablet, you will not have this tab.
As we said previously in this chapter, Handwriting Recognition is an important tool when writing text. Windows 7 has a great capacity to learn how to recognize your handwriting style. Tweaking the Handwriting settings will be well worth a little toil if you expect to be using the pen to any degree. Click the Go to Pen and Touch link (or click Start and type Pen and the link will appear in the search results). This brings up the dialog box you see in the right side of Figure 38.9. Click the Handwriting tab, and you can turn off the Recognizer and turn off automatic learning. Windows 7 keeps each setting on by default, and we recommend that you not change them. Keep the default settings unless you have a personal vendetta against the Handwriting Recognizer. Let your computer learn to better recognize your handwriting over time. Your efficiency will increase markedly.
At the bottom of the Tablet PC Settings dialog box (Buttons tab) there is a link for setting the order in which the screen rotates when you press the rotate button on your tablet. This can be useful to cut down the number of button presses required to switch between portrait and landscape screen modes. Note that if you don’t have a rotate button, you can go to Control Panel, Display, Screen Resolution and open the Orientation drop-down list and rotate the screen that way. If you have a slate Tablet PC (no keyboard), choose Portrait or Portrait (flipped) mode as the default if it isn’t already selected. Portrait gives more of a “paper” feel, as the layout of the screen is more like a piece of paper.
Screen Does Not Change Layout for Convertibles
![]()
If your convertible Tablet PC does not go into tablet mode when you rotate the screen, it could be that your rotation program (a small app that controls the layout of the Table PC display when the screen is physically rotated) failed to initialize. Follow these steps to change the layout of your Tablet PC:
1. Open the Control Panel.
2. Click Hardware and Sound (if in Category view).
3. Click Windows Mobility Center.
4. Click Rotate Screen. Each time you press this button, the screen rotates 90 degrees.
When changing the layout of the screen to portrait using the above method, when you want to revert back to landscape, you must follow the preceding steps again. Using the preceding method is a manual way of rotating the display. To fix the automatic rotation utility program, try reinstalling the program or checking online for a newer version of the software.
In portrait layout, Word documents and full-page items will be easier to read and will require less scrolling. The only time I would suggest you change to Landscape is when you are watching a full-screen movie or slideshow. Most convertible Tablet PCs come with a swivel screen that changes the layout when rotating and closing. When typing on the physical keyboard with a convertible Tablet PC, the screen must be in Landscape mode if you want to read what you are writing. On some models, you can change to Portrait orientation while typing on the keyboard, but do you want to have to cock your head 90 degrees to the side the entire time? (This setting could be useful, however, if you stood the computer on its side and used an external USB or Bluetooth keyboard. I have done this when I really wanted to type and also had a vertical page orientation.)
Aside from the left- and right-handed options, the links on the Other tab are just basic links to the Pen and Touch options and the Tablet PC Panel options. Windows 7 incorporated these links in this menu just to give you quick access to those settings.
Pen and Touch Dialog Box
The Pen and Touch dialog box (shown on the right in Figure 38.9) has four tabs, listed next. Most of the options on these tabs are fine left with the default settings. The option you’ll most likely want to change is the touch pointer option on the Touch tab, if you have a touch-enabled screen.
• Pen Options tab—Gives you options for how the pen interacts with the screen. Changing how the stylus implements such functions as a right-click can better help you customize your tablet. Other options here let you turn off the right-click equivalent and the back-end eraser. Most likely, you will never want to change these settings. Clicking Settings lets you set such things as how fast a double-tap has to be in order to register, and “spatial tolerance,” which is how far away the second tap can be from the point of the first one and still be interpreted as a double-click. (These choices are also on the Touch tab, where they are applicable to touching.)
• Flicks tab—If you are new to using pen flicks, leave these settings alone. After a bit of practice, you will be efficient in using pen flicks. You can increase the range of your pen flick usage by changing your settings in the Customize Flicks dialog box, shown in Figure 38.10, which offers additional flicks that can do basic functions such as undo, delete, copy, and paste. You also can add a custom flick, assigning a flick to trigger any key or key combination you choose.
Figure 38.10 Customizing pen flicks.

Pen Flicks Not Working
![]()
If you find that Pen Flicks will not work at all or only works very scarcely, make sure that pen flicks are turned on. Refer to the “Pen Flicks” section earlier in this chapter.
If pen flicks are turned on, you might just be having a problem implementing a flick. Go to the pen flicks training in the Pen and Touch applet in Control Panel, and click Practice using flicks (at the bottom of the dialog box). This will guide you in how to successfully use pen flicks.
• Handwriting tab—These options were covered briefly in the section, “Handwriting Recognition.”
• Touch tab—This tab will appear if your tablet has a touch-sensitive screen. There are quite a few options here, if you drill down. On the first level, you can turn off touch altogether. If you do that, touching the screen will not register. Only the pen will. This could be useful if you want to prevent accidental modifications to data or graphics by accidental touches (for example, if you are using a graphics editing program such as Photoshop). Turning on the Touch Pointer results in the appearance of a small image of a computer mouse on the screen wherever you touch the screen with your finger. If you are new to using touch, I suggest turning this on, at least for a while. The advantage is that it helps you aim the pointer more accurately, and it has left and right mouse buttons on it. With time and experience, you may find this little assistant unnecessary and can ditch it. Right-clicks can be performed using “touch and hold” just as with the pen. Simply touch a spot on the screen and hold your position for a second or two, until the large circle appears, and then release, after which the context menu appears. When the Touch Pointer is turned on, you scoot the touch pointer around the screen as it if were the real deal—push on the body of it. Click the buttons by tapping on it. The Advanced Options buttons give you transparency, size, and tracking speed choices.