
10. Windows Imaging Tools
Image Manipulation in Windows 7
From the earliest versions of Microsoft Windows, there have been tools that helped you manage images on your PC. In the early days, when the technology we enjoy today was not as readily available, these programs were limited to creating a picture on your computer screen and printing it out—very limited, but then again, so was the hardware.
Witness the leap from Windows Vista, just barely two years old, and you can see that Microsoft has further refined the tools built in to Windows 7 to handle this massive influx of digital content. In this chapter, we discuss the ways to get digital images into your computer, how to touch them up so they appear their best, and how to share these pictures with others.
What’s Built in to Windows 7 for Photographs?
Like digital photography? Own a scanner? Windows 7 supports the immense popularity of digital photography and scanning with the new Windows Media Libraries. Windows 7 introduces a new centralized location to organize all of your media and has more closely integrated it with Windows Explorer and Windows Media Player.
The Windows Pictures Library can help you have more fun and get more use from your photographs. In the following sections, you’ll learn how each of these features works.
Tip
![]()
The new Windows Media Libraries are not real folders, per se. They are special folders that collect, display, and give access to a specific type of media from a centralized locale. You can add to the list of folders being watched for various types of media by clicking the 2 Locations link under the Windows Pictures Library header in the folder listing. By default there are two locations, so you should see something like Includes: 2 Locations.
Windows Pictures Library
Many Windows 7 options can be accessed through the new Windows Pictures Library included with Windows 7. You can find the Windows Pictures Library, shown in Figure 10.1, by choosing Start, Pictures.
Figure 10.1 The Windows Pictures Library main screen.
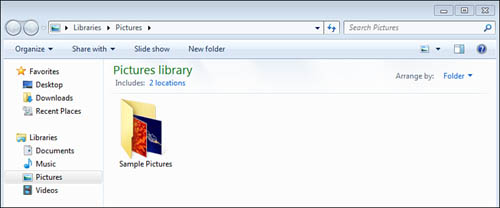
By default, the Windows Pictures Library shows all photos that are in all watched folders, including the current user’s Pictures folder. You easily can add individual photos or entire folders of photos.
Tip
![]()
Microsoft has created Library folders for each type of media—images, videos, and audio. Each and every one of these folders behaves in the same manner, so the information contained in this chapter works with any type of media. That’s a good thing, as well, because most digital still cameras are more than capable of taking video. Just make sure your storage card has enough room on it to store a day at Disney!
To add an individual photo to Windows Pictures Library, do the following:
1. Open Windows Pictures Library.
2. Open the folder that contains the photo or video that you want to add to the Windows Pictures Library.
3. Click and drag the photo from the folder that contains the photo to the Windows Pictures Library.
That’s it! After you drag the photo into the Windows Pictures Library, the file is copied to your Pictures folder and appears in the Library.
Importing Files into the Windows Pictures Library from a Media Source
To add all the photos from a specific multimedia storage device, simply connect the device to your computer. These devices are typically your digital still camera or a media card or USB thumb drive. Windows Pictures Library will scan the device and add any photos and movies it finds to the associated libraries (that is, images will go to the Windows Pictures Library, videos will go to the Videos Library, and so on). A folder can be removed just as easily in Windows Explorer, by finding the folder under the Folders selection in the left pane, right-clicking it, and choosing Delete.
Organizing Photos and Movies in Windows Pictures Library
Once you start importing several photographs into Windows Pictures Library, your main gallery view can start to become a little crowded. To alleviate this problem, Windows Pictures Library prompts you to create custom categories called tags to better group your media. Windows 7 will ask you to create a tag each time you insert media or import from a camera or other media device. Make the tag as descriptive as possible. If you take a range of different pictures in a set, try using a date and a location description to better organize your media.
Working with Scanners and Cameras
With Windows Vista, Microsoft replaced the functionality of the Scanner and Camera Wizard with the Windows Gallery, which has now been replaced in Windows 7 with the Windows Pictures Library. The Windows Pictures Library allows you to scan images from a scanner, copy images from a digital still camera, or import a movie from a supported video camera. Almost any modern imaging device is supported by Windows Pictures Library. If you have more than one imaging device supported by Windows 7, you can import images from any of them from within the Windows Pictures Library or in the new Windows Media Player.
Using Windows Pictures Library with a Scanner
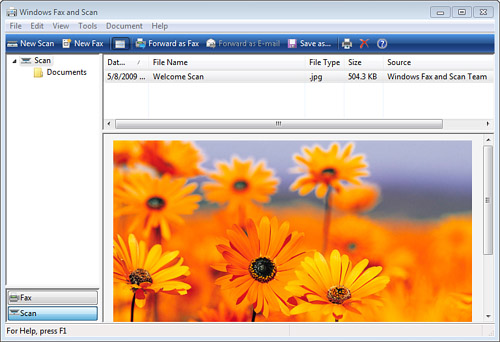
To start the Windows Pictures Library with your scanner, push the Scan button on your scanner. This will open the new Windows Fax and Scan application (see Figure 10.2). You may also use the image acquisition feature from within your favorite photo editor or paint program. Image acquisition is located in the File menu of most applications.
Figure 10.2 The New Scan pane, where you can set the scanning options.
When the wizard starts, follow this procedure to scan your pictures:
1. On the Choose Scanning Preferences screen, select the profile (which defaults to photo) and select New Scan to prescan your picture with default settings. With some scanners, you might need to press the Scan button on the scanner itself to perform the preview (see Figure 10.2).
2. You can manually adjust the contrast, brightness, and resolution for the scan (I recommend 75dpi for scans you plan to use in slideshows and 150–300dpi for scans you want to print). After this is done, click Scan to acquire the picture from the scanner.
Tip
![]()
If you place only one photo on your scanner, the wizard automatically selects it for you. Adjust the scan boundaries by dragging the corners only if you want to crop the photo during the scan. If you place more than one picture on the scanner, you will need to adjust the scan boundaries manually to scan each photo.
3. When scanning is complete, you will be prompted to tag the picture. This is optional but will make finding your scanned pictures easier after they are imported into Windows Pictures Library. Click OK, and the picture is shown as it is imported into the Photo Library. You can then use the postprocessing commands mentioned elsewhere in the chapter to clean up the picture, if needed.
Scanner Not Recognized by Windows Pictures Library
![]()
If your scanner was working fine with Windows XP, but you find that Windows 7 will not show it in Windows Pictures Library, there are some things you can try.
The Windows Pictures Library is certainly a convenient way to use your scanner, but it’s not the only way. Before you try the scanner again, be sure you install drivers for your scanner that are compatible with Windows 7 or Vista. You might be able to use Windows XP–compatible drivers if you can’t get Windows 7 drivers yet. Install the latest drivers available (you might need to restart your computer afterward) and try the wizard again. Windows Update is a great way to get new drivers.
Next, see whether you can use the scanner with its own TWAIN or ISIS driver. If you can, you don’t need to use Windows Pictures Library. Remember to use the Scan button on the scanner if it has one; some scanners require you to push this button to start the scanning process.
Contact the scanner vendor for help if you’re still unable to use the scanner with either the wizard or its own scanning software.
Finally, you need a way to view and organize your pictures after you’ve scanned them. Although the Pictures folder has some built-in tricks, third-party software can help you view and locate pictures stored in any folder and on any type of media. Here are a few programs that you should consider:
• IrfanView (www.irfanview.com)—IrfanView is one of the oldest and most venerated freeware image viewers and processors available. It works just fine with Windows 7 and even has a nice thumbnail manager for organizing your images outside the Windows libraries system. Go to Options, Properties/Settings, open the Toolbar tab, and select the Grosberg_24 set. It’s a lot easier to see in Windows 7.
• Google’s Picasa (www.picasa.com)—If you’re a Google user, then Picasa 3 may just be the answer for you. Not only does it handle images like the old Vista Photo Gallery (just way better), it also lets you manage your albums online and gives you more options to share your pictures.
Using Windows Pictures Library with a Digital Camera
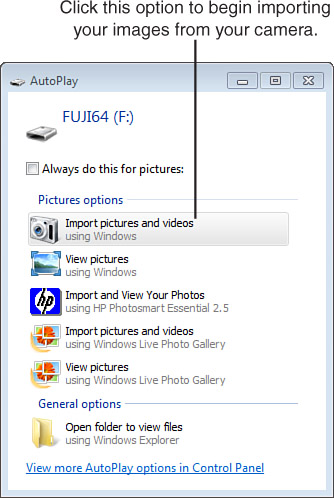
Importing photographs from your digital camera is a simple process. The import process is automatically started when your camera is connected and powered on. You will see a dialog box similar to Figure 10.3 (your camera name will appear at the top of the dialog box). You can begin the import process by selecting the highlighted option, Import Pictures and Videos Using Windows.
Figure 10.3 The AutoPlay menu for a digital camera.
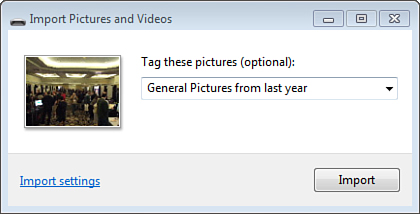
Windows will scan your camera’s storage media for any and all pictures and videos and will ask you to add tags (see Figure 10.4). Do so and click Import.
Figure 10.4 The Import Pictures and Videos dialog box enables you to tag photos you are importing.
Tip
![]()
The first time you connect your digital camera to your computer, Windows 7 might need to load drivers specifically for your camera. For most modern cameras, this is a transparent process that only takes a few seconds, but it might be a good idea to have any CDs or DVDs that came with the camera on hand, in case specialized drivers are required. Sony cameras in particular, which use the proprietary Sony Memory Stick technology, have required special drivers be installed. Windows 7 has a lot more drivers preinstalled than previous versions of Windows.
Once Windows has completed the import it will open the Imported Pictures and Videos page for you to review.
Windows offers a default collection of settings that control how pictures and videos are imported into your computer. You can change how these settings work before you even complete your first import by clicking the Import Settings link in the Import Pictures and Videos dialog box to open the Import Settings dialog box, shown in Figure 10.5. The following are the options:
• Settings For—Use this menu to select which settings you will be modifying. In this case, the Cameras and Portable Devices option should already be selected.
• Import Images To—Enables you to choose the top-level folder where the pictures are imported. A subfolder will be created for each import session, depending on the setting of the Folder Name option.
• Import Videos To—You may also select a different folder to import videos to, and Windows 7 knows how to tell the files apart.
• Folder Name—This option allows you to specify the folder to which the pictures will be imported. As stated, this is a subfolder of the Import Images To option.
• File Name—Identify the naming convention used to name the individual pictures. Preserve Folders means use the existing folder arrangement on the card or camera. You would use this option if you have a fancy camera and you organize your photos in your camera, or you had already organized the photos on a CD or DVD or removable camera card or USB flash drive using another program. More likely, you’ll want to use the Tag setting.
Figure 10.5 The Import Settings dialog box enables you to modify import settings.
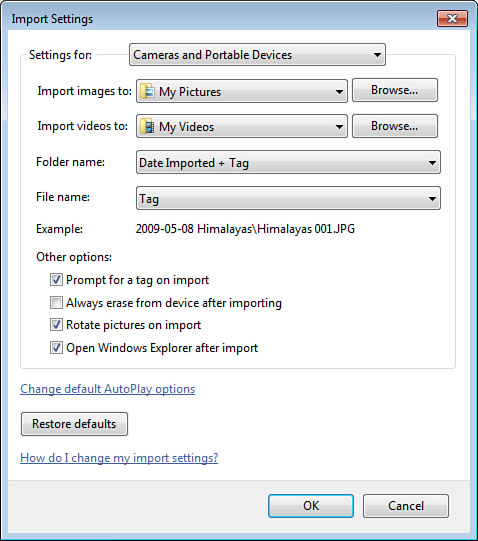
The next set of options controls how Windows deals with the import process. First, you will want to leave checked the Prompt for a Tag on Import option, because that will help you keep your import sessions organized. The Always Erase from Device After Importing option does allow you to clear your camera after each use, but Windows 7 now knows what images it has already imported, so it will not re-import duplicates over and over again. Choosing this option is generally a good idea unless you have another way to erase the pictures from your camera.
If your camera knows what orientation it was held in when the images were taken, you are also given the option to perform automatic rotation of your images on import. Finally, you can choose whether you prefer Windows Explorer to open following the import.
After you set the options to your liking, click the OK button and click Import in the Import Pictures and Videos dialog box. The wizard displays each picture while it copies the selected pictures and provides a status display onscreen, shown in Figure 10.6.
Figure 10.6 The wizard displays the progress of the import task.
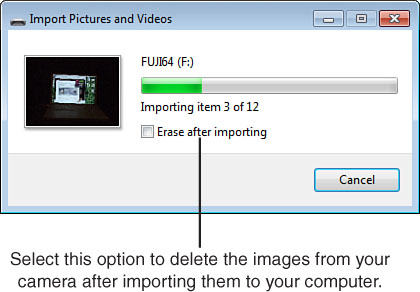
If you chose to delete the pictures from your imaging device, the wizard will delete them from your camera after it has successfully imported them to your computer and inform you of its progress.
Now the pictures are imported from your digital camera into the Windows Pictures Library. You can view each of the pictures and, if needed, perform some basic manipulation on them in Windows Media Player, as outlined in the next section.
Manipulating Pictures in Windows Media Player
Unless you are a perfect shot every time you click the shutter, there will inevitably be times where the photos you take with your digital camera can use some touching up—anything from removing red eye to cropping out unnecessary portions of the photograph. Despite the fact that versions of Windows prior to Vista did not include this functionality for you (requiring you to purchase third-party software), Windows Media Player contains some tools that allow you to do basic image correction.
To fix a photo using the Touch Up tool, navigate to the photo inside Windows Media Player. Right-click on the image and select the Picture Details option. Now, click the Touch Up option and this will give you the following options to the left of the picture (see Figure 10.7):
Figure 10.7 Fixing a photograph in the Windows Media Center.
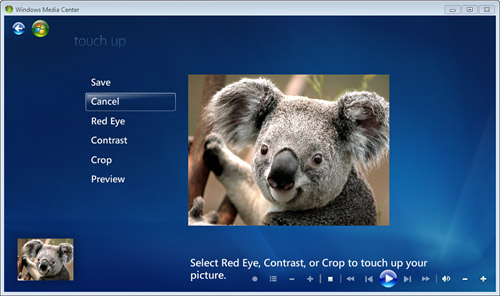
• Red Eye—Enables you to select an area of the picture for the wizard to remove “red eye” (caused by the flash bouncing off the retina)
• Contrast—Gives you a submenu allowing you to change the brightness and contrast of the picture
• Crop—Gives you a highlighted frame within the picture, allowing you to “cut out” unnecessary picture elements
• Preview—Allows you to take a closer look at the changes you’ve made before committing to them
Each of these tools automatically adjusts the aspects of the image for you. If you don’t like what Touch Up does, you can cancel the changes by clicking the Cancel button. If you want to save your changes, you will have no choice but to overwrite your existing image.
Printing Your Masterpiece
Windows 7’s Slideshow feature can show you your digital photos immediately. How about instant prints from your digital photos? By printing the photos on your own color printer, you can have pictures as fast as your printer can produce them and get them in a variety of sizes.
Tip
![]()
If you haven’t used your inkjet printer for a week or more, or your printouts are of poor quality, click the Utilities tab (if available) and run your printer’s head cleaning or nozzle test options with plain paper inserted in your printer (take out the photo paper until you’re ready to print a good print). Head and nozzle clogs will ruin your printout and waste expensive photo paper, and most recent printers also offer a cleaning routine on this tab. If your printer doesn’t have a menu option for head cleaning, check the instruction manual for the correct method to use. You might need to press buttons on the printer to activate a built-in head-cleaning routine.
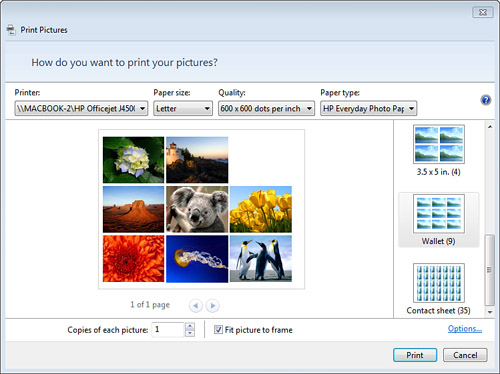
You can print photos from either the toolbar in a photo folder or the pull-down menu in a photo folder. To make prints from the digital pictures stored on your computer, simply select the photos you want to print (use Ctrl+click or Shift+click to select individual photos from the folder, or you can use Ctrl+A to select all of them) and click the Print button. This brings up the Print Pictures dialog box, shown in Figure 10.8.
Figure 10.8 Options for printing a picture.
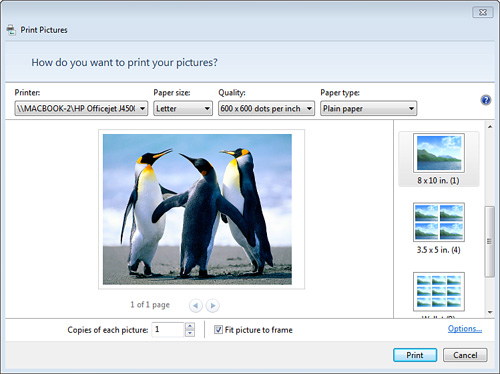
From here, you can modify the options that control how and where the picture is printed. Above the picture you are printing, you can change the printer used, the paper size in the printer, and the print quality used. At the bottom, you can choose how many pictures are to be printed, as well as the option Fit Picture to Frame. If selected, this means that Windows will resize the picture so that it fills up the entire picture size selected on the right side of the window at the expense of cropping out some of the top and/or sides of the photograph. When deselected, it will print the original photograph in its entirety but will leave whitespace at the top and/or sides of the frame, where the photograph does not exactly fit the photograph size selected.
Along the right side of the Print Pictures window, you will see several options for how the printed photographs will fit on the paper selected. As you choose different finished photograph sizes on the right, the picture preview in the middle of the window will change to reflect how the photos should actually appear on the paper when printed, as reflected in Figure 10.9. If you choose fewer photographs than are available for the layout chosen, Windows will leave blank space on the photo sheet to conserve ink in your printer.
Figure 10.9 We are printing fewer pictures than are available in the format chosen, and thus Windows leaves blank spaces on the sheet.
Tip
![]()
For best picture quality, it is generally recommended to leave the Fit Picture to Frame option selected. If you want exact control over what is displayed in the picture, use the Edit picture option in Windows Pictures Library.
Poor Print Quality with Digital Photos
![]()
If you find that your digital photos look terrific onscreen but are poor quality when printed, there are three major factors that control digital photo quality—any of which could be the culprit:
• Camera settings
• Printer settings
• Paper type
Get any of these wrong, and you won’t get the print quality you want.
Your digital camera should be set to its highest quality and resolution settings, especially if it’s a 2-megapixel or lower-resolution camera. Highest quality uses less compression to avoid loss of fine detail (more space is used on the flash memory card per picture than with lower quality settings), and highest resolution uses all the pixels to make the picture (again, requiring more space on the flash memory card per picture). If you use your camera to create pictures for use on the Web, the lower quality and resolution settings are fine, but printed pictures need the best quality available. Remember that your monitor needs just 96 dots to make an inch, whereas most inkjet printers put 600 to 1,200 dots into the same inch. So, a picture that’s just right to fit on the screen doesn’t have enough detail to print well.
Similarly, the printer should be set for the best quality setting that matches the paper type. If you’re planning to print “knock-’em-dead” digital masterpieces, be sure to use photo-quality paper and set the printer’s options accordingly. Just want a quick snapshot for the refrigerator? Use plain paper and set the printer for plain paper. Mismatch print type and paper type and you’re sure to have problems because inkjet printers calculate how much ink to use and how to put it on the paper according to the options you select.
Remember, high-quality printing takes time; several minutes for an 8×10-inch enlargement on photo paper with high quality settings is typical.
If your digital camera is only capable of 2 to 5 megapixels, it’s time to upgrade; 7 to 10 megapixel (also called 7–10MP) cameras are as cheap as ever and the storage needed to support those large images is also dirt cheap. You can generally find 8 to 16GB SD, xD, miniSD, or microSD (these sizes also add the term HC, or High Capacity, to the name) cards for as little as $30–$50. It’s all the more mind boggling when you realize that an 8GB microSD card, about half the size of a key on a laptop, can be had for as low as $20. So, before you start collecting more low-grade images of your family, take a gander at the $100–$150 offerings in the camera section at your local big box store. Make sure to pick up some storage cards at the same time.
Sharing Your Photos with Others Electronically
Windows Windows Pictures Library supports two methods of sharing your photographs with others without having to print them out—emailing and burning them to CD/DVD. This section touches on the first of these methods. To learn more about creating a CD or DVD with Windows Pictures Library, see the next section “Burning Your Pictures to CD or DVD.”
Tip
![]()
Windows Mail is no longer included in Windows 7. It is a part of the Windows Live software set, which you can download from Microsoft for free. It’s now integrated into Windows Live, but it still supports a wide range of email account types and advanced email management functions, including improved handling of email messages that include images. There is additional information on Windows Live in Chapter 15.
Emailing photographs is straightforward; you select the pictures you want to email and choose E-mail from the toolbar at the top of the window. You are then given the option of resizing the files to a lower resolution to make them smaller and therefore easier to send to someone as an email attachment. The Attach Files dialog box defaults to 1024×768, which is a good standard size—however, you can size them to any resolution from 640×480 to 1280×1024, or choose to leave them at the same resolution as the source. Whichever resolution you choose, the Attach Files dialog box will give you the size in megabytes of the attachments.
After you have decided on a picture resolution, click the Attach button. Windows Pictures Library will then resize each of the pictures and open a new email message in the default email program (which, by default, is Windows Mail) with each of the photos as a separate attachment to the email. All that’s left to do is address the email, edit the subject and text, and click Send.
Burning Your Pictures to CD or DVD
There are times where you might think, “Having pictures on the computer is great, and I really like the printed photographs, but how can I keep my pictures in a more permanent format?” If you have a CD-RW or DVD-RW drive in your computer (most modern computers come with one by default), Windows 7 can help you create a photo disc so that you can keep your digital masterpieces safe from the hands of time, or the destructive power of the next big Internet worm.
The integration of Windows Photo Gallery and Windows Explorer as the Windows Libraries in Windows 7 means you can burn files to disc in one convenient place. Fortunately, Windows actually knows which files are images and which are not.
Writing Photos to CD Using Windows Explorer
When Windows 7 detects a supported CD-RW or DVD-RW, it asks you whether you want to write, or more commonly, burn data to it. Your options are to use it as a thumb drive (Read/Write) or as a storage medium (Read Only). Here’s how to use it:
1. If you want to copy only some of the pictures in your folder, select the pictures you want to copy and then insert a blank disc into your CD/DVD drive.
2. To copy all photos in the folder to CD, don’t select any pictures first. Insert a blank CD or DVD into your CD/DVD drive. When you are done with the Setup Wizard, all items inside of your Windows Pictures Library will have been added to the disc. You will be warned that the disc you inserted does not have enough space to hold all of your media items.
3. You will be prompted to name the disc. Do so and click Next.
4. The pictures are copied to the CD or DVD, depending on the method you selected.
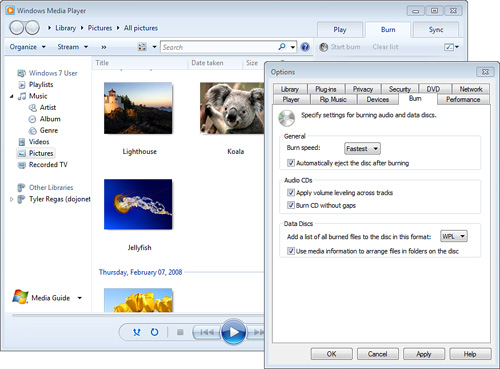
5. If you are having problems making a CD successfully, adjust the speed used by your drive to record data. The easiest way to do this is to open Windows Media Player; click Organize, Options; change to the Burn tab; and change the burn speed to a slower speed (see Figure 10.10).
Figure 10.10 Selecting a lower burn speed on a CD-RW drive that lacks buffer-underrun protection.
Your photo folders act as regular folders after they’ve been copied to the CD. If you want to use the special imaging features, such as Slideshow or photo printing discussed earlier in this chapter, select a file in the folder and choose File, Preview. The picture is loaded into the Windows Photo Viewer, which has buttons for photo printing, slideshows, image rotation, editing, and other imaging options.
Making CDs and DVDs from Windows Media Player
When you first start Windows Media Player, select the Burn tab. From there you can select the photos you want to burn to recordable media and drag them to the sidebar. When you click the Start Burn button Windows Media Player burns the selected items to disc based on your settings in the Options dialog box.
Which Output Option to Use
Obviously, you must choose the output option that best suits the intended audience. Who is the audience for your photo CD or DVD? Are you sending images to Granddad to play back on his DVD player in the living room, or are you preparing a slideshow for an important business meeting that will be played on a computer? Compatibility is the name of the game when it comes to sharing recordable CDs and DVDs, as you probably know. Target your audience and keep in mind that there are many firmware differences between different brands, models, and vintages of CD and DVD players that determine whether they can play back a disk. Send up a test balloon (send your colleague a couple example disks) and make sure your intended audience can read it. Few things are more disconcerting than having a crowd of people gather to see your show and all you have to share is a blank screen.
What Is This Blu-Ray Thing?
Now that CD-R, CD-RW, DVD-R, DVD+R, DVD-RW, and DVD+RW are all supported standard disc types and very few optical drives are incapable of, at the very least, burning a CD-R, there’s only one new place to go: Blu-Ray. Blu-Ray is an optical disc storage technology developed by Sony. The process uses blue lasers, something which was impossible just five years ago, to write huge amounts of data to a disc the same size as your standard CD-R. A single-layer Blu-Ray disc (BD) can hold up to 25GB of data, while a dual-layer BD (which isn’t any larger than a single layer) can hold 50GB. A dual-layer DVD can hold up to 8.5GB, so you can see why Blu-Ray is becoming important. Many computers are starting to come with Blu-Ray drives that are still capable of dealing with all of the older disc formats, as well. Just be aware that Blu-Ray media isn’t cheap yet, and that if you burn a Blu-Ray disc, you’ll want to make sure your recipient has a Blu-Ray–compatible player to play it on.