
15. Email and Newsgroups with Windows Live Mail
Choosing an Email Client
From the start, the Internet has been touted as a means for enhancing human communications, and among the many communication protocols available in the online world, few have had the impact of electronic mail (email). You already know email and Web (its official protocol name is HTTP), but do you remember FidoNet, NNTP, Gopher, UUCP, Archie, Jughead, Veronica, or WAIS? All of these are, in one form or another, antiquated methods of communicating over the Internet. AOL had its own technologies, which weren’t compatible with CompuServe’s or Prodigy’s technologies. Email was the great level playing field which was available to all, so it became the standard we now know.
To fully understand the nature of email, keep in mind that, at its most basic level, it is simply a way for users to send messages to each other over a network. This network could be a local area network (LAN) run by your company using Microsoft Exchange Server software. In this situation, the network server manages all message traffic. The server can also act as a gateway to other servers, allowing you to send mail beyond the LAN. If you have an email account with an Internet service provider (ISP) or other Internet-based service, the provider’s server acts as your gateway to other mail servers across the Internet.
Given that email is here to stay, you must decide which email client you plan to use for reading, composing, and sending messages. A number of options are available to you, and which one you ultimately choose will depend not only on your personal preferences but also on professional needs. This choice is made all the more critical because Microsoft has removed Outlook Express from Windows 7. In fact, Windows Mail, MSN Messenger, and Photo Gallery are no longer part of Windows 7. To have access to these programs, you must download the Windows Live Essentials package of applications from Microsoft.
Note
![]()
While it is neither convenient nor intuitive to have to download it, Windows Live Essentials is an excellent set of programs, and it’s free. Windows Live Essentials includes: Messenger for IM, Mail for email, Writer for blogging, Photo Gallery for image management, Movie Maker for making movies, Toolbar for Internet Explorer, and Family Safety to help keep your kids safe.
Windows Live Mail is a multifeatured program designed to appeal to a variety of email users, but it isn’t for everyone, especially if you work in a corporation that requires tight integration of email with its communications infrastructure (for example, mobile communications devices such as the iPhone, BlackBerry, Palm OS or WebOS, Symbian, and Windows Mobile smartphones). Windows Live Mail can also function as a newsgroup client, making it a “one-stop” program if you routinely communicate via email and use newsgroups.
Windows Live Mail includes some important improvements over its predecessor, Windows Mail from Windows Vista, although it is essentially an update of the same program. One of the most significant additions to Live Mail is the inclusion of a calendaring system, which makes Live Mail more like Outlook than ever before.
Tip
![]()
If you use a Windows Mobile device as your smartphone, you also have received a copy of Outlook along with your handset. You’ll need this copy because ActiveSync, the software that synchronizes your desktop to your handset, won’t work with anything else. If you prefer, however, you can still install Windows Live Mail and use it for other email accounts.
Windows Live Mail Quick Tour
Because covering the many different email clients available would be beyond the scope of this book, we will assume that you have chosen Windows Live Mail. You can download it, as well as a series of other helpful applications, for free and it will meet many, if not all, of your email needs.
Getting Windows Live Essentials
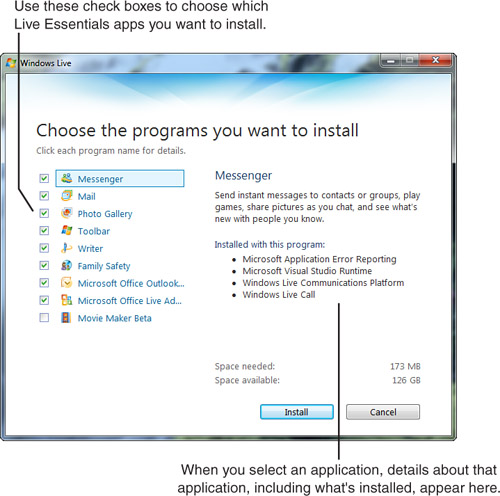
Once you have an Internet connection configured and can access websites, go to www.windowslive.com and download Windows Live Essentials for free. The initial download is just the installer (1.08MB). The speed of your Internet connection and the components of Windows Live Essentials you choose will determine how long it takes for the installation. By default, all components are selected (see Figure 15.1) except Movie Maker Beta, for a total of 164MB. If you have Outlook installed, it will also offer you the Outlook Connector and the Office Live Add-in (which requires a free Office Live account). If you choose everything, including Movie Maker Beta, the download is 184MB. If you’re still on dial-up, I would start the process before you “close shop” for the night. It should be done by morning.
Figure 15.1 Windows Live Essentials program selection screen in the installer application.
Launching Windows Live Mail
After Windows Live Essentials is installed, it will be located in your Start menu. You can launch it by clicking Start, All Programs, Windows Live, and selecting the Windows Live Mail item. Once it’s running and you can see its icon on the taskbar, right-click the icon and select Pin This Program to Taskbar so that it will always be available there.
Setting Up an Email Account
Before you can send or receive email, you need to have an email account. Microsoft assumes that when you download Windows Live Essentials you have a Windows Live account. There is also a good possibility that your account has already been set up for you by your ISP. You’ve likely been using an email account for some time. If that account happens to be from one of the numerous free online providers, all the better.
Wherever you get your email from, Windows Live Mail can likely handle it rather easily. If you have a Hotmail, Messenger or MSN Messenger, Windows Live, Xbox Live, or even an old Passport account, you can log in to Windows Live. If you don’t have any of these accounts, you can create one for free at www.windowslive.com. You can sign up for an @live.com or @hotmail.com address or, such as Passport used to allow, you can use your own email address.
Note
![]()
As you likely know, Windows likes to have default programs for certain tasks. If you use Internet Explorer and then install Firefox, the new application will ask you if you want to make it the default application for web browsing. If you make that change and then go back to IE, it will ask if you want to make it the default again or to just stop asking. Email works the same way. Windows 7 doesn’t come with a mail client, so the first one you install becomes the default. Since you’re installing Windows Live Mail as part of the Essentials package, Windows Live Mail becomes the default. You can even manage the applications Windows uses as default for various file types and tasks by going to Start, Control Panel, and opening the Default Programs item. Once that opens, click the Set Your Default Programs link.
When you run Windows Live Mail the first time, the New Account Wizard will run to walk you through setting up access to your account. These steps also work for setting up a second or third account on the same machine:
1. If this is your first time starting Windows Live Mail, skip to step 2. If you have already configured Windows Live Mail for an email account and would like to add another, click the Add Another Email Account link in the sidebar. You’ll see the dialog box shown in Figure 15.2.
Figure 15.2 Starting the New Account Wizard to set up your email account.
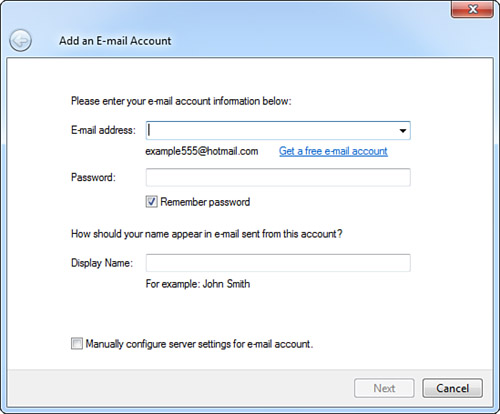
2. Enter your email address, that account’s password, and your display name (for example, Simon LeBon, Eric Idle, or Darth Vader), and then click Next.
3. If Windows Live Mail recognizes the service provider you have entered, it already knows how to reach those servers and will complete the configuration automatically. In most cases, however, Live Mail can generally figure out your mail server settings by using a kind of “best guess” technology. If it is capable of doing so, click Finish. If not, you will receive the server configuration pages and jump to step 4. You should have this information from your ISP or email service provider (you may also choose to do this manually if you prefer).
Tip
![]()
Most ISPs provide this information on their websites. So if you cannot locate the documentation you received when you signed up for service, your easiest option is to visit your ISP’s website to find your incoming and outgoing email server names.
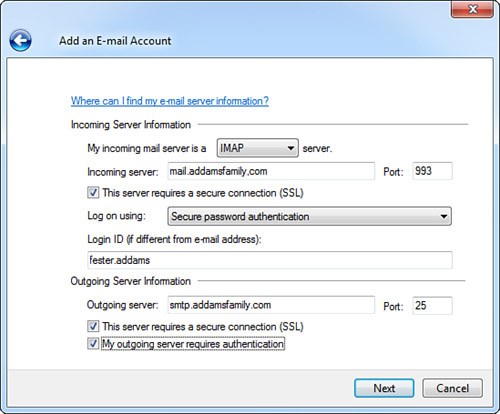
4. The next wizard box asks for your incoming mail server type (either POP3, IMAP, or HTTP), the address of your mail server and whatever settings it requires to allow you access, what your username is, and how to connect to the outgoing server (see Figure 15.3) as well as any other settings specified by your provider. Click Next.
Figure 15.3 Enter your mail server details here. This information should have been supplied by your ISP or other email provider.
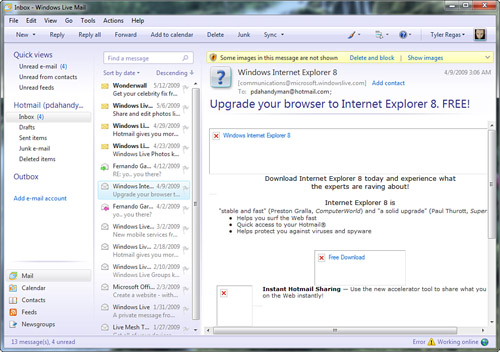
5. If you have successfully configured the account by filling out the dialog box, you will be informed that you have completed the setup. Click Finish. You will know for sure once you click Finish and Windows Live Mail tries to connect to the server (see Figure 15.4).
Figure 15.4 Now you can see your email.
6. If any settings were not correct, you will not be logged in and you will receive warning dialog boxes alerting you to check your settings again. You can find these settings by right-clicking the account name in the sidebar and selecting Properties.
Password Trouble
![]()
If the server will not accept your password, you might’ve used the wrong letter case. Many email servers are case sensitive. If the Caps Lock key on your keyboard is on, you might have entered the password in the wrong case. Sometimes, an inadvertent space can be the culprit as well.
Reading and Processing Incoming Messages
Note
![]()
Secure Password Authentication (SPA) is used by some email services to prevent unauthorized users from getting or sending your email. When you attempt to receive your mail in Windows Live Mail, a screen will pop up asking for you to enter a username and password. Both Windows Live Mail and MS Outlook have this feature. Most email (POP) servers do not use this feature, so you should probably leave it turned off.
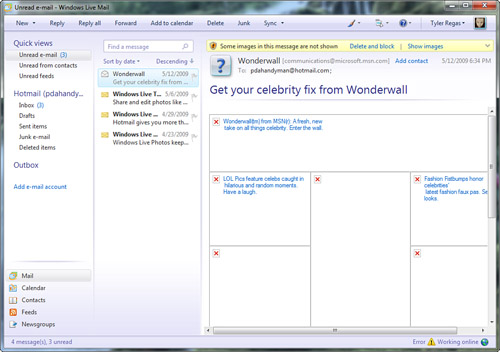
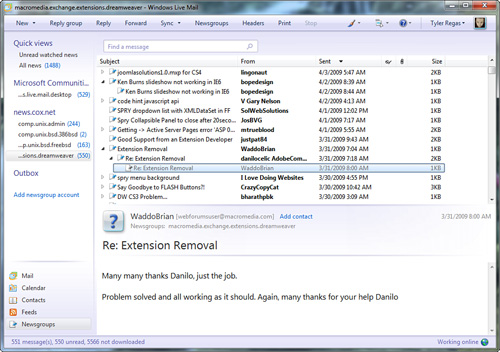
After you have an account set up, you are ready to begin downloading and reading mail. To get started, open Windows Live Mail and go to the Inbox. By default, Windows Live Mail automatically checks for new mail when it first opens. If your installation is configured otherwise, click the Sync button on the toolbar. As your mail is coming in, a dialog box appears indicating which account is being checked and shows the progress of the sending and receiving. It will also tell you how many messages are being transferred. New messages will then appear in your inbox as well as in the Unread E-mail Quick View folder, as shown in Figure 15.5.
Figure 15.5 The Unread E-mail Quick View has three new messages and is displaying the first message, which was marked unread but now is marked as read because it appears in the viewer pane.
When you reply to a message, you need to be wary of a few things. First, note that if the incoming message was sent to a group of people, clicking the Reply button will send your message to the single person who sent it to you; clicking Reply All will send your message to the entire list of people who received the original message. Although this can be a helpful tool when communicating with a group of people, it could get you in trouble if you think you are writing to a specific person and accidentally click the Reply All button. Before you send any message, make sure the correct person or persons are listed in the To: and Cc: fields. Anyone listed in those two fields will receive a copy of the message as well as a list of the other recipients and their email addresses, so make sure you aren’t airing your dirty laundry more publicly than you intended. The section “Creating and Sending New Mail” later in this chapter discusses addressing messages more thoroughly.
Tip
![]()
Windows Live Mail does not show the menu bar by default; instead, it shows a small icon on the toolbar that sits between the icon of a paintbrush and a question mark on a small, round disc, all just left of the active email account selector. Just click and you will see Options and other items. You can make the menu bar appear from this menu, as well.
The rest of the reply process is straightforward. You just type in your own text and click Send on the toolbar when you are ready to deliver the message. By default, Windows Live Mail automatically places the text of the original message in the reply.
When you’re composing your reply, keep in mind these important points:
• Consider editing the quoted text in the reply by cutting it down to the text you actually intend to respond to. Most people don’t appreciate reading four pages of quoted text followed at long last by “Me too.”
• Include enough of the original text to help the recipient understand exactly what you are replying to. If the recipient doesn’t read your reply for several days, he might not remember what the original statements were.
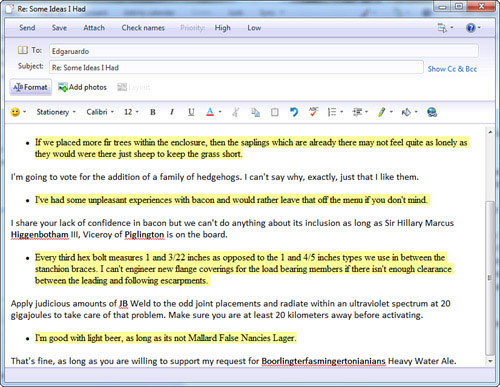
• Breaking up quoted text with your own inserted comments is usually acceptable, but make sure it is obvious which words are yours. Figure 15.6 illustrates this reply technique in a plain text message. Windows Live Mail inserts the > sign before each line of the email you’re responding to. In an HTML email (sometimes mistakenly called rich text), a solid vertical bar runs down the left side of the original text, and writing new text between paragraphs doesn’t break that bar, so it’s difficult to tell what text is newly written. In that case, use colored text or another font (choose Format, Font).
Figure 15.6 Highlighted text and reply text are interspersed throughout the message, but there is little doubt as to who wrote what.
Deleting Messages
How and when messages are deleted depends on what kind of mail server you use. If you receive mail from a POP server, deleted messages remain in the Windows Live Mail Deleted Items folder indefinitely, similar to “deleted” files in the Windows Recycle Bin. You can permanently delete messages by right-clicking the Deleted Items folder and choosing Empty ‘Deleted Items’ Folder from the shortcut menu that appears.
Note
![]()
Note that the term “delete” means that the message is removed from the server permanently and that “purge” means that it is removed from the current view and dealt with as determined by any rules you may have in place. For example, if you opt to have deleted messages moved to the Trash folder, it will be marked as deleted from the Inbox, but will appear in the Trash folder after it is purged.
You can change the way Windows Live Mail handles items in the Deleted Items folder. To do so, choose Tools, Options, and select the Maintenance tab to customize when and how mail messages are deleted. Note that you may need to set Windows Live Mail to show the menubar using the iconic Tools menu in order to see the full Tools menu, as described earlier in this chapter.
If you have an IMAP mail server, deleted messages are moved to an online Deleted Items folder or Trash folder, depending on what it’s named on the server itself.
Checking Mail in Multiple Accounts
![]()
If you have several mail accounts, but Windows Live Mail doesn’t check all of them when you click Sync, open the Properties dialog box for each of your mail accounts. On the General tab is an option labeled Include This Account When Receiving Mail or Synchronizing. Make sure a check mark appears next to this option for each of your mail accounts.
Creating and Sending New Mail
The process of creating and sending new mail is almost as easy as receiving it. To open a New Message composition window, click the New button on the Windows Live Mail toolbar.
Tip
![]()
In Outlook Express, you had to install Microsoft Word to have a spell-checking option when composing mail. In Windows Live Mail, spell checking is built in. Click the Check Spelling icon in the toolbar when composing a message (the button with ABC and a red check mark). Adjust your spelling options by going to Tools, Options, and clicking the Spelling tab.
Addressing messages properly is important. A single misplaced character, or an extra one, in an email address can send the message to the wrong person or to no one at all. Typical email addresses can look like these:
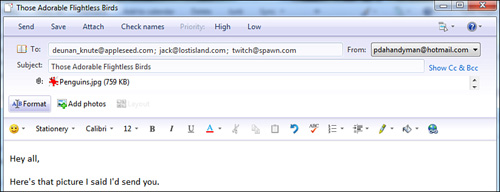
Notice that Windows Live Mail only has the To: address field that appears by default. The To: field is the only required field when sending email; all the others, including the Subject line and even the message body, can be blank. The To: field usually contains the email address of the primary recipient, although it can contain more than one address, as shown in Figure 15.7. Separate multiple addresses with a semicolon (;).
Figure 15.7 A new message with an attachment has been addressed to several people.
Tip
![]()
Some mail servers are case sensitive. If you’re not sure whether yours is, just type the whole address in lowercase letters.
To send email to several people, use the Cc: field. Cc: is short for Carbon Copy or, these days when that messy blue paper is nearly extinct, Courtesy Copy. To send to several people without allowing its recipients to see the names or email addresses of others who also received it, enter addresses in the Bcc: field (Blind Carbon/Courtesy Copy). To make the Cc: and Bcc: fields appear, click the link called Show Cc & Bcc at the right end of the Subject field.
Tip
![]()
It is a good idea to use the Bcc: field when you are sending an email to a large audience. This hides the addresses from prying eyes and potential spammers who might then pick up the addresses. Use the Cc: line if you are corresponding with a few people on a project and want everyone to be in the loop and be able to see everyone else’s address. This also allows any recipient to click Reply All and send a response to the group, whereas Bcc: does not.
When you are finished composing the message, just click Send on the toolbar. If you want to save the message for later editing, and not send it yet, click File, Save. The file is then saved in your Drafts folder, where you can open it again later, edit it, and send it.
Identity Crisis
![]()
What do you do if you don’t like the name Windows Live Mail uses to identify you in outgoing messages? The name Windows Live Mail uses could be indicative of several things. First, if you have multiple accounts or identities configured in Windows Live Mail, make sure you are selecting the desired account in the From: pull-down menu when you send the messages. You can also open the Accounts dialog box and check the settings for your email address(es). To open the Accounts dialog, you will need to activate the Show Menu Bar option in the Tools menu. The Name field under User Information on the General tab is the name used to identify you on outgoing mail.
Sending and Receiving Attachments
Of the many features that make email a versatile method for communication, perhaps the most useful is the capability to send files along with an email message. You can attach any electronic file stored on disk to an email message in Windows Live Mail and then send it to someone else.
Note
![]()
Some email accounts do not allow you to send or receive file attachments with messages. Others, particularly HTTP accounts, limit the number and size of attachments allowed. Check with your account provider to find out whether you have this capability. Also, make sure that the recipient has the capability to receive attachments.
Attaching a file to an outgoing message is easy. In the message composition window, click the Attach button on the toolbar and locate the file you want to send in the Insert Attachment dialog box. After you have selected the file, click Attach. The file attachment should appear in the header information, as shown earlier in Figure 15.7.
Before you send any attached files, consider the bandwidth it will require. Even if you have a fast network or Internet connection, if the recipient connects to the Internet via a dial-up modem, downloading the attachment could take a long time. In general, you should avoid sending any attachments that are larger than 1 or 2MB unless you are sure the recipient’s connection can handle them or that the recipient knows in advance that they’re about to receive some rather large files. It’s best to ask your recipient first. Many mail servers (especially web-based accounts) limit the total amount of space a person can use, and many also set a limit to the size of attachments allowed (often capping the attachment size at 1 or 2MB, though some high-speed servers such as Comcast cap it at 10MB at the time we wrote this).
One more thing: If you or the recipient uses a 56Kbps or slower Internet connection, it is usually a good idea to compress large attachments before you send them. Simply right-click the document(s) you wish to send, choose Send To, and then Compressed (Zipped) Folder. Attach the compressed version to your email.
Tip
![]()
Here is a tip that can save you a significant amount of cash. You can view and print Microsoft Word, Excel, PowerPoint, and Visio attachments without having to purchase Microsoft Office. You can’t edit the documents, but you can view and print them. All you need to do is download the free Word, Excel, and PowerPoint viewer programs from Microsoft. Go to www.microsoft.com/downloads and search for Office viewers.
To open an attachment in a message you receive, right-click the attachment (listed in the header) and choose Save As to save it to disk, or Open to simply open it. If the attachment is a picture file, it often appears in the body of the message as well, depending on the format of the image file.
Guarding Yourself Against Email Viruses
Computer viruses often propagate themselves through email attachments. Hackers seem to get their jollies out of slowing down the Internet or bringing corporate business to a crawl. One way to do this seems to be to target the most popular email programs, such as Outlook and Windows Live Mail’s predecessor, Outlook Express. As a result, the bulk of email-borne contagion exists in the form of attachments whose payloads prey on the weaknesses in those two programs. Personally, I think that both these programs are excellent email clients, so I don’t suggest changing your email program just to avoid the onslaughts of malicious Internet hackers.
As you might suspect, Microsoft doesn’t want to lose customers either, so it makes a point of looking for viruses and posting critical updates to its site for easy download. A good approach is to run a Windows System Update regularly. Automatic Updates are turned on for just this reason.
In addition, security has been improved in Windows Live Mail to specifically combat this problem. By going to Menus, Safety Options, you’ll notice a wide range of new options for protecting yourself from malicious email. On the Security tab you will note that Windows Live Mail offers an option to warn you if another program attempts to send a message appearing to be from you. As you may be aware, this is a common way for viruses to spread. I recommend that you keep this option selected.
There is also an option that deals with potential threats from incoming email attachments. If you click the box next to Do Not Allow Attachments to Be Saved or Opened That Could Potentially Be a Virus, you’ll be more protected, but your ability to access any attachment to email in Windows Live Mail will be limited. If you’re diligent about it, a better way of dealing with the possibility of attachment-borne viruses is to carefully look over your incoming email before opening any attachment, following the tips presented a little later in this section. I’ve found that when enabling the automatic feature in Windows Live Mail, even the most innocuous attachments are prevented from opening. (You can regain access to these attachments simply by returning to the Security dialog box and deselecting this option.)
Yet another option is to download and use one of many available antivirus programs. A reliable source is www.mcafee.com, and its website is another good place to check for the latest discovered viruses and how to protect your computer from them. I like a freebie called Avast (www.avast.com) and have had good luck with it for several years. AVG also offers a free version of its commercial package. You can find it at http://free.avg.com.
![]() For help dealing with junk mail and spam and phishing emails, and for information on protecting your computer from viruses, adware, malware, Trojans, and all other manner of invasive mischief, see Chapter 30, “Protecting Windows from Viruses and Spyware,” and Chapter 33, “Protecting Yourself from Fraud and Spam.”
For help dealing with junk mail and spam and phishing emails, and for information on protecting your computer from viruses, adware, malware, Trojans, and all other manner of invasive mischief, see Chapter 30, “Protecting Windows from Viruses and Spyware,” and Chapter 33, “Protecting Yourself from Fraud and Spam.”
Contrary to popular belief, simply downloading an infected attachment virtually never harms your computer. With few exceptions, it is only if you open an attached executable file that there could be dire consequences. If possible, save the file attachment on a separate disk and then scan it with antivirus software.
Be especially wary of the following:
• Attachments you weren’t expecting (even from people you know). If in doubt, write back to the sender and ask whether they intended to send you the attachment. Their computer may have a virus they are unaware of. Ask whether the attachment is safe and whether they’ve run it on their computer.
• Executable attachments (filenames ending in .exe, .vbs, or .js). Be aware that sometimes filenames are misleading on purpose. For example, you might see an attachment such as party.jpg.vbs. This is not a picture. The final extension (.vbs) is the one that counts.
• Emails with cryptic or odd subjects and messages, such as “I Luv U,” “Here’s that document you requested,” or “CHECK THIS OUT!!!”
• Anything that comes from a source you are unfamiliar with.
Setting Up a Signature
If you use email for much of your personal and business communication, you may like to “sign” outgoing messages with an electronic signature file. These signatures frequently include additional information about you, such as an address, title, phone number, company name, web URL, or a witty quote. Windows Live Mail makes it easy to set up a standard signature that will be included in every message you compose. You can configure your own signature by following these steps:
1. Choose Menus, Options. Click the Signatures tab, shown in Figure 15.8.
Figure 15.8 You can create a standard signature for your outgoing messages here.
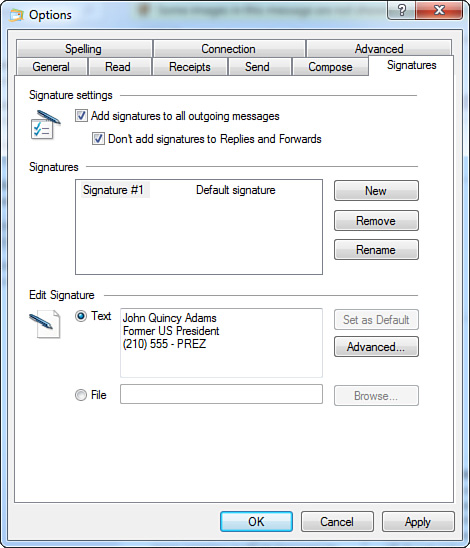
2. Click New to begin typing a new signature. Type your signature information.
Tip
![]()
Consider creating several signatures, with varying levels of personal information. You can then choose a signature in the message window by selecting Tools, Insert Signature in the message composition. If you have more that one signature configured, you will see a menu allowing you to select from the available choices.
3. If you have multiple email accounts, click Advanced and select the account or accounts you want this signature to be used with.
4. Place a check mark next to Add Signatures to All Outgoing Messages to enable this feature. Notice that, by default, your signatures will not be added to replies and forwards. Click OK when you’re finished.
Using the Windows Live Mail Contacts
You don’t have to communicate via email for long before you mistype someone’s address. Suddenly, spelling has become more important than ever before. Your local mail carrier can direct your parcel to you when the label is misspelled, tattered, and torn, but email with a misspelled address just gets bounced back to you or lost in the black hole of the “catch-all,” an account designed to receive incorrectly addressed email. Email addresses can also be cryptic and long, and a very rare few are even case sensitive. The Windows Live Contacts list (previously called Address Book in Outlook Express and Windows XP) feature in Windows Live Mail is a big help with all of this.
You can open Contacts in its own window by clicking the Contacts item in the sidebar.
Adding, Editing, and Removing Entries
A foolproof way to add someone to your Contacts is by doing the following:
1. Open a message sent to you by someone you want to add to the Contacts.
2. Click the Add Contact link that appears to the right of the address you want to add to your contacts.
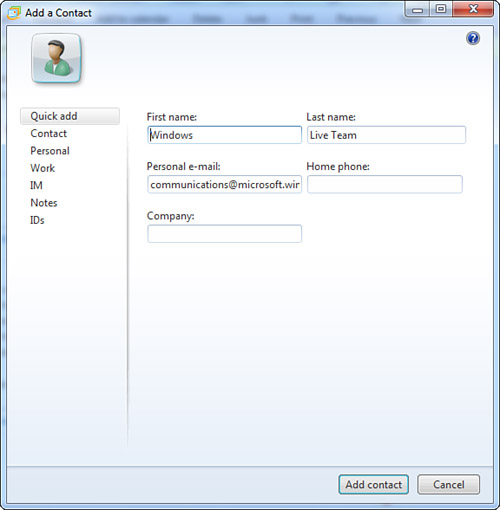
3. An Add a Contact dialog box opens for the entry, as shown in Figure 15.9. Go ahead and fill out as much of the form as you can now. You will save yourself a load of time later.
Figure 15.9 Go through all the tabs in the Add a Contact dialog box and enter any information about this contact you feel appropriate.
You also can add someone to your Contacts the old-fashioned way—that is, manually from a business card or other source. In Windows Live Mail, click the Contacts icon to open the Contacts list. Click the New button and the Add a Contact dialog box opens for you to enter information.
To edit a contact later, click again on the Contacts item in the sidebar to open the Contacts list. Select the contact that you want to edit by double-clicking that person’s name. The Properties dialog box now opens with a summary of that person’s contact information. To change or add information, you need to click one of the other tabs along the side of the dialog box—the information cannot be changed on the Summary tab.
You might find duplicate listings or unwanted contacts in your Contacts. Deleting a contact is simple: Just highlight the entry and click Delete (on the toolbar). Be certain you’ve selected the correct contact, because this action cannot be undone.
Dealing with Spam
A hot topic in email circles today is the subject of commercial advertisements that are mass delivered via email. This type of unsolicited mail is generally referred to as spam, a name attributed in Internet lore to a Monty Python musical skit pertaining to the pink meat product of the same name. This type of mail is so offensive to some people that a few states have even enacted laws against it.
Some groups are also working with the U.S. federal government to ban unsolicited email and place identification requirements on people and organizations who send advertisements via email. Countless antispam organizations exist, with one of the foremost being CAUCE, the Coalition Against Unsolicited Commercial Email (www.cauce.org).
The real problem with spam is that scam operations are rampant and difficult to detect. Spam also has an impact on Internet traffic, requiring a considerable amount of bandwidth that many people feel would be better used for other purposes.
If you have been online for more than an hour, you’ve almost certainly received some spam yourself. Windows Live Mail has a Junk Mail filter inherited from Outlook that uses massive amounts of data collected by Microsoft’s Hotmail service to help differentiate junk mail from real mail. As a default, it is turned on.
Before mail comes into your Inbox, it is analyzed by the Junk Mail filter using the latest information supplied by Microsoft through online updates. It then moves suspected junk mail into the Junk Mail folder for you to examine later. I do recommend that you visually scan the Junk Mail box once a day until you become convinced that it’s not eating up real emails that you would otherwise miss.
If an email has been mistaken as spam, right-click it and choose Mark As Not Junk. It will be moved to the Inbox. If you want to prevent the next email from this sender from going into Junk Mail again, right-click the email and choose Add Sender to Safe Sender’s List. This puts them in your “white list” of valid senders.
Newsgroups and the Internet
With the overwhelming and still growing popularity of the Web since its inception in the early 1990s, you might easily forget that the Internet was around for more than two decades before the first web page saw the light of a cathode ray tube. Before the inception of the Web, people used the Internet to access newsgroups. Newsgroups began in 1979 as a forum in which UNIX users could communicate with each other, and the concept grew steadily from there into what is now a global assemblage of people sharing information on virtually every topic imaginable.
Originally, news servers exchanged articles using UNIX-to-UNIX Copy Protocol (UUCP), which involves direct modem dial-up over long-distance phone lines. In 1986, the Network News Transport Protocol (NNTP) was released, allowing news to be transported via TCP/IP connection over the Internet. Most modern newsgroups use the NNTP protocol, and it is the only news protocol supported by Windows Live Mail.
Newsgroups are scattered on servers around the world, and the rough network used to carry newsgroup bandwidth is generally referred to as Usenet. We’re not implying, however, that some authority provides oversight of Usenet. “Usenet is not a democracy” is one of the first statements you will read in virtually any primer or Frequently Asked Questions (FAQ) list on the subject, alluding to the virtual anarchy in which this medium exists. Usenet has become so large and diverse that a simple definition cannot possibly do it justice.
What we can do, however, is roughly describe the types of newsgroups and news servers that you can access using Windows Live Mail. Basically, the administrator of your news server determines which news feeds you will have access to. Feeds are passed along to the server from adjacent servers, providing a decidedly decentralized structure to Usenet. Each server maintains a list of message IDs to ensure that new articles are received at a given server only once. An individual server can control which feeds it propagates, although the interconnectivity of Usenet servers ensures that a lone server has little or no control of the overall distribution. Thus, the authority of a news server is generally limited to what clients (that would be you) can access and what kind of material those clients can post. Likewise, the decentralization of servers means that an article you post may take hours—or even days—to circulate among all other news servers.
A free alternative to commercial news servers is a web-based news service, such as the one created by groups.google.com. An advantage of using a web-based news service is that a search brings back results from many newsgroups, not just one. It’s a terrific way to find expert postings on just about anything from open-heart surgery, to child adoption, to what people think of the new car you’re considering buying. However, messages are not brought into your news client program (such as Windows Live Mail) for reference offline.
Note
![]()
The terms newsgroup and Usenet are used almost interchangeably in today’s online world, but it is useful to know that newsgroup refers to individual groups, whereas Usenet refers to the entire network of groups as a whole.
Many folks still use newsgroups and want a decent reader and newsgroup message composer that works more like an email program. It’s also noteworthy that Microsoft has rethought newsgroups a bit and has some useful offerings in the way of help information on all its products, by way of Microsoft Communities, a set of super newsgroups with new features.
Locating News Servers
Many ISPs and companies provide news server accounts to their Internet users, but you still might find yourself looking for a server on your own. This might be the case even if you have a news account available to you; some service providers censor the news content that is available, and if you want uncensored news, you must rely on a different source.
Censorship, Big Brother, and NNTP Servers
![]()
News feeds are censored for a variety of reasons. For example, your company’s server might restrict feeds from alt., rec., and talk. groups to reduce the number of work hours lost to employee abuse or simply to reduce bandwidth. Many other servers restrict feeds that contain pornographic content for both legal and moral reasons.
Even if your news server provides a relatively unrestricted news feed, you should exercise care when deciding which articles you download from the server. Virtually all servers maintain logs of the activities of each login account. This means that your service provider can track which articles you download, and in most cases these logs can be subpoenaed and used against you in court.
In other words, Big Brother might be watching you download porn, bomb-making instructions, and bootleg copies of the latest Hollywood blockbuster. Be especially paranoid if you access a company news server; hours spent receiving otherwise legal content such as fruitcake recipes, Bill Gates jokes, and the like could still land you in hot water if the boss is monitoring your online activities.
Many news servers are available through virtually any Internet connection, but you’ll pay for that connection. Typically, monthly charges for a personal news server account range from $2 to $20 per month and get higher for corporate or higher-bandwidth accounts. If you plan to use newsgroups frequently, you might want to factor in this cost when you’re shopping for an ISP. You can find a good list of commercial news servers at http://freenews.maxbaud.net/forfee.html.
However, if you have an Internet connection and simply want a different news server, you can find a list of free news servers available online at http://freenews.maxbaud.net/newspage.html?date=today. The list of free servers can change daily.
Web-based news servers at the time of this writing could be found at http://newsguy.com/news.asp.
Newsgroup Isn’t Available on News Server
![]()
If a newsgroup you want to access isn’t available on your news server, click Reset List in the Newsgroup Subscriptions window. The newsgroup may be new and simply not shown in your current list. If the group still isn’t there, try contacting the ISP or other service that hosts the list and ask that service to add it. Often, new groups simply go unnoticed because so many of them are out there. Many news servers are willing to respond to such a request, unless they have a rule restricting or censoring the particular group.
Try paying for an alternative dedicated news server that does carry the newsgroup you’re interested in.
Setting Up a Newsgroup Account in Windows Live Mail
Before using newsgroups, you have to set up a news account in Windows Live Mail. Windows Live Mail actually comes with a newsgroup already set up, called Microsoft Communities, but it only has groups that pertain to Microsoft products, so you can write in for support on Windows 7, Office, and any other products. For real newsgroup reading, you have to configure a regular newsgroup account. Before you can configure your news account, you need to obtain a news server address, which should look something like news.domainname.com or possibly nntp.serviceprovider.com.
Your company might also have a news server account with a commercial provider. You can configure multiple server accounts in Windows Live Mail, just as you can set up multiple email accounts.
As mentioned earlier, a news server provides you with news feeds from other news servers. Which feeds are available to you depends on decisions made by your server’s administrator. For example, some news servers restrict feeds for all alt. (alternative) newsgroups because some of them contain highly objectionable material.
![]() If you do not have a news server you can access, see “Locating News Servers,” p. 409.
If you do not have a news server you can access, see “Locating News Servers,” p. 409.
To set up your account in Windows Live Mail, follow these steps:
1. Open Windows Live Mail, and click Newsgroups in the sidebar. Note the presence of the Microsoft Communities account already configured.
2. Click Add Newsgroup Account in the sidebar to open the wizard.
3. Follow the instructions in the wizard for inputting your display name and email address (the wizard might provide this information for you).
4. Type the name of your news (NNTP) server. If you don’t know the NNTP server name, contact your ISP or check its web page.
5. (Optional) You might have to log on to your news server with a password. If your ISP says you do, click that option in the box before clicking Next. You’ll be prompted to enter your username and password.
6. Click Finish. This finalizes your setup.
Tip
![]()
Although new newsgroups are created daily, the list that has been downloaded to your computer is static and doesn’t show new groups. The next time you click a newsgroup server in the left pane, you’ll probably see a dialog box telling you that new groups have been added since your last session, giving you the option of updating your list. To make sure you have a current list, right-click on a newsgroup server name in the left pane and choose Reset List.
Downloading the Newsgroup List
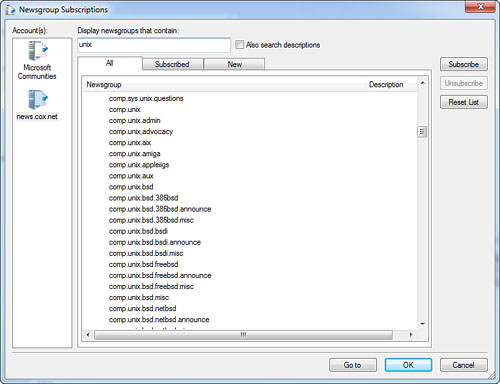
After you have set up the news account, Windows Live Mail’s next step is to download a list of newsgroups from the server. This is part of the “subscription” process. First, though, Microsoft asks whether it should search for Microsoft’s proprietary Communities technology that helps newsgroups work better. Doing this is your choice, but be aware that it doesn’t harm anything to search. When the list is finished downloading, it will look like Figure 15.10. (I sorted this list to show only newsgroups with the word “unix” in it, so your list will look different.)
Figure 15.10 Downloading the list of newsgroups.
Depending on the size of the list and the speed of your connection, downloading could take several minutes. You might have time to go get another cup of coffee. When the process is finished, the list is downloaded and you are ready to locate and subscribe to newsgroups. If your news server required a password and it was incorrect, you will be prompted again to enter it.
Finding and Reading Newsgroups
Usually, before you can read a newsgroup, you must first subscribe to it. A subscription simply means you’ve placed a bookmark of sorts in Windows Live Mail for that group, making it easy to return to and follow conversations whenever you are using Windows Live Mail.
Tip
![]()
If you don’t find a newsgroup that interests you, try a search at http://groups.google.com or another web source to see whether other groups not currently available on your news server exist. There is no such thing as a “complete” list of newsgroups, so a search of several different resources will yield the best results.
Before you can subscribe to a newsgroup, you must find one that piques your interest. Searching for a group in your downloaded list is fairly simple in Windows Live Mail (refer to Figure 15.10). As you type a word in the Display Newsgroups That Contain field, the list of newsgroups shrinks. You can experiment by typing a keyword you are interested in and pausing after each keystroke.
Newsgroups are usually—but not always—named descriptively. In Figure 15.10, where I used the term “unix,” you can see that all the groups listed have that term in its name.
Subscribing to Newsgroups
Windows Live Mail does not require you to subscribe to a group to view its contents. You can simply select a group from the list and click Go To to see messages posted to the group, but you might find it easier to manage the process by simply subscribing anyway. Subscribing to a newsgroup does not require any great level of commitment on your part because you can always unsubscribe with just two mouse clicks.
When you find a newsgroup you want to subscribe to, do the following:
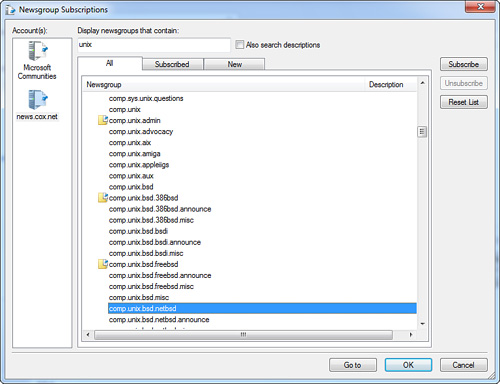
1. Click once on the newsgroup name to select it, and then click the Subscribe button. You may also double-click the newsgroup to subscribe or unsubscribe. Try it. An icon will appear next to the subscribed group names, as shown in Figure 15.11.
Figure 15.11 You can select a newsgroup and subscribe to it here. When you click Go To, this window automatically closes.
2. Click Go To at the bottom of the Newsgroup Subscriptions window. The window closes, and the 300 most recent posts are downloaded to your computer.
Actually, only the message headers are downloaded, and they appear listed in the window. The message contents are not downloaded until you choose to view a specific message.
Some Messages Are Unavailable After Synchronizing
![]()
If you synchronize a group but then find that some of the messages you click are unavailable, you should first check that the settings for the group are correct. If the group isn’t set to All Messages, and the Synchronize check box isn’t checked, this could easily explain the missing message bodies. Another possibility is that the message was removed from the host server sometime after the header list was distributed. It can take up to 72 hours after a message is physically removed before it disappears from the header list.
News servers only have so much disk space. To allow them to continually add incoming files to their lists, they must continually discard old files. If your server is missing a few articles, you may “ask” for a repost of the incomplete files, but while the poster is expected to service reasonable repost requests, there is no requirement to do so. Sometimes, a regular poster might not service repost requests at all, but will instead indicate an FTP, ICQ, or IRQ service where you can pick up missing files. And in many cases a repost request will be answered by a person who just happens to have downloaded the same file set and is willing to help support the group.
Finally, if you are doing everything right and your server is not gathering all the articles that were posted, consider informing your ISP’s support desk of the problem. It does not do any good to complain to everyone else in the newsgroup if you are not telling the few people who are actually paid to help you. Servers and the connecting routers are sensitive electronic equipment, and their only guarantee is that they will fail at some point. Help your ISP monitor the network.
If your server is poorly connected and misses a lot of articles, as stated previously, consider hiring a dedicated news service as a secondary server.
If you decide that you don’t want to remain subscribed to a group, unsubscribing is easy. Just right-click the group’s listing in the left pane and choose Unsubscribe from the context menu that appears. Alternatively, click the Newsgroups icon in the toolbar, choose the news server in question, and click the Subscribed tab. This will list all the groups you are subscribed to. Click a group, and then click Subscribe or Unsubscribe.
Reading and Posting Messages to a Newsgroup
When you first access a newsgroup, only the first 300 message headers are downloaded. You can download an additional 300 headers by clicking the Headers button in the toolbar.
Tip
![]()
Turn on and off the Preview pane by clicking View, Layout.
If you want to read a message, just click it and it will appear in the Preview pane. If you are not using the Preview pane, you can double-click a message to open it in a separate message window.
As you peruse the list of messages in the group, you need to understand the concept of discussion threads. A thread occurs when someone responds to a message. Others respond to the response, and this conversation becomes its own discussion thread. Messages that are part of a thread have an arrow next to them, and you can click this icon to expand a list of other messages in the thread. Figure 15.12 shows several expanded threads.
Figure 15.12 Threaded messages.
Which Messages Are New?
![]()
If you can’t tell which messages are new, open the Options dialog box by choosing Menus, Options. On the Read tab, place a check mark next to Mark All Messages As Read When Exiting a Newsgroup.
Posting messages to a newsgroup is simple. Perhaps the easiest way to post is to reply to an existing message. This process works much the same as replying to regular email, except that you must take extra care to ensure that your reply is going to the right place. Notice that the toolbar has a new button—the Reply Group button—as shown in Figure 15.12.
Caution
![]()
Information posted in newsgroups can be viewed by anyone, and we do mean anyone! Never post personal or sensitive information in a newsgroup.
Each reply button serves a unique purpose:

One aspect to watch carefully is that messages you post to a newsgroup are relevant. If the newsgroup is moderated, someone reviews all posts and removes posts deemed inappropriate. Look for a newsgroup FAQ for more information on netiquette (Internet etiquette) and any rules that might apply to the groups you are subscribed to.
Note
![]()
The default news message format is Plain Text. You should maintain this setting to ensure that your message can be read by other news readers.
Managing Messages
By default, Windows Live Mail is not configured to delete any messages from your newsgroups. If you would prefer that your newsgroups be cleaned up for you, you can set the option to delete messages from your computer and specify any number of days after you download them. Likewise, you can also set up Windows Live Mail to delete read messages every time you leave the group. You can review these settings by choosing Menus, Options. In the Options dialog box, click the Advanced tab, and then click the Maintenance button. The resulting Maintenance dialog box is shown in Figure 15.13.
Figure 15.13 Review your message management settings here.
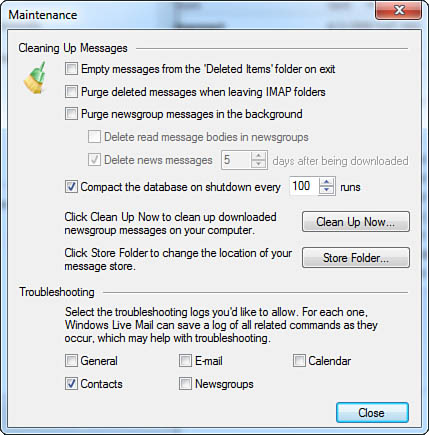
Message No Longer Available
![]()
If a message you read earlier appears to no longer be available, you may have configured Windows Live Mail to delete read messages a specific number of days after you have downloaded them. To change this option, click the Maintenance button on the Advanced tab of the Options dialog box to open the Maintenance dialog box shown in Figure 15.13.
If you want to maintain a record of the messages in your newsgroup, remove the check mark next to each Delete option. Messages remain in Windows Live Mail indefinitely if you deselect both of these options, but keep in mind that if the group has high traffic, these messages could eventually eat up a lot of disk space.