
23. Tweaking and Customizing Windows
GUI: To Tweak or Not to Tweak
Tweaking the GUI doesn’t mean anything lascivious. This chapter describes the graphical user interface and some interesting, useful, and fun stuff you can do with it—changes to help increase your computing efficiency and perhaps even make your computer more fun to use.
As you know, the GUI is the translator that interprets human input into commands the computer can interpret. It’s also responsible for displaying output from computer programs and the OS so you can understand the results. The Windows 7 GUI is set up with factory defaults that 90 percent of users will never touch, despite its being highly programmable and easily modifiable through the Control Panel, Folder Options, Properties dialog boxes, and so on. If you’re a GUI hacker (you know who you are) and all you want to do is get your work done, well, more power to you because you’re the one who’s going to get the pay raise. But playing with the GUI can be fun.
Most folks won’t modify their GUIs, but it’s a shame they don’t. Often, not even knowing there is recourse, users develop headaches from screen flicker, come down with eyestrain from tiny screen fonts, or live with color schemes they detest. They can usually rectify these problems with little effort, and have some fun choosing from hundreds of desktop themes, screen savers, wallpaper images, and so on. Likewise, means for managing zip archives, altering the right-click Send To options, and handling numerous other functions users have to deal with every day often take just a few clicks, a quick download, a Registry hack, or a setting change.
Screen Fonts Too Small
![]()
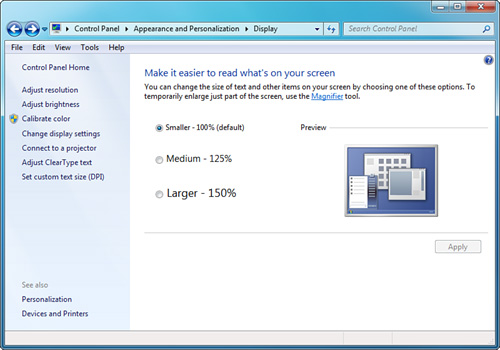
There are a couple of ways to fix screen fonts that are too small to read easily. The most common one is to decrease the screen resolution. However, on LCD monitors, as explained earlier, this is not the optimum solution. Leave the screen resolution on an LCD (including laptops) at the native resolution for the screen (check the manual); then tell Windows 7 to use a larger font. To increase the font size (up to 200%) of icons, the taskbar, menus, and other common Windows elements, do the following:
1. Right-click on the desktop and choose Personalize.
2. Click Display.
3. Select the Medium or Larger setting in the main pane, or click Set Custom Text Size (DPI) in the Tasks list.
Some of this chapter deals with standard display options. Other portions deal with deeper GUI tweaks and tricks. Just skim for the part that interests you.
![]() This chapter only briefly covers multimonitor support because it’s related more to hardware upgrades than the GUI. For coverage of multiple monitors, see “Installing and Using Multiple Monitors,” p. 790.
This chapter only briefly covers multimonitor support because it’s related more to hardware upgrades than the GUI. For coverage of multiple monitors, see “Installing and Using Multiple Monitors,” p. 790.
Start Menu Pizzazz!
The default Start menu of Windows 7 is similar to the Windows Vista version, and much improved over Windows XP and the old Windows 2000 style. For those of you who prefer the Windows 2000 menu—called the Classic Start menu—and want to keep using it, you’re out of luck. Microsoft didn’t include the option to switch to the Classic Start menu style in Windows 7 like it did in Vista and XP. But, if you’re willing to give the new look and feel a solid go, there are many nifty improvements you can take advantage of and even customize.
Tweaking the Start Menu
Tweaking the Start menu involves a right-click over the Start button (orb) to select the Properties command from the pop-up menu. This reveals the Taskbar and Start Menu Properties dialog box. The Start Menu tab is selected by default rather than the first tab—Taskbar—because you’re checking the Start menu’s properties.
Click the Customize button to open the Customize Start Menu dialog box, shown in Figure 23.1, which displays more than 50 options. The Customize Start Menu dialog box essentially lets you control how links, menus, and icons look and behave on the Start menu. Some of the options are
• Include items on the Start menu: Computer (enabled by default), Connect To, Control Panel (enabled by default), Default Programs (enabled by default), Devices and Printers (enabled by default), Documents (enabled by default), Downloads, Favorites Menu, Games (enabled by default), Help (enabled by default), Homegroup, Music (enabled by default), Network, Personal Folder (enabled by default), Pictures (enabled by default), Recent Items, Recorded TV, Run Command, Videos.
• Enable context menus and dragging and dropping.
• Highlight newly installed programs (enabled by default).
• Enable flyout menus for items such as Computer, Control Panel, Documents, Music, and Pictures when you click (or hover) on them, or treat those items as links and open a separate window showing the item’s contents. (See “Cascading Elements from the Start Menu” later in this chapter.)
• Search other files and libraries, selecting to search with (default) or without public folders. When entering as-you-type searches from the Start menu, Windows 7 will include public folders rather than just the files for the currently logged-in user.
• Search for programs and the Control Panel when performing as-you-type searches.
• Sort the All Programs menu by name automatically, which keeps the menu organized alphabetically.
• Display Administrative Tools, such as Event Viewer and Task Scheduler, on the Start menu.
• Choose between large (default) and small icons.
• Set the number of recently accessed applications to be displayed (the default is 10).
• Set the number of recent items to display in jump lists (the default is 10).
Figure 23.1 The Customize Start Menu dialog box.

Back on the Start Menu tab, you can select which action to take when the Power button is clicked. Your options are Switch User, Log Off, Lock, Restart, Sleep, Hibernate, and Shut Down (default).
Tip
![]()
If you want to return your Start menu settings to the factory defaults, there’s a shortcut. Just open the Customize Start Menu dialog box as previously described and click Use Default Settings.
Finally, you have two Privacy choices:
• Store and Display Recently Opened Programs in the Start Menu—Turn this off if you don’t want prying eyes to see which programs you worked with in the recent past.
• Store and Display Recently Opened Items in the Start Menu and the Taskbar—Turn this off if you don’t want others to see which items you worked with recently. These items are associated with jump lists on the Start menu, as described in Chapter 3, “The First Hour.”
Tip
![]()
Technically, almost everything on your Start menu can be found in C:ProgramDataMicrosoftWindowsStart MenuPrograms.
What doesn’t appear in this location is in the folder under Users, for example:
C:UsersEveAppDataRoamingMicrosoftWindowsStart Menu
You can modify those locations if you want to add shortcuts to or remove shortcuts from your Start menu. Remember, the Start menu is just a collection of shortcuts to programs and documents, not the actual files themselves.
With a bit of experimentation, you’ll find the combination of features that best suits your preferred Start menu population and function.
Tweaking the Taskbar
The taskbar itself has configurable options; these are contained on the Taskbar tab of the Taskbar and Start Menu Properties dialog box. You can lock the taskbar so that stray mouse actions won’t alter its placement or configuration, auto-hide it to maximize the desktop area, use small icons as the default, set it to appear along any edge of the screen, and combine buttons by default or only when the taskbar is full.
You’ll probably recall many of these controls from previous Windows OSs. In addition, there is automatic grouping of similar taskbar items as in Vista and XP. And if you have Aero turned on, you will see thumbnails of apps and docs when you mouse over a taskbar button.
Note
![]()
Auto-Hide is inherited from previous Windows versions and gives you more available screen real estate by causing the taskbar to appear only if you mouse down to the bottom of the screen.
As you probably know, and as mentioned in Chapter 4, task buttons on the taskbar are listed from left to right in their order of launch, up to a point. The default setting is to group buttons by similarity, which creates a stacked button representing similar programs. For example, if three Word documents are open, they appear as a single stacked button. The same applies if Windows Explorer and the Computer window are both open, or if Control Panel, Devices and Printers, and Default Programs are open simultaneously. Just hover your mouse pointer over the stacked button to display a pop-list of applications or documents it represents, and then choose one you want to jump to.
Hide Notification Area Icons and Notifications
If you’re experienced with previous Windows OSs you might be familiar with how quickly the notification area (called the system tray in XP, immediately to the left of the digital clock at the bottom of the screen) can fill up with icons. Some systems have had more than a dozen. Windows 7 manages its notification area intelligently by allowing inactive icons to be hidden. Plus, instead of displaying a long stream of active icons, only three or so are displayed along with an up arrow, which you can click to access the hidden icons. By clicking the Customize button in the Taskbar and Start Menu Properties dialog box, you can customize which icons and notifications are hidden or displayed.
Reposition the Taskbar
As with previous versions of Windows, you can still drag the taskbar to any edge of your desktop: top, bottom, or sides. You can also still expand the thickness of the taskbar to allow multiple rows of task buttons. Just hover the mouse pointer near the edge of the taskbar so that it turns into a double arrow, and drag it up, down, or sideways.
Tip
![]()
If you can’t get the taskbar to resize or move, it’s locked. Right-click an empty part of the bar (not on a button or Quick Launch shortcut) and select Lock the Taskbar to uncheck it.
Display Properties
The launching point for altering your GUI display settings is the Personalization window. From there you can reach a multitude of GUI settings, mostly affecting visual effects rather than GUI functionality:
• Themes for GUI elements
• Desktop background
• Window color
• Sound effects
• Screen saver settings
• Desktop icons
• Pointer and cursor shapes and sizes
• Special GUI effects such as Aero and window animations
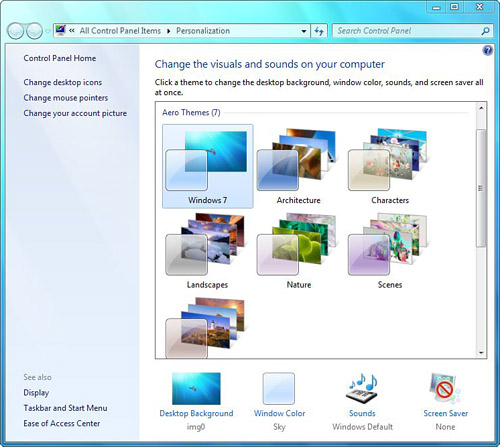
You can most easily reach the display properties by right-clicking the desktop and choosing Personalize. Figure 23.2 shows the resulting Personalization window. This is a greatly redesigned window compared to the Windows Vista and XP counterparts.
Figure 23.2 You can alter a multitude of display attributes from the desktop Personalization window.
Notice that the Tasks list includes Change Desktop Icons, Change Mouse Pointers, and Change Your Account Picture for easy, one-click access to the related dialog boxes. Clicking the Display link near the bottom of the Tasks list lets you modify advanced properties such as resolution, color calibration, hardware acceleration, refresh rates, and relative and custom text sizes.
Note
![]()
You also can get to the display properties from Control Panel. Click Start, Control Panel, Appearance and Personalization, Personalization.
The following sections briefly describe various primary options, which are in order of appearance in the Personalization window, starting with the main pane.
Note
![]()
Earlier in the chapter, we discussed the Classic Start menu style and mentioned it had been removed from Windows 7. The Windows Classic theme is different from the Start menu style. The Classic theme gives you a general Windows 2000 look and feel across the desktop, windows, and dialog boxes; however, you don’t get the old Windows 2000 Start menu look and functionality.
Themes
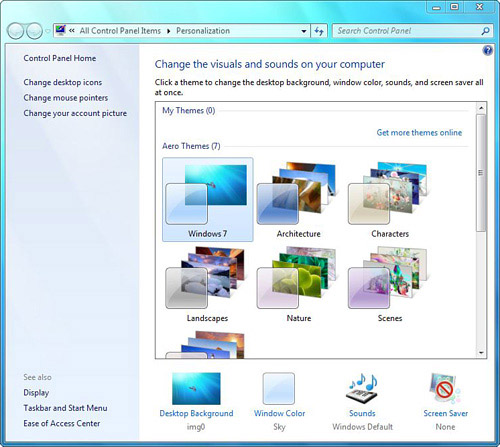
A theme is a background plus a set of sounds, icons, and other elements to help you personalize your computer with one click. Windows 7 includes several themes in the Personalization window (see Figure 23.3), such as the default Windows 7 (Aero) theme and a handful of other Aero themes for your choosing, all of which offer bold, stunning images and pleasing color palettes.
Figure 23.3 You can choose an overarching desktop theme of visuals and sounds using this window.
Scrolling through the list of themes, you’ll find the Basic and High Contrast Themes section. If you prefer the look of Windows 2000 and older versions, you can go retro by selecting the Windows Classic theme. High Contrast themes are helpful for the visually challenged.
Tip
![]()
Click the Get More Themes Online link to go to a Microsoft Windows website where you can download and safely install extra themes. You should exercise caution when downloading themes from non-Microsoft sources on the Web because these files modify critical system settings and could wreak havoc on a machine if they are not designed properly. Also, you face significant virus risks.
If you make changes to desktop colors or other GUI attributes such as those described in this chapter, you can save that theme to disk so you can later reload it. (Themes are stored in files with a .theme suffix.) Just click the Save Theme link and give it a name. The modified theme will appear in the My Themes section near the top of the Personalization window.
Desktop Background
The desktop is used to express your inner personality. It’s one of the few places where you can actually customize the otherwise impersonal personal computer. Hanging some wallpaper (such as a picture of your kids, your car, a sunset, and so forth) on your desktop gives the environment a more custom feeling. Microsoft includes dozens of options for you to goof around with. These include some stunning photographs, small tiles repeated across and down your screen, or solid colors. You can choose from a few supplied photos or supply your own, such as from your digital camera. Gone are the old desktop patterns, such as bricks and bamboo, that were available in previous Windows versions.
To personalize your desktop, follow these steps:
1. Right-click on an empty spot on the desktop and choose Personalize.
2. Click Desktop Background. You see the window shown in Figure 23.4.
Figure 23.4 Use this Desktop Background window to personalize your desktop with photos and colors.
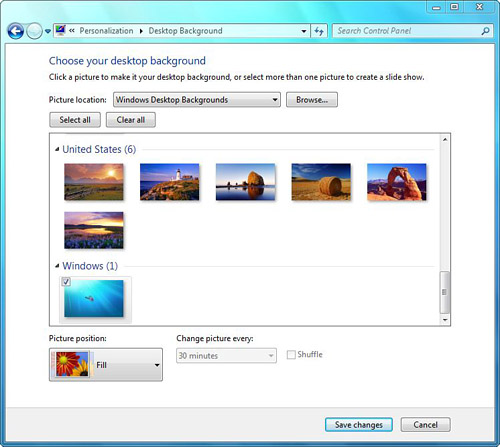
3. Click one of the images you like or search for another one. From the Picture Location drop-down list, choose Windows Desktop Backgrounds, Pictures Library, Top Rated Photos, or Solid Colors.
Tip
![]()
By the way, if you don’t want a pretty picture (or you need to hide the image of the sultry pin-up before your spouse returns), you can select Solid Colors in the Picture Location drop-down list. Then, choose a solid color of your liking from the resulting palette.
Windows Desktop Backgrounds are high-quality images designed to scale well and look good on any screen. Pictures Library lets you choose from photos in the Public Pictures folder on your computer, which is a shared folder that anyone using your computer (locally or on the LAN) can see. Top Rated Photos points to a folder supplied with Windows 7 that includes some additional photos for you to play with.
You can also use a personal photo. If you keep your stockpile of photos organized elsewhere, just click the Browse button, locate the correct folder, and choose your image. Acceptable photo formats are JPG, JPEG, BMP, DIB, TIF, and PNG images.
Caution
![]()
Remember, most images on the Web are copyrighted by the owner of the site. Using an image without permission is stealing. We recommend that you only use images provided expressly for desktop background use, or that you obtain permission first before using images not specifically offered as desktop backgrounds.
In addition to files already on your local system (or accessible over your LAN), you can grab any image from a website by right-clicking it and selecting Set as Background from the pop-up menu.
If you want to add some variety to your desktop, configure your desktop background as a slideshow. Just select more than one image for your desktop background, and then select a number of seconds, minutes, or hours in the Change Picture Every drop-down list.
Stretched a Bit Thin
![]()
If a desktop image looks blocky, either use a larger image or turn off the Fit setting. See the Control Panel, Appearance and Personalization, Personalization, Desktop Background, Picture Position option.
Window Color and Appearance
To customize your desktop even further, use the Window Color link near the bottom of the Personalization window to access the Window Color and Appearance feature. From this link, what you see will vary greatly depending on whether you are running in Aero mode or the older, less flashy Windows Basic (non-Aero) mode. Figure 23.5 shows both boxes.
Figure 23.5 The Window Color and Appearance window and dialog box. You’ll see the upper box if you are running Aero, the lower one if you are not.
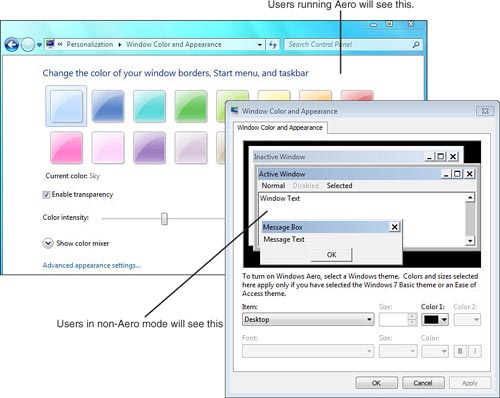
As you can see, the difference in these interfaces is like that between a butterfly (Aero) and a caterpillar (non-Aero). Let’s explore the Aero approach first and then the non-Aero.
Aero Mode
In Aero’s Window Color and Appearance window, simply click a color button and the scheme will change. Microsoft has made it easy to choose color schemes this way, without putting you through the hassle of applying a specific color to each GUI element (title bars, document workspace, scrollbars, and so on) or choosing schemes by names that don’t mean much to you, such as Wheat. (You can still assign individual colors if you want to by clicking the Advanced Appearance Settings link.) The effects of choosing a color button are immediately displayed across all open windows and applications when you click on it. Drag the Transparency slider to alter how translucent your window borders, title bar, and other elements will be. This effect is also instantly applied across the interface. Very slick.
Want to adjust the exact color hue, saturation, and brightness? Click the Show Color Mixer button. Three sliders show up. Adjust as you please. (Saturation means how pure the color is, by the way.)
Non-Aero (Basic) Mode
High Contrast (helpful for the visually challenged) or Windows Basic looks can be achieved by returning to the Personalization window and selecting a non-Aero theme from the Basic and High Contrast Themes section. If you prefer the look of Windows 2000 and older versions, select Windows Classic in the theme list.
Click Window Color to open the Window Color and Appearance dialog box (see Figure 23.6). You can alter the color settings, component size, and fonts of each individual component of a windowed display for most non-Aero themes. Careful—you can do some serious mischief here, creating some egregious color schemes to attract the fashion police or the scorn of a co-worker who passes by your desk frequently. Or you can design or choose schemes that improve readability on screens (or eyes) with certain limitations.
Figure 23.6 The Window Color and Appearance dialog box lets you control the color and font size of specific window elements.
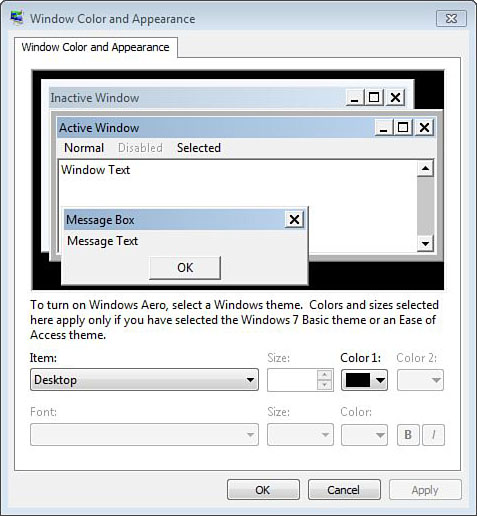
To change the settings, use the various pull-down lists or click on a window element in the preview area, such as the Active Window title bar. Then you can click Color 1 or Color 2 and assign colors from the color picker. In some cases, two colors are assignable because some elements (for example, title bars) transition from one color to another.
Tip
![]()
If you spend considerable time creating a color, component, and font styling, be sure to save it as a theme and give it a unique name (for example, Laura’s Theme). You do this by clicking OK in the Window Color and Appearance dialog box and then, in the Personalization window, choosing Save Theme. Otherwise, if you switch to another view, even for a second, you’ll lose all of your previous settings.
When using the color picker, clicking the Other button opens the Color dialog box (see Figure 23.7). You work with two color mix controls here. One is the luminosity bar (which looks like a triangle arrow pointing left), and the other is the color refiner cursor (which looks like a set of crosshairs).
Figure 23.7 The Color dialog box lets you fine-tune colors assigned to various Windows elements.
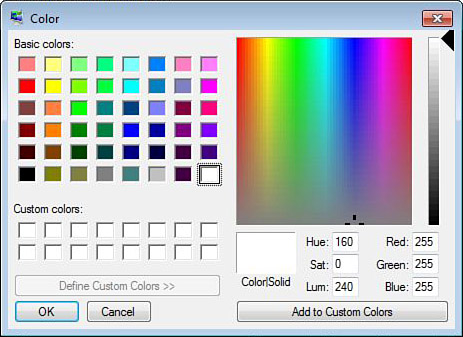
Just drag these cursors one at a time until the color in the Color/Solid box is the shade you want. As you do so, the numbers in the Hue/Sat/Lum and Red/Green/Blue boxes below the color refiner change.
• Luminosity is the amount of brightness in the color.
• Hue is the actual shade or color. All colors are composed of red, green, and blue.
• Saturation is the degree of purity of the color; it is decreased by adding gray to the color and increased by subtracting gray.
You also can type in the numbers if you want, but using the cursors is easier. When you like the color, you can save a color for future use by clicking Add to Custom Colors.
Sounds
The Sounds link in the Personalization window associates Windows events with sounds. Windows 7 comes with tons of sound files, a big improvement over the measly assemblage of WAV files supplied with some earlier versions of Windows. In fact, just as with the color schemes, you can create and save sound schemes by using the Sound applet; you can set up and save personalized schemes to suit your mood. Microsoft supplies a fairly rich variety of sounds for your auditory pleasure.
Despite the diverse selection, you can still use sounds you’ve put together using the Sound Recorder. For example, you could record a sound file that says “New Mail” and link it to that action if you don’t always notice the generic “new mail” sound when your messages arrive.
If you want to get fancy, you can record from a disc or tape recorder rather than from a microphone. This way, you can sample bits and pieces from your favorite artists by popping the audio disc into the computer and tapping directly into it rather than by sticking a microphone up in front of your boom box and accidentally recording the telephone when it rings. Just check out the Volume Control applet, and figure out which slider on the mixer panel controls the input volume of the disc. Then, use the Sound Recorder applet to make the recording. I have a few good ones, such as James Brown’s incomparable “Ow!” for an error message sound.
Tip
![]()
Make sure that WAV files you intend for system sounds aren’t too large. Sound files can be super large, especially if they are recorded in 16-bit stereo. As a rule, keep the size to a minimum for system sounds because it takes a few seconds for a larger sound to load and play.
You assign sounds to specific Windows “events” like this:
1. Right-click the desktop and choose Personalize.
2. Click Sounds. You’ll see the dialog box shown in Figure 23.8.
Figure 23.8 The Sound dialog box, Sounds tab. Change system sounds from here.
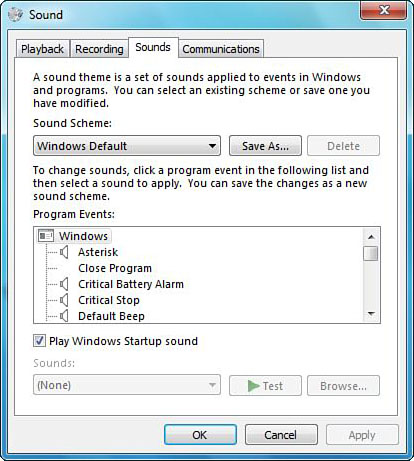
The Program Events section lists the events that can have sounds associated with them. Several classes of events are listed on a typical computer, such as New Mail Notification, the Windows User Account Control warning, Windows Logon, Exit Windows, Low Battery Alarm, and so on. As you purchase and install new programs in the future, those programs may add their own events to your list. An event with a speaker icon already has a sound associated with it. You can click it and then click the Test button to hear the sound. The sound file associated with the event appears in the Sounds list at the bottom of the Sound dialog box.
3. Click any event in the Program Events list for which you want to assign a sound or change the assigned sound.
Tip
![]()
The default folder for sounds is windowsmedia. If you have a WAV file stored in another folder and want to assign it to an event, use the Browse button in the Sound dialog box to locate it. You don’t have to move your sound files to the windowsmedia folder for it to work. However, if you reassign sounds regularly, you’ll find that the process is easier if you move your WAV files into the media folder first.
4. Open the drop-down Sounds list and choose the WAV file you want to use for that event. These names are for the various classes of dialog boxes that Windows displays from time to time. The sounds you’re most likely to hear often will be Asterisk (Windows error), Critical Stop, Default Beep, Exclamation, Windows Logon, Windows Logoff, and Windows Explorer Blocked Pop-up Window. You might want to start by assigning sounds to them and then add others as you feel like it.
5. Repeat these steps for each item you want to assign or reassign a sound to. Then click OK to close the dialog box.
At the top of the list of available sounds is an option called (None), which has the obvious effect: No sound will occur for that event. Assigning all events to (None) effectively silences your computer for use in a library or other silent setting. You can also silence all sounds easily by choosing No Sounds from the Sound Scheme drop-down list.
In the same way that the Window Color and Appearance dialog box (non-Aero mode theme) lets you save color schemes, the Sounds applet lets you save sound schemes. You can set up goofy sounds for your humorous moods and somber ones for those gloomy days. The ones supplied with Windows 7 are pretty decent, actually, and considering the amount of work required to set up your own schemes, you’ll probably make out best just trying a scheme to see if you like it. To choose an existing sound scheme, just use the Sound Scheme drop-down list and select one.
You can set up your own sound schemes by assigning or reassigning individual sounds, as already explained. But unless you save the scheme with the Save As button, it’ll be lost the next time you change to a new one. So, the moral is that after you get your favorite sounds assigned to system events, save the scheme. Then, you can call it up any time you want.
The Playback and Recording Tabs
In Figure 23.8, notice that in addition to the Sounds tab, there are also Playback and Recording tabs. Here, you can declare the default hardware you want to use for audio playback and recording. Most systems offer minimal choices in these departments because typical computers have only a single sound system.
Both tabs include Configure and Properties buttons for your sound hardware, which depend on your sound system’s chipset. Some offer options to adjust bass and treble; expanded stereo (sort of a wider sound based on adjustment of the “phase” of the signal going to the amplifier); sample-rate conversion options; equalization optimization based on the kind of speakers you have; amplitude gain or reduction; and hardware acceleration. (Use full acceleration if you’re a gamer because it affects DirectSound used in some games.)
Clicking the Recording tab, then on a microphone icon (Mic), and then clicking Configure opens the Speech Recognition window. From here, you can start using speech recognition, set up your mic, take a tutorial about how to use recognition, train your computer to better understand your voice, and open and print a Speech Reference Card (a cheat sheet of commands).
The Communications Tab
New to Windows 7 is the Communications tab, which you use to adjust the volume of system sounds while you’re using the computer as a phone. On this tab you can select to mute all sounds, reduce the volume by 80% or 50%, or do nothing if Windows detects communication over the PC.
Screen Savers
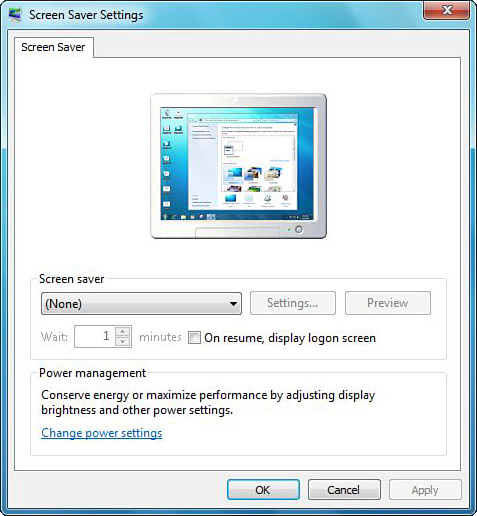
We all know what screen savers are. In the Personalization window, you can click on Screen Saver, and you’ll see the dialog box shown in Figure 23.9.
Figure 23.9 The Screen Saver Settings dialog box.
You can choose from several supplied screen savers and perhaps others you have installed from other sources. In the old days when phosphors would “burn,” screen savers prevented a ghost of an image from being burned into the screen for all time, no matter what was being displayed. Most modern CRTs don’t actually need a screen saver because the phosphors are more durable; LCD monitors use liquid crystal cells, not phosphors.
So, what good is a screen saver nowadays, you ask? Well, some monitor/card combinations go into low-power states when the screen is blanked, so if you choose Blank Screen, there could be some advantage.
Tip
![]()
Interested in space exploration? Think life might exist on other planets? If you want to become part of the largest global experiment in massive parallel processing, you can download the SETI@home screen saver to harness your computer’s otherwise wasted CPU cycles to sift through signals from outer space, searching for signs of intelligent life out there. (Go to http://setiathome.ssl.berkeley.edu if you’re interested in participating.)
Because far too many people leave their computers on all the time (it’s not really true that they will last longer that way), efforts have been made by power regulators and electronics manufacturers to devise computer energy-conservation schemes. Some screen savers will turn off the video card instead of displaying cute graphics. And, of course, some screen savers are fun to watch. Windows 7 comes with a handful of screen savers, such as 3D Text, Blank, Bubbles, Mystify, Photos, and Ribbons. All but Blank and Photos are in 3D.
Some screen savers are mindless; others are more interesting. Some, such as 3D Text, have additional options such as font, size, and color. You can check out each one as the spirit moves you. Just highlight it in the Screen Saver drop-down list and click Preview, or watch what happens in the little preview monitor. If you do a full-screen preview, don’t move the mouse until you’re ready to stop the preview or it will stop even before it gets started. If a particular screen saver has configuration elements, click the Settings button.
You can also create a personalized screen saver by displaying selected pictures and videos as a slideshow. Here is how to create your own slideshow as a screen saver for your Windows 7 desktop:
1. In the Screen Saver Settings dialog box, open the Screen Saver drop-down list and select Photos.
2. Click Settings to choose the pictures and videos you want in your slideshow and other options. After you make your changes, click Save and then OK.
Note that there are two more settings in the Screen Saver Settings dialog box:
• Wait x minutes—After the number of minutes you set here, the screen saver will begin. The smallest value is 1 minute. The largest is 9,999 minutes.
• On Resume, Display Logon Screen—A screen saver often comes on after you leave your desk for a while. As a safety precaution, in case you forget to log off or lock the computer (via Start, Lock) before leaving, it is a good idea to require that you provide your logon password when you return to your desk and touch a key or move the mouse.
If you’re looking to find the actual screen-saver files on your hard drive, they have an .scr extension and are stored in the windowssystem32 folder. In your Windows 7 system, they might be hidden. In Windows Explorer, click Organize, Folder and Search Options, and then click the View tab. In the Advanced Settings list, select the Show Hidden Files, Folders, and Drives radio button, and uncheck the Hide Extensions for Known File Types option. Click OK to close the dialog box. You should be able to see the SCR files in windowssystem32 at this point.
Note
![]()
You must have a video card that’s compatible with Direct3D to use the 3D screen savers in Windows 7. The OS will display a message to this effect in the Screen Saver Settings dialog box if you attempt to select a 3D screen saver without the proper card installed.
Double-clicking a screen saver runs it. Right-clicking and choosing Install adds it to your screen saver list. If you run it, just press a key or click the mouse to stop it.
The Web is littered with screen savers. The following are some reliable sources:
• Screensaver.com—www.screensaver.com
• Softpedia—www.softpedia.com
Between those two sources alone, you have access to more than 2,500 screen savers. Plus, many of the screen savers designed for previous versions of Windows will work on Windows 7.
In addition to selecting the screen saver du jour, you should also define the length of time the system must be idle before the screen saver is launched, as well as whether to display the logon screen or return to the desktop when the system is resumed (that is, when the keyboard or mouse is activated by a user).
Tip
![]()
You can uninstall screen savers you install, but you cannot uninstall the screen savers that come with Windows 7.
If you are working from a portable system or are an energy conservationist, the Screen Saver Settings dialog box also offers quick access to the power saving properties of Windows 7. Click the Change Power Settings link to open the Power Options window, which was discussed in Chapter 22, “Windows Management and Maintenance.”
![]() Power settings for laptops offer several power plans to choose from. See “Getting the Most Out of Your Battery,” p. 974.
Power settings for laptops offer several power plans to choose from. See “Getting the Most Out of Your Battery,” p. 974.
Setting Desktop Icons
You might want to change which basic system icons are always included on your desktop. Here’s how:
1. Open the Personalization window.
2. In the Tasks list, click Change Desktop Icons.
You can turn on or off five common shortcut icons to appear on the desktop:
• Computer
• User’s Files
• Network
• Recycle Bin
• Control Panel
Note
![]()
Change Mouse Pointers is the next link in the Personalization window. However, we don’t discuss it here because it’s covered in Chapter 22.
You can also manage the icons used for these desktop shortcuts using the Change Icon and Restore Default buttons. You can also uncheck the Allow Themes to Change Desktop Icons check box, if you want your desktop icons to remain static.
Account Picture
You can change the picture associated with your Windows user account that appears on the Welcome screen and your Start menu. Just click on the Change Your Account Picture in the Personalization window Tasks list. In the Change Your Picture window that appears, click one of the thumbnails, and then click Change Picture. You can also click the Browse for More Pictures link, and then locate and select a different image (including one of your own).
Display Settings
The Display link in the Tasks list of the Personalization window opens the Display window, shown in Figure 23.10. From here, you can increase the size of text and other elements of most windows by selecting the Medium – 125% or Larger – 150% radio button.
Figure 23.10 The Display window.
Note
![]()
Screen fonts are smoothed using the standard Windows method or using ClearType (the default). ClearType often improves the visibility range on older LCD displays.
The options listed in the Tasks list let you tweak the video driver’s most basic settings—screen resolution (desktop size), brightness, and color quality. You can configure other display settings (covered next), connect to a projector, adjust the ClearType text, and set custom text size up to 200%.
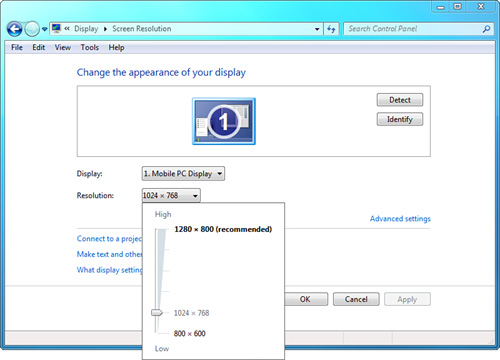
The Screen Resolution Window
Click the Change Display Settings link in the Tasks list of the Display window to open the Screen Resolution window. In this window you can select a display if you are using multiple monitors, change resolution settings, and connect to an external projector, among other tasks.
Windows 7 allows you to display the same desktop view on two or more monitors. On a notebook PC, you can display the desktop on both the built-in LCD panel and an external monitor. On desktop PCs, you need multiple video cards or a single card with dual outputs to use multiple monitors. You can also set up multiple screens such that each one is displaying different information, thus enlarging your overall desktop area (called extended desktop). This is covered in detail in Chapter 27, “Installing and Replacing Hardware.”
When you plug in a modern monitor, Windows usually detects it and sets the correct resolution, refresh rate, orientation, and color depth for it. Most newer monitors and projectors support Extended Display Identification Data (EDID), a standard video data format that transmits this information to the computer when you plug them in.
The Resolution setting makes resizing your desktop a breeze. Many of us want to cram as much on the screen as possible without going blind. This setting lets you experiment and even change resolution on-the-fly to best display whatever you’re working on. Some jobs, such as working with large spreadsheets, databases, CAD, or typesetting, are much more efficient with more data displayed on the screen. Because higher resolutions require a trade-off in clarity and make onscreen objects smaller, you can minimize eyestrain by going to a lower resolution, such as 1024×768 pixels. (A pixel is essentially one dot on the screen.)
Moving in Slow Motion
![]()
If you increase the resolution and find that the screen updates slowly when you drag windows around, you may find that running in True Color at a high resolution, such as 1280×1024, can result in response delays, especially if you have Show Window Contents While Dragging turned on (in the Performance Options dialog box). When you move a window, it moves jerkily across the screen. If you play videos such as Windows Media Video, QuickTime, MPEG, or RealPlayer movies, you’ll also notice these higher color depths can slow down the movies or make them play jerkily.
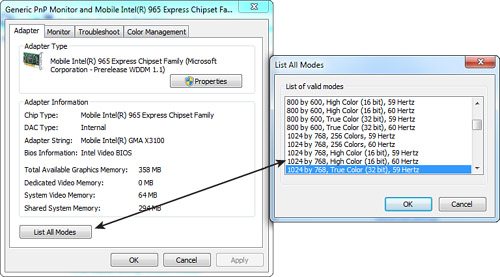
Unless you’re doing high-resolution photographic-quality work or something similar, you don’t need the high-resolution 24-bit or 32-bit color depth settings. Right-click the desktop and select Screen Resolution. Click Advanced Settings, and on the Adapter tab, click the List All Modes button. Try reducing the color depth a notch (such as to 24- or 16-bit color if you have those options) and enjoy the speed increase.
To change the resolution, open the Resolution list. A slider appears, as shown in Figure 23.11. Move the slider to the resolution you want, and then click OK or Apply. You are asked if you want to keep the changes. The good thing about the no-reboot video subsystem, first introduced with Windows 98, is that the driver settings should revert within 15 seconds unless you accept them. So, if the screen goes blank or otherwise goes bananas, click Revert or just wait. It should return to the previous setting.
Figure 23.11 Adjusting the resolution setting in Windows 7.
Where Did Those Icons Go?
![]()
If after changing the screen resolution, desktop items move off the edge of the screen and some windows can’t be closed, it’s possible that you switched to a lower resolution from a higher one. Theoretically, Windows is good about relocating desktop icons, but some applications might not do the same. For example, the small AOL Instant Messenger dialog box can be off the edge of the screen somewhere, and when it is, you can’t get to it. Closing and rerunning the program doesn’t help.
One trick is to switch to the application by pressing Alt+Tab. Then press Alt+spacebar and press M. This key combination invokes the Move command for the window. Then you can use the arrow keys on the keyboard to move the window (typically to the left and/or up). When you have the title bar of the window in view, press Enter. If this trick doesn’t work, switch back to the previous higher resolution, reposition the application window in question closer to the upper-left corner of the screen, and then switch back to the lower resolution. It might help to remember that your screen is always decreased or increased in size starting from the lower-right corner and moving up or down diagonally.
What Does That Say?
![]()
If you want to use an external TV monitor, but the output text is illegible, it’s important to note that displaying computer output on a TV monitor can be problematic. TV sets (as opposed to professional TV monitors) often overscan, pushing the edges of the image off the edge of the screen. The following are a few points to remember when you’re using a TV or video projector, whether you’re doing presentations, playing games, or giving your eyes a break by moving your focal plane back a bit:
• If your computer and TV or video projector have HDMI (High-Definition Multimedia Interface) or DVI (Digital Video Interface) connectors, use those for the best image quality. Use “S” (Super VHS) inputs if other connectors are not available.
• Use the Detect button in the Screen Resolution window (right-click the desktop and select Screen Resolution) to let Windows 7 automatically detect the output device.
• If you cannot get a decent screen image or if it’s blank, restart in Safe Mode and try updating your video card or TV tuner driver. Still no luck? Uninstall the driver and then re-install it in Safe Mode.
• Check the tabs in your adapter and monitor Advanced Settings dialog box for buttons that let you center the image on the TV. It’s most likely off center or needs resizing when you first try it. Some drivers, such as those from ATI, have advanced properties for fine-tuning a TV display.
• Your application may have a “zoom” control for easily increasing the size of text onscreen, without the hassle of reformatting the entire document. Microsoft Office tools such as Excel and Word, for example, have such a feature. Try bumping up the zoom size to increase legibility.
Exploring Advanced Display Settings
The Advanced Settings link in the Screen Resolution window opens the monitor and adapter Properties dialog box. This dialog box has four tabs—Adapter, Monitor, Troubleshoot, and Color Management.
The Adapter tab displays information about the video card and offers access to update, roll back, disable, and uninstall the video driver through the Properties button. (Click the Resources tab in the Properties dialog box if you want to fine-tune the configuration of the driver.) The List All Modes button is used to view the color, resolution, and refresh rate combinations supported by this video adapter.
Uh-Oh! My Monitor Died
![]()
What do you do if you change your resolution or refresh rate, and now the screen is blank? Normally, you shouldn’t have this problem because Windows 7 asks you to confirm that a screen resolution works properly and switches back to the previous resolution if you don’t confirm. If you changed color depth and resolution, and the system is stuck with a blank screen, you can reboot, press F8 during boot, and choose Safe Mode. Right-click the desktop, choose Screen Resolution, and reset the properties to what the computer was running at before the change. Be sure to reset both the screen resolution and the color depth (click Advanced Settings, List All Modes). In the worst-case scenario, start with 800×600 and 16-bit color. Then reboot normally. After you’ve rebooted successfully, right-click the desktop, choose Screen Resolution, and increase the settings one step at a time. Don’t change resolution and color depth at the same time, though. Increase one first and then the other, rebooting in between changes.
Note that some motherboards reserve F8 for a boot selection menu, which would prevent the preceding approach from working. If that is the case on your PC, reboot and press F6 to display advanced boot options. Then choose appropriately from the resulting menu.
The Monitor tab offers access to update, roll back, disable, and uninstall the monitor driver (Properties button), and to set the screen refresh rate. Use the screen refresh rate with caution because it can damage older monitors or render your desktop unviewable. Higher refresh rates reduce the flickering of the display. You can also select a color depth setting at the bottom of this tab.
Blurry Images in LCD
![]()
Unlike CRTs, LCDs do not benefit from higher refresh rates. Don’t try to use anything above a 60Hz refresh rate for an LCD monitor. Also, check the LCD monitor’s internal settings (check its manual) for a “phase adjustment” or focus adjustment to help clear up fuzziness on small text.
The Troubleshoot tab is used to set the hardware acceleration rate, anywhere between None and Full. Basically, this indicates how much video processing is offloaded to the video adapter instead of being performed by Windows 7 on the CPU. The more you can offload processing to the video card, the more smoothly your system will function. If you have problems with jitters or lockups, you may need to reduce the amount of hardware acceleration, if that option is not grayed out. (Some cards won’t let you change this setting, or you won’t have the privilege level necessary unless you are an administrator.)
The Color Management tab is used to set the color profile used to manage colors for your adapter and monitor. If you are performing high-end image processing, you may want to investigate this feature in the Windows 7 Resource Kit.
Fine-Tuning Display Settings
To fine-tune display settings beyond just the resolution, click the Advanced Settings link in the Screen Resolution window, and then click the List All Modes button. Assuming that Windows 7 has properly identified your video display card and that the correct driver is installed, the List All Modes dialog box (see Figure 23.12) should include all the legitimate options your card is capable of. Your color depth options, such as 256 Colors, High Color 32 bit, True Color 16 bit, and so on, are limited by the amount of video RAM on the card and the resolution you choose. The higher the resolution, the more memory is used for pixel addressing, limiting the pixel depth (number of colors that can be displayed per pixel). With many modern cards, this limitation is no biggie, and it’s likely that many Windows 7 users will not have to worry about it except possibly in cases when they have large monitors displaying 1600×1200 (or higher) and want 32-bit color and a high refresh rate. All modern color monitors for PCs, however, are capable of displaying 16 million colors, which is dubbed True Color.
Figure 23.12 The List All Modes dialog box.
Tip
![]()
Contrary to some advertising accompanying flat-panel monitors, LCDs don’t give a hoot about high refresh speed. In fact, they don’t like high speeds. LCDs use a completely different technology, typically with a transistor for each pixel. The dots don’t have to be refreshed as they do in a CRT. If you notice a blurry display on a desktop LCD screen, it’s probably because the refresh rate is set too high (such as to 75Hz). Lowering it to 59 or 60Hz should resolve the problem. This advice applies only to LCDs attached to analog display cards. Some outboard LCD monitors are driven by their own digital adapter cards, and refresh settings don’t affect those cards.
If you are experiencing any problems with your video system, from pop-up errors blaming the video system, to a flickering display, to even trouble resetting the resolution and color, click the Advanced Settings link in the Screen Resolution window and then the Troubleshoot tab. There may be some useful information there, depending on your monitor.
Caution
![]()
If you specify a refresh rate that is too high for your monitor, it could damage the monitor. Also, trying to expand the desktop area to a larger size might not work. You just get a mess on the screen. If you have this problem, try using a setting with a lower refresh rate, such as 60Hz or “interlaced.” The image may flicker a bit more, but at least it will be visible.
Reducing Screen Flicker
![]()
If your CRT monitor is flickering, you can change the refresh rate to fix the problem. Increase the refresh rate of the display subsystem to at least 70Hz by right-clicking the desktop, choosing Screen Resolution, and clicking Advanced Settings. In the Properties dialog box, click the Monitor tab, and then open the Screen Refresh Rate drop-down list.
Note that this applies only to older, CRT-style monitors, not thin, flat-panel LCD monitors. Most LCDs should be run at 60Hz for the clearest image.
Miscellaneous GUI Tips
Windows 7 offers many new features and capabilities. But you don’t have to settle for the out-of-the-box defaults; you can customize to your heart’s content. In the following sections, we provide you with several tips to help you soup up your Windows 7 installation.
Single- or Double-Click?
![]()
If you find that you accidentally run programs or open documents when you are certain that you didn’t double-click anything, you probably have Single-Click selection turned on. As a result, one click (or tap, if you’re using a touchpad) runs the program or opens the document that is highlighted. Change to Double-Click selection mode by opening a folder window; choosing Organize, Folder and Search Options; and selecting Double Click to Open an Item.
Fonts Preview Trick
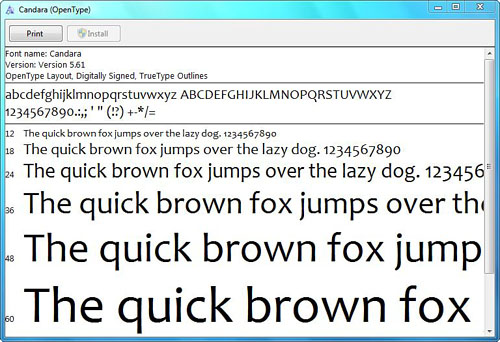
If you’ve ever tried to see what a font looks like before you printed it, you know how frustrating it can be. But, getting a preview of a font is now easier than ever before. Just open the Fonts applet through Control Panel, Appearance and Personalization, click any listed font, and click Preview. A font sampling window opens, displaying details about the font, a sample of most characters, and several sizes of characters (see Figure 23.13).
Figure 23.13 A font sampling window.
Which Windows Are You Using?
If you’re dual- or multibooting between Windows 7 (using the Windows Classic theme) and other Windows products, you may sometimes wonder which OS you’re running at any given time because the GUIs of the post-Windows 95 OSs are often quite similar. Yes, you’ll see a few giveaways, such as Computer versus My Computer, but if you’re using the Windows Classic theme, the clues can be subtle.
To determine what’s running, use these techniques to remind yourself:
• Execute winver from the Run command or from the Command Prompt window to open a dialog box that displays the OS name, version and build, and applied Service Packs.
• Click Start and right-click Computer. From the menu that appears, click Properties. The first set of information in the System applet indicates the version of Windows you’re currently using. You can also access the System applet from Control Panel, System and Security.
Limiting Flip 3D
If your computer does not have a high video performance rating and you have Aero turned on, using Flip 3D might be a bit slow if you have many apps and documents open at once. This can be particularly true if your windows have active video running because that consumes significant video display chip bandwidth.
Tip
![]()
Only attempt this if you know how to edit the Registry. Chapter 28, “Editing the Registry,” details Registry editing.
One solution is to limit the number of mini-pages that Flip 3D displays when you press Ctrl+Windows+Tab.
1. Ensure you have Windows Aero enabled already. If you have Windows Classic or another non-Aero theme running, right-click the desktop, select Personalize, and then change to the Windows 7 (Aero) theme.
2. Go to Start, All Programs, Accessories, Command Prompt.
3. Type regedit and click OK.
4. Navigate your way to HKEY_CURRENT_USERSoftwareMicrosoftWindowsDWM.
5. In the right pane, right-click an empty area, point to New, and select DWORD (32-bit) Value. Name it Max3DWindows. Right-click Max3DWindows and select Modify. Depending on your type of graphics card, your best bet is to base the value of this DWORD on the Windows Experience Index (see Chapter 22). If your computer has a rating of 1 to 2, set the Registry value as 3. If your rating is set to 3, you can have your Registry value set to 5. If your computer has a rating of 4 or 5, you can have anything over 10 as the Registry value and it will still run smoothly.
Note
![]()
To access the Windows Experience Index, click Start, right-click Computer, select Properties, and choose Windows Experience Index (or choose System Rating Is Not Available and then click Rate This Computer).
6. Set the value and then click OK. Close the Registry Editor.
7. Restart your computer for the changes to take effect.
More Visual Effects
There is another hidden location for Windows 7 GUI settings somewhat akin to those provided by Tweak UI, a utility that gives you access to hidden Windows settings. For this semisecret list, follow these steps:
1. Open Control Panel.
2. Choose System and Security, System.
3. Click Performance Information and Tools in the Tasks list.
4. Click Advanced Tools in the Tasks list.
5. Click Adjust the Appearance and Performance of Windows. (The UAC dialog box might appear.)
You will see the Performance Options dialog box shown in Figure 23.14.
Figure 23.14 A treasure trove of UI and performance settings.
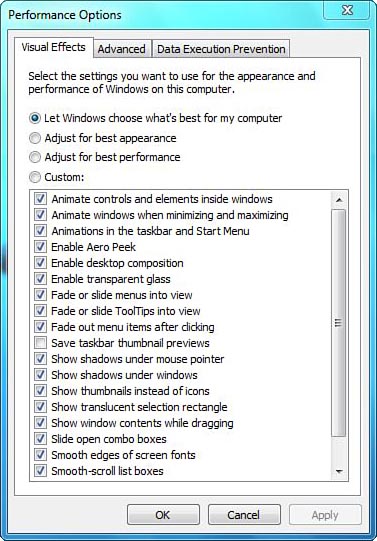
Have a ball making changes. Use care when adjusting the performance settings (processor scheduling and virtual memory). You don’t want to slow down your foreground processing unless you don’t mind waiting for response from your apps and input devices (keyboard and mouse). Letting Windows 7 handle stuff like virtual memory paging size (Advanced tab) and DEP (Data Execution Prevention tab) is generally the best way to go.
Administrator Tools Not Showing Up
Windows 7 is designed as an end-user OS. Thus, most of the system-level management tools are not made readily accessible by being placed in plain sight on the Start menu. Instead, they are contained within a subfolder of the Control Panel known as Administrative Tools. Open Control Panel, click System and Security, Administrative Tools to open a folder containing these management tools.
To gain access to Administrative Tools from the Start menu, right-click the Start menu and select Properties. In the Taskbar and Start Menu Properties dialog box, click Customize on the Start Menu tab. Scroll down to the bottom of the list, and in the System Administrative Tools section, select the Display on the All Programs Menu and the Start Menu radio button. Click OK.
Cascading Elements from the Start Menu
Cascading is the ability to expand certain folders right off the Start menu. These expanded menus are also called flyout menus. The native Windows 7 interface can be configured to add cascading menus to the Computer, Control Panel, Documents, Downloads, Games, Music, Personal Folder, Pictures, Recorded TV, and Videos items on the Start menu. This is the same feature discussed earlier in the chapter to gain direct Start menu access to Administrative Tools.
The process is simple:
1. Right-click the Start button and select Properties from the pop-up menu to open the Properties for the Start menu.
2. Select the Start Menu tab and click Customize.
3. Scroll down the list of Start menu items and change the settings for the desired items to Display as a Menu.
The menu item(s) now have a right-facing arrow by their names in the Start menu. When you click the menu item, a flyout menu appears.
Configuring the Recycle Bin
The Recycle Bin holds recently deleted files to provide you with a reasonable opportunity to recover them. As discussed in Chapter 4, “Using the Windows 7 User Interface,” the Recycle Bin holds the last deleted files that fit within its size restriction. That restriction, by default, is 10% for drives up to 40GB; for larger drives, the maximum is 4GB plus 5% of the capacity. However, you can customize the Recycle Bin for your specific needs.
The Recycle Bin’s Properties dialog box (accessed by right-clicking over the icon and then selecting Properties) displays available space for each partition/volume on the system. If you’ve never deleted a file by mistake and don’t think you ever will, you can elect to delete files immediately without storing them in the Recycle Bin. It’s better, however, to allow the Recycle Bin to catch your deleted files, even if that means lowering the maximum amount of allocated disk space. A final control in this dialog box enables a deletion confirmation dialog box—it’s recommended you leave this enabled as a safety measure.
Keep in mind that files moved to the Recycle Bin are not actually deleted. Instead, their path information is removed from the normal interfaces and moved into the Recycle Bin. Deleted files still remain on the drive exactly where they were before the deletion operation. This means they take up space on the drive. So, if you leave the default percentage setting on a 160GB hard drive, you can have up to 12GB of deleted files still sitting on the drive, slowing down the drive’s seek time.