
29. Command-Line and Automation Tools
Command-Line Tools
Despite the ease of use of the Windows graphical user interface, the command-line interface remains a useful way to perform many maintenance, configuration, and diagnostic tasks. Many of the most important diagnostic tools such as ping, tracert, and nslookup are available only from the command line, unless you purchase third-party graphical add-ons to perform these functions. And although the term “batch file” might bring back uncomfortable memories of the old MS-DOS days, batch files and program scripts are still powerful tools that provide a useful way to encapsulate common management functions. Together, command-line utilities, batch files, and scripts based on Windows Script Host provide a complete set of building blocks from which you can build high-level utilities for repetitive or complex tasks.
Tip
![]()
In this book, I only have room to show you how to set up and configure the command-line environment. For much more detail, tutorials, examples, and many helpful tips on using command-line tools, check out Brian’s book Windows 7 and Vista Guide to Scripting, Automation, and Command Line Tools, published by Que.
The Windows 7 Command Prompt Environment
To open a Command Prompt window in which you can type commands and review output, as shown in Figure 29.1, click Start, All Programs, Accessories, Command Prompt. Alternately, click Start and type cmd in the Search box. Then, when cmd.exe has been located, press Enter.
Figure 29.1 The Command Prompt window is the gateway to a world of powerful Windows management tools.
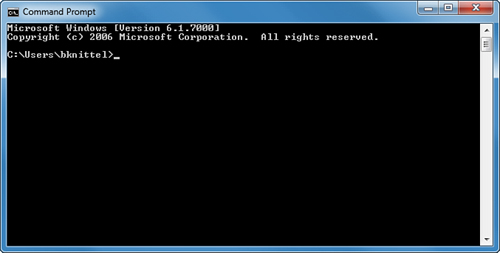
The main difference between a standard Windows application and a command-line program—which in Windows is technically called a console program—is that it doesn’t use a graphical display or pull-down menus. Instead, you type commands into the Command Prompt window to tell Windows to do something, and the programs type information back to you. Each command line starts with the name of the program that you want to run, followed by additional information called arguments. Arguments tell the program what specifically you want to do.
Tip
![]()
If you plan on using the Command Prompt window regularly, pin it to the taskbar for quick access. Right-click the Command Prompt window icon in the taskbar and select Pin This Program to Taskbar.
When you type a command line, Windows searches a list of folders called the search path for a file whose name starts with the program name you typed and whose name ends with any of several extensions such as .exe, .bat, and .vbs. The most common program extensions are listed in Table 29.1. Windows examines the file to see what type of program it is, and then runs it. It’s then the program’s job to interpret any arguments you typed after the program name.
Table 29.1 Typical Executable Program Extensions

Tip
![]()
You can also open a Command Prompt window from Windows Explorer. Hold the Shift key down, right-click a folder name, and select Open Command Window Here. The window will open with the selected folder as the default folder.
The search path is defined by a list of folder names in the PATH environment variable, and the complete list of extensions that Windows looks for is defined in the PATHEXT environment variable. The default search path includes the following folders:
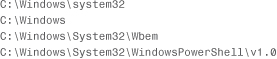
This means that any program file, batch file, or script stored in any of these folders can be run simply by typing its name. You can start both Windows programs and command-line programs in this way. For example, you just have to type notepad to start the Notepad accessory.
If you create your own batch files, scripts, or programs, it’s a good idea to create a separate folder to store them in, and to put that folder in the search path. I’ll show you how to do so later in this chapter, under “Setting the PATH Environment Variable.”
Caution
![]()
Be very careful when using an elevated Command Prompt window. Any commands you start from within this window will run with elevated privileges from the get-go, and you will receive no further UAC prompts when you start them. This includes Windows GUI programs—for example, if you type the command optionalfeatures, you will get the Turn Windows Features On or Off dialog box, and you will not have to confirm anything before it starts.
To be safe, do not use an elevated Command Prompt window for general-purpose work. Use it only to accomplish a specific task that requires elevated privileges; then close it.
Running Commands with Elevated Privileges
Some command-line programs require elevated privileges (via User Account Control) to do their job correctly. To run a command-line program with elevated privileges, you must run it from a Command Prompt window that is itself “elevated.”
To open an elevated Command Prompt window, click Start, All Programs, Accessories. Then right-click Command Prompt and select Run As Administrator. Or, if you have the Command Prompt icon pinned to your taskbar, there are two quick ways to open an elevated prompt:
• Right-click the icon, right-click the Command Prompt label in the Jump List pop-up, and then select Run As Administrator.
• Hold down the Shift+Ctrl keys and click the icon.
If you want, you can set a Command Prompt shortcut or pinned taskbar icon so that it is elevated by default. Right-click the icon and select Properties. On the Shortcut tab, click the Advanced button, and check Run As Administrator. Be sure to rename the shortcut so that it’s clear that it opens an elevated prompt.
Learning About Command-Line Programs
How do you know what programs are available and how to use them? For that, you have to turn to documentation about the command-line environment. For some reason, Microsoft no longer provides this in the Help and Support system, but you can search online, and some programs can be told to display their own usage information. To show you what’s available, we have posted a list of all the programs included with Windows 7 at www.helpwin7.com. And you might want to check out Brian’s book Windows 7 and Vista Guide to Scripting, Automation, and Command Line Tools. For a general online listing, perform this Google search, and then locate the A–Z listing for Windows Server 2008 or Windows Server 2003. Most of the programs listed there are available on Windows 7.
site:microsoft.com command line a-z windows server
To get additional information on a command that interests you, try the following sources, in the order listed. I’ll use the rasdial command in the examples that follow, but you can use the same technique with any command that interests you.
• A majority of command-line commands will print help information if you add /? to the command line. For example, to get information for the rasdial command, type rasdial /?.
• If the command prints so much text that it scrolls out of view, use one of the following techniques to read it all:
• Use the Command Prompt window’s scrollbars to back up.
• Press F3 to recall the command line, add | more to the end of the line, and press Enter. This will “pipe” the help listing through the more command, which displays it one screenful at a time. Press Enter after reading each screen.
• Type the command help rasdial. If too much text prints, use the techniques just listed to manage the overflow.
• Open Internet Explorer and type rasdial in the Search window. You might also try the Google search site:microsoft.com rasdial.
Not every one of those information sources will work for every command, but at least one should lead you to an explanation of what the command does and what its command-line options are, and provide some examples of its use. The command-line options for Windows 7, Vista, XP, and Server 2003 and Server 2008 are pretty much the same, so if you can’t find any Windows 7–specific information, documentation for the other versions should be okay to use.
Cutting and Pasting in the Command Prompt Window
Although you will usually use output redirection to store the output from command-line programs in files, you can also use cut and paste to move text into or out of a Command Prompt window.
To paste text into the window at the cursor location, click the window’s System Menu (the upper-left corner) and select Edit, Paste. It’s easier to do this without the mouse: just press Alt+Spacebar and type E P.
To copy text from the window to the Clipboard, click the window’s System Menu and select Edit, Mark. Alternatively, type Alt+Spacebar E M. Use the mouse to highlight a rectangular area of the screen, and then press Enter. This copies the text to the Clipboard.
By default, the mouse does not select text until you use the Mark sequence. This makes it easier to use MS-DOS programs that are mouse-aware. If you seldom use the mouse with MS-DOS applications, click the System Menu (or press Alt+Spacebar), select Defaults, and check Quick Edit. When Quick Edit is enabled, you can use the mouse to mark text for copying to the Clipboard without having to type Alt+Spacebar E M first.
Setting Environment Variables
Using environment variables is one of the ways that Windows communicates information such as the location of system files and folders—as set up on your particular computer—to programs. Environment variables indicate where temporary files are stored, what folders contain Windows program files, and other settings that affect program operation and system performance. In addition, they can be used in batch files to temporarily hold information about the job at hand.
In Windows 7, the initial environment variables that are defined when every Command Prompt window is first opened are set up using the GUI shown in Figure 29.2.
Figure 29.2 Examining the environment variables for the current user (top) and for all users of the system (bottom). The per-user list adds to or overrides the systemwide list.
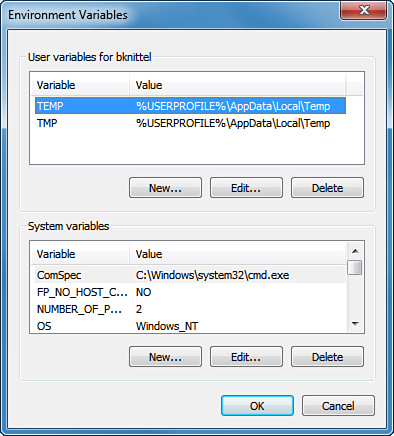
Notice that this dialog box has two sections, System Variables and User Variables. The lower, System Variables section defines the environment variables set up for every user account. The upper, User Variables section defines additional default environment variables just for the current user account. These add to or override the variables set up in the systemwide list.
To open this dialog box, if you are a computer administrator user, use either of these two methods:
• If you have a Command Prompt window open, type the command start sysdm.cpl and press Enter. You might need to confirm a UAC prompt. Then, select the Advanced tab, and click the Environment Variables button.
• Alternatively, click Start, right-click Computer, and select Properties. Select Advanced System Settings. You might need to confirm a UAC prompt. Then, click the Environment Variables button.
You can now edit both the upper User Variables (personal settings) and lower System Variables (systemwide settings) lists.
If you are not a computer administrator user, it’s a bit trickier. Use either of these two procedures:
• To edit the systemwide settings, you can use either of the preceding methods, but you’ll have to supply an administrator password. Don’t change the upper (personal) part of the dialog box—you will be changing settings for the wrong account.
• To edit your own personal environment variable list, you must use the following method: Click Start, Control Panel, User Accounts and Family Safety, User Accounts. In the task list at the left side, click Change My Environment Variables. You will be able to edit only the upper (personal) environment variable list.
After you have the dialog box open, you can create new variables, delete variables, or highlight and edit existing variables using the corresponding buttons.
If you need to alter a variable, you must understand what happens if there’s a conflict between environment variables defined in both the System Variables and User Variables lists. As a rule, Windows examines several locations for definitions, and the last definition seen wins. Windows sets variables from the following sources, in this order:
1. The systemwide variable list.
2. The personal variable list. (At this step, the PATH variable is treated specially. See the next section for details.)
3. Set commands in autoexec.nt. (This applies only for MS-DOS or Windows 3.x applications. See “The MS-DOS Environment” later in the chapter for more information.)
4. Subsequent definitions issued by set commands typed in a Command Prompt window or encountered in a batch file. These changes apply only to that particular window and will disappear when the window is closed.
Setting the PATH Environment Variable
If you write batch files or scripts, it’s useful to put them into one folder, and to add this folder name to the PATH variable, so that you can run your batch files and scripts simply by typing their names.
Because mis-editing the PATH variable can prevent Windows from finding applications it needs to run, Windows gives the “personal” PATH definition special treatment:
• For the PATH variable, the User Variables definition is added to the end of (appended to) the System Variables definition.
• For all other environment variables, a User Variables definition overrides a System Variables definition.
In other words, you can enter your own personal folder(s) into the User Variables definition of PATH without worrying about copying or messing up the system definitions.
To create a folder for your own scripts and batch files, use one of these two procedures:
• If you want to use the scripts and batch files only for your own use, create a folder, and put the full path to the folder into your “personal” PATH variable. For example, create a folder named c:scripts.
Then, add a PATH variable to the upper part of the Environment Variables dialog box (refer to Figure 29.2) with the value c:scripts. If you need to add more than one folder to your personal PATH, put a semicolon (;) between each folder name.
• If you want to create scripts and batch files that can be used by anyone who uses your computer, create a folder and be sure that its permissions are set so that all users can read it.
For example, create a folder named c:scripts. Right-click the folder, select Properties, and select the Security tab. If Users does not appear under Group or User Names, click Edit, then Add, and add “Users” to the list. Be sure that the Read & Execute permission setting is checked.
![]() To learn more about editing file and folder permissions, see “NTFS File Permissions,” p. 903.
To learn more about editing file and folder permissions, see “NTFS File Permissions,” p. 903.
Then, carefully edit the PATH variable in the lower part of the Environment Variables dialog box (shown in Figure 29.2). Add a semicolon (;) to the end of the existing text, and then add the folder name c:scripts.
Your folder now will be part of the PATH when you open a new Command Prompt window.
The MS-DOS Environment
If you still use MS-DOS programs, you’ll be glad to know that the 32-bit versions of Windows 7 still support MS-DOS programs.
Note
![]()
The MS-DOS and 16-bit Windows subsystems are not provided with the 64-bit versions of Windows. If you use a 64-bit version of Windows 7 and still need to run MS-DOS or Windows 3.1 applications, you can download and install the free Microsoft Virtual PC program from microsoft.com, or use VMWare from www.vmware.com. With either of these programs, you can set up a “virtual” computer, install a copy of MS-DOS, Windows 3.1, or any subsequent version of Windows, and run your older applications inside the simulated environment.
Be sure to install Virtual PC’s “Guest Extensions” inside the hosted operating system—these provide important enhancements. For example, they allow you to cut and paste between programs running inside and outside the virtual computer. This isn’t quite as effortless as the built-in support provided by 32-bit versions of Windows, but it works very well.
If you have Windows 7 Professional, Ultimate, or Enterprise edition, you might also be able to use MS-DOS applications installed in the Virtual XP system, which is a free download you can get from Microsoft.
Windows 7 and all other versions of Windows based on Windows NT run MS-DOS applications inside a program called ntvdm, which stands for Windows NT Virtual DOS Machine. Ntvdm is also used by the Windows 3.x support environment. It simulates the environment that DOS programs expect and makes them work correctly under Windows.
Ntvdm runs automatically when you attempt to start an MS-DOS or 16-bit Windows program. You don’t have to take any special steps to activate it, but you can tune it in several ways by doing the following:
• Configure user variables in the Environment Variables dialog box, as discussed in the section “Setting Environment Variables” earlier in the chapter.
• Make selections from the DOS window’s control menu.
• Make settings in the Properties dialog box for a shortcut to the DOS application.
• Set up custom autoexec.nt and config.nt configuration files so that you can address special memory, driver, or environment variable requirements a DOS program might have.
• Enter environment-altering commands at the command prompt.
I discuss these settings in the next several sections.
![]() For more information about virtual PCs, see “Taking the Virtual Machine Approach,” p. 72.
For more information about virtual PCs, see “Taking the Virtual Machine Approach,” p. 72.
![]() For more information about The Virtual XP system, see Appendix A, “Using Virtualization on Windows 7.”
For more information about The Virtual XP system, see Appendix A, “Using Virtualization on Windows 7.”
MS-DOS App Says Too Many Files Open
![]()
If you run an MS-DOS application and it gives an error message saying there are too many files open, you must modify config.nt (or create a custom config file). You should change the line that reads, for example, files = 40 to a larger number; for example, files = 100. See “Customizing Autoexec.nt and Config.nt,” later in this chapter, for instructions on modifying config.nt.
MS-DOS Application Displays Strange Characters
![]()
If your older MS-DOS application displays lots of strange characters on the screen, especially the combination ◊[, your program expected the support of a display driver called ansi.sys. You need to add the following line to your config.nt file, using the instructions under “Customizing Autoexec.nt and Config.nt” later in the chapter:
device=ansi.sys
Editing Advanced Settings for a DOS Application
If you’re experiencing difficulties while running a specific DOS program, you can fine-tune the VDM environment for the particular application, allowing it to run more smoothly, or in some cases simply allowing it to run at all. DOS property settings can affect many aspects of an application’s operation, such as (but not limited to) the following:
• The drive and folder (directory) selected as the default when an application starts
• Full-screen or windowed operation upon launch
• Conventional memory usage
• Expanded or extended memory usage
• The application’s multitasking priority level
• The application’s shortcut keys
• Foreground and background processing
Note
![]()
If the program is stored on an NTFS-formatted partition, the standard Security tab will also be listed in the Properties dialog box.
To edit these properties for a DOS program, do the following:
1. Find the program file or a shortcut to it.
2. Right-click and choose Properties.
Poke through each tab, and use the ? (question mark) button for help on the settings. Educational and game programs will most often require you to adjust the Memory and Compatibility settings.
Tip
![]()
The Screen tab’s Usage options determine whether the application initially comes up windowed or full screen. You still can toggle between views by pressing Alt+Enter. Of course, in full-screen display, the mouse is surrendered to the application. When you use a mouse with a windowed application, the mouse works within the window on its menus, and with Windows when you move the mouse back to the Windows desktop. No DOS-based mouse driver is needed. Mouse support is provided automatically.
Customizing autoexec.nt and config.nt
You can choose to further configure the MS-DOS and Windows 3.x environment by modifying Windows 7’s equivalent of the old CONFIG.SYS and AUTOEXEC.BAT files. These files are called config.nt and autoexec.nt and are used to configure each DOS VDM when it starts up. Just remember:
• The files CONFIG.SYS and AUTOEXEC.BAT in your hard drive’s root folder are completely ignored by Windows 7. If they’re there at all, it’s only to fool really old applications that won’t run unless they see that these files exist.
• The files config.nt and autoexec.nt in windowssystem32 are used, but only when Windows needs to start up an MS-DOS or Windows 3.x application. Any change to these files will take effect the next time you start the application—you don’t need to restart Windows.
The standard settings in config.nt as set up when Windows is installed are shown in the following listing. The REM comments have been removed for brevity. (If you upgraded your computer from an earlier version of Windows, your config.nt file might be different because the installer might have retained some of your previous operating system’s settings.)
dos=high, umb
device=%SystemRoot%system32himem.sys
files=40
You can edit the config.nt and autoexec.nt files with a simple text editor such as Notepad. They’re protected files, however, so you must run an elevated version of Notepad, using this procedure:
1. Click Start, All Programs, Accessories.
2. Right-click Notepad and select Run As Administrator.
3. Confirm the UAC prompt, or enter an Administrator password as requested. (Alternately, you can just type notepad in an elevated Command Prompt window).
4. Click File, Open, and browse to windowssystem32. Select autoexec.nt or config.nt as desired.
Tip
![]()
On my computers, I always change the files setting to files=100 and add the line device=%SystemRoot%system32ansi.sys.
device=%SystemRoot%
system32ansi.sys.
For more information about ansi.sys, see the next section.
Most of the settings used in MS-DOS 6 still work in config.nt, with some changes as noted in Table 29.2.
Table 29.2 Enhanced Settings for config.nt

If you want, you can create customized copies of config.nt and/or autoexec.nt and use them just with specific DOS programs. To do this:
1. Use an elevated copy of Notepad to create the new setting file(s) with different names. For example, you might save a modified config.nt as config_wordperfect.nt.
2. Locate the MS-DOS program’s .exe or .com file icon in Windows Explorer.
3. Right-click the icon and select Properties. Select the Program tab, and click the Advanced button. Enter the path to your customized config file.
Tip
![]()
Editing these files properly is no piece of cake. I suggest you have at hand a good DOS reference, such as Que’s Special Edition Using DOS 6.22, Third Edition. It’s out of print, but you can get a used copy at www.abebooks.com, among other places.
Issues with DOSKEY and ANSI.SYS
Two of the most common enhancements used on MS-DOS computers were DOSKEY and ANSI.SYS. DOSKEY provided enhanced command-line editing: for example, the use of the up and down arrow keys to recall previous commands. ANSI.SYS gave DOS applications a way to easily control the position and color of text output onto the screen.
Note
![]()
If you make changes to autoexec.nt or config.nt after having run an MS-DOS program from a Command Prompt window, you must close the Command Prompt window and open a new one for the MS-DOS subsystem to reload and take on the new configuration.
ANSI.SYS can be made available for MS-DOS programs simply by adding the line device=ansi.sys to config.nt (or an alternate config file). Unfortunately, no ANSI cursor support is provided for 32-bit Windows character mode (console) applications.
Conversely, DOSKEY—which has been enhanced significantly from the old DOS days—functions only in the 32-bit Windows console environment, and even if you attempt to load it in autoexec.nt, it does not function within the MS-DOS COMMAND.COM shell.
Batch Files
Although Windows Script Host is the most powerful tool for creating your own helpful programs, it’s also useful to know how to use the batch file language. Batch files let you take advantage of the hundreds of command-line programs supplied with Windows.
A batch file, at the simplest level, is just a list of command prompt commands that have been typed into a file whose extension is .bat or .cmd. When you enter the name of a batch file at the command prompt, Windows looks for a file with this name in the current directory and in the folders of the PATH environment variable. Windows treats each line in the batch file as a command, and runs them one after the other as if you’d typed the commands by hand. At this simplest level, then, a batch file can be a big help if you find yourself typing the same commands over and over.
Beyond this, there are several commands that you can use to write rudimentary “programs” within a batch file, so that it can take different actions depending on what you type on the command line, or depending on the results of the commands it executes. These “programming” commands have been greatly improved since the MS-DOS days, so writing useful batch files on Windows 7 is much easier than writing them was in the old days. In particular, the IF and FOR statements have been greatly extended. You can prompt the user for input. It’s possible to manipulate strings and filenames and perform arithmetic calculations. You can create subroutines within a single batch file. And there’s more.
Unfortunately, I don’t have room to provide coverage of batch file programming in this book, but I do in Windows 7 and Vista Guide to Scripting, Automation, and Command Line Tools, published by Que.
And some Microsoft documentation is available online. After reading this chapter, go to www.microsoft.com and search for these phrases:
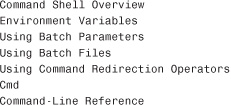
Then, open a Command Prompt window and type the commands

and so on.
Batch File Tips
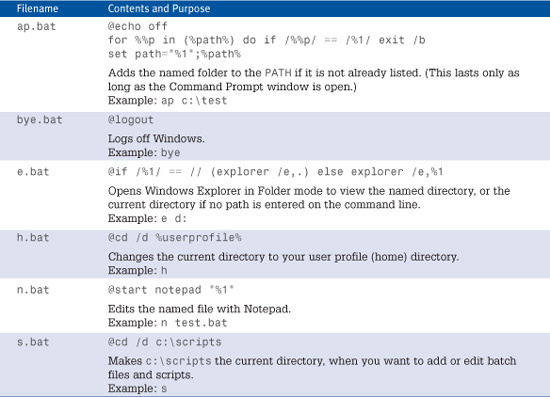
Table 29.3 lists several short batch files that I put on every computer that I use. These short command scripts let me edit files, change the path, view a folder with Explorer, and so on, simply by typing a couple of letters followed by a folder or filename. They don’t involve fancy programming, but they save me a significant amount of time when I’m working with the Command Prompt window.
Table 29.3 Useful Tiny Batch Files
Tip
![]()
To learn how to get the most from the batch files and the command line, get Brian’s book Windows 7 and Vista Guide to Scripting, Automation, and Command Line Tools.
If you create a c:scripts folder and add it to the PATH, as I discussed earlier under “Setting the PATH Environment Variable,” you might want to create these same batch files in that folder for your own use.
Windows Script Host
In the last decade or so, Microsoft has worked diligently to provide ways for programmers to gain access to the internal functions of commercial applications such as Word and Excel and of Windows itself. The approach is based on a technology called the Component Object Model, or COM, which lets a properly designed program share its data and functional capabilities with other programs—any other programs, written in any other programming language. If you’ve ever written macros for Word or Excel, you’ve worked with scripting and COM. One product of these efforts is Windows Script Host, or WSH, which provides a fast and easy way to write your own management and utility programs. Scripts have an advantage over batch files in that they can perform complex calculations and can manipulate text information in powerful ways because you write them in a full-featured programming language.
Scripts can massage, digest, and manipulate text files and data, view and change Windows settings, and take advantage of Windows services through COM objects provided as a standard part of Windows. In addition, if you have COM-enabled applications such as WordPerfect, Microsoft Word, or Excel installed, scripts can even enlist these applications to present information in tidy, formatted documents and charts.
Windows comes with support for two different scripting languages:
• VBScript—Nearly identical to the Visual Basic for Applications (VBA) macro language used in Word and Excel.
• JScript—Microsoft’s version of the JavaScript language, which is widely used to make web pages interactive. (JavaScript, by the way, is not the same thing as Java. Java is another programming language altogether.)
In addition, you can download and install scripting support for other languages. If you have a UNIX or Linux background, for example, you might want to use the Perl, Python, or TCL scripting languages. You can get free WSH-compatible versions of these languages at www.activestate.com.
If you are already versed in one of the scripting languages I’ve mentioned, by all means, use it. If you don’t already know a scripting language, VBScript is probably the best one to start with because you can also use it to write macros for Microsoft’s desktop applications. I’ll use VBScript in the examples in this section.
Creating Scripts
Just like batch files, scripts are stored as plain text files, which you can edit with Notepad or any other text file editor. To create a script file, choose a descriptive name, something like WorkSummaryReport perhaps, and add the extension that corresponds to the language you’ll be using. A script written in the VBScript language must have its filename end with .vbs.
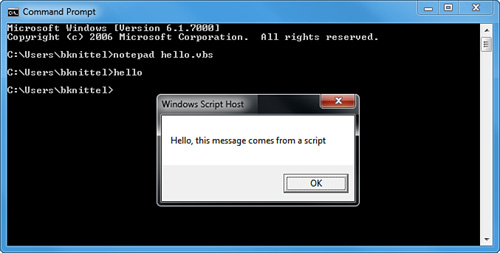
As an example, I’ll write a script that I’ll call hello.vbs. If you want to try it yourself, the steps are
1. Open a Command Prompt window by clicking Start, All Programs, Accessories, Command Prompt.
2. The Command Prompt window opens on the default directory usersyour_user_name. If you want to create the script in another folder, you will need to type in a cd command to change directories. (As I suggested earlier in this chapter, you might want to put your scripts into folder C:scripts, and add that folder to the PATH.) But for the purposes of this example, we’ll skip that and use the default directory.
3. Type the command notepad hello.vbs. When Notepad asks whether you want to create a new file, click Yes.
4. Type in the text
wscript.echo “Hello, this message comes from a script”
5. Save the script by selecting File, Save. You can leave the Notepad window open, or close it with File, Exit.
6. Bring the Command Prompt window to the foreground.
7. Type hello and press Enter.
If everything works, you see the dialog box shown in Figure 29.3. Click OK to close the dialog box.
Figure 29.3 The sample script displays a simple text message.
WSH can display its results in a window, as you just saw, or it can display results in the console window, as do most command-line programs. As you saw in the previous sample, the default is to display information in a window because the default interpreter for scripts is wscript. It’s usually best to change the default so that the default mode is the text-based console output method. To do this, type this command:
cscript //H:cscript //nologo //s
(Notice that the slashes are doubled-up in this command.) Now, type the command hello again. This time the script’s output should display within the Command Prompt window.
Some Sample Scripts
I don’t have room here to give you even an introductory course in VBScript programming. As I mentioned, that’s a topic that can fill an entire book. What I can do is give you some examples of how WSH can be used to perform useful tasks and to manage Windows.
Disk and Network Management
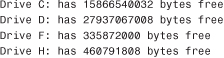
WSH comes with tools to examine and modify drives, folders, and files. Here is an example of a VBScript script that performs a reasonably useful task:

It displays the amount of free space on each of your computer’s drives. Type this script into a file named freespace.vbs in your batch file directory, and then type the command-line command freespace. On my computer this prints the following:
WSH can also work with networking features. The following VBScript script displays your computer’s current network drive mappings:

Windows Management Instrumentation
Windows Management Instrumentation (WMI) is a system service that provides access to virtually every aspect of a Windows computer system, from the hardware components up to the highest-level system services. For some components, WMI provides information only. Other components can be changed, and thus, as its name implies, WMI can be used to manage the system. You can use WMI to start and stop system services, monitor and stop applications, create drive mappings, share folders, and, with the appropriate updated WMI drivers installed, even manage system services such as Internet Information Services, Microsoft Exchange, and the Domain Name Service on Windows Server.
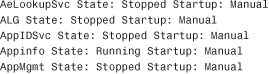
The following script lists the status of each system service installed on your computer. This script file can be named showservices.vbs. (The underscore at the end of some of the lines are part of the script.)
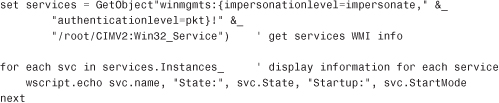
On my computer, the first few lines of output from this script look like this:
Remember, too, that as command-line programs, you can redirect the output of these scripts into a file. The command
showservices >listing.txt
puts the service list into file listing.txt, just as if showservices was a native Windows executable program.
Windows PowerShell
Microsoft has developed a new command-line environment called Windows PowerShell (WPS), which is installed as a standard accessory starting with Windows 7. WPS in many ways looks and acts like the familiar Command Prompt window, but it’s actually a very strange animal, and it gives you access to some very powerful programming tools. I don’t have room in this book to teach you much about it, but I will describe how it differs from batch file and scripts, and I’ll point you to resources that will help you learn more.
I used the word “strange.” Can a computer program be strange? Definitely! For one thing, most Windows PowerShell commands (which are properly called cmdlets) generate streams of objects, not text. Objects are computer representations of real-world things. They have properties that describe attributes of the things they represent, and methods that let you manipulate the things. For example, an object that represents a specific file on your hard disk might have properties like Name, Size, and LastWriteTime, and methods like Delete, Edit, and Open. Windows PowerShell works with objects in a new, unusual, and ultimately very powerful way.
Now, if you type dir in a regular Command Prompt window, the command shell interprets dir and generates a bunch of text listing the current folder’s files by name. The dir command is programmed very specifically to print information about files in text form. That’s all it can do.
In WPS, you can type dir and this will also print out a list of filenames, but something completely different is happening behind the scenes. In WPS, dir is a shortcut for the Get-Childitem cmdlet, which in its simplest use generates a stream of File objects; each object represents one of the files in a folder, and each object has properties and methods (for example, name and size). When an object (of any sort) lands in the WPS prompt window, WPS prints out a line of text listing the object’s most important properties. For a File object, this includes the file’s name, size, and the date it was created. So, when you type dir, WPS produces a stream of File objects and they end up as a nice, tabular listing of files.
The end result is the same as in the old Command Prompt environment, but it’s happening in a general, more abstract way. The cmdlet doesn’t know about or care about text or formatting: it simply spits out a bunch of File objects. And the WPS window will turn any list of objects into a nice tabular listing. Files, user accounts, hard drives, Windows services; whatever object a cmdlet throws into the WPS window turns into a nice text listing.
In addition, WPS includes a full-scale object-oriented programming language and has access to Microsoft’s .NET programming platform, which means WPS scripts can perform complex computations and communicate with other computers and networked (“cloud”) services.
WPS even lets you do complex things with objects without programming. You can use the familiar | pipe symbol to direct streams of objects from one cmdlet to another, and this lets you do very complex, specific things with tools that are separately very simple and general-purpose in nature. For example, the following command will delete all files in the current folder that are more than 6 months old:
dir | where-object {$_.LastWriteTime -lt (get-date).addmonths(-6)} | remove-item
It looks complex at first, but it’s not so bad. This command line strings three separate cmdlets together:
• dir—Spits out a list of all the File objects in the current directory. Here, they don’t land in the WPS command window, so they don’t make a text listing. Instead, the pipe (|) symbol instructs WPS to pass the objects to the next command.
• where-object—Passes just some of the objects through, based on the “filtering” condition inside the curly brackets. In this example, it passes through only those files that have not been changed for more than six months (that is, whose LastWriteTime value is less than the date/time six months back). So, objects representing just the old files are piped to the next command.
• remove-item—Deletes the hard disk files corresponding to each of the file objects it receives.
Caution
![]()
Don’t just open a WPS window and type this command to see whether it works! You’ll most likely delete a bunch of important files from your Windows profile folder. If you want to see whether it works, type just the first two parts of the command:
dir | where-object {$_.LastWriteTime -lt (get-date).addmonths(-6)}
This will print out a list of the selected files but will not delete them.
As I said earlier, you’re not limited just to using commands that you type into the WPS window. WPS has a full-scale programming language with variables, loops, subroutines, user-defined objects, and so on. You can use these at the command prompt or in script files. You also can create shortcuts (called aliases) for commonly used commands and scripts to make typing easier, and a bunch of aliases are predefined for you.
For more information about WPS, check out Brian’s book Windows 7 and Vista Guide to Scripting, Automation, and Command Line Tools or Windows PowerShell 2.0 Unleashed.
Task Scheduler
Windows Task Scheduler lets you specify programs to be run automatically at specified dates and times and on certain events like system startup, users logging on, or even the occurrence of any event that can be logged in the Event Viewer.
Note
![]()
When Task Scheduler runs a task as a different user than the one currently logged on, the logged-on user cannot see or interact with the program. Be sure that scheduled tasks can operate without user input and exit cleanly when they’ve done their work. And keep in mind that once an application or service is running, even if it was launched through a scheduled task, it will affect system performance just as if you started it manually.
By itself, the Task Schedule service does not significantly affect system performance, although the tasks it runs can. However, you can instruct it not to start specified tasks when the system is busy. You might want to do this, for example, if a particular task generates a lot of disk activity.
What kinds of tasks would you run with Task Scheduler? As I mentioned, the tasks need to run without user interaction. So, they are typically maintenance tasks such as defragmenting the hard disk, cleaning out temporary files, and so on. Windows uses Task Scheduler for this very purpose, and you’ll notice that there are several pre-installed scheduled tasks set up when Windows is installed to do this very sort of thing. Task Scheduler can also watch for the occurrence of any event that can be recorded in the Event Log.
Task Scheduler is especially useful with batch files and scripts, because these scheduled programs can usually be designed to run without any user interaction. It’s truly the ultimate automation tool because you don’t even have to be there when it’s working!
Note
![]()
Obviously, the computer has to be alive to run a task, so if you expect to do a disk cleanup at 4:00 a.m., be sure to leave the computer on. If a scheduled task is missed because the computer was turned off, Windows will perform the task the next time the computer is started, but the task will now be running while you’re using the computer, which is probably what you were trying to avoid by having it run at night.
There are two types of tasks you can create in Task Scheduler:
• Basic tasks—Designed to be run using the current user’s account, and support a single triggering event or time.
• Tasks—Can be run using any specified user account, and can be configured to run whether the user is logged in or not. Tasks can also be run in Windows XP or Windows Server 2003 compatibility mode, and can be configured to run with higher than normal priority if necessary.
To create a Basic task in Task Scheduler, follow these steps:
1. Open Task Scheduler as discussed earlier in this section. Task Scheduler displays in the top center pane a summary list of tasks that started and/or completed during the last 24 hours, and displays a list of active tasks below that. (Here, “active” means “defined and enabled to run at the specified time or event.” It doesn’t necessarily mean “actively running right now.”)
2. The Add Actions pane is located on the right side. Click Create Basic Task. The Create Basic Task Wizard opens.
3. Enter the name of the task and a description. Enter whatever you want, to remind you of what the tasks does. Click Next to continue.
4. On the Task Trigger screen, select when to run the task. You can choose daily, weekly, monthly, or one time; when the computer starts, when you log on, or when a specific event is logged.
You can use the When a Specific Event Is Logged option to trigger the task when a specific Event Log entry is recorded. For example, you could use this to perform some sort of notification if a disk error event occurs. You’ll need to enter the event’s numeric ID number.
Tip
![]()
To find an event’s ID number, find an occurrence of the event in the Windows Event Log.
5. Click Next.
6. Specify applicable time options, such as time of day, as required. Click Next.
7. Select what you want the task to do (open a program, send an email, or display a message). Click Next to continue.
8. If you selected Start a Program, use Browse to locate the program, batch file, or script. (For Windows applications, browse in the Windows or Windowssystem32 folders. For third-party applications, search in the subfolders of the Program Files folder. For scripts you’ve written yourself, browse to the folder in which you’ve stored the script or batch file.) Then provide any necessary command-line switches or settings, and if you want to specify a default drive and folder for the program, enter the path to the desired folder.
If you selected Send an Email, enter the information for sender, receiver, SMTP email server, message, and so forth.
If you selected Display a Message, enter the message title and message text. Then, click Next.
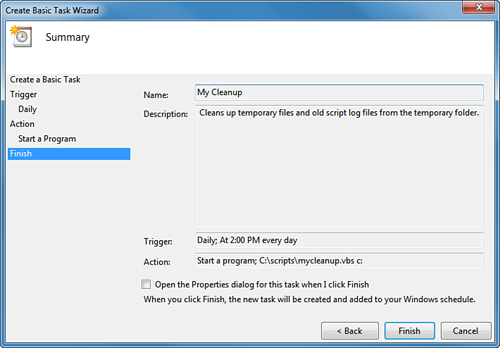
9. Review the task on the Summary screen (see Figure 29.4). If you want to set advanced options such as idle time, what to do if the computer is running on batteries, and what to do after the task completes, check Open Advanced Properties for This Task When I Click Finish. Click Finish to complete the task.
Figure 29.4 Completing the configuration of a basic task.
For more advanced scheduling, use the Create Task selection. The Create Task interface uses a multi-tabbed interface instead of a wizard. The General tab includes security options, while the Triggers tab permits you to specify multiple triggers for a task (the task will be performed whenever any of the triggers occurs). The Actions tab supports multiple actions in a task, the Conditions tab includes options to configure idle time, power, and network connection requirements, and the Settings tab supports conditions for running and stopping a task. Use Create Task, rather than Create Basic Task, when you need these additional settings in your task.