
9. Windows Media Center
Windows Media Center—What’s the Hubbub?
Windows Media Center (or WMC as I’ll refer to it from here on out) is included in Windows 7 Home Premium, Professional, Enterprise, and Ultimate editions. All other versions of Windows 7 do not include the WMC components. WMC is an outgrowth of Microsoft’s interest in evolving the common PC into a multimedia entertainment center. Due to specific hardware requirements, which include a TV tuner capture card with built-in MPEG-2 video encoding and decoding, a high-end graphics card with a minimum of 64MB of video memory, DVD recording, a fast processor, and other goodies, WMC is usually purchased as a preloaded component on a new PC.
Note
![]()
Complete books have been written about Windows Media Center Edition (the predecessor to WMC-equipped versions of Windows Vista), and I expect new books will be written about WMC as well, although I believe that within a week’s time of experimentation, a fairly savvy user can discover the ins and outs of WMC on her own. It certainly helps to have a bit of a primer, however, with some tips scattered throughout. That’s what this chapter is all about.
With the advent of the Windows Anywhere initiative, users without WMC-compatible hardware can purchase the hardware separately, install it, then upgrade the OS to an appropriate version of Windows 7 and enjoy WMC on their PC.
WMC adds the capability to do the following with a large TV-like interface using a remote control:
• Display and record TV shows
• Listen to cable, broadcast, and Internet FM radio
• Rip and play music CDs
• Play DVDs
• Manage and display your digital photographs
• Record DVDs
Of course, as you know, you can rip music CDs, play DVDs, and display your digital photographs using Windows Media Player and Windows Photo Gallery, as described elsewhere in this book. WMC essentially puts a new skin on those functions and integrates them with TV viewing and a few other goodies. Windows 7 Media Center includes easier access to IPTV content and TV guides, rich touchscreen capabilities, and a variety of tools for accessing, navigating, and searching through video content.
As we know, Microsoft (often standing on the shoulders of innovative giants) has helped push the industry to new heights, or at least to take a deep breath on the technology ascent, by codifying standards. Whether through fostering cooperation among technology companies or by forcing its own agenda, it doesn’t much matter. Progressive standards for such things as data CD recording, sound and video cards, high-resolution color displays, energy conservation, standardized I/O ports, Plug and Play (PnP) interfaces, as well as greater overall computer performance have often been championed by Microsoft. Standards, of course, serve Microsoft because its bread and butter depends on selling OSs that can run reliably on as many brands and models of PCs as possible.
WMC is an exciting milestone in the evolution of PC OSs that began in earnest back when the first spec for a multimedia PC (MPC) was issued by Microsoft. I remember writing, even somewhat wistfully, about the MPC in my earlier Windows books (3.11 and 95). At that time, it was a big deal to include in PCs the now-ubiquitous sound cards and CD-ROM drives. (I recall purchasing my first outboard SCSI-based CD-ROM drive from Toshiba for $600 and change.) The next step (learning from the woefully underpowered MPC spec) was the Entertainment PC 97 spec. The minimum system requirements for the Entertainment PC 97 are a 150MHz Pentium chip, a 256KB Level 2 cache, 32MB of memory, 3D audio, and the Universal Serial Bus. This spec was a subset of the Simply Interactive PC (SIPC) spec, to be technically accurate.
Of course, bloatware applications and the increasing speed demands of the once-gluttonous Windows itself also spurred the demand for quicker PCs. Unfortunately, this comes at some cost to the environment as well as our pocketbooks, as we feel obliged to continuously dispose of older computers and upgrade to newer ones. On the upside of this unceasing speed and size war (the belief that bigger and faster are always better) comes the likes of WMC. Were it not for lightning-fast CPUs, video cards, hard drives, front-side buses, DVD drives, and inexpensive color displays, PCs couldn’t begin to tackle exotic, highly data-intensive tasks such as DVD playback and TV recording.
Tip
![]()
You’ll find a lot of WMC information at www.hack7mc.com/ and www.microsoft.com/windowsxp/using/mce/default.mspx.
Following on the heels of the popular TiVo digital video recorder (DVR) and competing systems such as ShowStopper (from Panasonic) and ReplayTV (from ReplayTV), the WMC attraction to many is driven primarily by its capability to mimic a DVR. Although, as I mentioned, WMC also gives you MP3, CD, and DVD playback and digital photo slideshows, we could already do those with Windows Media Player and the Windows Picture and Fax viewer, respectively. The only difference in those departments is the delivery medium: WMC lets you control the show from the comfort of your armchair, using a remote control. The show itself plays on your TV or, preferably, through your TV projector in your home theater.
The idea of a computerized house—especially for entertainment delivery—is so appealing that home builders are beginning to build WMC machines, along with in-wall wiring and integrated large plasma screens, into newly built homes. Some developers are doing this on a large-scale basis, in hundreds of homes. This helps housing developers differentiate themselves from the competition.
Speaking of competition, alternative hardware and software packages have been on the market for some time that do all that WMC does, but it’s more of a mix-and-match approach to creating a home-entertainment PC. For TV viewing and recording, you have to add hardware such as a TV tuner/video card to your PC, be sure that the sound card and TV tuner work together, and so on. You can record and play back TV and even do text searches through recorded captions, looking for hot words in, say, a newscast. A quick search on the Web reveals a few well-liked products, including
• CyberLink PowerCinema
• SageTV Media Center
• SnapStream Beyond TV
Some of these programs have numerous features that WMC is missing, such as web-based control and media-server capability.
What’s New in Windows 7 Media Center?
Microsoft has upped the ante in terms of value-added features for WMC customers new and old alike. Many original features remain intact, but more importantly there are much-needed upgrades to the way existing features function and multimedia collections are accessed, displayed, or navigated. Windows 7 makes multimedia a core component of its operation to include native DVD playback (in other words, no third-party software installation), support for unprotected iTunes music, and support for AVCHD video from popular high-definition (HD) digital camcorders.
The following features cover most of what’s new in Windows 7 WMC:
• Start menu improvements include text visibility for enhanced readability and increased icon size for better viewing. WMC is now visually less cluttered than previous versions, the Start menu overlays any currently playing media, and it also recalls the last location strip between sessions instead of resetting to TV and Movies.
• Now Playing features upsized thumbnails, improving visibility over the miniscule proportions of Windows Vista, which irked many users. The thumbnail tile’s title is situated for better readability and usability—particularly among international versions of WMC in which foreign languages make for long title displays.
• Music library enhancements further improve user-friendliness, especially with regard to large audio collections. Obscure albums lacking album art are no longer treated to bland blue backgrounds with white text—random color schemes now help those entries visually blend with other artwork within the Music Library gallery.
• Music Now Playing is treated to a much-welcomed makeover. WMC begins music playback at the Now Playing page, but after a while the action items (for example, View Queue, Visualize, Play Pictures, Shuffle, Repeat, Buy Music) fade away into an animated backdrop of scrolling album cover art—a neat visual effect. If you press a remote control button or move the mouse, the action items come back into full view against the backdrop of album covers.
• Content rating is even easier through Rating Shortcuts. Press numeric buttons 1 through 5 on your remote or keyboard to rate music and pictures in real time.
• Turbo Scroll caters to large media collections. Hold down on left or right directional buttons to transition into an abbreviated content listing ordered in alphabetical chunks. Let go on the appropriate letter combination to position the library at an exact location.
• Shared Libraries builds upon the Home Group features of Windows 7 and is common across Music, Pictures, Video, and Recorded TV. You can peruse and enjoy content from a variety of computers on your home network and select among local media collections or browse among remote shared media libraries.
• Ambient Slideshow enhances the Pictures viewing experience. It launches both in screensaver mode and upon invoking the new Play Favorites feature on the Start menu. Ambient Slideshow corresponds directly to the content rating system by playing only the pictures you’ve rated as 3 stars or higher. Also provided are zooming features, zooming animations, and slideshows within slideshows for enhanced picture viewing experiences.
• Videos library enhancements are purely functional—no cosmetic changes are involved. Like other categories (Pictures, Music, and Recorded TV) it draws upon the Shared Libraries feature for remote and local media collections. H.264 (MPEG-4) playback is supported by default and the Video Play All feature cycles through all entries in a specific category in continuous playback mode. You can also resume previous playback exactly where you left off.
• Integrated TV Pack Enhancements provides additional support for Asian, European, and U.S. TV-viewing customers. Apart from upgrades for foreign audiences, the seek bar is interactive and allows you to select relative positions within playing content. Users that enjoy mouse navigation in WMC can enjoy greater interactivity than before.
Aside from functional improvements, Microsoft has gone to great lengths to improve the visual aspect of WMC. There are lots of subtle behavioral changes and visual improvements that further enhance the WMC customer experience. And with greater availability across a variety of Windows 7 products, WMC is fast becoming a fixture of the modern media-rich lifestyle.
The WMC Hardware
Suffice it to say that WMC machines have considerable hardware requirements. At the very least, a WMC machine has the following:
• A remote infrared (IR) sensor that enables the remote control to communicate with the computer and that also controls the cable or satellite set-top box
• A fast graphics card for smoothly displaying moving images such as video and TV playback
• A TV tuner that captures the television signal from a cable, satellite, or HDTV antenna source
• A hardware encoder that enables you to record TV shows from cable, satellite, or HDTV antenna to your computer’s hard disk in real time
• A TV output jack so that you can display WMC content on a TV connected to your computer
• A digital audio output that allows you to integrate digital audio from your computer into an existing home-entertainment system
You can read about Windows Media Center feature set and related information at www.microsoft.com/windows/windows-media-center/default.aspx.
The New WMC PC Form Factors
As of this writing, no brand-name manufacturers provide complete ready-to-run systems running Windows 7 Media Center. If you can’t find what you want in a brand-name system by the time this book reaches your hands, you can have a local computer builder design the perfect system for you. If it meets the minimum requirements for Windows 7 Home Premium, Professional, or Ultimate, it should be upgradable to the latest edition of WMC.
WMC PCs come in a wide variety of form factors that push the outside of the envelope of what we call a PC. They range from boxes that look much like PCs to those that most definitely do not. Figure 9.1 shows an example of several WMC PCs. As you can see, there’s a trend to blend the look of the PC with home-entertainment gear such as a stereo receiver. This is becoming the preferred form factor for audiophile types who don’t want their WMC machine to take up a lot of space or to look like a computer. This design also allows the computer to be rack-mounted or stacked with other A/V gear.
Figure 9.1 WMC PCs take major liberties with the physical appearance of a PC.

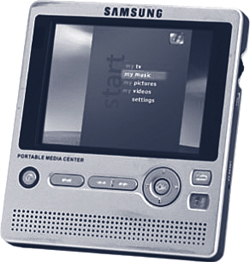
Due to the miniaturization of large hard disk storage, proliferation DVD writers, and availability bright wide-screen LCDs, another class of WMC-based computer has recently emerged: portables. These power-packed portable entertainment systems come in three flavors—a laptop computer on steroids, a Tablet PC, and a small, dedicated playback-only WMC machine. Figure 9.2 shows a small, dedicated WMC portable tablet device from Samsung. The Qosmio has a TV tuner card in it. However, some WMC laptops do not record TV, owing to the lack of a TV tuner card. Virtually all the small, portable WMC tablet-format devices are playback-only devices as well.
Figure 9.2 Laptops can run WMC, too, if they sport the necessary hardware. Dedicated tablet-format WMC machines are also available.
As of this writing, you can find some information about WMC PC hardware at www.microsoft.com/windows/windows-media-center/get-hardware.aspx.
Is Windows Media Center Based on Home or Business Versions?
Good question. I’ve had some debate with friends and colleagues about this. Media Center Edition (MCE) 2004 was based on Windows XP Professional. It included the capability to join a domain and encrypt the file system. When MCE 2005 came out, these features were no longer available, indicating that the 2005 version was based on the Home version of XP. This inability to join a domain handicapped business users and indicated that Microsoft’s primary focus for MCE was the home user. That decision must have generated a lot of negative feedback to Microsoft because the current version of MCE is included in a home version (Windows 7 Home Premium) and a business-capable version (Windows 7 Professional and Ultimate).
Can I Upgrade My Non-WMC PC to a WMC PC?
You might be wondering, “Can I install WMC on my own PC if I have the right hardware?”
You can if you have the right hardware and purchase a copy of Windows 7 Home Premium, Professional, or Ultimate. Each of these versions includes WMC and supports a wide range of hardware. You can purchase any of these versions as upgrades for previous Windows MCE computers; however, you do not need a WMC computer to use these products. You can also purchase a standard version and replace your current OS. Some compatible video/TV cards are as follows:
• AVerMedia AVerTV Combo ATSC/NTSC/QAM Tuner Card
• LEADTEK WinFast HDTV200
• HAUPPAUGE WinTV-HVR-2250 TV Tuner Card
• ASUS My Cinema EHD3-100 Dual Hybrid
• Diamond ATI TV Wonder HD 650 Combo Card
• DViCO FusionHDTV7 Dual Express DUAL HDTV/Analog TV Tuner Card
Tip
![]()
You’ll find a lot of WMC hardware information at the Microsoft Partner Directory at www.microsoft.com/windows/products/winfamily/mediacenter/partners/default.mspx.
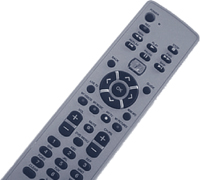
Microsoft makes a remote control for WMC machines, which I suggest picking up. It has useful keys along the top edge to control movies, skip commercials, and adjust the system volume. Figure 9.3 shows a typical remote.
Figure 9.3 Example of an IR remote control designed for WMC.
If you want to research how to upgrade to WMC or create a homebrew WMC box, you might want to do some web surfing. One such site available at the time of this writing is www.tomshardware.com/reviews/windows-7-htpc,2159.html.
Basic WMC PC Hookup
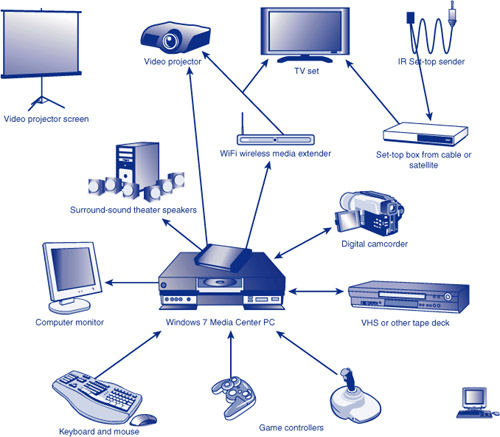
If you’ve had the joy (or job) of setting up a home-entertainment system or home theater, you know how convoluted the wiring can become. Assuming you have mastered the typical scenario with a TV or projector, an A/V switch, multiple video input devices, Dolby 5.1 (or 7.1) sound, and consolidating your remote controls, installing a WMC computer into your A/V arsenal is a relative no-brainer. Figure 9.4 displays a sample of the potpourri of gear you can integrate into a WMC setup.
Figure 9.4 A Windows 7 WMC PC can serve as a creativity and entertainment center, integrating a mess of equipment.
Leaving out the Cray computer, five digital HD video dishes on the roof, and the four subwoofers you’re likely to have accumulated over time if you’re a home theater nut, Figure 9.5 shows a typical basic WMC hookup.
Figure 9.5 A typical WMC wiring diagram.
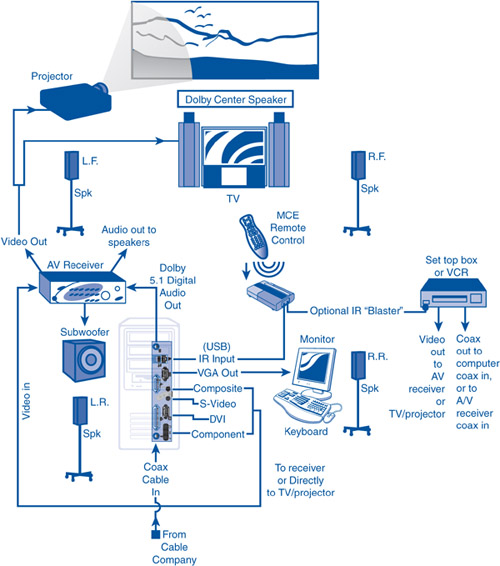
Notice in Figure 9.5 that a relationship exists between the cable or satellite box and the infrared blaster that connects to the IR receiver for the WMC remote control. This allows the single remote control to also control the cable/satellite box.
Also note that, depending on your computer’s video card, you have more or fewer options for output to external display hardware (projectors, TV, and computer video displays). Most WMC computers have at least a composite video output with which to drive your TV or projection unit. For the cleanest image, though (especially if you are using a projector), you need a higher-resolution video connection. The next step up is an S-Video output. Obviously, your TV/projector must have an S-Video input for this to work. Moving up from there, many projectors have a VGA input, just like on the back of a computer monitor. I run a long VGA extension cable from my WMC machine to my projector using such a cable. I can run the projector in 1024×768 mode with a nice resolution and even do word processing or web surfing on my 10-foot screen, sitting in an easy chair with a wireless mouse and keyboard.
My TV Tuner Is Not Working
![]()
If you have a Media Center tuner that either is not supported by Windows 7 or does not work under Windows 7, you can often resolve the problem by going to your manufacturer’s website, downloading the latest Windows 7 driver, and installing it. This worked for me on my Toshiba Satellite with an external USB TV Tuner. If you have supported hardware, but the driver fails to load, you need to determine why. Some helpful troubleshooting device driver suggestions can be found in Chapter 26, “Keeping Windows 7 and Other Software Up to Date.”
For the ultimate in clarity, you have to use the DVI as your conduit to the projector. My projector (Sanyo Z2) has a DVI connector, as does my PC. The catch here is that DVI cables are expensive, whereas VGA cables are not, and S-Video and composite video cables are super cheap. Some sites online will sell you DVI cables at a fraction of what they charge at computer stores, though. (An excellent cable source is www.csccable.com.) Keep in mind when considering your connection type that clarity will go from best to worst, in this order: DVI, VGA, component, S-Video, composite.
Media Center Extender
After folks catch on to the idea of WMC computers, they will not want to be trapped in the one entertainment room the computer is directly tethered to. A series of gadgets called the Media Center Extender lets you gain access to PC-based content for any connected (wired or wireless) TV or monitor within the house. To this aim, Microsoft is focusing on a new generation of products that will allow access to digital entertainment, such as live and recorded TV, photos, movies, and music that resides on a Windows 7 Media Center PC from any room in the home.
Since the release of the first version of Media Center in 2004, a variety of hardware makers have released products with Media Center Extender technology embedded in them. This includes many new TVs, set-top boxes, and the Microsoft Xbox 360. Set-top boxes ship with remote controls. These products typically range in price from $100 to $250.
Tip
![]()
Here’s a video about how to set up an Xbox 360 as an extender: www.microsoft.com/windowsxp/mediacenter/videos/Xbox360connection.asx.
Here’s a good FAQ on Media Center Extenders: www.microsoft.com/windows/products/winfamily/mediacenter/extenderfaq.mspx.
Other manufacturers, incidentally, are working on their own implementations of this grand idea, independently of Microsoft. Onkyo, Sony, InterVideo, Linksys, and HP are some of the manufacturers releasing similar hardware devices and systems, some of which will work with WMC and some of which will be for their own platforms. We’re beginning to see many (mostly wireless) schemes for integrating more and more of the home with the computer-based entertainment system.
The WMC Functions
As mentioned earlier in this chapter, WMC is simply a program that runs as a shell on top of Windows 7. The program path is %SystemRoot%ehomeehshell.exe.
Note
![]()
The “eh” means “electronic home,” which is an overarching Microsoft initiative for developing the networked home of the future, based on Microsoft technology.
The shell has a large-print GUI that at first suggests it is designed for people with vision disabilities. It is certainly a boon to the visually impaired, but the thinking behind the interface was to make it easier to read on a TV screen. If you’ve ever used WebTV, you know what I mean—reading normal computer-sized text on a TV set can send you running to the optometrist for a checkup.
When you boot a WMC-enabled computer, it comes up looking like any normal Windows PC. Nothing notable happens until you run the WMC program. Your desktop and Start menu sport a little green icon that launches the WMC interface. Then, you see the WMC Start screen. When it appears, maximize the window; it then looks like the screen shown in Figure 9.6.
Figure 9.6 A typical WMC Start screen.
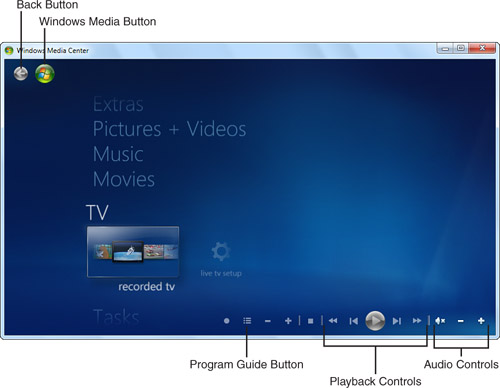
The number of options on the Start screen varies depending on the hardware in your computer. If you don’t have an FM radio function on your TV card, for example, you won’t see any radio functions (as is the case here).
The following sections discuss the central features of WMC, but with emphasis on a few tricks for each one instead of telling you how to use them. Their use is actually straightforward, and you really don’t need me to explain it to you. Suffice it to say, you engage each function of WMC by scrolling vertically to select the main function, or horizontally to select a subfunction, and then simply clicking the name (or alternatively using the remote control’s up and down arrows to highlight the name) and pressing the Select button.
No Video in WMC
![]()
If the device driver is loaded and functioning properly and you are still unable to see live or recorded video in WMC, it is time to look at signal-related issues. First, be sure the cables are connected properly. If you have another device, such as a portable TV, you can use to verify that the cables are connected properly and carrying a valid TV signal, do so. That way, you know that the cabling is not an issue. You may also find that the signal is not properly formatted for your TV tuner by using an external device.
If you get a good video signal and you still can’t see any video in WMC, perhaps WMC is not properly configured. The best way to test and verify your signal setup is to go to the Start page, select Tasks, Settings, TV, Set Up TV Signal, and then manually configure your TV signal. When you get to the TV Signal Setup dialog box, click the Next button to proceed to the Select Your TV Signal dialog box and let WMC attempt to automatically detect your signal. Failing this, TV Setup will give you the option to let WMC try again or you can choose Let Me Configur My TV Signal Manually. Verify your settings, or change them, to the correct signal provider. Use Cable for a TV signal from a cable set-top box, Satellite for a signal from a satellite provider (Dish, DirecTV, and so on), or Antenna for a public broadcast antenna or coaxial output from any type of signal provider. Then, move on to the Select a Working TV Signal dialog box. This is where you get the opportunity to select your TV Tuner’s input signal. If you use a public broadcast (coaxial cable) signal, your input should be on channel 2, 3, or 4, with 3 being the most common. S-Video or composite video are more likely to be used by satellite and cable boxes, but some cable boxes also provide a coaxial output. If you use a cable box with a coaxial output, check the back of the box for a switch to set the channel to output the signal on. Usually, it is set to channel 3 with an alternative of channel 4. If you are unsure of your input channel, a simple test is to just try each input choice one at a time and see whether you get a signal in the preview window. After you obtain a signal, click Next and work your way through the rest of the dialog boxes until you complete the video setup.
For example, my TV tuner has coaxial and composite TV signal inputs. My signal provider is a DirectTV HD DVR with HDMI, composite, and YbPbR outputs. It is designed to provide HD signals to HD devices, but my TV tuner is an SDTV device. When I first connected it using the composite inputs, I could not figure out why I was not getting a picture. I was fairly confident that the cables were okay because I was getting sound. Then it dawned on me that I had my DVR set to provide an HD picture to my HDTV at 1080i. HDTV signals are output only on the HDMI and YbPbR outputs. To get a video signal output on the composite video outputs, I had to reconfigure the DVR to SDTV 480i mode.
Movies
Windows 7 separates the Movies and TV categories in WMC. The Movies library now contains its own subcategories, such as Title, Genre, Year, Parental Rating, Type, and Date Added. Little has changed visually for the Movies library, but it is capable of sharing content from other computers on the network. Out-of-box support for H.264 in Windows 7 includes Media Center Extenders (both stand-alone and integrated implementations) and the XBox 360 in extender mode.
Playback options include the ability to continuously play all videos in a specific gallery. Like slideshows, you can have a nonstop panorama of your favorite memorable moments caught on camera—such as a collection of your favorite vacation videos. Both Movies and TV have the ability to resume playback wherever you previously left off—no more seeking to the place where you were interrupted last time.
TV
Although it’s novel that you can use your computer to watch TV, who cares? Personally, I never thought there was much worth watching on the tube anyway. Then again, I never have made a science out of TV program selection the way some people have. So, I end up channel surfing when I have some downtime, missing the beginning of a show I would have liked to see. Or maybe a friend tells me about an excellent program after the fact, when it’s too late.
The electronic TV Guide in WMC has made a friend out of TV again and changed my watching habits. The Guide is your online TV programming guide, so you can see what is on TV and perform searches for programs you might want to see, prearrange recordings of upcoming programs, and so forth.
Using the Guide, I’m finding that there are some amazing shows from time to time—excellent documentaries, music programs, and old movies, for example. I can cull through two weeks’ worth of upcoming programs using keyword searches and hone in on something I’d like to see. For example, recently I ran a keyword search on “music” and landed on a documentary about Joni Mitchell. I also set the DVR to record some weekly series, such as PBS’s Nova and the daily broadcast of the BBC news. They stack up on my hard drive, and I can watch them whenever I get around to it.
WMC has three advantages over and above a competing service such as TiVo:
• I don’t have to pay a monthly subscription charge (or lifetime charge) to access a TV programming guide.
• Nobody is keeping tabs on my viewing habits. (TiVo reports what you watch, and this data is used as input for various marketing databases.) Even if you can opt out of the data collection and the collection is anonymous, many people don’t bother. In essence, many TiVo watchers’ habits are being studied en masse.
• I don’t need to rent or purchase another piece of hardware. I already have my computer, and it’s a multifunction machine. It does a lot more than just tune in and play back TV shows.
On the downside, though, TiVo has some features that are more advanced than those offered by WMC. For example, if you have both satellite and cable feeds, TiVo can combine both program guides into a single onscreen grid. And, because TiVo is a simple machine, it’s not likely to go haywire just when the Super Bowl is about to begin. A TiVo also has the advantage of being a dedicated device. For example, if your WMC machine is recording the latest episode of America’s Funniest Home Videos, you’re probably not going to be able to effectively play World of Warcraft.
Setting Up the Guide
Before you can benefit from the Guide, you have to configure some settings. Go to the Start page and click Tasks, Settings, TV, Guide.
Tip
![]()
To program WMC to record an upcoming show, highlight the show in the Guide and press the Record button on the remote or on the keyboard. One press records the individual show. Press it again to record the series.
The Guide downloads new data at a time you choose on the Settings screen, keeping the listings up-to-date. It does this in the background while you’re doing other work. Your computer has to be on, however.
The Guide displays channel and network information, titles and times of shows, and information about each show. You can drill down to check out an upcoming show to determine whether it’s one you’ve seen, for example. You select a show and then click More Info/Details to do this.
When you’re watching live TV, the DVR is at work in the background, even if you’re not recording a previously scheduled show. It records what you are watching live, so you can press the Pause button (onscreen, on your keyboard, or on the remote) and go grab a snack. While you’re gone, the recording continues, although the playback is paused. This way, when you return, you just press the Play button and you’re back in the groove, right where you left off, without missing any of the action. This is possible only because a WMC computer is fast enough to enable the DVR to record one thing and play back another simultaneously. Thus, it’s writing to the hard drive and reading from it more or less at the same time.
Tip
![]()
If you want to record (and save) a program you’re watching live, press the Record button on the remote or keyboard. Otherwise, the program isn’t saved to disk.
Tip
![]()
We all hate commercials, and DVRs let you skip them quite easily. If your WMC computer has a keyboard, it probably has a Skip Ahead key. So does your remote. This key jumps the playback ahead 29 seconds per press. Because commercials are typically 30 or 60 seconds long, one or two presses skips a commercial. I’ve gotten good at guessing the right number of presses to skip a spate of commercials in just a couple of seconds. If you get too aggressive, you’ll need to back up. Each press of the Replay key on the remote backs you up 7 seconds.
WMC interleaves the hard disk reads and writes so intelligently that no recorded or played-back frames are dropped. Caching of video data in separate RAM buffers helps make this possible. If you’re not taxing the system heavily by doing other highly disk- or CPU-intensive computing in the background, this works flawlessly. WMC is given high priority by the OS by default, and I haven’t noticed dropped data, even with a large number of other tasks running.
Owing to this same sleight of hand, you can also record a live show in the background and view a previously recorded one—a nice feature that other DVRs can perform. You cannot, however, watch one live show while recording another live show unless you have multiple TV tuners installed. This is because a TV tuner can tune to only one channel at a given time.
Heavy Disk Consumption in Live TV
Unfortunately, the file format Microsoft originally used for the Vista and XP WMC DVR (DVR-MS) is not very efficient, especially if you use the highest-quality settings. The files appear to be equivalent in size to the digital video files you would import from a DV camcorder. Figure about 3GB for a one-hour show. A half-hour show consumes about 1.5GB. Windows 7 uses a new WTV format (using the .wtv extension), which will not play on Vista and XP machines—but DVR-MS will play in the new WMC. WTV replaces DVR-MS for recorded TV shows for playback on Vista Media Center with TVPack2008 and Windows 7 computers. There’s simply no way to utilize WTV files on unsupported machines, and copy protected WTV files can be played only on the machine where they are originally recorded. WTV recordings can also access digital video broadcasting (DVB) subtitles for playback and records all audio streams (that is, audio descriptions), unlike the DVR-MS format.
Microsoft’s decision not to use a more compressed file format such as WMV or DivX isn’t sensible, in our opinion. Now Microsoft has decided to employ another format that doesn’t work outside WMC, WMP, and so on. You can, however, view WTV recordings in Windows Vista’s Media Center (and related extenders) with the additional TV Pack.
One hour of Xvid or DivX consumes roughly 350MB—almost a factor of 10 difference! Even normal DVD data is smaller (about 2GB per hour). There are ways to convert Microsoft’s format and store it as Xvid or DivX, but the couple of programs that are out there are still in beta stages as of this writing (for example, tvshowexport).
Tip
![]()
You can lower the quality level as a global default but still set the quality to a higher level for individual programs you intend to record. Use the Advanced Record settings for the program in question.
This flaw seriously limits the number of shows you can keep on the hard disk at any one time, especially at the highest-quality setting. You can choose a lower-quality setting as the default for all recordings, but you might not like the results. The four levels of record quality are fair, good, better, and best.
Table 9.1 shows the amount of hard disk space used for recording video, as well as the data rate used.
Table 9.1 Hard Disk Consumed Per Hour of Recording

Pictures + Videos
Pictures + Videos is simply a slideshow presenter and video manager. You point the program to the directory (the default is Pictures) containing your digital photos, and you can step through the pictures manually or let the slideshow feature run automatically. Actually, the slideshow effect is quite pleasing because it does a cross-fade and some panning around in a bit of a random way to give a little more professional feel to your slideshow. (Some people call this the “Ken Burns” effect, after the documentary film maker Ken Burns who so often uses old still images in his productions.)
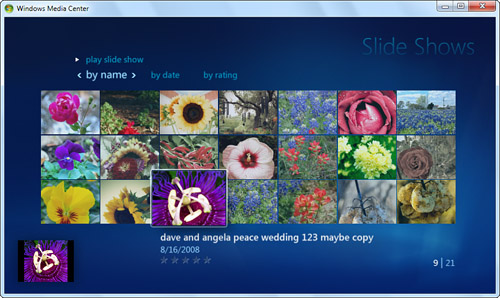
Windows 7 introduces the new Ambient Slideshow that launches as a screensaver when you initiate Play Favorites from the Pictures + Videos menu. All pictures you personally rate 3 stars or higher are pulled into the Ambient Slideshow with zoom in, zoom out, and zooming animation features. It can also play slideshows within a slideshow selection. The animation starts off as a gallery wall of your pictures (see Figure 9.7). The new ratings system places your rated pictures into various buckets that WMC uses to draw its slideshow images from to produce the gallery wall and other effects.
Figure 9.7 View your image collection as a slideshow in WMC.
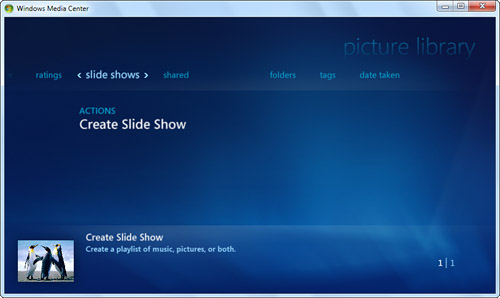
The Shared category of the Pictures Library inherits the Shared library, which includes images from other computers on the network. You can also create custom slideshows using the Create Slide Show action under the Slide Shows category heading, as shown in Figure 9.8. If you hold down left or right directional arrows on your remote, Turbo Scroll will fast-forward images through the slideshow.
Figure 9.8 Create custom slideshows from your picture collections.
Personally, I have all my photos stored in my external FireWire drive because there are so many of them. So, I have to direct Pictures to find them there. You can do this by adding a folder to watch (Tasks, Settings, Library Setup) or creating a shortcut to the actual source of your files and putting that in Pictures:
1. Arrange Windows Explorer so that you can right-click and drag your photo folder into Pictures.
2. Left-click the relocated photo folder and select Create Shortcut Here from the context menu that appears.
3. When you go to Pictures in WMC, you’ll now see a folder there with the name of your photo folder. Open that folder to see the pictures.
When you play your slideshow, it begins at the level of the open folder. If you have your photos arranged in folders, like I do, first drill down into the folder to be included in the slideshow. Photos in the folders below the current level will not be displayed. You can use the remote control or keyboard to step through the slides.
If you just stick in a memory card from your camera, you can view those photos without even loading them onto the hard disk. Just do the following:
1. Insert a memory card.
2. When prompted by AutoPlay, select View Pictures Using Windows Media Center.
3. The Play Slide Show menu appears with the memory card selected. The name varies depending on the type of media inserted. For example, if your pictures are on a memory stick, the media is called MEMORYSTICK. If you are using an SD memory card, the media is called Microsoft WPD FileSystem driver.
You can add music to your slideshow (and even a playlist consisting of a number of files). This is a nice feature to spice up your slideshows. This way, even if you are boring your audience with endless pictures of your baby, at least they’ll have some music to listen to.
Follow these steps:
1. From the WMC Start screen, go to Music and start your music playing first.
2. Return to the WMC Start screen and go to Pictures.
3. Click Tasks, Settings, Pictures to choose whether the song information shows onscreen while songs are being played.
4. Move back a page by clicking the Back button at the top of the WMC window. (It looks like a green left arrow.)
5. Start your slideshow by selecting Slide Show.
Tip
![]()
You can print a picture when stepping through images from WMC. When the picture you want to print is onscreen, press the More Info/Details button on the remote control. Then, choose Picture Details. Next, choose Print from the menu and Print once more when prompted to confirm your selection to print the image.
Music
This feature works in conjunction with Windows Media Player. WMC puts its interface (skin) on top of WMP. You can play audio CDs, copy CD tracks to your Music library, or play your library. When playing CDs or files from the library, song and album information (if available) is displayed onscreen. If you use another program—such as iTunes, MusicMatch, or WinAMP—to organize and play your MP3, WMA, or AAC files, you’re out of luck unless you also import your files into WMP. But be careful that you don’t rearrange your files in WMP and then mess up your song organization in your other player.
For dropping in a CD and playing it straight away, do the following:
1. Run WMC or press Start on the WMC remote.
2. Insert the CD. It should start to play.
3. If you want to copy the CD files into your Music library, select Copy CD.
When your MP3 files are all organized using WMP, run Music. You can play back tunes and view visualizations on your TV or computer monitor. You have to use WMP to create playlists, manage your files, and modify ID3 tags (things like genre, artists’ names, and so forth), however.
Click the Visualize button to switch the screen to a series of sometimes-lovely and mesmerizing motion graphics. WMC uses the same visualizations as WMP. You can find and install new ones by searching the Web for “visualization” and downloading ones designed for WMP.
Some Tricks of the Trade
For the most part, using WMC is intuitive. You might need a bit more information in some areas, however, to get the most out of WMC. In this section, we look at a few of these items, such as
• Playing DVDs and other video files
• Viewing TV shows on your HDTV or projector
• Broadcasting TV shows to your TV or projector
• Burning DVDs from recorded TV
• Setting Parental Control ratings
Playing DVDs and Other Video Files
After setting Windows Media Center as the default DVD player, simply inserting a DVD into a DVD-ROM drive should result in Media Center playing the DVD. To go to the DVD menu (where you can change scene selections, change languages, or choose your DVD’s special features), press the DVD Menu button on the remote.
You can change the language, closed captioning, and remote control option defaults for all DVD playback in the main settings screen in WMC. (Go to the Start screen and select Tasks, Settings, DVD.)
Viewing TV Shows on Your HDTV or Projector
If you want to watch your recorded or live TV on something other than your computer screen, your computer must, obviously, have an output your TV can accept. I discussed this earlier in the chapter. Most HDTVs and many projectors have DVI or VGA connectors. These are the preferred methods to use to connect the display output of your WMC computer to your HDTV or projector.
The key to obtaining the best picture is to choose an output resolution that corresponds to your HDTV or projector display resolution. HDTV supports 480i/480p at 720×480, 720p at 1280×768, and 1080i/1080p at 1920×1024. If your projector is not an HDTV projector, you need to refer to your documentation to determine the best output resolution (usually 640×480, 800×600, or 1024×768) to use for your VGA connection.
The truly nice feature about using your HDTV, or projector, as the output of your WMC computer is that your HDTV becomes the primary display of your computer. If you use a wireless media center keyboard with built-in trackpad (mouse), you can operate your entire computer from your couch. This opens up many possibilities for family entertainment—from using your WMC computer as a DVR, to playing music from your CD collection, watching DVD movies, playing video games, or even browsing the Internet.
If your WMC computer is in one room and your HDTV or projector is in another room, one easy method to connect them is to use a Microsoft Xbox 360. To connect your WMC computer and Xbox 360, you need the following:
• WMC computer with a wired or wireless network connection
• Microsoft Xbox 360 with a wired connection, or the optional wireless network adapter
• A network hub for a wired connection, or a wireless access point, router, or hub for a wireless network connection
• Optional Xbox 360 Universal remote control
• An SDTV with composite inputs or an HDTV with YPbPr inputs
After you have assembled the required hardware, the next step is to set it up, connect the various cables, and then configure the software. The basic process for a wireless network is as follows:
1. Install the wireless network adapter to the Xbox 360.
2. Connect the Xbox 360 AV HD adapter cable to the Xbox 360, set the Xbox 360 switch to HDTV, and connect the other end of the cable with three RCA male connectors color-coded green, red, and blue to your HDTV YPbPr inputs—green to green, red to red, and blue to blue. Then connect the audio inputs using the other set of color-coded connectors, yellow, red, and white, to your HDTV audio inputs—red to red and white to white. Leave the yellow connector unused.
Tip
![]()
If you have a problem connecting your Xbox 360 to your SDTV/HDTV, check out the Xbox 360 support page at support.xbox.com/support/en/us/xbox360/hardware/console/setup/ConnectToTVList.aspx.
3. For an SDTV with composite inputs, set the Xbox 360 switch to TV and connect the other end of the cable to your TV’s composite inputs. Connect yellow to yellow (video), red to red (right audio), and white to white (left input). If your TV has one audio input, use the red one.
4. Set your HDTV to use the YPbPr (component video) inputs. If you use an SDTV, set it to use the composite or monitor input.
Note
![]()
Optional Xbox AV cables are available with S-Video and VGA connectors.
5. Boot the Xbox 360 and configure the wireless network card to match the settings in your wireless access point, router, or hub.
6. Open WMC and go to Start, Tasks, Add Extender, and step through the Extender Setup Wizard.
At this point, your Xbox 360 should be live and capable of accessing all the content on your WMC PC. You can use the Xbox 360 universal remote, or your WMC remote, to control the displayed Media Center Extender menus.
Broadcasting TV Shows to Your TV or Projector
Getting your TV signal to your TV can be a problem if your WMC computer is not in the same room as your TV or if you do not have a Microsoft Xbox 360. Your cleanest and clearest signal is over a DVI cable, but these are expensive—especially in any significant length. No matter which kind of cable you use (S-Video, composite, component, VGA, or DVI), you’ll likely end up drilling holes into your house or apartment, or at least snaking the cable around the room and possibly tacking it around your baseboards. What a hassle.
Tip
![]()
Some short-range TV transmitters have an IR relay built in to them, so check that option first. The RCA job I bought did not.
If you’re like me, you’ll want a quick-and-dirty solution, at least as proof of concept, until you have that free Saturday to venture into the depths of your crawl space under the house and install the more permanent wiring. So trek down to your local electronics store (for example, RadioShack) and purchase a short-range A/V transmitter/receiver combo designed for this purpose. I bought a set (RCA brand) for about $100. These transmit and receive composite video and accompanying stereo audio. You connect the small transmitter box to the computer’s video and audio outputs, and connect the other (receiver) module to the TV or projector. The results, in my case, didn’t look too bad, either. I was surprised. Check the specs on the package to see how far it can broadcast, and be sure you can return it if your walls turn out to be too thick; there is metal or some other signal blockage; too much video or audio noise is introduced by your microwave oven; or the TV and computer are too far away from each other for the product to work properly.
Tip
![]()
Don’t confuse the IR blaster that comes with the WMC computer with the IR receiver that’s typically built in to a little box that has a USB connector on it. Your little WMC remote control receiver box has two mini jacks on the back that you can plug IR blasters into. (A blaster typically has a long, skinny wire and a little IR module on the end.) You can use blasters to change the channel on external devices, such as set-top cable boxes or your VCR. Consult your computer’s manual for how to position the blaster on your set-top box or VCR so that your remote control keypresses are passed through to those devices.
I originally made the mistake of thinking these little IR pods were receivers. They are not. Point your remote at them, and they do nothing. All they do is repeat IR signals received by your IR receiver module along to another device. For tips about using the set-top box IR pods, read this URL (despite referencing XP MCE 2005, the setup information still applies): www.microsoft.com/windowsxp/mediacenter/using/setup/settop.mspx.
That leaves one additional issue: the remote control signal. I have my projector upstairs and my computer downstairs. I wanted to use the WMC remote. So, how was I going to get the IR signal to the IR receiver on my WMC computer? Again, the solution was found at the local electronics store—an IR extender that uses radio frequencies to transmit the IR signal between rooms.
So, I purchased an IR remote control extender. Similar to the A/V transmitter, this gadget has two parts: a transmitter and a receiver. Set up the transmitter near your TV or projection screen. Put the receiver near your WMC machine with its IR blaster pointed toward the WMC IR receiver (what you’d normally point the remote control at). Now, you can use your remote from the comfort of your recliner. It will relay the signal back to the computer.
After you get the IR remote control working and the image coming through to your TV or projector, you might also have to reduce the size of the WMC window on your computer screen if you want to see the entire image on your TV or projector. This can take a little trial and error. The WMC window is completely sizable, just as any window is, and as you resize the window, the video image resizes accordingly.
On my system, I position the WMC window all the way into the upper-left corner of my computer monitor and then drag the window’s lower-right corner diagonally until the window fills the projector’s (or TV’s) image. Because I have my projector in another room, I save myself the hassle of running back and forth between rooms by temporarily connecting a small TV monitor that sits beside my computer. I use that to make this adjustment. Then, I switch the output back to feed the projector.
Tip
![]()
If you don’t like the WMC video player, the files the WMC DVR creates (they have the extension .dvr-ms and you can find them in the Recorded TV directory on the drive specified in the WMC Recorder settings) can also be played by WMP or other, more feature-rich players, such as BS.player.
Burning DVDs from Recorded TV
An obvious trick you can perform is to create a DVD or VHS tape of shows recorded from TV + Movies. One reason to do so is to keep the shows to watch months or years from now, without tying up hard disk space in the meantime. (Be sure you are aware of copyright laws that pertain to the shows you want to copy, of course.) If your WMC computer includes a recordable DVD drive, you are already capable of creating your first DVD. It’s a simple process with WMC. Just follow these steps:
1. Insert a blank recordable DVD in your DVD recorder.
2. Select Recorded TV in the TV category.
3. Select the TV show you want to record.
4. Press Enter on the selected title or right-click to bring up the details window.
5. Press the right-arrow key or click the Actions entry.
6. Under Additional Commands, choose Burn a CD/DVD.
Now that you have recorded your first TV show to DVD, you may have noticed that it recorded everything that occurred during your recording. This usually includes a few minutes of the previous show, commercials, and a few minutes of the following show. That’s a lot of extra material that you probably don’t want to watch, and it is certainly a lot of storage space you don’t want to waste. So, what can you do about it? Quite a bit, actually.
Windows 7 includes Windows Movie Maker. It’s a basic application for merging video clips with simple transitions and creating an output file. The output file has several options—from playback on your computer as an AVI file to reducing it in resolution and compressing the file so that you can play it back on any Windows Mobile device, including your Windows Smartphone. It is also possible to burn the output file to DVD using Windows DVD Maker. Windows Movie Maker was included in Vista, but as of Windows 7 it is a download from the Windows Live site.
Some key items to keep in mind with using Windows Movie Maker to edit and publish your recorded TV shows include
• Storage space and compression—High-quality video consumes a great deal of storage space on your disk. The WMC file format (DVR-MS) provides good-quality video files, but a long-term storage conversion to a higher compression video format can lower your storage requirements significantly. Storing your files in high-quality DVD format can reduce the file size by two-thirds.
• Video quality—The better the quality of the video, the more space it requires on your disk. If you use a recorded TV show in SDTV format, use an output resolution of 720×480 as your highest-quality setting. Broadcast SDTV is as low as 320×240, whereas cable and satellite SDTV can be as high as 720×480. Using an output format higher than the input format generally does not produce a higher-quality video. Instead, it usually just takes up more storage space on the disk.
Tip
![]()
To dub a show from your WMC machine to a VHS tape, connect the composite video output (or S-Video output of your S-VHS recorder) to the recorder. Then, start playing back the show on the computer. Try a little sample at first, and play the tape back on a TV set to ensure that the entire image is making it onto the tape. On some computers, the entire video image is automatically scaled to fit into the NTSC analog output. On others, you have to manually size and position the playback window, as explained in the previous section.
• Back up your work—Editing is a time-consuming process. Make frequent backups of your work in progress to avoid data loss in the event of a computer software/hardware glitch.
• Output/storage—Depending on the size of your video, you might output to a video CD (VCD). A VCD cannot store as much data as a DVD but is less expensive. A VCD also makes a good alternative for sending smaller files to relatives. If a file is too large to fit on a VCD, use a DVD. A single-sided DVD can store up to 2 hours of video in standard mode and 1 hour in high-quality mode.
Setting Parental Control Ratings
You might want to control what kinds of TV, movies, or DVDs are playable on your system. To prevent your children from watching inappropriate TV, follow these steps:
1. From the WMC Start screen, select Tasks, Settings, General, Parental Controls.
2. When prompted, enter your four-digit code using the numeric keypad on the remote or keyboard. If this is the first time you have entered a code, confirm the code when prompted.
3. Select TV Ratings.
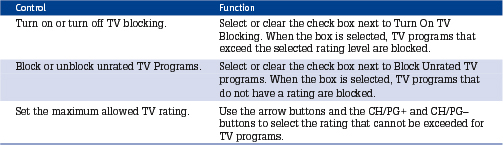
4. On the TV Ratings menu, you can make the selections shown in Table 9.2.
Table 9.2 TV Parental Controls
5. When finished specifying your ratings, click the Save button.
To prevent your children from seeing X-rated DVDs, follow these steps:
1. From the WMC Start screen, select Tasks, Settings, General, Parental Controls.
2. When prompted, enter your four-digit code using the numeric keypad on the remote or keyboard. If this is the first time you entered your code, confirm the code when prompted.
3. Select Movie/DVD Ratings.
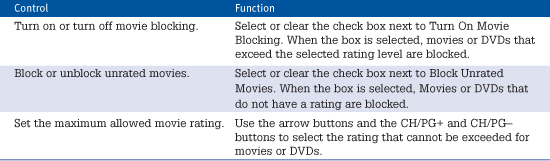
4. On the Movie/DVD Ratings menu, you can make the selections shown in Table 9.3.
Table 9.3 Movie/DVD Parental Controls
5. When you finish specifying your ratings, click the Save button.
Table 9.4 shows the keyboard shortcuts for playing DVDs when you don’t have the remote control available or are sitting at your PC.
Table 9.4 DVD Keyboard Shortcuts
