
5. Managing Files and Searching
What’s New in Windows Explorer
Chapter 4, “Using the Windows 7 Interface,” touched on the two applications that allow you to view and manipulate files, folders, libraries, and other computer information: Computer and Windows Explorer. You may remember that Computer was dubbed My Computer in Windows XP, and both Computer and Windows Explorer are present in Windows 7 with many of the same functions and features as in Vista, XP, and previous versions of Windows. For example, you can use the built-in tools in Computer and Windows Explorer to move, copy, delete, rename, and create new files and other items on your computer.
Indeed, Computer and Windows Explorer have nearly identical interfaces and options. If you’re in Windows Explorer, you can open the Computer folder in the Navigation pane to view your computer’s media. With the Computer window open, you can view other directories and files.
Note
![]()
Windows Explorer is still hidden away in the Accessories area of the Start menu. This is because Microsoft wants to draw your attention away from how files are managed on the hard drive and to direct your attention to displaying folders and documents within libraries (or collections). Libraries are discussed in more detail in Chapters 3 and 4.
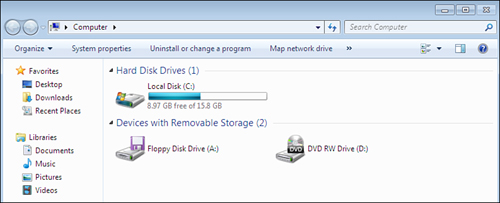
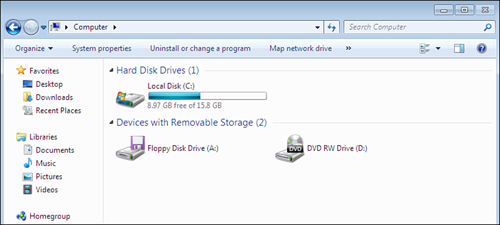
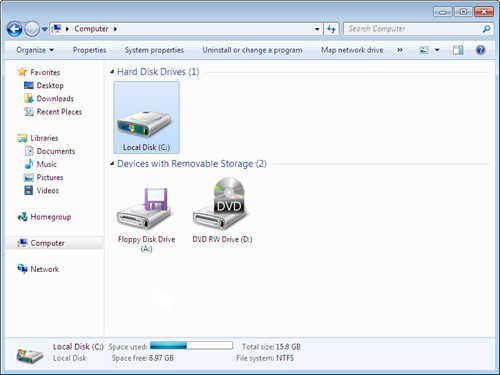
By default, the Computer folder (or window) opens in the Content pane on the right and shows the current hard drives and removable drives installed on the computer, as shown in Figure 5.1.
Figure 5.1 The Computer window with the hard drive(s) and removable drive(s) in the Content pane.
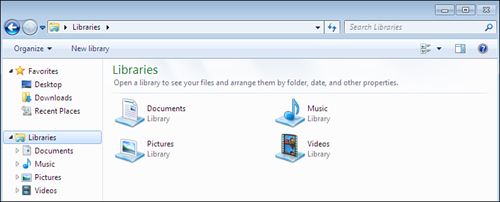
However, when you open Windows Explorer, Windows 7 opens the Libraries library and displays the sublibraries within, as shown in Figure 5.2.
Figure 5.2 The Windows Explorer window with the contents of the Libraries library in the Content pane.
Although Computer and Windows Explorer have many of the same features and are highly similar to their counterparts in Windows Vista, they differ from My Computer and Windows Explorer in older versions of Windows as follows:
• The menu bar at the top of the window is hidden by default and is replaced with features closely aligned with the navigation and search tools in Internet Explorer. These include Back and Forward buttons, a box that shows breadcrumbs of where you are in relation to other windows, and the Search box replaces the Search pane in older versions of My Computer/Windows Explorer. (See more about breadcrumbs in the “Buttons, Breadcrumbs, Toolbars, and More” section later in this chapter.)
• The toolbar has been combined with organizational features of the menu bar in older versions of My Computer/Windows Explorer; the options in the toolbar change to reflect the type of information you’re viewing in the Content pane so that you can perform tasks more quickly. For example, if you’re viewing picture files in your Pictures Library, you may see toolbar options for burning a disc or creating a slideshow, as shown in Figure 5.3. If you’re viewing your computer media in the Computer window, you’ll see toolbar options to view system properties, uninstall or change a program, map a network drive, and more, as shown in Figure 5.4.
Figure 5.3 The toolbar options for the Pictures library in Windows Explorer.
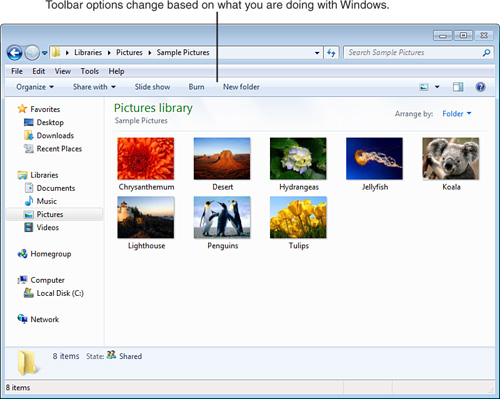
Figure 5.4 The toolbar options for the computer media listed in the Computer window.

• You now have a wider variety of views when you look at objects in the Computer or Windows Explorer window. You’ll learn more about the different views available to you in the “Customizing File and Folder Views” section later in this chapter.
Note
![]()
If you have more toolbar options than the toolbar can hold, Windows 7 gives you a clue that more options are available by showing the double-arrow (![]() ) button to the right of the rightmost button in the toolbar. Figure 5.4 shows an example of this double-arrow button.
) button to the right of the rightmost button in the toolbar. Figure 5.4 shows an example of this double-arrow button.
• Instead of clicking Help in the menu bar as you did in earlier versions of My Computer/Windows Explorer, the Computer and Windows Explorer window toolbars in Windows 7 include a Get Help button at the right side of the toolbars. When you click this button, the Windows Help and Support Center opens and displays the topic that is most germane to your current situation.
• The Favorites group appears at the top of the Navigation pane. This group lets you quickly access the Desktop, master folder for Downloads, and Recent Places. Clicking Recent Places, for example, displays the Windows applications and libraries you’ve recently visited.
• The Libraries group follows the Favorites group in the Navigation pane, followed by Homegroup, Computer, and Network. Clicking Libraries reveals the Documents, Music, Pictures, and Videos libraries in the Content pane. Homegroup lets you easily share music, pictures, and documents on your home network. You should already be familiar with the Computer window at this point, so the last item is Network, which enables you to access network settings.
• The Details pane appears at the bottom of the window and displays metadata, or information about the information in the computer (in the Computer window) or in the folder (in the Windows Explorer window). See “Viewing Meta-Information” later in this chapter for more information.
Note
![]()
The chapters in Part IV, “Windows 7 and the Internet,” cover the ins and outs of getting connected, browsing the Web, using search engines, creating and serving web pages, and using email, newsgroups, and so forth. However, what’s relevant here is how the Windows 7 WebView affects how you work with files and folders.
The Legacy of WebView
Windows XP included Microsoft’s WebView technology that attempted to make your local content integrate as seamlessly as possible with Internet-based content. This integration was designed to offer the benefits of more information displayed within the interface by default and quick access to common activities.
Microsoft ended WebView with Windows XP, but many features of WebView were integrated into Windows Explorer and the Computer folder in Windows Explorer in Vista, and these features have been improved and refined in Windows 7.
Figure 5.5 shows Windows Explorer in WebView, which is the standard view. Classic view, which was an option in Windows Vista and enabled you to use a Windows 2000–like interface, no longer exists in Windows 7. WebView gives you access to some common tasks related to files and folders in the toolbar above the Navigation and Content panes. The Details pane at the bottom of the window displays basic information about a selected item, such as
• The selected item’s name and type (such as document, folder, application, library, and so on)
• The date on which it was most recently modified
• Its size and other item-specific information
Figure 5.5 Windows Explorer in WebView (standard view).
Much of this information also appears in a ToolTip when the mouse cursor is placed over an object, as shown in Figure 5.5.
How WebView Gives Windows 7 a Browser Look and Feel
Some key WebView effects have remained in Windows 7, such as Desktop Gadgets (formerly part of the Windows Sidebar in Vista). Microsoft has worked hard to dovetail the interfaces of Internet Explorer and Computer/Windows Explorer more tightly than ever in Windows 7. Some of the key WebView effects that have remained in Windows 7 include
• Computer and Windows Explorer have Back and Forward buttons, an Address bar, and a Search box similar to Internet Explorer.
• The toolbars in folder and Windows Explorer windows are customizable and have address fields, just like a browser. You can type in a web address and press Enter (or click Go), and the Internet Explorer window appears and displays the content. If you enter a drive letter (C:, for example), its contents are displayed.
• Windows 7 can navigate the contents of compressed archives, such as zipped files, without a third-party utility. Archive files act like compressed folders. You’ll learn more about zipping and packing files in “Zipping and Packing Files” later in this chapter.
There are many more features and options in the interface. If you’re the controlling type, you might want to fine-tune aspects of your folders’ behavior. Go to the Folder Options Control Panel applet by choosing Appearance and Personalization, Folder Options from the Control Panel window, and then select the View tab. You’ll see a bevy of options that affect how folders and their contents are displayed, as shown in Figure 5.6. We’ll get to those in the “Customizing File and Folder Views” section later in this chapter. Also, the “Buttons, Breadcrumbs, Toolbars, and More” section in this chapter, and Chapter 23, “Tweaking and Customizing Windows,” cover even more ways to change the interface.
Figure 5.6 The View tab of the Folder Options dialog box.

Buttons, Breadcrumbs, Toolbars, and More
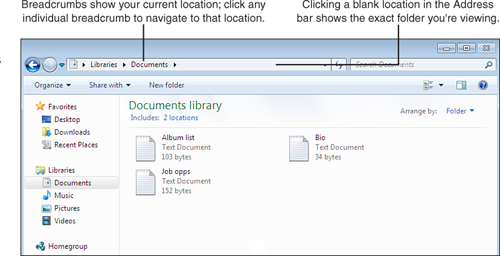
One big improvement introduced in Windows Vista and carried over into Windows 7 is the OS’s capability to let you know where you are in relation to parent and child windows. These breadcrumbs appear as text and icon representations of folders, windows, and services, as shown in Figure 5.7.
Figure 5.7 Breadcrumbs in the Address bar.
Note
![]()
If there are no other child locations underneath the parent location, a right arrow will only appear to the right of the location name if that location has a submenu associated with it. Otherwise, no right arrow will appear next to the location name.
The Address bar displays your current location, which is any disk drive, library, folder, or other place where you can store files and folders. As you read the Address bar from left to right, the parent location appears at the far left of the box. Each child location appears to the right of its parent location, and the current location you’re in appears without any child locations to its right. For example, in Figure 5.7, the current location is Documents. Each location is followed by a right-facing arrow.
Tip
![]()
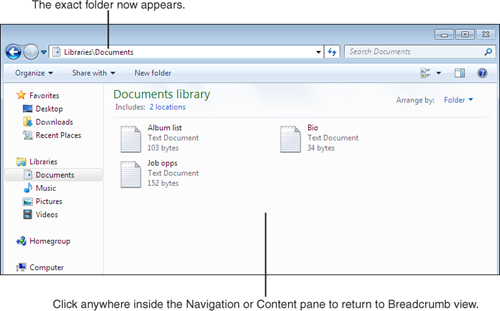
If you want to see the exact folder path you’re in instead of the location, click on a blank area in the Address bar. The information in the Address bar changes to the exact path, as shown in Figure 5.8. Return to the location view by clicking on a blank spot in the Navigation or Content pane.
Figure 5.8 The Address bar with the path displayed.
You can also type the exact path in the Address bar to open a specific library or folder instead of using location-based navigation.
The breadcrumbs that appear depend on the library or folder you’re in. What’s more, the right arrow not only shows that the next window or service is the child of the current parent or service, but it also lets you select from a menu of related options. Let’s take a look at examples of the breadcrumbs you see in the Computer window and Windows Explorer.
Breadcrumbs in the Computer Window
When you open the Computer window, the open Computer folder displays the computer media information in the Content pane. In the Address bar, you see a computer icon and the location name Computer, as shown in Figure 5.9.
Figure 5.9 The Computer window Address bar.
The home icon appears at the left side of the Address bar, followed by the Computer folder name. In the Computer location, the home icon is a computer. If you double-click the C: drive in the Content pane, the Address bar adds the name of your C: drive—the default name is Local Disk (C:)—to the right side of the Address bar, as shown in Figure 5.10.
Figure 5.10 The Computer window Address bar with the name of the C: drive added.
Note that the home icon has changed from a computer to a hard disk. The icon changes to reflect the location type. For example, if you open a folder on the C: drive, the icon in the Address bar changes to an open folder.
If there is a submenu associated with a location in the Address bar, you can open this submenu by clicking the right arrow to the right of each location. When you click the right arrow, the arrow changes to a button and the arrow points down toward the menu, which appears directly underneath the down arrow. Figure 5.11 shows the submenus for the home icon. Clicking on Computer or Local Disk (C:) would show those submenus as well.
Figure 5.11 The submenu for the home location.
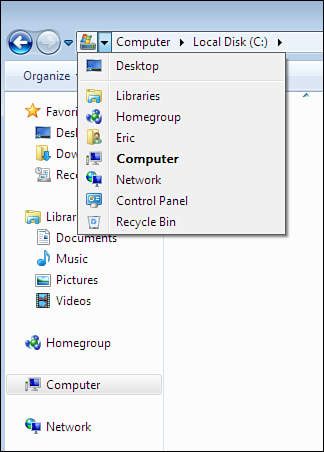
Menu options in bold text are locations that are currently open. If you click another location in the menu, the Address bar changes to reflect the new location to which you have moved.
Breadcrumbs in Windows Explorer
When you open Windows Explorer, the Libraries window appears by default, and the Address bar shows you that the Libraries library is your location. The functionality of the Address bar in Windows Explorer is the same as in the Computer window—you can move to a location by clicking on the location name in the Address bar, and you can also open submenus by clicking the right arrow to the right of the location name.
Tip
![]()
You can move to different locations in the Address bar in one of two ways:
• Click the location name in the Address bar.
• Click the Back and Forward buttons. If you click the Back button, you go back to the location immediately to the left of the current location in the list. Click the Forward button to go to the current location’s child location. If you can’t go back and forward any more in the list, the Back and/or Forward buttons will be inactive.
However, there is one significant difference: The Address bar shows your user profile as a location. When you click the right arrow next to the user profile name, a submenu appears that lets you open your Contacts; Desktop files; Downloads, Favorites, Links, and My Documents folders; games and media folders; and searches.
User Profiles
User profiles are files that contain configuration information for each user on your computer. Configuration information includes desktop settings, network connections, and application settings. When you log in to Windows 7 using your account, Windows reads this user profile and configures your desktop, network connections, and application settings so that everything works the way you expect.
A user profile is different from a user account. A user account contains information about what files and folders your account can access, the changes your account can make to your computer, and your user preferences such as your desktop background and color theme.
Windows 7 assigns the same number and type of directories to each user profile. The user profile file also remembers which files go in which directory for that user. For example, if I have my own documents in my Documents library and Lisa has her own documents in her Documents library, I will see only my documents.
Navigating the File System
In Windows 7, the toolbar appears just below the Address bar by default, and changes every time you click on an object in the Computer window or Windows Explorer. These changes reflect what you can do with the file or folder. A menu bar is also available, however, and you must first enable the menu bar as described in “Turning Panes On and Off” later in this chapter.
Figure 5.12 shows two different examples of menu toolbar options available for two different objects. In the first part of Figure 5.12, the Windows Explorer window shows the Music library with the five menu toolbar buttons showing what you can do with the files, including Play All to play all the music files in the library and Burn to burn to a disc.
Figure 5.12 The Music library menu toolbar options.
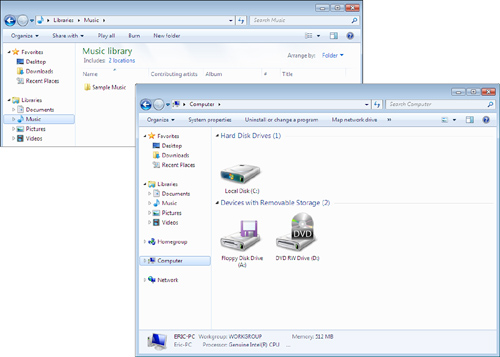
The second part of Figure 5.12 shows the Computer window with the computer’s media listed. The menu toolbar buttons are different from those available for the Music library. You can organize the folder’s contents, access system properties, uninstall or change a program, or map a network drive. As mentioned previously, the double-arrow (>>) displays to indicate additional options are available. In this case, if you click the double-arrow button to the right of Map Network Drive, you’ll see a pop-up menu for opening the Control Panel.
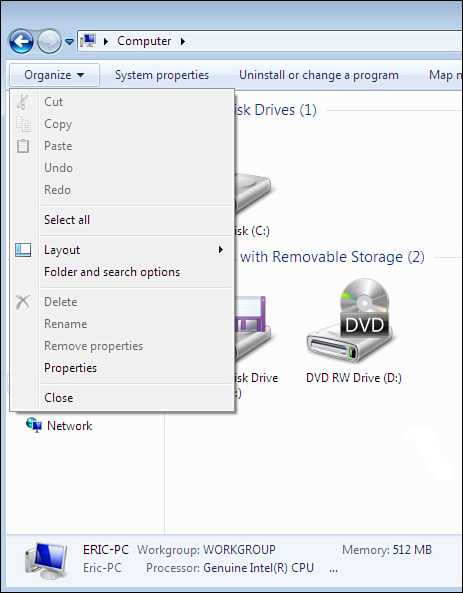
You probably noticed that a few parts of the toolbar never change: the Organize button (on the far left) and Views (Change Your View) button (unlabeled, third from the right). These buttons let you determine how to organize and view the files, folders, and other objects. When you click the Organize button, a menu appears with many of the same options that were available in the File menu in My Computer/Windows Explorer in Windows XP, as shown in Figure 5.13.
Figure 5.13 The Organize menu.
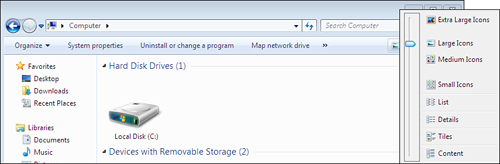
When you click the down-arrow button to the right of the Views button, the Views menu appears, as shown in Figure 5.14. This menu shows you the different ways of presenting information in the Content pane of the window. You can select from eight different options using the slider bar, which appears to the left of the selected view type. You will learn more about views in the “Customizing File and Folder Views” section later in this chapter.
Right-Clicking
Windows makes good use of the right mouse button to access information in Windows Explorer and Computer. Indeed, use of the right mouse button has become so prevalent that even the latest versions of the Mac OS incorporate the right-click to open and manipulate objects on the screen.
In Windows Explorer, right-clicking on a file, folder, or library opens a pop-up menu so that you can work with it in various ways, depending on the object type. You can open a document, folder, or library; share a file or folder with other users in your homegroup; send a document to an email recipient; run a program; install or set up a utility such as a screen saver; play a sound file; and so forth. Figure 5.15 shows a pop-up menu for a music file. To learn more about homegroups, see Chapter 17.
Figure 5.15 The pop-up menu for a music file.
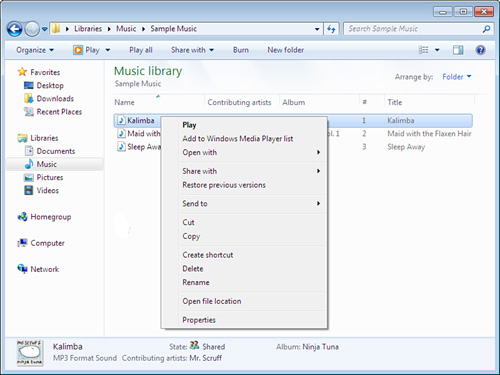
When you right-click on a file or folder, a new button may appear on the menu bar to give you more options. In Figure 5.15, the pop-up menu provides a number of choices, starting with Play at the top of the menu. The Play button also appears in the menu toolbar so that you can click the Play button or click the down-arrow button to the right of the Play button to choose the media player you want to use.
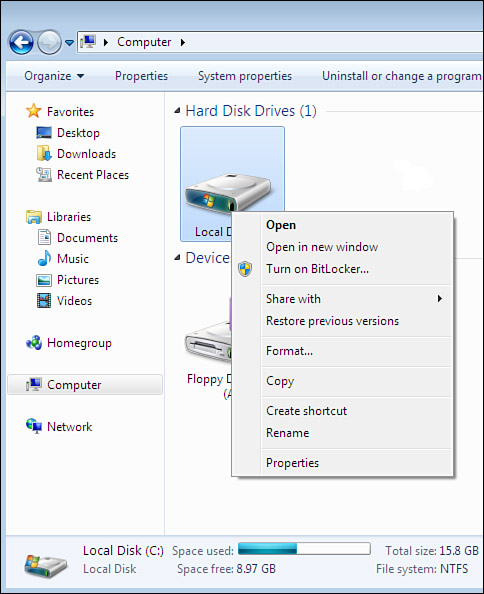
In the Computer window, right-clicking on a computer media icon brings up different options for working with the C: drive, as shown in Figure 5.16. You’ll also notice that the Properties button appears on the menu bar (and as an item in the pop-up menu) so you can open the Properties window for the C: drive.
Figure 5.16 The pop-up menu for a hard drive.
Selecting Several Items
On most lists, especially within Computer and Windows Explorer, not to mention the file and browser dialog boxes, you can select multiple items at once to save time. The normal rules of selection apply:
• Draw a box around them by clicking and holding over empty space near the first item and then drag across and over the desired selections until all are highlighted and/or contained within the selection box; then release the mouse button.
• Select the first of the items, hold down the Ctrl key, and click to select each additional object you want to work with. Use this technique to select a number of noncontiguous items.
• Select the first of the items, hold down the Shift key, and click the last item. This selects the entire range of objects between the starting and ending points.
After several items are selected (they will be highlighted), right-clicking any one of the objects brings up the Cut, Copy, Paste menu. The option you choose applies to all the selected items. Also, clicking anywhere outside the selected items deselects them all, and Ctrl-clicking (or pointing) to one selected object deselects that object.
Drag-and-drop support is implemented uniformly across the Windows 7 interface. In general, if you want something placed somewhere else, you can drag it from the source to the destination. For example, you can drag items from the Search results list into a folder or onto the desktop, or you can add a picture attachment to an email you’re composing by dragging the picture file into the new email’s window. Also, the destination folder does not have to be open in a window. Items dropped onto a closed folder icon are added to that folder. You can also drag and drop items via the taskbar by dragging an item over an application button, pinning it to the application. A pop-up menu appears, enabling you to select the item (such as a music file) and launch the application. You can also drop items into the Start menu to add them to the listings, or drop items over desktop icons to open them with the application onto which you drop the item (assuming the application supports the object’s file type). However, you can also use the Cut, Copy, and Paste methods of moving files and folders.
Arranging your screen so you can see both source and destination is graphically and intuitively reassuring because you can see the results of the process. To quickly arrange two windows side by side, pull one window to the far-left side of the screen until the background becomes highlighted, and then release the mouse. The window snaps into place, taking up half the screen. Pull the other window to the right in the same manner, and it then fills the right half of the screen. To show only one window, use Aero Shake by grabbing the window’s title bar and jiggling (shaking) it toward the second window a few times. Windows 7 displays the window in the middle of the screen, hiding the second window.
Caution
![]()
Don’t try moving program files unless you know they have not registered themselves with the OS and they can harmlessly be moved around between folders.
Viewing Meta-Information
A feature in Computer and Windows Explorer that was introduced in Windows Vista is the Details pane, which appears at the bottom of the Computer or Windows Explorer window, as shown in Figure 5.17.
Figure 5.17 The Details pane at the bottom of the window contains meta-information.
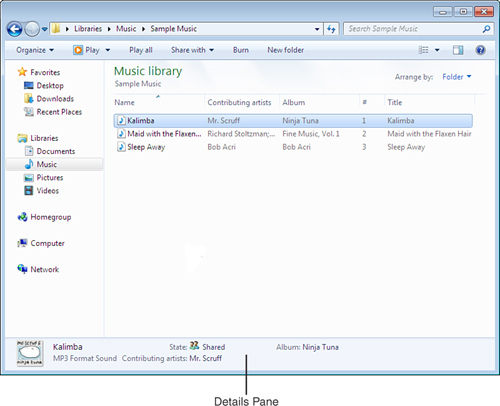
In Windows XP and older versions of Windows, Windows Explorer and My Computer only showed basic information about the selected object in the status bar. This information is called meta-information, or information about the information contained in the file. For example, when you clicked on a Microsoft Word file you would see information about the type of file, the date and time the file was saved, and the size of the file, all in small text that was squeezed onto one line in the status bar.
As you can see in Figure 5.17, the Details pane provides information about a selected object in a format that’s easy to read. Information in the Details pane varies with the type of object you’re viewing. In Figure 5.17, you see a music file that includes the following information:
• The icon associated with the file. In this case, it’s an album cover.
• The name of the file.
• The program the file is associated with, which is an MP3 audio file.
• The name of the artist(s).
• The album name.
Note
![]()
If you don’t select a file, folder, or other object in the Content pane, the Details pane displays information about the current location. For example, if you haven’t selected a file in the Music library, the Details pane shows a folder icon with the number of items in the folder.
The Details pane is different when you open the Computer window and click the Local Disk (C:) icon. As shown in Figure 5.18, the Details pane shows a bar that denotes the amount of space used on the hard drive, the amount of free space on the drive, the total size of the drive, and the file system used.
Figure 5.18 The Details pane showing meta-information for Local Disk (C:).
Turning Panes On and Off
Windows Explorer and the Computer window offer several panes, and you can turn each one on and off to suit your needs. Windows Explorer offers four panes, whereas you can view only three panes in the Computer window. Both windows allow you to display and use the menu bar, which is turned off by default.
View the panes you have open by clicking the Organize button in the toolbar and then choosing Layout. The options appear in the flyout menu, as shown in Figure 5.19. The Layout menu displays an icon to the left of each inactive pane name, and a blue box around a check mark signifies that the pane is currently active.
Figure 5.19 The Layout flyout menu in Windows Explorer.
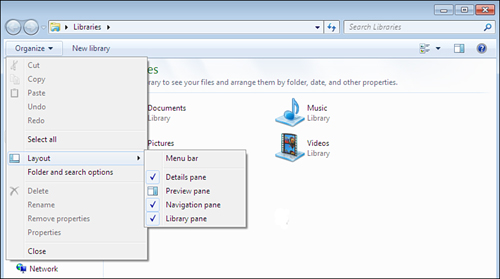
By default, the Computer and Windows Explorer windows display the Navigation and Details panes. In addition, the Library pane is available in Windows Explorer (but not in the Computer window).
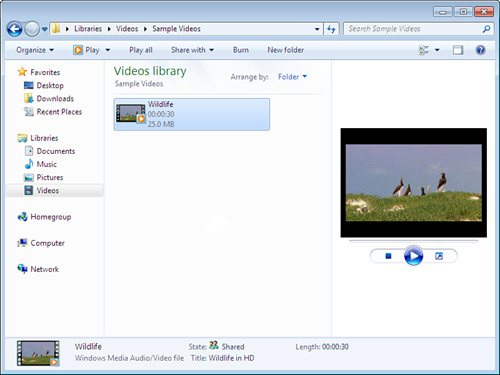
The Preview pane is disabled by default. When you select it in the Layout menu, the Preview pane appears at the far right side of the window and shows a thumbnail preview of the file when you click the filename, as shown in Figure 5.20. If the file is a multimedia file, you can play the file in the small window and see whether the file is something you want to play in Windows Media Player or your multimedia player of choice. If there is no file to preview, a message appears in the Preview pane: “Select a file to preview.”
Figure 5.20 The Preview pane with a multimedia file displayed.
When you click Menu Bar in the Layout flyout menu, the menu bar you may be familiar with from earlier versions of Windows appears above the menu toolbar.
Note
![]()
The Preview pane settings persist regardless of your current location or whether you’re using Windows Explorer or the Computer window. For example, if you enable the Preview pane in the Music library and then move to the Documents library, the Preview pane remains visible. Similarly, if you enable the Preview pane while using Windows Explorer, the pane is still available if you open the Computer window.
This menu bar contains the well-known File, Edit, View, Tools, and Help menu options. Many features in these menus were brought over from Windows XP and Vista, and you can’t get to these features without enabling the menu.
Customizing File and Folder Views
When you create a new user profile, Windows 7 automatically creates a personal folder that matches your username and places a number of subfolders within that master folder. These subfolders are categorized by name (including My Documents, My Pictures, and My Music) and allow you to put your files into them. What’s more, these subfolders are private; no other user that uses your computer can view or open these subfolders. Yet what Microsoft gives you isn’t uniquely you.
Tip
![]()
A quick way to access the menu bar without going through the Layout menu is to press the Alt key.
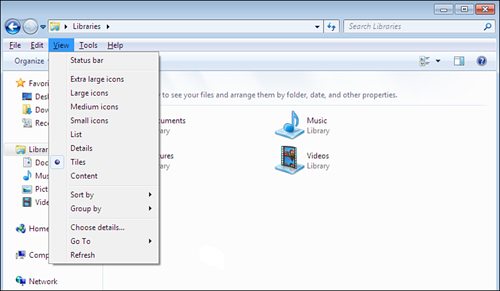
Windows 7 offers a wide range of options for customizing how files are displayed through the Computer and Windows Explorer utilities. The full set of options is available from the View menu (accessible when the menu bar is displayed), although you can access many of the options from the toolbar as well. The options on the View menu change slightly based on which window you’re viewing (Computer versus Windows Explorer) and whether you’re viewing a library or folder.
The most common controls found on the View menu (see Figure 5.21) are
• Status Bar—If you miss the status bar at the bottom of the window, use this control to enable the display of this information bar. It shows the number of items in a library or folder, number of items selected, information about menu bar commands as you hover over them, and so on.
• Views—This section allows quick change of the view used to display file objects: Extra Large Icons, Large Icons, Medium Icons, Small Icons, List, Details, Tiles, and Content. Content view is new to Windows 7 and displays files and folders in a mixed graphical/stacked arrangement.
• Arrange By—This menu item appears in Windows Explorer when folders are displayed in a library and is used to define custom attributes for the selected folder. It defaults to Folder view, but you can change the arrangement of items based on author, date modified, tag, type, or name. The Arrange By options are specific to the type of library or folder selected.
• Sort By—This menu allows you to determine the sort order for files and folders. For example, you could group music files by name and show the files in ascending order.
• Group By—This menu allows you to group files by a certain criteria, such as the filename, file type, date, and so on.
• Choose Details—This command sets the details that appear in ToolTips, details, and Tile view. The defaults are name, date modified, type, and size. Over 100 options are available, which include attributes, company, file version, owner, and subject.
Note
![]()
Windows 7 remembers the view type you selected for each folder, but if a view type isn’t specified, the default view type is Tiles.
• Go To—This menu is used to navigate back, forward, up one level, or to recently visited locations.
• Refresh—This command reloads the display of files and folders.
Figure 5.21 The View menu of Windows Explorer.
Setting Folder Options
Folder Options should be seen as more of a superset of controls over all folders on a system, whereas folder customization occurs on an individual or parent and subfolder basis. Folder Options is a Control Panel applet you can access from Computer and Windows Explorer. This applet is used to set a wide range of file system features.
Open the Folder Options dialog box by clicking the Organize button and then clicking Folder and Search Options. The Folder Options dialog box appears as shown in Figure 5.22.
Figure 5.22 The Folder Options dialog box.
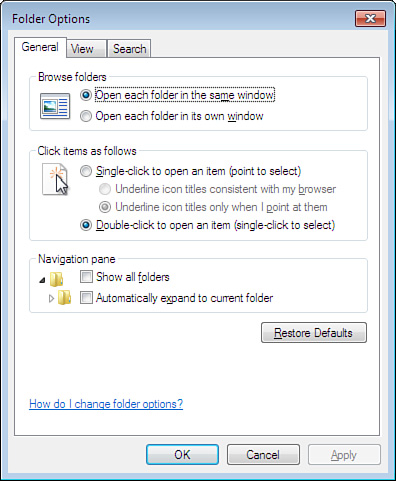
The General tab of the Folder Options dialog box defines whether folders are opened in the same or in a new window, and whether single-clicks or double-clicks are used to open items. You can also configure the Navigation pane to show all folders by default, and/or automatically expand to the current folder. If you make changes to this tab, you can always return to the default by clicking the Restore Defaults button.
The View tab (see Figure 5.23) perform two major functions—folder view management and advanced settings management. For folder view management, all folders can be reset to their default views, or the currently selected folder’s view can be applied to all folders.
Figure 5.23 The View tab of the Folder Options dialog box.
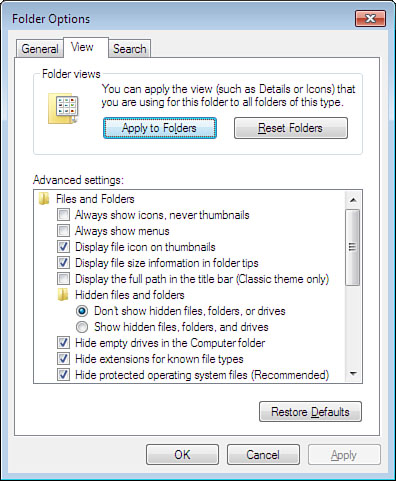
The Advanced Settings section contains a long checklist of settings. One use of this section is to choose what you want the OS to show you and hide from you. For example, if you want to see every file on your system, enable Show Hidden Files, Folders, and Drives and disable Hide Extensions for Known File Types and Hide Protected Operating System Files (Recommended). To return to the defaults, just click the.
Note
![]()
If you’ve tried to delete a folder that looked empty but an error message states that the folder still contains files, you are probably dealing with hidden files. To see what’s not being shown, change the Hidden Files and Folders Advanced setting to Show Hidden Files, Folders, and Drives. You might run into this issue with downloaded applications that must be extracted to a temporary folder before being installed. They sometimes include files premarked as hidden.
The other tab in the Folder Options dialog box is the Search tab, which you learn more about in the section, “Searching,” p.173.
Managing Libraries
In Windows 7, libraries provide a convenient mechanism for grouping related content items in ways that make sense to the user. The default libraries group items by type of content, so you’ll find document files in Documents, music and related files in Music, photos and images in Pictures, and video and related files in Videos. But there’s no reason why you can’t create a library for a project that might contain all these file types, and more. Let’s take a look at what’s involved in creating a library, and adding and removing elements from that library.
Creating a Library
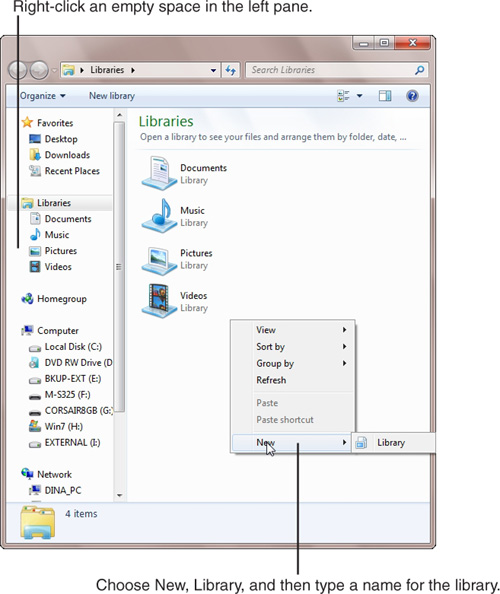
To create a new library, open Windows Explorer to the Library view, then right-click in the left pane and select New, Library in the resulting pop-up menus (see Figure 5.24).
Figure 5.24 The right-click technique is a quick and easy way to create a new library.
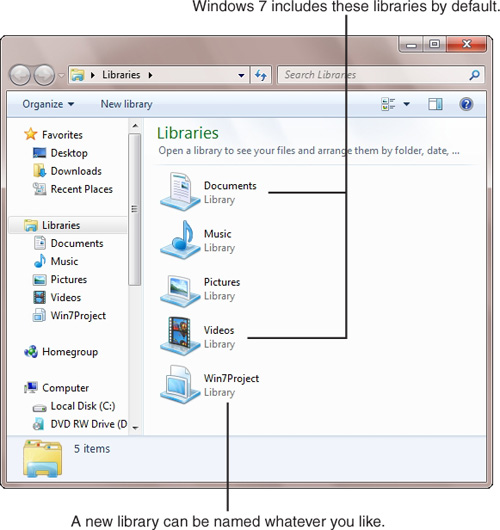
When the New Library element appears in the right pane, give that library a unique and descriptive name. I called mine Win7Project for this book (see Figure 5.25).
Figure 5.25 A newly created library with a descriptive name.
Add Elements to a Library
The contents in a library are rooted in a folder on a hard disk somewhere, so the process of populating a new library begins by including an existing folder. You might want to consider creating a new folder for this purpose if you’d prefer to leave your existing folder structure alone.
Note
![]()
Windows 7 won’t let you include a folder from a removable drive in a library, so don’t bother trying this with a folder from a UFD or other removable drive or media.
The easiest way to add elements to a library is to open two instances of Windows Explorer:
1. In one Windows Explorer window, open the source folder that contains the items you want to add to the library.
2. In the other Windows Explorer window, open the target library.
3. Right-click items in the source window and select Copy.
4. Right-click in the library window and select Paste Shortcut to add items to the library without moving them into your base folder. On the other hand, you can drag and drop items if you want to move them into your library folder. The results of both such operations appear in Figure 5.26.
Figure 5.26 To add items to the library, paste those items or paste shortcuts into the library window.

Remove Elements From a Library
If you’ve pasted shortcuts into your library, you need only delete the shortcuts to remove their parent items without affecting those items. If you’ve copied the parents into the library’s base folder but have retained originals, you can delete the copies to remove them from the library. If you moved the files from their original folder into the base folder, you must move them back to the original or some other folder to keep them. If you delete them, they will be placed in the Recycle Bin.
Searching
The Search function has been greatly refined in Windows 7 compared to Vista and previous Windows editions. Called Desktop Search (or Search, for short), Windows 7 lets you search for files, folders, email messages, hard drives, PCs, and much more, whether the items are local or remote. You can search from the Search box on the Start menu, or use the familiar Search feature in Computer or Windows Explorer.
In addition, Windows 7 introduces a new technology referred to as federated search, which enables you to use something called a search connector to easily find web-based applications on internal and external sites, right from your Search tool.
Types of Searching
Windows 7 uses two different types of searching:
• Intermediate searching—Uses an index to find objects with filenames that you type into the Search box in Windows as well as in the Start menu. Like the index of a book, Windows 7 stores information about files such as the filename, file date, and properties, including words in a document. As you type your search criteria into the Search box, the list of programs changes to show you files that meet that criteria based on what Windows 7 finds in the index. The big advantage to intermediate searching is that it’s fast, but it only uses one criteria (the filename), so if you need more information you need deep searching.
• Deep searching—Lets you search for different and multiple criteria such as the filename, the date the file was saved, and the location in which the file was saved. You can use Boolean arguments such as AND and OR as well as “greater than” and “less than” to help Windows 7 search for the files you need. For example, you may want to search for a file that was saved before (or less than) a certain date. You can also use wildcards in filenames to search for filenames that contain letters in certain places. For example, if you want to search for files that start with the letter N and end with the letter W, you would type N*W as the filename to search for; the asterisk represents all characters and any number of characters between N and W. In this case, Windows 7 would also find folders in which a parent folder begins with N and the child folder begins with W, such as NotebooksWork.
Changing Search and Indexing Settings
Note while reading this section that we’re describing the built-in Windows 7 Search features. Your system might have a different search tool installed, such as Google Desktop Search, Yahoo Widgets, or some other brand—those tools will operate differently. You’ll have to refer to those tools’ help files or websites to learn how they work. However, you might want to know that you can choose which program will do your searching for you, and even switch back and forth between the programs you want to use as your default. Choose Start, Default Programs, Set Your Default Programs, and you’ll see a screen that allows you to change which search tool to use by default.
Windows 7 indexes most common files on your computer, including all the files in your personal folder, your email, your offline files, Internet Explorer History, and the Start menu. Program files and system files are not indexed because Microsoft says those files are rarely searched.
That doesn’t mean that Windows 7 won’t search nonindexed files. Windows 7 searches filenames and contents in indexed locations and only searches filenames in nonindexed files by default. You can change this default in the Folder Options dialog box from Computer or Windows Explorer.
Open the Folder Options dialog box by clicking the Organize button in the menu toolbar and then clicking Folder and Search Options. In the Folder Options dialog box, click the Search tab, which appears as shown in Figure 5.27.
Figure 5.27 The Search tab of the Folder Options dialog box lets you choose indexing options.
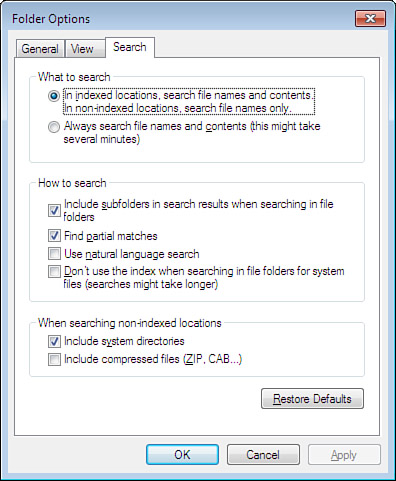
You determine what to search in the What to Search area at the top of the tab. Your other option is to have Windows 7 search filenames and contents in all files. This type of search could be a lot slower than the default, depending on how many files you’re searching. When you search nonindexed locations, you can also tell Windows 7 whether you want to include system directories and compressed files at the bottom of the tab.
In the How to Search area in the middle of the tab, the default search parameters are to search in subfolders and to find partial matches. You can also decide how to search, including using natural language search (where you get to ask a question), and turn off the index. If you decide you don’t like your changes and want to revert to the defaults, click Restore Defaults.
The Indexing Options applet in the Control Panel also lets you view the state of the index and make changes to the file types and folders you want to index. Open the Indexing Options applet by clicking Start, Control Panel, and then Indexing Options (in Icons view). The Indexing Options window appears as shown in Figure 5.28.
Figure 5.28 The Indexing Options window.
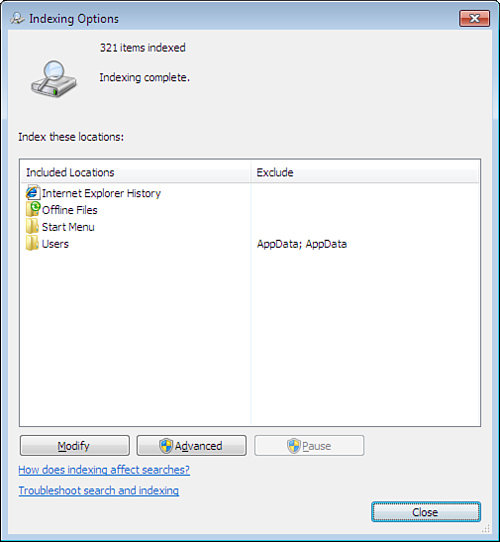
The Indexing Options window shows how many items are indexed and which folder locations have indexed files. You can modify the folder locations by clicking Modify. If you want to really drill down when configuring your index, click Advanced. The Advanced Options dialog box appears so that you can index encrypted files, delete and rebuild your index, and set the index location.
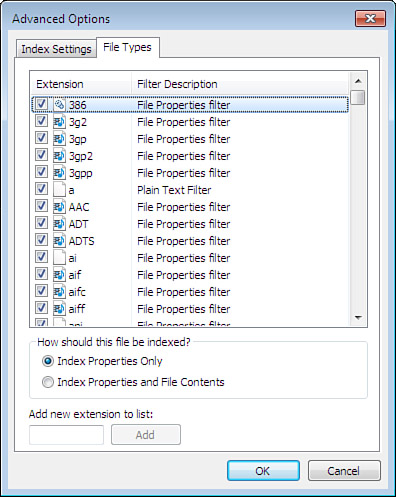
If you click the File Types tab, as shown in Figure 5.29, you can scroll down the list and add and remove files to index categorized by file extension. You can also tell Windows 7 whether you want the file to be indexed by properties only or by properties and file contents. If you don’t see the extension in the list, type the file extension in the Add New Extension to List text box at the bottom of the tab and then click Add.
Figure 5.29 The File Types tab in the Advanced Options dialog box.
Searching As You Type
You can search for files, folders, movies, and even URLs as you type in the Computer or Windows Explorer window as well as in the Start menu. You do this by typing characters in the Search box; Windows displays the matching results in the Search box.
Tip
![]()
When you type characters in the Search box, you can refine your search by prefacing the search characters with the object criteria name in which you want to search, followed by a colon and then your search criteria. For example, if you want to find a file with a name that starts with b, type filename:b in the Search box. This searches for all files with a name starting with the letter b. Other object criteria names include date and type. You can also use filters, which you’ll learn about shortly, to accomplish similar tasks.
Searching in Computer or Windows Explorer
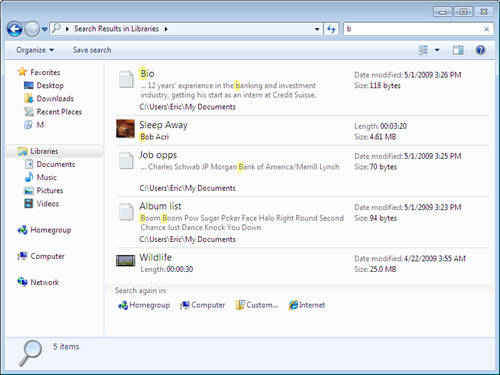
Start searching by typing a character in the Search box. After you type the character, Windows automatically searches for items in the current location that match your criteria (see Figure 5.30). As you type more characters in the Search box, Windows 7 refines the search and culls the list of matches until you find the one match you need—or at least narrows it down to only a few matches so you can find the file you need quickly.
Figure 5.30 The list of search results in Windows Explorer.
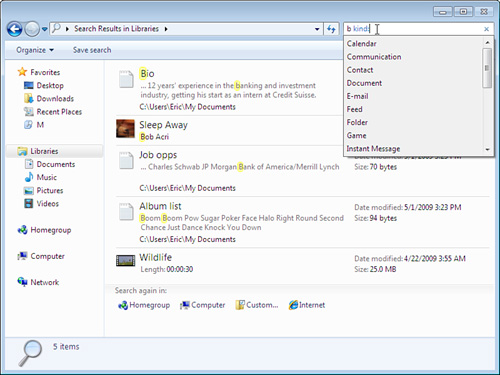
You can also refine searches using the Add a Search Filter pane that appears under the Search box when you click in or type in the Search box. (You have to be quick; this tiny window displays for only about five seconds at a time.) Available filters change depending on the library or folder selected in Windows Explorer or the Computer window. For example, with the Music library selected, you can select Album, Artists, Genre, and Length filters. Filter options for the Libraries library include
• Kind—The Kind filter includes types of objects, such as calendar, communication, document, email, game, recorded TV, saved search, and many more.
• Date Modified—Selecting Date Modified opens a pop-up calendar in which you can select a specific date or a range of dates, or select less-defined date ranges such as A Long Time Ago or Earlier This Year.
• Type—The Type filter lists some common file types to search for, such as MP3, MVW, and text document.
• Name—The Name filter lets you enter one or more letters of a file or folder name.
Can’t Find a Program
![]()
If you cannot find programs using the Search box in Windows Explorer, use the Start menu Search box instead. Begin typing Programs, and a list of matches will appear above the Search box. Just click the link for Programs and Features. You could also open Control Panel and click Programs and Features directly.
If you know the group where your wayward file resides, you can click one of these filters, and then type your search criteria in the Search box or select it from a pop-up menu. An example of using the Kind filter is shown in Figure 5.31.
Figure 5.31 Using the Kind filter.
If the search doesn’t find any files, folders, or other objects that meet your search criteria, the Content pane in the Computer or Windows Explorer window states, “No items match your search.” You can click one of the icons listed under Search Again In to change the location being searched. Or you’ll need to erase one or more characters in the Search box, or erase all the characters in the Search box and start over.
Note
![]()
When searching in the Computer window, a message bar might appear, prompting you to add C: or another drive to the index. When you click the bar, a shortcut menu appears with Add to Index and Modify Index Locations options.
If you want to save the results of your search, click the Save Search button in the toolbar. Windows 7 asks you to name your search before you save it, and after you save the search file the file appears at the bottom of the Favorites list.
Can’t Find a File
![]()
If after much trying you still can’t find the folder or file you’re looking for, the problem could be that your search might only be looking at indexed locations—and indexed locations aren’t all the locations on your computer. Consider using the Indexing Options window to rebuild your index and include your entire C: drive.
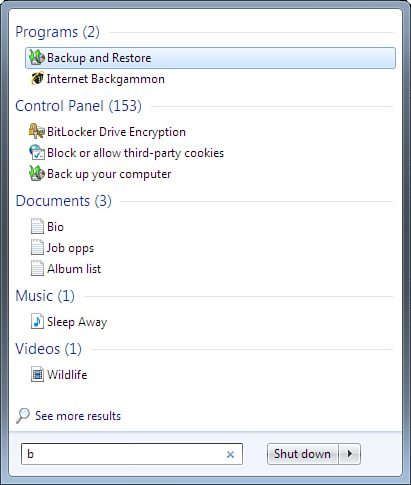
Searching in the Start Menu
If you want to perform a faster search to see what’s on your computer that matches your search criteria, or zero in on programs, you can type search criteria in the Search box at the bottom of the Start menu.
As with typing in the Search box in Computer or Windows Explorer, type one character in the Search box and you will see the results as shown in Figure 5.32.
Figure 5.32 The results in the Start menu.
You can open an item in the results list, whether it’s a program, multimedia file, picture, document, or other file type, by clicking its link. If your search turns up no matches, the Start menu states, “No items match your search.”
Tip
![]()
In the Start menu, you can see all results from the Start menu search by clicking the See More Results link at the bottom of the search list. If you have not installed another desktop search engine, this launches your search results in a search window called the Search Explorer, which is essentially Windows Explorer with search-related menu items. If you have changed the default search tool, such as to Google Desktop Search, you’ll see a Search Everywhere link rather than a Search More Results link, and the results will appear in that search tool’s interface.
Can’t Find Files That Belong to Other Users
![]()
If your search results aren’t returning files that belong to other users on you computer, you should know that Windows 7 only searches your own files to index by default. However, you can add another user’s files to your search results by opening the folder that contains the user’s files. This is usually in the form of C:UsersUser, where User is the name of the person on your system with the files. (You may need to type the administrator password to get access to these files.) After this folder is open, perform your search, and the files in the directory are included in the search.
Grouping and Stacking
Windows 7 not only comes with more powerful searching tools but more powerful organizational tools as well for sorting and filtering files.
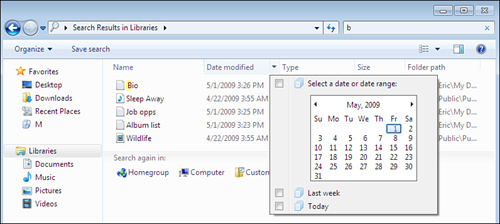
In Details view in Computer or Windows Explorer, the top of the Content pane that displays files in your search results list includes column headings that double as filter controls, enabling you to filter the files in the Content pane. When you hover the mouse pointer over a column heading, a down-arrow button appears on the right. Just click the arrow button to display filter information in a small window underneath the button. Figure 5.33 shows an example.
Figure 5.33 The window for filtering files by a specific date.
The filter criteria are available when searching or when simply browsing libraries or folders, and they change depending on the location you’re in. Some of the criteria you can sort by include
• Name, in three different categories (A–H, I–P, and Q–Z)
• Date modified, which lets you filter by a specific date you can select from a calendar, as shown in Figure 5.33
• Type, which may include the ability to filter by compressed folders, file folders, documents, images, registration entries, and so on
• Size, which lets you display objects by categories of size, such as Medium (100 KB–1 MB), Large (1–16 MB), Huge (16–128 MB), or Unspecified
Additional criteria may include folder path, contributing artists, album, title, tags, rating, and many more, all with subcriteria that let you focus on specific information you want to see.
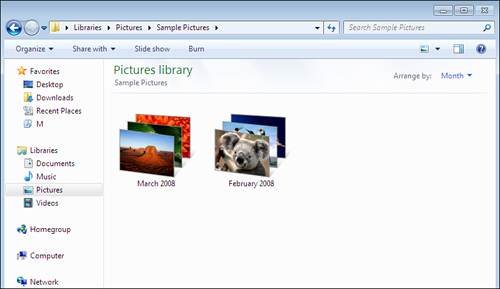
These filtering windows also let you use the options described in the “Customizing File and Folder Views” section earlier in this chapter for browsing your files and folders. For example, to view your files in a stacked arrangement, such as pictures taken in a certain month, right-click on a blank area of the Content pane, select Arrange By, and then select Month. Windows 7 takes all these pictures and combines them into stacks based on month, as shown in Figure 5.34.
Figure 5.34 Stacked files organized by months.
Stacked files behave like folders, so you can open up the stacked file and see what’s inside. So what’s the big deal? Stacks are a quick way to collect content that meets your criteria and put them all in one place. And stacks have no physical location on your computer, so they don’t take up space on your computer as a folder does—stacks are just another representation of your content based on your filter criteria.
Windows 7 also allows you to group files by the criteria listed by the filter. Just right-click on a blank area of the Content pane, select Group By from the shortcut menu, and select a group criterion. For example, if you group files by name, Computer or Windows Explorer will group all the files by filename starting with the A–H group at the top, followed by the I–P group, and ending with the Q–Z group at the bottom. The grouping filter allows you to get a more granular view of which files belong to a particular group.
Zipping and Packing Files
In the 1980s, as computer networking and sharing files through bulletin board systems became popular, it became important to make files as small as possible because transmission speeds in those days were slower than a snail’s pace compared to today’s speeds. (Of course, back then we thought 1200bps was blazing speed!)
Today we still send files back and forth through email, and computer server bandwidth has trouble handling it all, so compressing files to their minimum size is as relevant now as it was years ago. In fact, it’s become so relevant that Microsoft included built-in compression technology beginning with Windows XP, and compression technology is also included in Windows 7.
One of the most popular compression systems in the 1980s and 1990s was PKZip. Like Xerox and Google, whose brand names became synonymous with the products they perfected, compressing files soon became known as zipping. Today Windows 7 still refers to compressed files as zipped files.
Here’s how you compress one or more files:
1. Select the file(s) you want to compress.
2. Right-click a selected filename.
3. In the pop-up menu choose Send To and then click Compressed (Zipped) Folder.
Tip
![]()
You can add new files to the compressed file by dragging the files to the compressed file.
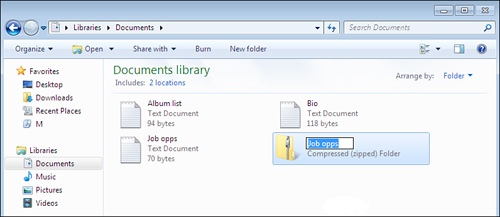
The compressed file appears in the same directory and takes on the name of the file you right-clicked in the compression process, as shown in Figure 5.35. Windows 7 selects the compressed file after you create it and highlights the filename so you can delete it and give the compressed file its own name.
Figure 5.35 A compressed, or zipped, file.
Note
![]()
You can’t compress a file when you’re viewing a stack. The Send To option doesn’t appear on the flyout menu.
After you compress the file, you can extract files by right-clicking the compressed file and then clicking Extract All. A dialog box appears and allows you to select a destination folder for the extracted files.
Note
![]()
JPEG files are already compressed, so you won’t see much more compression from those files when you place them in a compressed file. The total size of a compressed JPEG file is about the same size of the total size of an uncompressed JPEG file.
File and Folder Security
File and folder security is a necessary part of computing, especially in these days of always-on networking and multiple users and networks interacting with your computer. Therefore, security is an integral part of Windows 7.
As Windows NT was developed in the 1990s, Microsoft realized that the standard File Allocation Table (FAT) file system could not provide security features users would need, including permissions and editing to restrict user access to specific files. In response, Microsoft developed the NTFS file system. Today Microsoft recommends that computer users running Windows format their hard disks in NTFS primarily because NTFS-formatted files and folders provide better security.
You can access, view, and change security settings for folders and individual files. Here’s how:
1. Right-click the file or folder.
2. Click Properties in the menu.
3. Click the Security tab. Figure 5.36 shows the Security tabs for a folder and a file, respectively.
Figure 5.36 Windows offers different security options for folders and files.
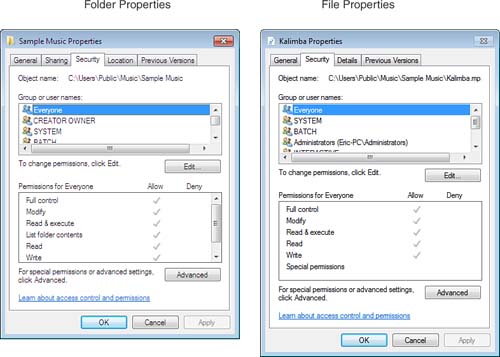
As you can see, there are only minor differences between the Security tab for a folder and the Security tab for a file. You can view the permissions for each group or username by clicking the group or username in the Group or User Names list. Change permissions for the selected group or user by clicking Edit. If you need to set special permissions or advanced settings, click Advanced.
![]() To learn more about Windows 7 file security and other security features, see Chapter 31, “Protecting Your Data from Loss and Theft.” You can also learn more about file management options, including file and folder encryption and managing access and control by users and groups, in Chapter 31.
To learn more about Windows 7 file security and other security features, see Chapter 31, “Protecting Your Data from Loss and Theft.” You can also learn more about file management options, including file and folder encryption and managing access and control by users and groups, in Chapter 31.