
4. Using the Windows 7 User Interface
Who Should Read This Chapter?
Many readers might wonder why an advanced book such as this includes coverage of something as basic as the Windows user interface (UI). The decision was primarily driven by the knowledge that many users of Windows 7 will be upgrading from Windows 2000, XP, and even Vista. For those users, savvy as they might be with Windows concepts, the Windows 7 UI is different enough that they’ll need a roadmap to get started. When you are familiar with it, you’ll wonder how you ever got around in those old clunky environments. In addition to the newer look of Windows 7, many new functions are woven into the fabric of the new UI—we don’t want you to miss out on them. We’ve also included some UI tips and tricks that you might not know about. So even if you consider yourself a Windows veteran, at least take the time to skim through this chapter before you move on.
Don’t just take our word for it. Experiment with the new UI as you read this chapter. We’ve found that nothing can substitute for direct hands-on operation to get an understanding and a feel for the new user environment. Most of the information in this chapter is not of a level or type that can damage your system, but whenever caution is needed, we spell it out clearly.
Note
![]()
Upgrading might not be just for the fun of it. Microsoft stopped offering support for MS-DOS, Windows 1.0-3.x, Windows for Workgroups, and Windows 95 on December 31, 2001. Support for Windows 98 (OSR2 and SE), Me, and Windows NT 4 Workstation was dropped on June 30, 2003. Support for Windows 2000 Professional ended on June 30, 2005. And support for Windows XP Service Pack 1 ended on October 10, 2006. When Microsoft says it will be dropping support, that means the Microsoft technical support system will not respond to calls or email with questions regarding these OSs. In addition, and more importantly, Microsoft will no longer locate and fix security problems in these older OSs. In addition to Windows 7, Microsoft still supports Windows XP Service Packs 2 and 3, as well as Windows Vista Service Packs 1 and 2—at least for the time being.
We aren’t able to cover everything about the new environment in this chapter, but we do a good job of covering the important aspects and those of interest to most readers. If you run across a button or command that you don’t recognize, don’t be afraid to explore the Windows Help service for details and instructions. The Windows 7 Help system builds upon the help and support available in Windows Vista, and expands upon the articles previously available.
![]() For those looking for ways to tweak and customize the new GUI, see Chapter 23, “Tweaking and Customizing Windows.”
For those looking for ways to tweak and customize the new GUI, see Chapter 23, “Tweaking and Customizing Windows.”
If at any time you want to put this book down and walk away from your system, jump to the “Exiting Windows Gracefully” section near the end of this chapter to find out how to log off with aplomb.
Logging In to Windows 7
In Chapter 3, “The First Hour,” we briefly showed you how to log on, and gave you a quick tour of the OS. We’ll cover the logon process and the Welcome screen in more detail in this section.
When Windows 7 starts up, you need to log on before you can start to work. There are three ways that this logon process can occur, depending on how your computer was set up:
• In most cases, you will see the Welcome screen, which displays a list of user account names and pictures. Locate and click your account name. If asked for a password, type in your password, then press Enter.
• If your computer is a member of a domain network (as is usually the case in a corporate setting), the screen may instruct you to press Ctrl+Alt+Del to log on. Hold down the Ctrl and Alt keys, and then press the Del key. Then, when prompted, enter your logon information, as provided by your network administrator. This will include a username, password, and location, which is the network’s domain name. To use a local account instead of a domain account—that is, a user account that is defined only in your computer—enter the name of your computer as the location.
• If your computer’s bootup process takes you right to the Windows desktop, it’s been set up to log on to an account automatically. You can leave it like this, if you want, and still use the Log Off or Switch Users feature to log on with other user accounts. Alternatively, you can disable the automatic logon feature and have Windows display the Welcome screen at startup.
![]() For more information about automatic logons, see “Just One User?,” p. 93.
For more information about automatic logons, see “Just One User?,” p. 93.
By the way, it’s likely that shortly after installing Windows, or upon booting the first time and logging in, you’ll see a “balloon” notification at the bottom of your screen, warning you that your computer might be at risk because you do not have antivirus protection. Clicking the balloon brings up the Windows Action Center (which replaces the Windows Security Center that you have come to know and love in previous versions of Windows). The Action Center can also be accessed by opening the Control Panel and choosing the System and Security section.
Logging On from the Welcome Screen
On most systems, you’ll see the Welcome screen every time Windows starts up. You may also see it when another user has logged off, when someone has disconnected from Windows using Switch User, when the system has been locked, or after the screen saver has kicked in.
If you see the Welcome screen, just click on your user account to log on. The Welcome screen presents a list of available user accounts that can be used to access this system. If a password is associated with a selected account, you are prompted to provide it.
If you have forgotten your password, click the question mark. (Note: The question mark appears only if you have previously defined a password hint in the Users section of the Control Panel.) If there was a hint defined for your account, Windows will display the hint so that you might remember the password.
If you forget your password, and you previously created a password reset disk, you can use the reset disk to gain access to your account. If you don’t have a password reset disk, you’ll have to have another user log on using a Computer Administrator account and reset your account’s password for you. This process could make you lose access to some information in your account, including website passwords that Windows remembered for you, and if you were using the Encrypted Files feature on Windows 7 Professional, Enterprise, or Ultimate edition, you could lose your encrypted files too. So, we strongly urge you to create a password reset disk for your account.
![]() To learn how to create and use a password reset disk, see “Before You Forget Your Password,” p. 91.
To learn how to create and use a password reset disk, see “Before You Forget Your Password,” p. 91.
After you’ve logged in, it’s time to explore the user interface—or, as Microsoft likes to call it, the user experience.
Using Windows 7—The User Experience
Windows 7 has a familiar yet different user interface. Most of the visual aspects of the desktop environment have been updated, but you’ll find most of the tools and applications you remember from Windows XP and Windows Vista right where you expect. As with Windows Vista, the user interface in Windows 7 is Aero. While substantially the same as Windows Vista, there have been a number of tweaks and improvements to the Aero UI, which make the Windows 7 experience subtly different from the Windows Vista experience. A few new features in the UI are so attractive that they will be very gratifying if you have just switched from Vista to Windows 7. If you want the older stylings of previous Windows versions (mainly Windows 2000–era visual stylings), revert to the “Classic” style. However, we highly recommend giving the new look and feel a try for a week or so before ditching it.
Microsoft’s visual palette now has three different user styles to choose from:
• Windows Classic—Contains the same user interface as Windows 2000 and earlier versions, if you still prefer that interface. It is important to note, however, that even though the visual theme might be set to Windows Classic, you will still have the Windows 7 Start menu, with no easy way to revert to the “old school” Start menu.
• Windows 7 Basic—Gives you the Aero look and feel, but without all the semitransparent glass effects that can cause old graphics hardware to become a bit overwhelmed.
• Aero—Provides a semitransparent “glass” look for the taskbars, menu bars, and window frames, as well as advanced features. Those features include Flip, which shows thumbnails of open programs when you move the mouse pointer over an application button in the button bar, Aero Peek, which allows you to see the contents of windows before selecting them, animated windows when opening and closing windows, and Flip 3D for “flipping” between 3D representations of your windows. Aero is processor intensive and, therefore, needs a high-grade video graphics card installed on your computer to work.
But even with all the enhancements, everything still seems to have a similar function or placement to that of Windows 2000, XP, and Vista, and it’s not too different from Windows 9x or Me. Thus, you’ll easily leverage your existing experience and expertise in navigating and operating Windows 7. After a few days, you’ll soon forget how you got by without all these useful improvements.
Note
![]()
For a nearly exhaustive list of keyboard shortcuts for navigating and controlling aspects of Windows 7, check out the “Keyboard Shortcuts” document, available through the Help and Support Center. Just click Start, Help and Support; type keyboard shortcuts in the title in the Search field; and then click the blue magnifying glass icon. The document should appear under Best 30 Results, so click that link in the Search Results to get to it.
However, Windows is more than just an OS and GUI. Like other versions of Windows, Windows 7 includes a broad collection of useful programs, from a simple arithmetic calculator to a fancy system and network-management tools. This list also includes a word processing program called WordPad, a drawing program called Paint, Internet Explorer for cruising the Web, CD-burning software that lets you create your own CDs, DVD-burning and playback tools, utilities for keeping your hard disk in good working order, and a data-backup program—just to name a few. See Chapter 7, “Gadgets and Other Supplied Accessories,” to learn more about some of the accessories included with Windows 7.
Parts of the Windows 7 Screen
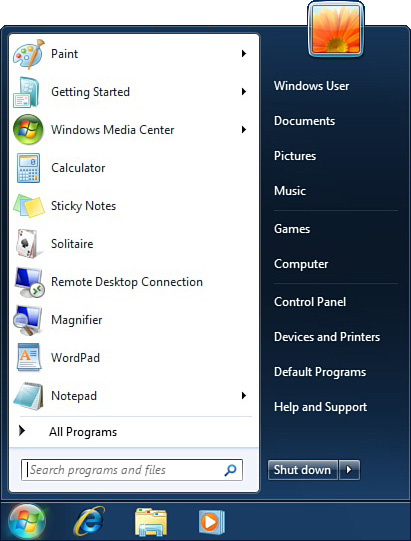
At this point, you should be booted up and signed in. After you’ve logged in, Windows 7 deposits you in its basic environment (called the desktop). You’ll probably notice two things almost immediately: first, the taskbar at the bottom of the screen, and second, an empty (or nearly so) desktop (see Figure 4.1). The taskbar is the central control mechanism for the Windows 7 user experience. It hosts the Start menu, the taskband area, active program buttons, the notification area (sometimes called the system tray by users that have been using Windows for a while), and the clock. The only item that is present on your desktop is the Recycle Bin, although if you purchased a computer system with Windows 7 preinstalled, you might see other icons as well. Unlike previous versions of Windows, with a default installation of Windows 7, the Recycle Bin is located in the top-left corner of the desktop and not in the lower right, as with Windows XP and Vista. The location of the Recycle Bin might change, however, depending on how you sort icons on the Desktop.
Figure 4.1 The default desktop with the Start menu open.
All you really must know to use Windows 7’s interface are these essential building blocks and how to manipulate a window and its commands. If you’ve been using any recent version of Windows, you already know the latter. You just need to be brought up to speed on the advanced Windows 7 interface specifics.
Note
![]()
You might also see some items on the right edge of your desktop, such as a clock or calendar, or a news or stock ticker. These are clever desktop add-ons called Windows Desktop gadgets and are covered in Chapter 7, “Gadgets and Other Supplied Accessories.”
The Desktop
The desktop is your home base while doing your work in Windows. It is always on the screen as the backdrop (whether you see it or not) and you can deposit files and folders right on it for storage. It’s analogous to a real desktop in this way. It also serves as a handy temporary holding area for files you might be copying from, say, a floppy disk to a hard disk folder. The Recycle Bin holds deleted work objects, such as files and folders, until you empty it (with caveats). Just as in previous versions of Windows (or the Mac, for that matter, if you’re coming from that background), you’ll do all your work in Windows 7 using graphical representations of your files and applications, called icons.
All the desktop icons you are familiar with from Windows XP and 2000 have been moved to the Start menu. (And if you upgraded from Windows XP or Vista, the Windows 7 Start menu will look very familiar.) You can gain access to Computer, Documents, and Network with a simple click on the Start button. You can easily control which items appear on the taskbar, or on the desktop (see Chapter 23).
The Recycle Bin
The Recycle Bin acts a bit like the waste paper basket at the side of your desk. After you throw something into it, it’s basically trash to be thrown out; however, you can still retrieve items from it if you get there before the cleaning staff takes it and throws it away for good. Within Windows 7, the Recycle Bin holds those files you’ve deleted using Windows Explorer or Computer. It does not capture files deleted by third-party tools, files deleted from floppy disks or network drives, files removed with an uninstall program or from DOS boxes, or DOS files running in a DOS box.
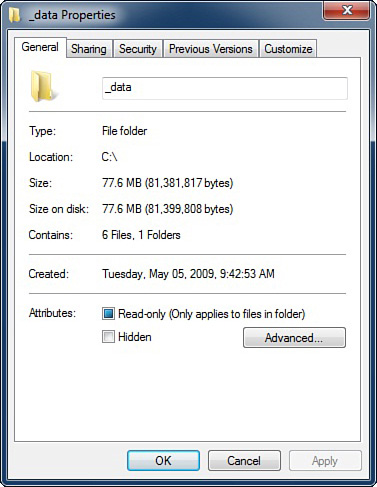
The Recycle Bin has limited storage capacity. However, Windows 7 provides each user with a default amount of Recycle Bin space, specified in megabytes. When the maximum size of the Recycle Bin is reached, the oldest files are permanently removed from the hard drive to make room for newly deleted files. The size of the Recycle Bin can be customized as a percentage across all drives or as a unique size on each individual volume. The Recycle Bin is customized through its Properties dialog box (see Figure 4.2). The configuration options are discussed in Chapter 23, but if you want to get to them now, right-click the Recycle Bin icon and select Properties from the pop-up menu.
Figure 4.2 The Recycle Bin Properties dialog box.

Caution
![]()
Don’t try moving program files unless you know that they have not registered themselves with the OS and that they can harmlessly be moved between folders. If you must move applications, use a tool specifically designed for this.
If you delete files in folders shared by other computers on a network, or delete files by typing commands into the Command Prompt window, the files are not moved to the Recycle Bin. They’re deleted instantly and permanently.
After a file is removed from the Recycle Bin, it cannot be recovered using native tools. You must restore the files from a backup, use a third-party recovery tool (which often needs to be in place before the file is deleted), or live without the lost files. If you don’t want your excess trash sitting around, you can also configure the system to bypass the Recycle Bin entirely so that it permanently deletes files immediately instead of granting you a recovery period.
To restore a file still retained in the Recycle Bin, double-click the desktop icon to open the Recycle Bin, locate and select the file to restore, and then click the Restore This Item button in the toolbar (see Figure 4.3). The file/folder(s) then are returned to the original location.
Figure 4.3 Restoring a file from the Recycle Bin.

You can also manually empty the Recycle Bin. This is often a useful activity before defragmenting your hard drive or if you just want to permanently delete files and folders. The Empty Recycle Bin command, found in the right-click pop-up menu for the Recycle Bin icon, the File menu if the menu bars are enabled (be sure no items are selected—otherwise, the File menu’s context changes to file/folder restore operations), and the Recycle Bin Tasks list of the Recycle Bin interface, is used to clear out all files that are being retained.
Icons
As you know, the small graphical representations of your programs and files are called icons. Windows 7 uses icons to represent folders, documents, programs, and groups of settings (such as dial-up connections).
Note
![]()
In recent versions of Windows, Microsoft began using the term folder instead of directory. It wants to focus your thoughts toward the idea of your files being stored on the hard drive in a manner similar to that of a filing cabinet for manila folder. Although this analogy helps, we don’t always stick to Microsoft-speak. So if you see folder or directory in this book, know that we consider them to be the same.
Icons are either objects themselves or shortcuts. A shortcut is a means to gain access to an object from multiple locations throughout the environment. Shortcuts are the preferred way to access the same object from multiple locations, to avoid having to make duplicate copies of the original object or application. Duplicating the object often causes version problems, such as never knowing which one has your most recent changes, and difficulties in upgrading or replacing applications. Shortcuts eliminate these issues and take up less space. You could have thousands of shortcuts pointing to the same application or document and still save drive space.
Note
![]()
Compatibility mode is a nifty feature that enables Windows 7 to support a wider range of software products than Windows 95 and Windows NT combined. A compatibility mode is simply a designation for a software platform-emulation environment. In other words, when an application is launched with compatibility mode enabled, a virtual machine representing that application’s native environment (Windows 9x, Windows NT, Windows 2000, Windows XP, or Windows Vista) is created in such a way that the application is fooled into thinking that it is the only application present on the computer system running its preferred OS.
If you have installed a 64-bit version of Windows 7, you cannot run MS-DOS or Windows 16-bit (Windows 3.x) applications. However, if you have installed a 32-bit version of Windows 7, MS-DOS or Windows 16-bit applications are automatically launched into their own virtual machine called WOW (Windows on Windows). Microsoft also makes available a free download called Windows XP Compatibility Mode, which allows even the most die-hard Windows XP application to run on Windows 7. For more information, see Appendix A.
Additionally, a shortcut can define alternative launching parameters, such as default directories, command-line parameters, compatibility mode, and so on. To alter the settings of a shortcut, right-click it and select Properties from the pop-up menu.
Dialog Boxes
The Open and Save dialog boxes (also known as file or browse dialog boxes) for most applications still offer the same shortcuts and controls as those of previous versions of Windows. This typically includes a shortcut menu to Recent Places (the new name for Internet Explorer history), Desktop, Documents, Computer, and Network. Not all applications that function on Windows 7 offer a fully enhanced file dialog box.
Many dialog boxes have tabs. These often appear at the top of a dialog box, as the tabs for General and Security do (see Figure 4.4). Tabs are used to offer multiple pages or displays of controls within a single smaller window. Many of the configuration settings dialog boxes have tabs, so watch for them. To select another tab, just click on it. In some cases, tabs are easy to miss; the new color scheme and display enhancements don’t always direct your eyes to tabs.
Figure 4.4 A Properties dialog box containing tabs that you can click to see additional settings.
Putting Items on the Desktop
The desktop is a convenient location for either permanent or temporary storage of items. Many folks use the desktop as a home for often-used documents and program shortcuts. I’m quite fond of using the desktop as an intermediary holding tank when moving items between drives or computers, or to and from removable media. It’s particularly good for pulling found items out of a search window or other folder while awaiting final relocation elsewhere.
Here are some quick helpful notes about using the desktop:
• You can send a shortcut of an object to the desktop very easily by right-clicking it and choosing Send To, Desktop (thus creating the shortcut).
• The desktop is nothing magical. Actually, it’s just another folder with a few additional properties. Prime among them is the option to have live, active, Internet-based information on the desktop using Windows gadgets, such as stock tickers, weather reports, and the like.
• Each user on the machine can have his or her own desktop setup, with icons, background colors, screen saver, and such.
• Whatever you put on the desktop is always available by minimizing or closing open windows, or more easily by clicking the Show Desktop button on the far right of the taskbar. It is for just this reason that almost every application enables you to save files directly to the desktop, and many programs default to saving files on the desktop. Keep in mind that some items cannot be moved onto the desktop—only their shortcuts can. (For example, if you try to drag a Control Panel applet to the desktop, you’ll see a message stating that you cannot copy or move the item to this location.)
If you want to be able to access a Control Panel applet from the desktop, you have only one choice: create a shortcut to the applet and place it on the desktop. However, in other cases, when you’re copying and moving items, particularly when using the right-click method, you’ll be presented with the options of copying, moving, or creating a shortcut to the item. What’s the best choice?
Here are a few reminders about shortcuts:
• They work just as well as the objects they point to (for example, the program or document file), yet they take up much less space on the hard disk. For this reason, they’re generally a good idea.
• You can have as many shortcuts scattered about for a given object as you want. Therefore, for a program or folder you use a lot, put its shortcuts wherever you need them—put one on the desktop, one on the Taskband, one on the Start menu, and another in a folder of your favorite programs on the desktop.
Caution
![]()
Remember that shortcuts are not the item they point to. They’re aliases only. Therefore, copying a document’s shortcut to a floppy or a network drive or adding it as an attachment to an email doesn’t copy the document itself. If you want to send a document to some colleagues, don’t make the mistake of sending them the shortcut unless it’s something they’ll have access to over the LAN or Web. If it’s a shortcut to, say, a word processing document or folder, they’ll have nothing to open.
• Make up shortcuts for other objects you use a lot, such as folders, disk drives, network drives and printers, and web links. From Internet Explorer, for example, drag the little blue E icon that precedes a URL in the Address bar to the desktop, to save it as a shortcut. Clicking it brings up the web page.
• The link between shortcuts and the objects they point to can be broken. This happens typically when the true object is erased or moved. Clicking the shortcut can result in an error message. In Windows 7, this problem is addressed in an ingenious way. Shortcuts automatically adjust when linked objects are moved. The OS keeps track of all shortcuts and attempts to prevent breakage. Shortcut “healing” is built into Windows 7 for situations in which the automated recovery mechanism fails.
• If you’re not sure about the nature of a given shortcut, try looking at its properties. Right-click the shortcut and choose Properties. Clicking Find Target locates the object that the shortcut links to and displays it in a folder window.
Tip
![]()
To quickly bring up the Properties dialog box for most objects in the Windows GUI, you can highlight the object and press Alt+Enter.
Properties and the Right-Click
Ever since Windows 95, a common theme that unites items within Windows is the aspect called properties. Properties are pervasive throughout Windows 9x, NT 4, 2000, XP, Vista, and now Windows 7. The Properties dialog boxes provide a means of making changes to the behavior, appearance, security level, ownership, and other aspects of objects throughout the OS. Object properties apply to everything from individual files to folders, printers, peripherals, screen appearance, the computer itself, or a network or workgroup. All these items have a Properties dialog box that enables you to easily change various settings. For example, you might want to alter whether a printer is the default printer or whether a folder on your hard disk is shared for use by co-workers on the LAN.
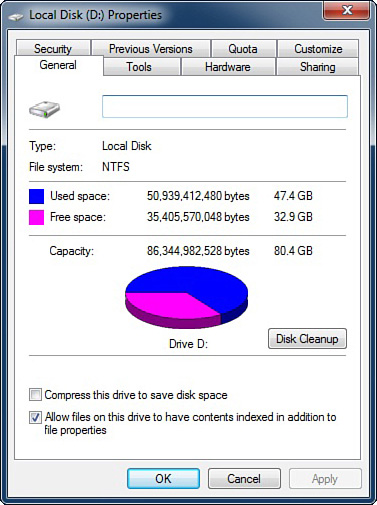
A typical set of properties is shown in Figure 4.5, which displays the Properties dialog box for the D: drive (hard disk) on a computer. Notice that there are several tab pages in this dialog box. Some Properties dialog boxes have only a single page, whereas others have many.
Figure 4.5 A typical Properties dialog box for a hard disk.
Properties dialog boxes are very useful and often serve as shortcuts for modifying settings that otherwise would take you into the Control Panel or through some other circuitous route. With some document files (for example, Word files), you can examine many settings that apply to the file, such as the creation date, author, editing history, and so forth.
Here are some typical uses of right-click context menus:
• Sharing a folder on the network
• Changing the name of your hard disk and checking its free space
• Changing a program’s icon
• Creating a new folder
• Setting the desktop’s colors, background, screen saver, and so on
• Adjusting the date and time of the clock quickly
• Displaying a font’s technical details
• Renaming an object
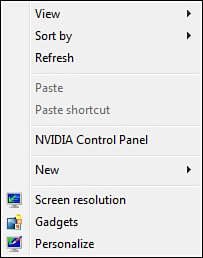
As an example of the right-click, simply get to an empty place on the desktop and right-click on it. Right by the cursor, you’ll see a menu that looks like the one shown in Figure 4.6. Notice that you can slide your cursor up and down the menu to make choices. Choose Personalize down at the bottom of the list. You’ll see the Personalization settings for your desktop (as well as general video display, screen saver, and other related items). By the way, many menus (Start, menu bar, pop-up, and so on) have commands with a small arrow to one side. If you highlight one of these commands, a submenu flies out—hence, the term flyout menu.
Figure 4.6 An example of a right-click menu, this one from an empty location on the desktop. Notice that it contains flyout menus.
If you want to use Windows most efficiently, make a habit of right-clicking on objects to see what pops up. You might be surprised to see how much time you save with the resulting shortcuts.
Note
![]()
Starting with this chapter, we’re going to assume that you understand the choice between single-click mode and double-click mode. Some of the figures in the book might have icons, files, or other object names underlined, whereas others might not, based on what mode the computer was set in when the screenshots were grabbed. Don’t let it throw you. When we say “double-click something,” we mean run it or open it by whatever technique is applicable based on your click setting. Also, when we say “click it,” that means select it. Remember that if you have single-clicking turned on, just hover the pointer over (that is, point to) the item to select it. Generally, we are working from the defaults set by Microsoft.
Using Windows Explorer
For a bird’s-eye view of your computer, many users prefer Folder view over the usual folder system, which can clutter your screen with numerous overlapping windows when you have lots of them open. Using the folders in the left pane makes copying, moving, and examining all the contents of your computer easier. If you’re doing housekeeping, copying and moving items from one folder to another or across the network, or hopping back and forth between viewing web pages and your local hard disk, mastering this view will serve you well.
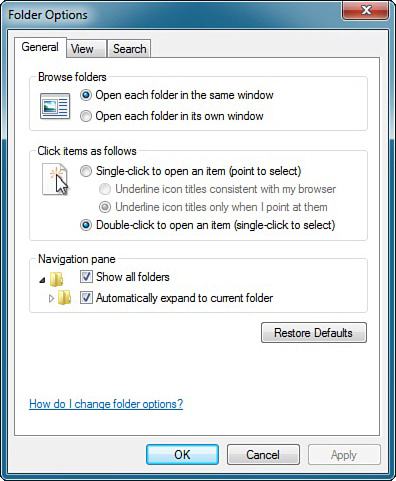
You probably remember that Folder view was introduced with Windows 95 in the form of Windows Explorer, and although it’s still in Windows 7 under that name, it’s not featured as much as it used to be. This is because the functionality of Windows Explorer can be added to all folder windows (such as Computer) simply by enabling the Show All Folders option (and optionally choosing Automatically Expand to Current Folder) in the Folder Options dialog box under Appearance and Personalization in the Control Panel (see Figure 4.7).
Figure 4.7 The Folder Options dialog box, where you can choose to see more folder information in the navigation pane.
The Folder paradigm affords significant power and flexibility in file and folder control; Microsoft and other software makers have adopted it for other classes of programs. For example, right-click on Computer and choose Manage. The resulting application (Computer Management) uses the same approach, as do many web pages.
The Folder view (call it Windows Explorer, if you want) lets you examine the Control Panel, the LAN, the Internet, your hard disk, or the Recycle Bin—all with a minimum of effort.
To recap, you can get to Windows Explorer by clicking Start, All Programs, Accessories, Windows Explorer.
Figure 4.8 shows the folders that appear on my own computer in Folder view.
Figure 4.8 The basic Windows Explorer screen, showing the computer’s major components on the left and the contents on the right.

Displaying the Contents of Your Computer
When you use Windows Explorer, all the objects constituting your computer appear in the list on the left. Some of those objects have a triangle pointing right to the left of them, which means the object is collapsed; it contains subitems that aren’t currently showing. These triangles are visible only if the mouse cursor is in the left Navigation pane; once you move out of the Navigation pane, the triangles fade and are no longer visible.
Click an item in the left pane to see its contents in the right pane. If the item has a white triangle pointing to the right, click it to open the sublevels in the left pane, showing you the relationship of the folders and other items in a tree arrangement. In the figure, you can see that the Documents Library has been opened in this way. Notice that the triangle is no longer white and pointing to the right, but is now black and pointing downward, indicating that the object’s display has been expanded. Clicking the black triangle causes that branch to collapse.
If you open a local disk drive or disk across the network, you can quickly get a graphical representation of the disk’s folder layout. Then click a folder to see its contents. By right-clicking on disks, folders, or files, you can examine and set properties for them. The straight lines connecting folders indicate how they’re related. If you have more folders than can be seen at one time, the window has a scrollbar that you can use to scroll the tree up and down.
Notice that there are two scrollbars—one for the left pane and one for the right. These scroll independently of one another, which can be very useful when you’re copying items from one folder or drive to another.
Working with Objects in Folder View
Working with folders and files in this view is simple. As explained previously, you just click an item in the left pane, and its contents appear in the right pane. Choose the view (Large Icons, Small Icons, and so on) for the right pane using the toolbar’s More options button, near the top-right corner. In Details view, you can sort the items by clicking the column headings.
When they’re displayed, you can drag items to other destinations, such as a local hard disk, a floppy drive, or a networked drive. You can drag and drop files, run programs, open documents that have a program association, and use right-click menu options for various objects. For example, you can right-click files or folders and choose Send To, DVD RW Drive to copy items to a DVD disc. I use the Send To, Mail Recipient option all the time, to send attachments to people via email.
With a typical hard disk containing many files, when its folders are all listed in the left pane, some will be offscreen. Because the two panes have independent scrollbars, dragging items between distant folders is not a problem. Here’s the game plan:
1. Be sure the source and destination folders are open and visible in the left pane, even if you have to scroll the pane up and down. For example, a network drive should be expanded, with its folders showing (using and mapping network drives is covered in Chapter 20, “Using a Windows Network”).
2. Click the source folder in the left pane. Now its contents appear to the right.
3. Scroll the left pane up or down to expose the destination folder. (Click only the scrollbar, not a folder in the left pane; if you click a folder, it changes the displayed items on the right side.)
4. In the right pane, locate and drag the items over to the left, landing on the destination folder. The folder must be highlighted; otherwise, you’ve aimed wrong.
This technique suffices most of the time. Sometimes, it’s too much of a nuisance to align everything for dragging. In that case, use the cut/copy-and-paste technique discussed earlier in the chapter. Remember, you can copy and paste across your home LAN as well as between your local drives.
Here are a few tips when selecting folders:
• You can select only one folder at a time in the left pane. If you want to select multiple folders, click the parent folder (such as the drive icon) in the left pane and select the folders in the right pane. Use the same techniques described earlier for making multiple selections.
• When you select a folder in the left pane, its name becomes highlighted. This is a reminder of which folder’s contents are showing in the right pane.
• You can jump quickly to a folder’s name by typing its first letter on the keyboard. If there’s more than one folder with the same first letter, each press of the key advances to the next choice.
• The fastest way to collapse all the branches of a given drive is to click that drive’s black triangle sign.
• You can quickly rearrange a drive’s folder structure in the left pane by dragging folders. You can’t drag disk drives, but you can create shortcuts for them (for example, a network drive) by dragging them to, say, the desktop.
• If a folder has subfolders, those appear in the right pane as folder icons. Clicking one of those opens it as though you had clicked that subfolder in the left pane.
• When dragging items to collapsed folders (ones with a plus sign), hovering the pointer over the folder for a second opens it.
Caution
![]()
Although it’s powerful, Folder view is also dangerous. It makes accidental rearrangement of your hard disk’s folders extremely easy. When selecting folders, be careful to not accidentally drag them. The icons are small, and this is easy to do accidentally, especially in the left pane. A little flick of the wrist and a click of the mouse, and you’ve dragged one folder on top of another folder. This makes it a subfolder of the target. Remember, the left pane is “live,” too. Rearranging the directory tree could make programs and files hard to find and even make some programs not work.
• You can use the right-click-drag technique when dragging items if you want the option of clearly choosing Copy, Move, or Create Shortcut when you drop the item on the target.
• To create a new folder, in the left pane, click the folder under which you want to create the new folder. Right-click in the right pane and choose New, Folder.
• Delete a folder by right-clicking it and choosing Delete. You’re asked to confirm.
Windows Shortcut Keys
Longtime users of Windows have probably grown accustomed to navigating around the Windows user interface using the keyboard. This especially comes in handy when your mouse or trackball decides to suddenly quit working, and you need to save the document you’re working on. On modern computer keyboards, you will see a Windows key that looks like the Microsoft Windows logo—pressing this Windows key once will bring up the Start menu. However, starting with Windows XP, you can use combinations of the Windows key and other keys to perform certain system tasks quickly. Although not an exhaustive list, Table 4.1 shows several Windows key shortcuts that are useful in Windows 7 that might help speed your way through the Windows UI.
Table 4.1 Windows Shortcut Keys
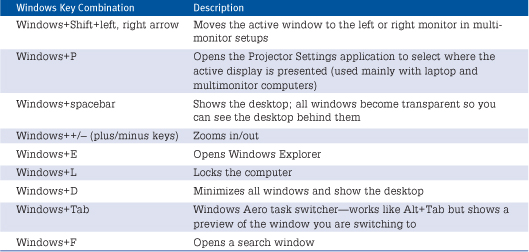
As you can see, there are a multitude of Windows key combinations that can make your day-to-day life easier as you’re jetting around the Windows interface. A more comprehensive list of Windows shortcut keys can be found in the Windows 7 online help.
Gestures
In Windows 7, Microsoft has introduced an all-new way of interacting with the Windows UI—gestures. While the majority of Windows gestures are used only on a tablet PC (see Chapter 38, “Tablet PC Features,” for more information on Tablet PC features), there are three useful gestures that can make working with Windows 7 much easier:
• To quickly maximize a window, grab the title bar of the window by clicking on it, and then quickly drag the mouse so that the pointer touches the top of the screen. The window will grow to fill the entire screen. To return the window to its previous size, simply grab the title bar and drag the window back to the desktop.
• You can make a window fill the entire left or right side of the screen by grabbing the title bar and dragging the window to the left or right edge of the screen, so that the mouse pointer touches the edge of the screen. This is useful if you have two windows that contain similar information (two word processing documents, for example) and you need to compare the contents side by side. As with the maximize gesture just discussed, simply grab the title bar and move the window back to the desktop to restore the window to its previous dimensions. These gestures are called Aero Snap, so named because they easily allow you to “snap” a window to the top or sides of the screen.
• You can reduce desktop clutter by using what has been dubbed the Aero Shake. If you have multiple open windows displayed on the desktop, and you need to have only a single window displayed, you can grab the title bar of the window you want to focus your attention on and shake it back and forth. All other displayed windows will minimize, leaving just the desired window open on the desktop. To restore the minimized windows, perform the Aero Shake again and all the windows magically appear once again.
![]() For more on gestures and touchscreen shortcuts, see Chapter 38.
For more on gestures and touchscreen shortcuts, see Chapter 38.
The Taskbar, the Start Menu, and Other Tools
The taskbar is the command center for your user environment under Windows 7. With few or no desktop icons after initial setup, everything you do within Windows 7 has to start with the taskbar. The taskbar (refer to Figure 4.1) is host to several other highly useful tools, including the Start menu, the taskband, the open application buttons, and the notification area.
The Start menu is the control center for Windows 7. Most native applications and installed applications have an icon within the Start menu that is used to launch or access them. The Start menu has two columns of access elements.
By default, the Start menu displays the most recently accessed applications. A fresh installation of Windows 7 includes prestocked items in this list, such as Windows Media Player and the Getting Started menu, which walks you through various configuration items, such as adding additional users and personalizing the Windows 7 environment. This leaves room for only a single recently accessed application. These prestocked items will disappear, but if you are impatient you can forcibly remove them one at a time by issuing the Remove from This List command from the right-click pop-up menu.
At the bottom of the left column is All Programs, which is an access point to the rest of the Start menu. Those of you from Windows 9x and above will recognize this as the Programs section of the Start menu. The Start menu’s right column lists Documents, Pictures, Music, Games, Computer, Network (optionally), Control Panel, Devices and Printers, Default Programs, and Help and Support.
Below the right column is the Shut Down button and the Shut Down menu, marked by a right arrow. The Shut Down button works exactly as advertised—it shuts down and powers off the computer with no confirmation dialog boxes, other than prompts to close any open files. The Shut Down menu enables you to choose other options for shutting down Windows 7, including Switch User, Log Off, Lock, Restart, Sleep, and Hibernate. Sleep is used to put the computer in a low-power state so you can quickly recover and continue working from where you left off, while Hibernate writes the contents of the computer memory to the hard drive and powers off the computer, so it can be left unattended for longer periods of time without fear that a power failure will wipe out any work you might have in memory at the time. It is important to note that the Hibernate option is available only if Hybrid Sleep is disabled (see Chapter 3 for more information on Hybrid Sleep). Hybrid sleep is enabled by default on desktop machines but not on laptops. The Lock button locks the computer so no one else can access it without the proper password—obviously, your user account will need a password set for this option to do any good.
Tip
![]()
Pressing Ctrl+Esc or the Windows key opens the Start menu as though you clicked the Start button. You then can navigate using the arrow keys. Use the Enter key to launch or access the selected item.
Clicking any of the items listed on the Start menu either launches an application or opens a new dialog box or menu. Most of the items on the top level of the Start menu are discussed later in this chapter. Clicking All Programs scrolls to a second page of programs, while leaving the quick links such as Control Panel still visible, which is the same behavior as in Windows Vista.
You can add new items to the Start menu by dragging an item from Computer or Windows Explorer over the Start menu button, then over All Programs, and then to the location where you want to drop it. You can even manipulate the Start menu as a set of files and shortcuts through Computer or Windows Explorer. You need to go to the system root (usually C:, but it could be anything on multiboot systems) and drill down to Users< (where username>Start MenuPrograms< is the name of the user account whose Start menu you want to modify).username>
To the far right on the taskbar is the notification area. Some services, OS functions, and applications place icons into this area. These icons provide both instant access to functions and settings, as well as status displays. For example, when you’re working on a portable system, a battery appears in the notification area indicating how much juice is left. The clock is also located in the notification area.
Notice that the far-right portion of the taskbar, to the right of the clock in the notification area, is blank. Microsoft has done away with the classic Quick Launch bar in Windows 7 and put the Show Desktop button in its place. If you hover over the Show Desktop area of the taskbar, all the currently open windows will “turn to glass” and allow you to see what is currently hidden on the desktop. Never fear, however, as the applications will come back just as quickly once you move the mouse away from the Show Desktop section of the bar. You can also click the Show Desktop button to quickly minimize all open windows (much like the classic behavior of the Show Desktop button), and restore them just as quickly by clicking the button a second time.
Between the Start button and the notification area are the active application buttons. These are grouped by similarity, not by order of launch. Notice that instead of the traditional application buttons you have grown accustomed to since Windows 9x, applications that are running in the Windows 7 GUI are represented by a square icon, with no accompanying window title text. This is a major change from previous Windows versions, but once you get used to it you will see that it is quite superior to the previous methods of organizing the running applications.
As previously mentioned, the Quick Launch bar that has been around since Windows 9x is missing, much to the chagrin of Quick Launch bar enthusiasts everywhere. In Windows 7, Microsoft has replaced the Quick Launch bar functionality with “pinning,” which enables you to take an application shortcut and place it permanently on the taskbar. You can then click any of the pinned applications to launch an instance of that application. You can also pin frequently used documents to the pinned applications on the taskbar (how’s that for recursion?) for quick launch at any time. To accomplish this, you simply drag a file onto its respective application on the taskbar, and the application file is now pinned to the taskbar application. You can access these pinned applications by right-clicking the pinned application and choosing one of the application files.
Tip
![]()
There might be times when you want to open a file with an application that is not its default—for example, you might want to open a file with a CSV (comma-separated values) extension in Notepad rather than Microsoft Excel. You can do this by holding down the Shift key while you are dragging the file to the desired application on the taskbar. The application file will then be pinned to the selected application.
With practice, most users find that this is a superior alternative to the Quick Launch bar. There is, however, a way to get the Quick Launch bar back:
1. Right-click an open section of the taskbar and choose Toolbars, New Toolbar.
2. In the Folder: bar at the bottom of the dialog box, enter %AppData%MicrosoftInternet ExplorerQuick Launch.
Note
![]()
You can reposition the taskbar on the right, left, or top of the screen. Just click any part of the taskbar other than a button and drag it to the edge of your choice. The Taskbar and Start Menu Properties dialog box includes a locking option to prevent the taskbar from being moved accidentally. Be sure to deselect this option before you attempt to relocate the taskbar (right-click the taskbar and clear the check mark next to the Lock the Taskbar option). This can also be accomplished by right-clicking the Start button, choosing Properties, and changing the Taskbar Location on Screen setting on the Taskbar tab.
You’ll now find the Quick Launch bar on the far right of the taskbar, and you can move it anywhere.
Each running application has a gray border around the application icon. If you hover over the application icon, you will see thumbnails of each of the windows that particular application has open. Unless you have super-human eyesight, you probably won’t be able to read the text in those thumbnails, which can make for an interesting time trying to figure out which of those tiny thumbnails was the email you were just working on. Windows 7 comes to the rescue with an enhancement called Aero Peek. Simply hover over one of the presented thumbnails, and all the other open windows “turn to glass” and the selected window rises to the foreground so you can see exactly what is in that window. You also have the option of closing any of the application’s open windows directly from the thumbnail view.
Note
![]()
In Windows XP and earlier versions, you could add Windows updates in the Add or Remove Programs applet. In Windows 7, adding and viewing Windows 7 updates is performed in the System and Security section of the Control Panel. You’ll learn more about updating Windows 7 in Chapter 22.
You can further control and modify the taskbar and Start menu through their Properties dialog boxes.
![]() For more information on customizing the taskbar and the Start menu, see Chapter 23.
For more information on customizing the taskbar and the Start menu, see Chapter 23.
Uninstall or Change Programs
As with Windows Vista, Windows 7 doesn’t include an Add or Remove Programs applet. Instead, Windows 7 provides you with the Uninstall or Change a Program applet, which enables you to uninstall, change, or repair a program.
Uninstalling a program is analogous to what we called “removing” a program in earlier versions of Windows. Changing a program enables you to make changes to the functionality and features of the program, such as installing Microsoft Access from the Microsoft Office CD if you didn’t install that program previously. Repairing a program enables you to repair any problems you’re having with a program, such as a word processing program not saving files.
Tip
![]()
Never attempt to remove an application from your system by deleting its files from the Program Files folders (or wherever). Actually, “never” might be too strong. Removal through manual deletion should be only a last resort. Always attempt to use the Uninstall or Change a Program applet or the uninstall utility from the application first.
You’ve probably noticed that not all programs show up in the Uninstall or Change a Program applet. They don’t appear because only programs that comply with the 32-bit Windows API standard for installation get their filenames and locations recorded in the system database, allowing them to be reliably erased without adversely affecting the operation of Windows. Many older or less-sophisticated applications simply install in their own way and don’t bother registering with the OS.
Tip
![]()
Some programs, such as Microsoft Office, include service packs and other updates that help keep the programs running in top condition. However, these updates might cause Windows to run slowly and/or otherwise malfunction. If you suspect that a recently installed upgrade is the problem, you can view and uninstall updates by clicking the Uninstall a Program link and following the upcoming instructions starting with step 3.
What’s more, the built-in uninstaller lets you make changes to applications, such as adding or removing suboptions (assuming that the application supports that feature).
Using the uninstall feature of the applet is simple:
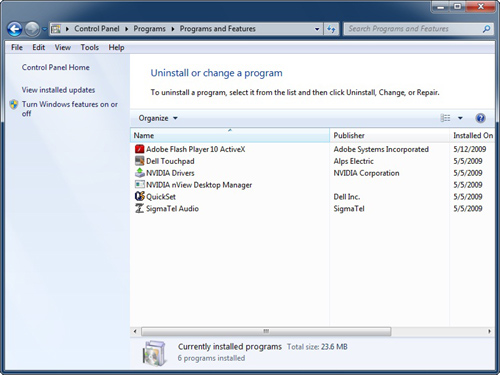
1. Click Start, Control Panel, click Programs, Uninstall a Program.
2. Check the list of installed applications. A typical list appears in Figure 4.9. Note that you can sort the applications by clicking the column heading.
Figure 4.9 Choosing the program to uninstall or change.
3. Select the program you want to change or uninstall.
4. Click the Uninstall/Change button.
5. Answer any warnings about removing an application, as appropriate.
Tip
![]()
Obviously, removing an application can’t easily be reversed by, say, restoring files from the Recycle Bin because settings from the Start menu and possibly the Registry are deleted.
Some applications (for example, Microsoft Office) prompt you to insert the program CD when you attempt to change or remove the app. These prompts can be annoying, but what can you do? The setup, change, and uninstall programs for some large suites are stored on their CDs, not on your hard disk. Just insert the disc when prompted.
Note
![]()
Incidentally, the Uninstall or Change a Program applet can be run only by users with Administrator credentials on their local computer. Although some applications can be installed or removed by nonadministrators, most require Administrator privilege.
Add New Programs
So how do you install a program on a disc in your CD or DVD drive from the Control Panel in Windows 7? You no longer can as you did with Windows XP and earlier versions of Windows. Nearly all software written for Windows comes with an autoinstall program that runs when you insert the CD or DVD into the appropriate drive. Microsoft obviously believes that adding software from the Control Panel is now superfluous, but if you have a program that won’t open the autoinstall program automatically, consult your software installation instructions or search for the autoinstall file on your CD using Computer or Windows Explorer. Autoinstall files usually have the name setup.exe or install.exe.
Using Older Programs
As I said at the beginning of the chapter, Microsoft is constantly moving people toward upgrading to the newest version of Windows. If you still have Windows 3.x, you will be dismayed to learn that Windows 7 64-bit versions will not run DOS and Windows 3.x programs.
If you have programs written for Windows XP or earlier that worked correctly in those older OSs but don’t work well in Windows 7, Microsoft was kind enough to include the Program Compatibility Wizard in Windows 7 so you can select and test compatibility settings that could identify the problem(s) and hopefully get your program working again.
Here’s how you open the Program Compatibility Wizard:
1. Click Start, Control Panel, Programs.
2. Under the Programs and Features section at the top of the window, click the Run Programs Made for Previous Versions of Windows link. The Program Compatibility Wizard window appears; you can use it to pinpoint the problem(s) with your application. Additionally, Microsoft is making available a free download named Windows XP Compatibility Mode, which enables you to run programs written for Windows XP much more easily under Windows 7. For more information on Windows XP Compatibility Mode, see Appendix A, “Using Virtualization on Windows 7.”
Running Your Applications
If you’re just upgrading from a previous version of Windows (such as 9x, XP, or Vista), you already know how to run applications, how to switch between them, and how to manage them. But if you are new to Windows OSs, here is a quick how-to guide.
How to Launch Your Apps
Applications are launched under Windows 7 in a number of different ways, as is the case with many other things in Windows. You’ll probably end up using the technique that best fits the occasion. To run an application, perform one of the following tasks (ranked in order of ease of use):
• Use the Start button to find the desired application from the resulting menus. Click All Programs if you don’t see the one you want.
• Open Computer or Windows Explorer, browse through your folders to find the application’s icon, and double-click it.
• Find the application by clicking Start and then typing the application name in the Search box. (The Search method works only for programs installed in a predefined list of folders called the search path, which is discussed in Chapter 29, “Command-Line and Automation Tools.”)
• Locate a document that was created with the application in question and double-click it. This runs the application and loads the document into it. With some applications, you can then close the document and open a new one, if you need to.
There are two easy ways to open an existing document in the application that created it:
• Click Start, Documents, and look among the most recently edited documents. Clicking one opens the document in the appropriate application.
• You can also click Start, Recent Items, and look among the most recently edited files if you have customized the Start menu to show Recent Items.
In the name of expediency, we don’t cover all these options. When you get the hang of the most common approaches, you’ll understand how to use the others. Notice that some of the approaches are “application-centric,” whereas others are “document-centric.” An application-centric person thinks, “I’ll run Word so I can write up that trip expense report.” A document-centric person thinks, “I have to work on that company manual. I’ll look for it and double-click it.”
Running Programs from the Start Button
The most popular way to run your applications is to use the Start button, which is located in the lower-left corner of your screen. When you install a new program, the program’s name is usually added somewhere to the Start button’s All Programs menu lists. If you’ve recently used an application, Windows 7 might list it in the recently used list on the top-level Start menu area. Sometimes you’ll have to “drill down” a level or two to find a certain program because software makers sometimes like to store their applications under their company names. Then you just find your way to the program’s name and choose it, and the program runs.
Tip
![]()
Sometimes, spotting a program in a list is a visual hassle. Press the first letter of the program you’re looking for, and the cursor jumps to it. If multiple items start with that letter, each keypress advances one item in the list. Also, pressing the right-arrow key opens a submenu. The Enter key executes the highlighted program. Items in the lists are ordered alphabetically, although folders appear first, in order, with programs after that.
Note that all selections with an arrow pointing to the right of the name have submenus—that means they open when you click them or hover the pointer over them. Several levels of submenus might exist. For example, to see the System Tools submenu, you have to go through All Programs, Accessories, System Tools.
Often, you’ll accidentally open a list that you don’t want to look at (say, the Games submenu). Just move the pointer to the one you want and wait a second, or press the Esc key. Each press of Esc closes one level of any open lists. To close all open lists, just click anywhere else on the screen, such as on the desktop or another window. All open Start button lists go away.
Shortcut Doesn’t Work
![]()
What do you do if you click a shortcut somewhere in the Start menu and nothing happens or you get an error message? Too much software overhead would be involved for the OS to keep track of all the shortcuts and update them as necessary when the files they point to are moved or deleted. A system that has been in use for some time will certainly have “dead” shortcuts, just as web pages have broken links floating around. When you click a shortcut icon anywhere in the system—be it in the Start menus, on the desktop, or in a folder—and you get an error message about the program file, click OK and let Windows take a stab at solving the problem by searching for the application. If it’s found, Windows 7 “heals” the shortcut so that it will work again the next time you use it.
If that doesn’t work, try searching by using Start, Search, or typing into the Search box above the Start button. (And recall that you can access the Search window by tapping F3 or Windows+F.) See whether you can track down the runaway application. If you’re successful, you’re probably better off erasing the bad shortcut and creating a new one that points to the correct location. You can create a new shortcut by right-clicking the app’s icon and choosing Create Shortcut. Then drag, copy, or move the shortcut to wherever you want, such as onto the Start button.
Another good trick to help you sort out a bad shortcut or to follow where its trail is leading is to right-click the icon and choose Properties, Find Target.
Remember, moving folders that contain applications (for example, Office might be in C:Program FilesMSOffice) is a really bad idea. Once installed, many programs need to stay where they were put, unless you use a utility program specifically designed for the task. This is because application locations are recorded in the system Registry, and simply moving the program executable files around doesn’t update the system Registry.
Running a Program from Computer or Windows Explorer
If you’re a power user, chances are good that you’ll be sleuthing around on your hard disk using either the Computer approach or Windows Explorer. I certainly have programs floating around on my hard disk that do not appear in my Start button program menus, and I have to execute them directly. In general, the rule for running programs without the Start menu is this: If you can find and display the program’s icon, just double-click it. It should run.
Tip
![]()
Just as in Windows XP, 2000, and Vista, the differences between Computer and Windows Explorer within Windows 7 are more cosmetic than functional. In fact, simply by changing the default view, you can obtain the same view (that is, the same layout, panes, and details) using either interface. To alter the views, use the Organize toolbar button.
Getting to a program you want is often a little convoluted, but it’s not too difficult to grasp. Plus, if you understand the DOS directory tree structure or you’ve used a Mac, you already know more about Windows 7 than you think. Double-click a drive to open it, and then double-click a directory to open it. Then double-click the program you want to run. Figure 4.10 shows a typical directory listing for Computer.
Figure 4.10 A typical directory as shown in Computer.

Tip
![]()
Network is a version of the Computer interface that is used to gain access to network resources. Overall, it’s used in the same manner as Computer. The only difference is that you must be on a network and someone must grant you access to shared resources on other systems for this tool to be of any use. Thus, we’ve left the discussion of this tool to Part V, “Networking.”
Here are some notes to remember:
• Folders are listed first, followed by files. Double-clicking a folder reveals its contents.
• If you want to see more folders on the screen at once to help in your search, you have several options. You can use the More options button on the toolbar to change view options. The Small Icons view uses small icons with only the object name. The Medium Icons, Large Icons, and Extra Large Icons views display images extracted from the file objects themselves—these views are most useful for graphic files. The List view displays everything in a column by its object name only. The Details view offers the most comprehensive information about file system objects in a multicolumn display, with object names, object type, size, modified date, comments, and so on. The Tiles view provides an image with the object type and size.
Tip
![]()
Pressing Backspace while in any folder window moves you up one level in the directory tree. Also, the Back and Forward buttons work just like they do in a web browser—they move you forward and back through folders you’ve already visited.
Of course, many of the files you’ll find in your folders are not programs; they’re documents or support files. To easily find the applications, choose the Details view and then click the column head for Type. This sorts the listing by type, making it easy to find applications in the list (which carry an Application label).
Note
![]()
Applications, registered file types, and certain system files do not have their file extensions (a period and three-letter label that follows the filename) displayed by default. “Hidden” system files and directories are invisible, too. This choice was made to prevent cluttering the display with files that perform duties for the OS but not directly for users. It also prevents you from meddling with files that could cripple applications and documents, or even the system at large. Personally, I like seeing as many details about files as possible, so when I first install a system, I change the default settings to show me every file on my system. You can do this through the View tab of the Folder Options applet, accessed through the Control Panel. You can also access the Folder Options applet quickly by typing folder in the Start menu Search box.
Using Libraries
Windows 7 is designed to help you focus on your creative tasks instead of the underlying OS, which supports the tools and files. Part of this includes the Documents, Pictures, and Music Start menu items. These links also appear on most file or browse windows, as well as within Computer and Windows Explorer. These three elements always link you back to a standard location where your personal data files are stored.
Windows 7 introduces the concept of libraries for your personal documents. While the standard My Documents, My Music, My Pictures, and My Videos folders are still listed and accessible under your user folder, Windows 7 gives you the ability to see data from all these directories in one convenient place—the library. Libraries can pull their data from multiple sources, whether that source is a folder on the local hard drive, an external hard drive, or a network location, and presents the files in an easy-to-manipulate interface. For more on libraries and how to configure them, see Chapter 5.
Tip
![]()
Documents is not the same as Recent Items. Recent Items is a quick-access list of the most recently accessed resources. This includes documents, music files, image files, archive files, and even (sometimes) programs.
The Documents library is the master folder for all your personal data files. This is the default storage location whenever you save a new document or data file. These libraries are provided to simplify the storage and retrieval of your most intimate file-stored creations. Clicking on one of these Start menu links opens a Computer window to the library specified.
Pictures
The Pictures library is to Windows 7 what the My Pictures folder was to Windows XP. You can store pictures in this folder and then view the pictures quickly from the Start menu (by clicking Start, Pictures) or from the Favorites Links section in Computer or Windows Explorer. A new installation of Windows 7 includes eight high-quality sample pictures in the Sample Pictures subfolder.
Music
The Music library is to Windows 7 what the My Music folder was to Windows XP. You can store music files in this folder and then listen to the music files quickly from the Start menu (by clicking Start, Music) or from the Favorites Links section in Windows Explorer. A new installation of Windows 7 includes three high-quality sample music files in the Sample Music subfolder.
Using Speech Recognition
Not everyone who uses Windows uses the keyboard. Some people are physically unable to use a keyboard, and others prefer voice commands to typing text whenever possible. With Speech Recognition, Windows 7 accommodates users who want to talk to their computer.
Windows 7 interfaces with a keyboard and mouse (or mouse equivalent) by default. You can set up Speech Recognition by clicking Start, Control Panel, Ease of Access, Speech Recognition. The Speech Recognition window appears (see Figure 4.11).
Figure 4.11 The Speech Recognition window lets you configure your Speech Recognition settings.

This window contains five links to choose from, but the link you want to click first to set up Speech Recognition is Start Speech Recognition. After you click this link, the Set Up Speech Recognition Wizard appears, enabling you to set up the computer to recognize your voice. Tasks you complete in the wizard include setting up the microphone, taking a speech tutorial, and reading text to your computer to help your computer better translate your voice to text.
You can also view and print the Windows Speech Reference Card that contains a list of common voice commands that Windows 7 understands.
Advanced Speech Options
You can further configure Speech Recognition options by clicking the Advanced Speech Options link in the Speech Recognition window. The Speech Properties window appears with the Speech Recognition tab open, as shown in Figure 4.12.
Figure 4.12 The Speech Properties window Speech Recognition tab.
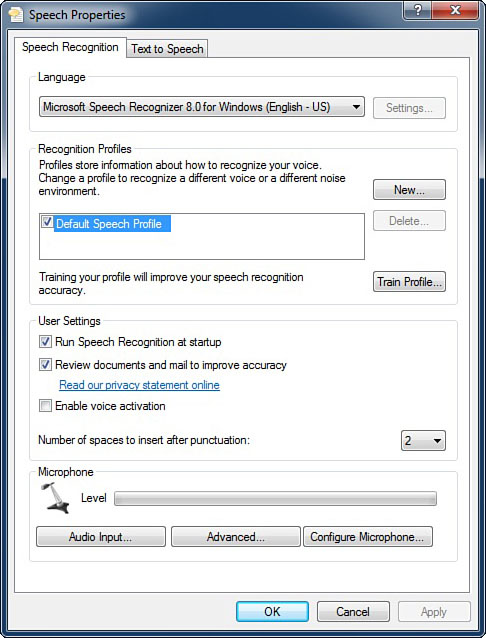
In this tab, you can select the Microsoft Speech Recognition software for the type of English you’re speaking—US English (which is the default) or UK English. You can also create a new Speech Recognition profile, determine whether you want to run Speech Recognition when Windows 7 starts, and specify how your computer will improve its speech-recognition accuracy. As part of that accuracy, you can also adjust your microphone input.
If you prefer Windows to read text aloud through your computer speakers, click the Text to Speech tab (see Figure 4.13).
Figure 4.13 The Speech Properties window Text to Speech tab.

By default, only one voice is available in Windows Vista: Microsoft Anna, which is a pleasant female voice. You can preview Anna’s voice by clicking Preview Voice. You can also control Anna’s voice speed using the Voice Speed slider bar. Enable Text to Speech by clicking OK.
Help and Support
We haven’t yet advanced our computing systems to the level displayed in Star Trek, where officers state an action verbally and the action takes place. When you want your computer to do something, you need to tell it what to do. Often you have to explain in great detail at every step exactly what actions to take or not to take. The Windows 7 Help system is designed to help you find out what everything within the environment can and cannot do, as well as teach you how to perform the activity you need for work or play.
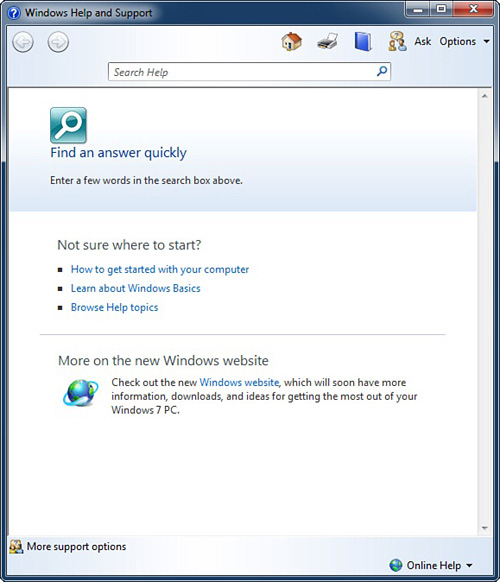
You can access the Help system by clicking on the Help and Support item on the top level of the Start menu. The Help system offers a wide range of options, from a search routine, to topic-organized texts, to task-assisting walk-throughs, to Internet-updated dynamic content help (see Figure 4.14). The Help system also includes access to a full index, a history list, and a favorites list. It operates in much the same way as a web browser—using hyperlinks, Back and Forward buttons, and the capability to return to the start of the system using the Home button. When searching for material, you can use Boolean rules to fine-tune your keyword search phrases (AND, OR, NOT, and NEAR). This is definitely a tool that is worth exploring and consulting in times of trouble or confusion.
Figure 4.14 The Windows Help and Support interface.
Exiting Windows Gracefully
When you’ve finished a Windows 7 session, you should properly shut down or log off to ensure that your work is saved and that no damage is done to the OS. Shall we reiterate? Shutting down properly is very important. You can lose your work or otherwise foul up Windows settings if you don’t shut down before turning off your computer. If multiple people share the computer, you should at least log off when you’re finished so that others can log on. Logging off protects your work and settings from prying eyes. When you shut down, Windows does some housekeeping, closes all open files, prompts you to save any unsaved work files, and alerts the network that you and your shared resources are no longer available for consultation.
You can always choose to shut down the computer; all or only some of this information might apply to your machine. Newer machines have more shutdown features because they’re likely to have advanced power management built in to them via ACPI (Advanced Computer Power Interface).
These are the steps for correctly exiting Windows:
1. Close any programs that you have running. (This can almost always be done from each program’s File, Exit menu if the menu bar is active or by clicking the program’s close button.) If you forget to close programs before issuing the Logout or Shut Down command, Windows attempts to close them for you. If you haven’t saved your work, you’re typically prompted to do so. You must close some programs, such as DOS programs, manually. Windows alerts you if it can’t automatically close an open program. Quit the DOS program and type exit at the DOS prompt, if necessary. If you are just switching user context, your open application’s status is saved so you can quickly return to it later.
2. Click Start, and then move the mouse over the right-arrow button to the right of the Shut Down button. You’ll see the menu shown in Figure 4.15.
Figure 4.15 The Shut Down selection menu.

3. Click on the desired option.
Consider these points:
• The Hibernate option records the current state of the system to disk and then shuts down the computer. When the power is turned back on, the system reboots. If you log back in as the same user who initiated the hibernation, the system returns to its exact state at the moment of hibernation.
• If you want to log off, expand the Shut Down menu and select Log Off.
Tip
![]()
Logging off clears personal settings from memory and puts the computer in a neutral state, waiting for another user to log on. However, it doesn’t bring the system to its knees. Logging off does not stop running services, which can include web services, file sharing, print sharing, UPS support, and scheduled tasks.
• If you attempt to shut down the computer while another user’s desktop is still active (that is, you choose Switch User and at least one other user is still logged on), you’ll see a warning message stating that performing a shutdown could result in data loss, along with the options to continue with shutdown (Yes) or abort (No).
• Sleep puts the computer in a suspended state, letting you quickly come right back to where you were working before you suspended the PC. This means you don’t have to exit all your applications before turning off your computer. You only have to choose Sleep. This also saves energy because the hard drives, the CPU, the CPU fan, some internal electronics, and possibly the power supply and fan go into a low-power state. If your monitor is Energy Star compliant, it should also go into a frugal state of energy consumption. When you want to start up again, a quick press of the power switch (on some computers, a keypress on the keyboard or a jiggle of the mouse will do) should start up the system right where you left off.
• Be sure to press the power button for just a second or so. Anything more than 4 seconds on most modern computers in a Sleep state causes the computer to completely power down.
• Be aware that Sleep holds your system state only as long as the computer has power. In XP, if the power failed, everything stored in the computer’s RAM is lost. You’d end up doing a cold boot when the power is restored or, if it’s a laptop with a dead battery, when you hook up your AC adapter to your laptop again. The good news is that in Windows 7, Sleep is more intelligent. When the battery level gets too low, the power management system in Windows 7 switches into gear and initiates Hibernation (which we’ll discuss next). One of the more interesting features of recent versions of Windows, including Windows 7, is hibernation. Like Sleep mode, hibernation lets you pause your work and resume later, without laboriously shutting down and reopening all your applications and files. But unlike Sleep, Hibernate isn’t “volatile.” If the AC power fails or batteries run flat, it doesn’t matter because Hibernate stores the system state—that is, the contents of memory and the status of all hardware devices—on a portion of the hard disk, instead of keeping the system RAM alive in a low-power state. After storing the system state to the hard disk, the computer fully shuts down. When it’s restarted, a little internal flag tells the boot loader that the system has been stored on disk, and it’s reloaded into memory.
• Hibernation requires as much free hard disk space as you have RAM in your PC. If you have 512MB of RAM, you’ll need 512MB of free disk space for hibernation to work. When you choose Hibernate from the Shut Down menu, Windows 7 has to create a fairly large file on disk. In my case, for example, it’s 2GB in size. On a 3GHz Intel Pentium 4, the entire process takes about 15 seconds. Restarting takes about the same amount of time. Remember, if you’re going to put a laptop running on batteries to sleep for more than a few hours, use Hibernate or just do a complete shutdown, closing your applications and documents. That way, if the batteries run out, you won’t lose your work.
Dealing with a Crashed Application or Operating System
Even though Windows 7 is fairly immune to crashing, the applications that run on it are not necessarily so robust. Not to be cynical, but many IS professionals don’t consider any version of Windows worth their trouble until at least a service pack or two hit the streets, because they know that bugs tend to be prevalent in first-release software. Still, with an OS as complex as Windows 7, we bet there are a few gotchas lurking.
Forcing Your Computer to Shut Down
![]()
If your system is really acting erratically or stuck in some serious way and you’ve already killed any unresponsive programs, press Ctrl+Alt+Del. This should bring up the Windows 7 options menu. Click the red Shut Down button in the lower-right corner of the screen. If you get this far, there’s hope for a graceful exit. You might have to wait a minute or so for the Turn Off command to take effect. If you’re prompted to shut down some programs or save documents, do so. Hope for a speedy shutdown. Then reboot.
My point here is that you’re going to bump into some unstable behavior from time to time. If you notice that a program isn’t responding, you might have a crash on your hands. To gracefully survive a crash, possibly even without losing any of your data, try the following steps:
1. Try pressing Esc. Some programs get stuck in the middle of a process and Esc can sometimes get them back on track. For example, if you accidentally pressed Alt, this activates the menus. A press of Esc gets you out of that loop. If you’ve opened a menu, two presses of Esc or a click within the application’s window might be required to return to normal operation.
2. Windows 7 has greatly improved application-management facilities. In most cases, even after an application has crashed, you should still be able to minimize, maximize, move, resize, and close its window.
3. Can you switch to the app to bring its window up front? First try clicking any portion of the window. If that doesn’t work, click its button in the taskbar. Still no? Try using successive presses of Alt+Tab. If you get the window open and responding, try to save any unfinished work in the app and then try to close it by clicking the Close button or selecting File, Exit.
4. If that doesn’t work, try right-clicking the program’s button in the taskbar and choosing Close from the pop-up menu.
5. If that doesn’t work, press Ctrl+Shift+Esc to launch the Task Manager. Notice the list of running applications. Does the one in question say “Not responding” next to it? If so, click it and then click End Task.
6. If Task Manager reports that you don’t have sufficient access to terminate the task, you must reboot the system. First, attempt a graceful shutdown using the Shut Down option in the Start Menu. However, if that fails (that is, it hangs on the hung application or it never seems to complete the shutdown process), you need to resort to power-cycling. When the system reboots, you should be back to normal.
Ctrl+Alt+Del Doesn’t Work
![]()
If Ctrl+Alt+Del doesn’t work, it’s time to power-cycle the computer. Press the power switch to turn off the machine. This might require holding in the power button for more than 4 seconds. You could lose some work, but what else are you going to do? Sometimes it happens. This is one good reason for saving your work regularly and looking for options in your programs that perform autosaving. As writers, we set our AutoSave function in Microsoft Word to save every 5 minutes. That way, we can recover from a system crash and lose only up to 5 minutes of work instead of everything.
Incidentally, although it’s extremely rare, I’ve known laptops to not even respond to any form of command or power button when the OS was fully hung. I’ve even had to remove any AC connection, fully remove the main battery, wait a few seconds, and then reinsert the battery and reboot. Removing the battery is important; otherwise, the battery keeps the computer in the same stuck state, thinking it’s just in Sleep mode.