
Project 37 – 1-Wire Digital Temperature Sensor
You are now going to take a look at the DS18B20 digital temperature sensor. These sensors send the temperature as a serial data stream over a single wire, which is why the protocol is called 1-Wire. Each sensor also has a unique serial number, allowing you to query different sensors using its ID number. As a result, you can connect many sensors on the same data line. This makes them very popular to use with an Arduino because an almost unlimited amount of temperature sensors can be daisy chained together and all connected to just one pin on the Arduino. The temperature range is also wide at -55°C to +125°C.
You’ll use two sensors in this project to demonstrate not only how to connect and use this type of sensor but also how to daisy chain two or more together.
Parts Required
You will need two DS18B20 sensors in the TO-92 format (this just means it has three pins and so can easily be inserted into a breadboard or soldered onto a PCB). Some are marked DS18B20+, which means they are lead free.
| 2 × DS18B20 Temperature Sensor | |
| 4.7K ohm Resistor |
Connect It Up
Connect everything as shown in Figure 13-3.
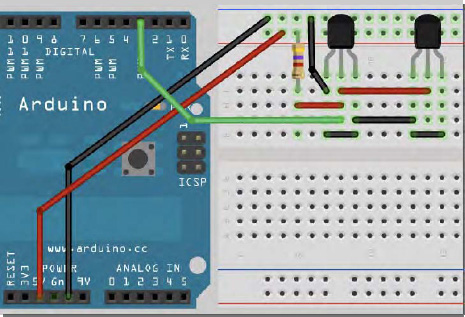
Figure 13-3. The circuit for Project 37 – 1-Wire Digital Temperature Sensor (see insert for color version)
I am going to do the code in two parts. The first part will find out the addresses of the two sensors. Once you know those addresses, you will move onto part 2, where the addresses will be used to obtain the temperatures directly from the sensors.
Enter the Code
Before you enter the code, you need to download and install two libraries. The first is the OneWire library. Download it from www.pjrc.com/teensy/td_libs_OneWire.html and unzip it. The OneWire library was first written by Jim Studt with further improvements by Robin James, Paul Stoffregen, and Tom Pollard. This library can be used to communicate with any 1-Wire device. Place it in the “libraries” folder of your Arduino installation.
Next, download and install the DallasTemperature library from http://milesburton.com/index.php?title=Dallas_Temperature_Control_Library and again install it in the “libraries” folder. This library is an offshoot of the OneWire library and was developed by Miles Burton with improvements by Tim Newsome and James Whiddon. This project is based on code from the examples included with this library.
Once you have installed both libraries, restart your Arduino IDE and then enter the code from the program in Listing 13-2.
Listing 13-2. Code for Project 37 (Part 1)
// Project 37 - Part 1


#include <OneWire.h>

#include <DallasTemperature.h>


// Data line goes to digital pin 3

#define ONE_WIRE_BUS 3


// Setup a oneWire instance to communicate with any OneWire devices (not just Maxim/Dallas

 temperature ICs)

OneWire oneWire(ONE_WIRE_BUS);


// Pass our oneWire reference to Dallas Temperature.
DallasTemperature sensors(&oneWire);


// arrays to hold device addresses
DeviceAddress insideThermometer, outsideThermometer;


void setup()
{

  // start serial port

  Serial.begin(9600);


  // Start up the library
  sensors.begin();


  // locate devices on the bus
  Serial.print("Locating devices...");

  Serial.print("Found ");

  Serial.print(sensors.getDeviceCount(), DEC);

  Serial.println(" devices.");


  if (!sensors.getAddress(insideThermometer, 0)) Serial.println("Unable to find address

 for Device 0");

  if (!sensors.getAddress(outsideThermometer, 1)) Serial.println("Unable to find address

 for Device 1");
  // print the addresses of both devices

  Serial.print("Device 0 Address: ");

  printAddress(insideThermometer);

  Serial.println();


  Serial.print("Device 1 Address: ");
  printAddress(outsideThermometer);

  Serial.println();

  Serial.println();

}


// function to print a device address
void printAddress(DeviceAddress deviceAddress)

{

  for (int i = 0; i < 8; i++)

  {

    // zero pad the address if necessary

    if (deviceAddress[i] < 16) Serial.print("0");

    Serial.print(deviceAddress[i], HEX);

  }

}


// function to print the temperature for a device
void printTemperature(DeviceAddress deviceAddress)

{

  float tempC = sensors.getTempC(deviceAddress);

  Serial.print("Temp C: ");

  Serial.print(tempC);

  Serial.print(" Temp F: ");

  Serial.print(DallasTemperature::toFahrenheit(tempC));

}


// main function to print information about a device
void printData(DeviceAddress deviceAddress)

{

  Serial.print("Device Address: ");

  printAddress(deviceAddress);

  Serial.print(" ");

  printTemperature(deviceAddress);

  Serial.println();

}


void loop()
{

  // call sensors.requestTemperatures() to issue a global temperature

  // request to all devices on the bus

  Serial.print("Requesting temperatures...");

  sensors.requestTemperatures();

  Serial.println("DONE");
  // print the device information

  printData(insideThermometer);

  printData(outsideThermometer);

  Serial.println();

  delay(1000);

}
Once the code has been uploaded, open up the serial monitor. You will have a display similar to this:
Locating devices...Found 2 devices.


Device 0 Address: 28CA90C202000088
Device 1 Address: 283B40C202000093


Requesting temperatures...DONE
Device Address: 28CA90C202000088 Temp C: 31.00 Temp F: 87.80

Device Address: 283B40C202000093 Temp C: 25.31 Temp F: 77.56
The program gives you the two unique ID numbers of the DS18B20 sensors you are using. You can find out which sensor is which by varying the temperature between the two. I held onto the right hand sensor for a few seconds and, as you can see, the temperature increased on that one. This tells me that the right sensor has address 28CA90C202000088 and the left one has address 283B40C202000093. The addresses of your sensors will obviously differ. Write them down or copy and paste them into your text editor.
Now that you know the ID numbers of the two devices you can move onto part 2. Enter the code from Listing 13-3.
Listing 13-3. Code for Project 37 (Part 2)
// Project 37 - Part 2


#include <OneWire.h>

#include <DallasTemperature.h>


// Data wire is plugged into pin 3 on the Arduino

#define ONE_WIRE_BUS 3

#define TEMPERATURE_PRECISION 12


// Setup a oneWire instance to communicate with any OneWire devices (not just Maxim/Dallas

 temperature ICs)

OneWire oneWire(ONE_WIRE_BUS);


// Pass our oneWire reference to Dallas Temperature.
DallasTemperature sensors(&oneWire);


// arrays to hold device addresses – replace with your sensors addresses
DeviceAddress insideThermometer = { 0x28, 0xCA, 0x90, 0xC2, 0x2, 0x00, 0x00, 0x88 };

DeviceAddress outsideThermometer = { 0x28, 0x3B, 0x40, 0xC2, 0x02, 0x00, 0x00, 0x93 };
void setup()

{

  // start serial port

  Serial.begin(9600);


  // Start up the library
  sensors.begin();


  Serial.println("Initialising...");
  Serial.println();


// set the resolution
  sensors.setResolution(insideThermometer, TEMPERATURE_PRECISION);

  sensors.setResolution(outsideThermometer, TEMPERATURE_PRECISION);

}


// function to print the temperature for a device
void printTemperature(DeviceAddress deviceAddress)

{

  float tempC = sensors.getTempC(deviceAddress);

  Serial.print(" Temp C: ");

  Serial.print(tempC);

  Serial.print("  Temp F: ");

  Serial.println(DallasTemperature::toFahrenheit(tempC));

}


void loop()
{

  // print the temperatures

  Serial.print("Inside Temp:");

  printTemperature(insideThermometer);

  Serial.print("Outside Temp:");

  printTemperature(outsideThermometer);

  Serial.println();

  delay(3000);

}
Replace the two sensor addresses with those you discovered using the code from part 1 and then upload this code. Open the serial monitor and you will get a readout like this:
Initialising...


Inside Temp: Temp C: 24.25  Temp F: 75.65
Outside Temp: Temp C: 19.50  Temp F: 67.10


Inside Temp: Temp C: 24.37  Temp F: 75.87
Outside Temp: Temp C: 19.44  Temp F: 66.99


Inside Temp: Temp C: 24.44  Temp F: 75.99
Outside Temp: Temp C: 19.37  Temp F: 66.87
If you solder the outside sensor to a long twin wire (solder Pins 1 and 3 together for one wire and Pin 2 for the second wire) and then waterproof it by sealing it in heatshrink tubing, it can be placed outside to gather external temperatures. The other sensor can obtain the internal temperature.
Project 37 – 1-Wire Digital Temperature Sensor – Code Overview
First the two libraries are included:
#include <OneWire.h>

#include <DallasTemperature.h>
Then the digital pin you will be using for reading the data from the sensors is defined
#define ONE_WIRE_BUS 3
followed by a definition for the precision required, in bits
#define TEMPERATURE_PRECISION 12
The precision can be set between 9 and 12 bits resolution. This corresponds to increments of 0.5°C, 0.25°C, 0.125°C, and 0.0625°C, respectively. The default resolution is 12 bit. The maximum resolution of 12 bit gives the smallest temperature increment, but at the expense of speed. At maximum resolution, the sensor takes 750ms to convert the temperature. At 11 bit, it is half that at 385ms, 10 bit is half again at 187.5ms, and finally 9 bit is half again at 93.75ms. 750ms is fast enough for most purposes. However, if you need to take several temperature readings a second for any reason, then 9 bit resolution would give the fastest conversion time.
Next, you create an instance of a OneWire object and call it oneWire:
OneWire oneWire(ONE_WIRE_BUS);
You also create an instance of a DallasTemperature object, call it sensors, and pass it a reference to the object called oneWire:
DallasTemperature sensors(&oneWire);
Next, you need to create the arrays that will hold the sensor addresses. The DallasTemperature library defines variables of type DeviceAddress (which are just byte arrays of eight elements). We create two variables of type DeviceAddress, call them insideThermometer and outsideThermometer and assign the addresses found in part 1 to the arrays.
Simply take the addresses you found in part 1, break them up into units of 2 hexadecimal digits and add 0x (to tell the compiler it is a hexadecimal number and not standard decimal), and separate each one by a comma. The address will be broken up into eight units of two digits each.
DeviceAddress insideThermometer = { 0x28, 0xCA, 0x90, 0xC2, 0x2, 0x00, 0x00, 0x88 };

DeviceAddress outsideThermometer = { 0x28, 0x3B, 0x40, 0xC2, 0x02, 0x00, 0x00, 0x93 };
In the setup loop, you begin serial communications at 9600 baud:
Serial.begin(9600);
Next, the communication with the sensors object is started using the .begin() command:
sensors.begin();
You print "Initialising..." to show the program has started, followed by an empty line:
Serial.println("Initialising...");

Serial.println();
Next, you set the resolution of each sensor using the .setResolution command. This command requires two parameters with the first being the device address and the second being the resolution. You have already set the resolution at the start of the program to 12 bits.
sensors.setResolution(insideThermometer, TEMPERATURE_PRECISION);

sensors.setResolution(outsideThermometer, TEMPERATURE_PRECISION);
Next, you create a function called printTemperature() that will print out the temperature in both degrees C and F from the sensor address set in its single parameter:
void printTemperature(DeviceAddress deviceAddress)
Next, you use the .getTempC() command to obtain the temperature in Celsius from the device address specified. You store the result in a float called tempC.
float tempC = sensors.getTempC(deviceAddress);
You then print that temperature
Serial.print(" Temp C: ");

Serial.print(tempC);
followed by the temperature in Fahrenheit
Serial.print("  Temp F: ");

Serial.println(DallasTemperature::toFahrenheit(tempC));
You use :: to access the toFahrenheit function that is inside the DallasTemperature library. This converts the value in tempC to Fahrenheit.
In the main loop, you simply call the printTemperature() function twice, passing the address of the inside and then the outside sensor each time followed by a three second delay:
Serial.print("Inside Temp:");

printTemperature(insideThermometer);

Serial.print("Outside Temp:");

printTemperature(outsideThermometer);

Serial.println();

delay(3000);
I recommend you try out the various examples that come with the DallasTemperature library as these will give a greater understanding of the various functions available within the library. I also recommend that you read the datasheet for the DS18B20. This sensor can also have alarms set inside it to trigger when certain temperature conditions are met that could be useful for sensing conditions that are too hot or cold.
The DS18B20 is a very versatile sensor that has a wide temperature sensing range and has the advantage over an analog sensor in that many can be daisy chained along the same data line so that only one pin is needed no matter how many sensors you have.
Next, you are going to take a look at a totally different kind of sensor that uses sound waves.