
Project 46 – Ethernet Shield
You'll now use the Ethernet Shield and a couple of temperature sensors to demonstrate accessing the Arduino over Ethernet.
Parts Required
Arduino Ethernet Shield 
2 × DS18B20 Temperature Sensors ![]()
4.7K ohm Resistor ![]()
Connect It Up
Insert the Ethernet Shield on top of the Arduino, then connect everything as shown in Figure 17-1 with the wires going into the Ethernet Shield in the same place as they would on an Arduino.
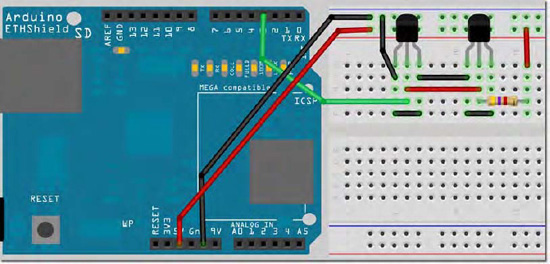
Figure 17-1. The circuit for Project 46 – Ethernet Shield (see insert for color version)
Enter the Code
Enter the code from Listing 17-1.
Listing 17-1. Code for Project 46
// Project 46 – Based on the Arduino Webserver example by David A. Mellis and Tom Igoe


#include <SPI.h>

#include <Ethernet.h>

#include <OneWire.h>

#include <DallasTemperature.h>


// Data wire is plugged into pin 3 on the Arduino
#define ONE_WIRE_BUS 3

#define TEMPERATURE_PRECISION 12


float tempC, tempF;


// Setup a oneWire instance to communicate with any OneWire devices (not just Maxim/Dallas

temperature ICs)

OneWire oneWire(ONE_WIRE_BUS);
// Pass our oneWire reference to Dallas Temperature.

DallasTemperature sensors(&oneWire);


// arrays to hold device addresses
DeviceAddress insideThermometer = { 0x10, 0x7A, 0x3B, 0xA9, 0x01, 0x08, 0x00, 0xBF };

DeviceAddress outsideThermometer = { 0x10, 0xCD, 0x39, 0xA9, 0x01, 0x08, 0x00, 0xBE};


byte mac[] = { 0x48, 0xC2, 0xA1, 0xF3, 0x8D, 0xB7 };
byte ip[] = { 192,168,0, 104 };


// Start the server on port 80
Server server(80);


void setup()
{

  // Begin ethernet and server

  Ethernet.begin(mac, ip);

  server.begin();

    // Start up the sensors library

  sensors.begin();

    // set the resolution

  sensors.setResolution(insideThermometer, TEMPERATURE_PRECISION);

  sensors.setResolution(outsideThermometer, TEMPERATURE_PRECISION);

}


// function to get the temperature for a device
void getTemperature(DeviceAddress deviceAddress)

{

  tempC = sensors.getTempC(deviceAddress);

  tempF = DallasTemperature::toFahrenheit(tempC);

}

void loop()

{

  sensors.requestTemperatures();


  // listen for incoming clients
  Client client = server.available();

  if (client) {

    // an http request ends with a blank line

    boolean BlankLine = true;

    while (client.connected()) {

      if (client.available()) {

        char c = client.read();


        // If line is blank and end of line is newline character '
' = end of HTTP request
        if (c == '
' && BlankLine) {

          getTemperature(insideThermometer);

  client.println("HTTP/1.1 200 OK"); // Standard HTTP response

          client.println("Content-Type: text/html
");

          client.println("<html><head><META HTTP-EQUIV=""refresh""CONTENT=""5"">
");

          client.println("<title>Arduino Web Server</title></head>");

          client.println("<body>
");
          client.println("<h1>Arduino Web Server</h1>");

          client.println("<h3>Internal Temperature</h3>");

          client.println("Temp C:");

          client.println(tempC);

          client.println("<br/>");

          client.println("Temp F:");

          client.println(tempF);

          client.println("<br/>");

          getTemperature(outsideThermometer);

          client.println("<h3>External Temperature</h3>");

          client.println("Temp C:");

          client.println(tempC);

          client.println("<br/>");

          client.println("Temp F:");

          client.println(tempF);

          client.println("<br/>");


          break;

      }

        if (c == '
') {

          // Starting a new line

          BlankLine = true;

        }

        else if (c != '
') {

          // Current line has a character in it

          BlankLine = false;

        }

      }

    }

    // Allow time for the browser to receive data

    delay(10);

    // Close connection

    client.stop();

  }

}
You will need to enter the two address numbers of the temperature sensors (See Project 37) in this line:
byte ip[] = { 192,168,0, 104 };
You will also need to change the IP address to one of your own. To do this, you will need to find out from your router what IP address range has been set aside for devices on your computer. Usually, the address will start off as 192.168.0 or 192.168.1—then you just add another number higher than about 100 to make sure it does not interfere with existing devices. You may also need to go into your router settings to ensure that any HTTP requests to port 80 are forwarded to the IP address of the Ethernet Shield. Look under ”Port Forwarding” in your router manual. It may also be necessary to open port 80 in your firewall.
Now, open up your web browser and type in the IP address and port, e.g.
192.168.0.104:80
If everything is working correctly, you will get the web page shown in Figure 17-2 in your browser.

Figure 17-2. The web browser output from the Arduino web server
The page will auto refresh every five seconds to show any changes in the temperatures. If you have set up the port forwarding and firewall correctly in your router, you will also be able to access the page from anywhere that has Internet access. You will need to know the IP address of the router, which can be found from the routers administration page. Type it, followed by the port number, into any web browser, e.g.
95.121.118.204:80
The above web page will now show up in the browser and you can check the temperature readings from anywhere you have Internet access.
Project 46 – Ethernet Shield – Code Overview
Some parts of this code are repeated from Project 37, so I will gloss over those sections and instead concentrate on the parts relating to the Ethernet Shield. First, you load in the libraries. Make sure you have the libraries for the temperature sensors in your libraries folder first (see Project 37). Note that as of Arduino IDE version 0019, it has been necessary to include the SPI.h library in any project that requires the Ethernet.h library.
#include <SPI.h>

#include <Ethernet.h>

#include <OneWire.h>

#include <DallasTemperature.h>
Next, the pin and precision for the sensors is set
#define ONE_WIRE_BUS 3

#define TEMPERATURE_PRECISION 12
along with the two floats you will use to store the temperature in Celsius and Fahrenheit.
float tempC, tempF;
An instance of the oneWire object is created and you pass a reference to the Dallas Temperature library:
OneWire oneWire(ONE_WIRE_BUS);


DallasTemperature sensors(&oneWire);
The addresses for the two temperature sensors are set. Remember to find out what these are using the code in Project 37 if necessary.
DeviceAddress insideThermometer = { 0x10, 0x7A, 0x3B, 0xA9, 0x01, 0x08, 0x00, 0xBF };

DeviceAddress outsideThermometer = { 0x10, 0xCD, 0x39, 0xA9, 0x01, 0x08, 0x00, 0xBE};
Next, you need to define the MAC and IP address of the device:
byte mac[] = { 0x48, 0xC2, 0xA1, 0xF3, 0x8D, 0xB7 };

byte ip[] = { 192,168,0, 104 };
The MAC (Media Access Control) address is a unique identifier for network interfaces. The network card in your PC or Mac will have had its MAC address set buy the manufacturer. In your case, you are deciding what the MAC address is. It is simply a 48 bit number, so just put any six hexadecimal digits into the address, although leaving it as it is in the code will be fine. The IP address will need to be a manually set and it must be one from the range allowed by your router.
Next, an instance of a server object is created along with the port number for the device:
Server server(80);
The server will listen for incoming connections on the specified port. A port number is simply a pathway for data. You only have one Ethernet cable going into your device but the port number decides where that data will go. Imagine the MAC address as being the building address of a large apartment block and the port number the individual number of the apartment.
Next comes the setup routine. You start by initializing the Ethernet communications and passing the MAC and IP address of the device to the instance:
Ethernet.begin(mac, ip);
Now you need to tell your server to start listening to incoming connections using the begin() command:
server.begin();
You also need to start your sensors and set their resolution:
sensors.begin();

sensors.setResolution(insideThermometer, TEMPERATURE_PRECISION);

sensors.setResolution(outsideThermometer, TEMPERATURE_PRECISION);
Next, you create the function to obtain the temperatures from the sensor (as done in Project 37):
void getTemperature(DeviceAddress deviceAddress)

{

  tempC = sensors.getTempC(deviceAddress);

  tempF = DallasTemperature::toFahrenheit(tempC);

}
Next comes the main program loop. First, you request the temperatures from the two sensors:
sensors.requestTemperatures();
You need to listen for any incoming clients, i.e. web pages requesting to view the web page served by the Arduino. To do this, you create an instance of type Client and use it to check that there is data available for reading from the server. The client is the web browser that will connect to the Arduino. The server is the Arduino.
Client client = server.available();
Next, you check if a client has connected and if any data is available for it. If true, the if statement is executed.
if (client) {
First, the if statement creates a Boolean variable called BlankLine and sets it to true:
boolean BlankLine = true;
A HTTP request from the client will end with a blank line, terminated with a newline character. So you use the BlankLine variable to determine if you have reached the end of the data or not.
Next, you check if the client is still connected or not, and if so, run the code within the while loop:
while (client.connected()) {
Next, you check if data is available for the client or not. If data is available, the code within the next if statement is executed. The available() command returns the number of bytes that have been written to the client by the server it is connected to. If this value is above zero, then the if statement runs.
if (client.available()) {
Then a variable of type char is created to store the next byte received from the server. Use the client.read() command to obtain the byte.
char c = client.read();
If the character read is a newline (‘
’) character, you also need to check if BlankLine is true or not. If so, you have reached the end of the HTTP request and so can serve the HTML code to the client (the user's web browser).
if (c == '
' && BlankLine) {
Next comes the data you will send out from your server. You start by obtaining the temperature from the internal sensor.
getTemperature(insideThermometer);
Next comes the HTML code you have to issue to the client. Every page is made up of code called HTML (or HyperText Markup Language). Explaining HTML is beyond the scope of this book, so I will just give some basic information only. If you wish to learn more about HTML, check out the HTML entry on Wikipedia at http://en.wikipedia.org/wiki/HTML. There are also plenty of HTML tutorials available on the internet. You use the client.println() command to issue data to the client. Basically, you send out the code to create a web page. If you right click in a web page in most browsers, you will be given the option to view the source code. Try this and you will see the HTML code that makes up the web page you have just been viewing. The code tells the browser what to display and how to display it.
First, you tell the client that you are using HTTP version 1.1, which is the standard protocol used for issuing web pages, and that the content you are about to send is HTML:
client.println("HTTP/1.1 200 OK"); // Standard HTTP response

client.println("Content-Type: text/html
");
Next, you have the HTML tag to say that everything from now on will be HTML code and the head tag of the HTML code. The head contains any commands you wish to issue to the browser, scripts you want to run, etc. before the main body of the code. The first command tells the browser that you want the page to automatically refresh every five seconds.
client.println("<html><head><META HTTP-EQUIV=""refresh""CONTENT=""5"">
");
Then you give the page a title. It will appear at the top of the browser and in any tabs you have for that page.
client.println("<title>Arduino Web Server</title></head>
");
You end the head section by inserting a </head> tag. Next is the body of the HTML. This is the part that will be visible to the user.
client.println("<body>
");
You display a <h1> heading saying “Arduino Web Server”. H1 is the largest heading, followed by H2, H3, etc.
client.println("<h1>Arduino Web Server</h1>");
followed by the title of the next section, which is “Internal Temperature” as an h3 heading
client.println("<h3>Internal Temperature</h3>");
Then, you print the temperature in C and F followed by line breaks <br/>:
client.println("Temp C:");

client.println(tempC);

client.println("<br/>");

client.println("Temp F:");

client.println(tempF);

client.println("<br/>");
Next, the external temperatures are requested and displayed:
getTemperature(outsideThermometer);

client.println("<h3>External Temperature</h3>");

client.println("Temp C:");

client.println(tempC);

client.println("<br/>");

client.println("Temp F:");

client.println(tempF);

client.println("<br/>");
Then the while loop is exited with a break command:
break;
You now set BlankLine to true if a
(newline) character is read and false if it is not a
(Carriage Return), i.e. there are still characters to be read from the server.
if (c == '
') {

         // Starting a new line

BlankLine = true;

}

else if (c != '
') {

         // Current line has a character in it

BlankLine = false;

}
You wait a short delay to allow the browser time to receive the data and then stop the client with a stop() command. This disconnects the client from the server.
delay(10);

client.stop();
This project is a basic introduction to serving a webpage with sensor data embedded in it via the Ethernet Shield. There are nicer ways of presenting data over the Internet and you will look at one of those methods next.