
Now that we have defined our example document, let's index it! Steps for indexing an example document with cURL are as follows:
- The simplest way to send it for indexing is by using the cURL command-line tool:
>> curl -X POST 'http://localhost:8983/solr/simple/update?commit=true&wt=json' -H 'Content-Type: text/xml' -d @docs.xml - If you have named the file to be posted in a different way, just use your own name in the command. I assume that you are executing cURL from the
/test/chp02directory; if not, please use the full path name for your file. - If everything goes well, you should receive output like the following:
>> {'responseHeader':{'status':0,'QTime':901}} - This result will inform us about the time used to process the query, and send us a code representing a status and an error message in case an exception is thrown.
Request parameters: Note that the output is in JSON, as we requested in the query using the wt=json parameter. We also asked Solr to directly add the document, using the commit=true parameter. When you have to insert a huge number of documents (for example, using a batch script that sends every document in this way), you probably want to speed up the process by inserting a certain number of documents and asking for a commit at the end, as the changes will not be fixed till the next commit.
Response parameters: Here status represents a status code (0 is ok, as it represents no errors), and QTime is for query time (the time internally used to execute a search or, in this case, an insert).
cURL specific parameters: We are using the format as shown in the following command:
>> curl -X POST [http://solr?q1=v1&q2=v2] -H [http headers] -d @[path-of-file].xml
When you use cURL, you can send a request to an HTTP address using one of the standard HTTP methods. I strongly suggest that you explicitly declare the method you are using with the parameter -X, because it makes things more readable, especially if you plan to define your own test scripts, save them, and share with others. The -H parameter is used for headers for the same reason. In this case we are sending our file called docs.xml (written using the Solr XML syntax) by the POST method. The parameter -d (or –data-binary) is used to define the binary data to be sent, and the @ character declares that we use the name of the file and not the actual data.
Tip
A good place to read something more about cURL is in the official documentation at http://curl.haxx.se/docs/manpage.html, or http://curl.haxx.se/docs/httpscripting.html.
If you want to read something more on HTTP, there are several resources on the web. I suggest you start with wikipedia pages at
http://en.wikipedia.org/wiki/Hypertext_Transfer_Protocol http://en.wikipedia.org/wiki/Query_string
You can also take a look at the site http://www.jmarshall.com/easy/http/
The binary data for the index is saved by default in the /data directory, under the Solr Home. This folder will contain an /index/ folder with the binary files for the index itself, and can contain a directory to store other data for the specific functions we will see later in the book (for example, spellchecking). It's interesting to view the files saved under the /data directory. Every index is split into several parts. When an optimization is run, the segments may vary in size, number, and names.
The structure of the XML file we created permits us to add more than one <doc> element, so it's up to us to decide if we want to write an XML file for every document, or simply create a unique file for adding a group of documents at the same time.
Now that the example document has been added to the index in our simple core, let's try returning all the documents with the default query:
>> curl -X GET 'http://localhost:8983/solr/simple/select?q=*:*&wt=json&indent=true'
This query executed on the command line corresponds to the one automatically generated on the web interface when we move into the Query section; now click on the Execute Query button:
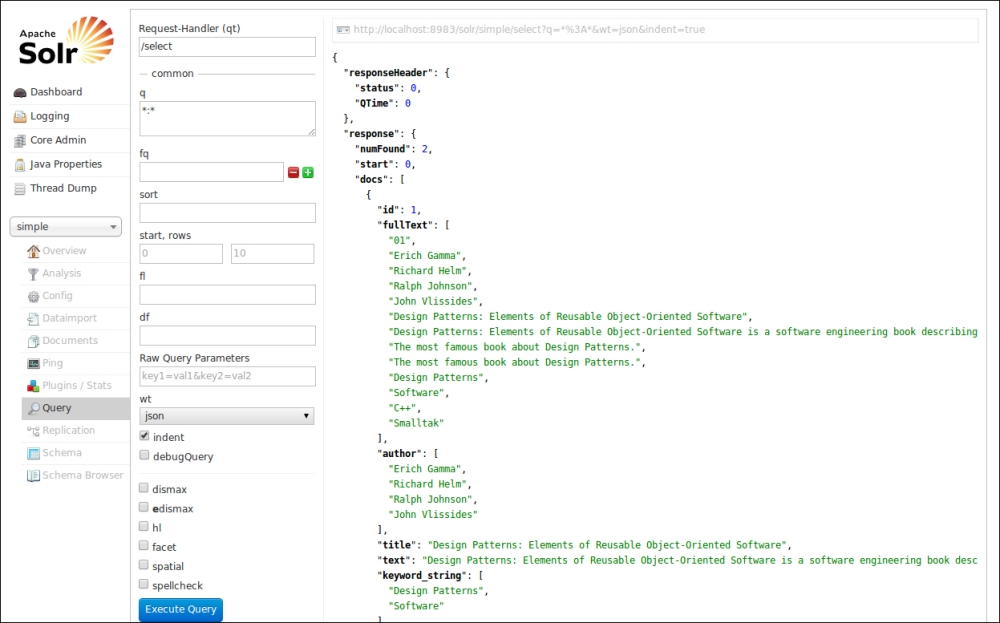
As expected the fullText field contains all the results. Every single value is encapsulated into a <str> string element, and there is no explicit mention in the output about a field being dynamic or not.
The response format (in this case, in JSON) includes the parameters we have seen when posting the XML file via cURL in the header. Solr always responds with the same general format.
Another option to add documents to an index is to send them directly from a web interface, as shown in the following screenshot:
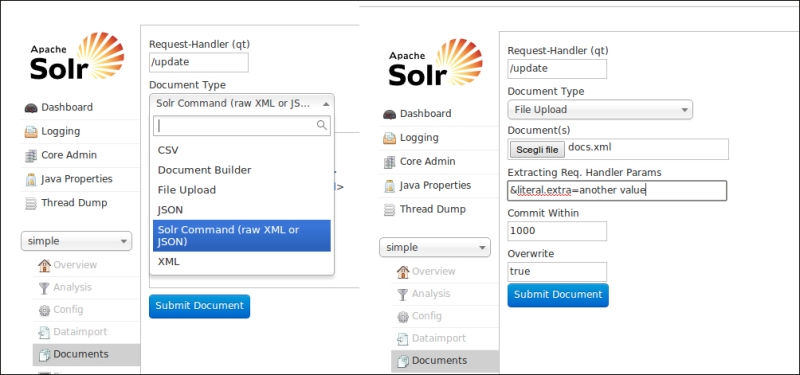
In the screenshot you can recognize two different options for posting the document to be indexed. On the left, we can choose to copy and paste the content of our docs.xml file in page form. We can also post the corresponding JSON format that we will see later in the book, and simply push the Submit Document button. On the right part of the image, you'll see that we can also upload the docs.xml file. In this case we also have the chance to add custom metadata, which is useful if we want to add, for example, administrative metadata (such as provenance or the date of the last update) for maintenance purposes.
The two examples are available in the document section on the left, and you can easily recognize other intuitive options from the screenshot, including a plain CSV format that does not interest us at the moment, but can be very useful in a number of real situations.
From my point of view the most surprising part of this interface is the Document Builder option, as shown in the following screenshot:
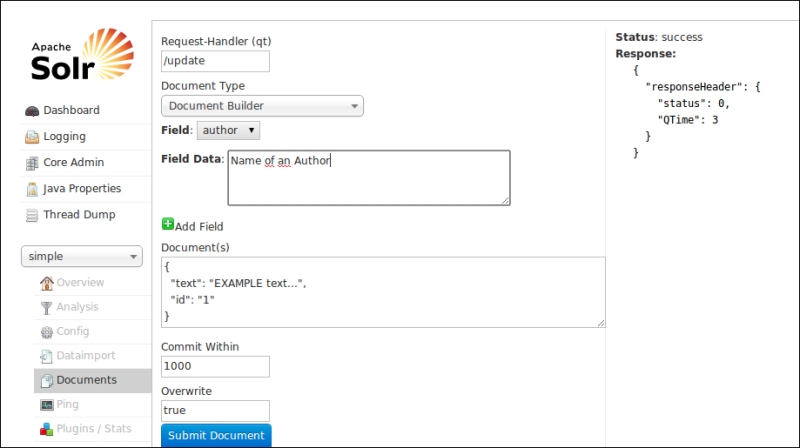
As you can see this interface permits us to 'construct' an example document and post it directly to the index. The sequence of steps is very simple:
- Select a field.
- Write some field data.
- Add the field (with the green button).
At the end of this simple three-step iteration, the current version of the document you are constructing will be presented in the preview text area in a JSON format. You can directly re-edit the document there, and you can also re-iterate the three steps as many times as you want for adding new fields.
As you may imagine, this interface is still evolving (it has been introduced recently, by the way) and probably still lacks some useful functionalities, but it is very good to play with at the beginning, and it can offer us another way to perform our tests. My suggestion is to have at least two different browser windows (or tabs) opened on your Solr instance: one for performing queries, and the other for testing indexing if needed.
We will focus on cURL in the book, in order to better focus on a process that can be easily reproduced later with programming languages; but feel free to make your own experiments with this interface, too.