In this section, you will create multiple Task Forms in a task flow. These Task Forms will be in sequence. You have already witnessed creation of task flow. There, you have a Create Train checkbox. You will select this option to create a task flow that allows a sequential flow of pages. You will do it for EnterQuoteUI, however you can repeat the same for BusinessAnalystUI, Approve Terms/Deal, and Finalize Contracts, too.
In this section, you will create a Task Form sequence flow:
- Open JDeveloper in the default role.
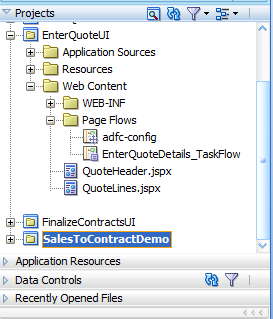
- Delete the pre-existing EnterQuoteUI project.
- Create a new project by selecting New | Generic Project, and name it EnterQuoteUI.
- Click Finish.
- This will create Empty Project in the application navigator.
- Right-click the EnterQuoteUI project and select New. This will open the new gallery.
- Select the All Technologies tab and go to Web Tier | JSF, select the ADF Task flow Based on Human Task item and click OK.
- In the SOA Resource browser, select EnterQuoteDetails.task and click OK. This will open the Create Task Flow dialog.
- In the Create Task Flow dialog, select Create as Bounded Task Flow and check Create Train.
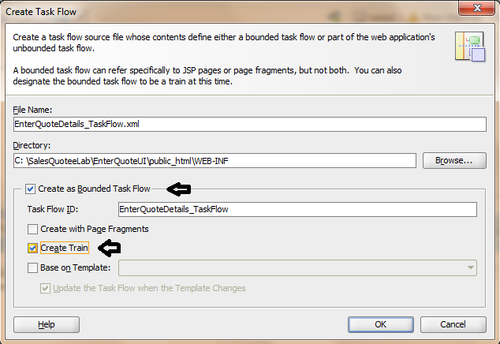
- Click OK.
- This will open
EnterQuoteDetails_TaskFlow.xml. - Rename
taskDetails1_jspx.jspxasQuoteHeader.jspx. - Go to Component Palette | ADF Task Flow | Components and drag-and-drop View into the designer.
- Name the QuoteLines activity as View.
- Go to Component Palette | ADF Task Flow | Components and click Control Flow Case.
- Create a flow from QuoteHeader to QuoteLines and then to QuoteLines and taskReturn, as shown in the following screenshot:

- Double-click QuoteHeader view. This will open the Create JSF Page dialog.
- Enter
QuoteHeader.jspxas File Name, as shown in the following screenshot: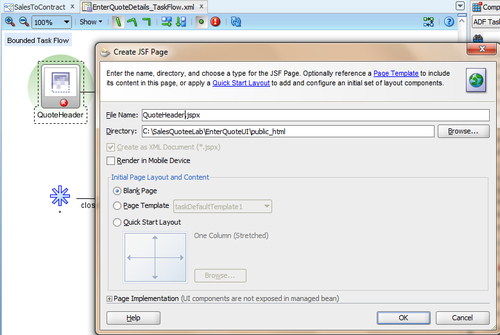
- Let the details be default, and click OK. This will open the
QuoteHeader.jspxfile. - Go to Data Control | EnterQuoteUI_EnterQuoteDetails | getTaskDetails | Return and drag-and-drop Task into the designer.
- Click Human Task and select Task Header, to create a task header for the page.

- In the Edit Action Binding dialog, click OK twice.
- Go to Component Palette | ADF faces | Layout and drag-and-drop Panel Group Layout.

- Go to Data Control | EnterQuoteUI_EnterQuoteDetails | getTaskDetails | Return | Payload and drag-and-drop Summary into Panel Group Layout, which you have just created.
- Click Form and select ADF Form.
- In the filled Edit form, click OK.
- When you have completed the preceding steps, Save.
- Go to EnterQuoteDetails_TaskFlow.xml and double-click QuoteLines.
- In the Create JSF Page dialog, click OK. This will open the
QuoteLines.jspxfile. - Go to Data Control | EnterQuoteUI_EnterQuoteDetails | getTaskDetails | Return and drag-and-drop Task into the designer.
- Click Human Task and select Task Header, to create a task header for the page.
- In the the Action Binding dialogs, click OK twice.
- Go to Component Palette and drag-and-drop Panel Group Layout from the Layout menu.
- Go to Property Inspector for the Panel Group Layout and select Vertical as Layout.
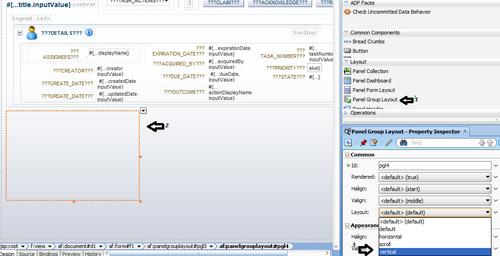
- Go to Component Palette and drag-and-drop Panel Group Layout from the Layout section.
- Go to Property Inspector for the Panel Group Layout and select Horizontal as Layout.
- Go to Component Palette | Common Components and drag-and-drop Output Text into the the Horizontal Panel Group Layout you just created.
- In the Property Inspector of this text box, enter
Quote Summaryas Value.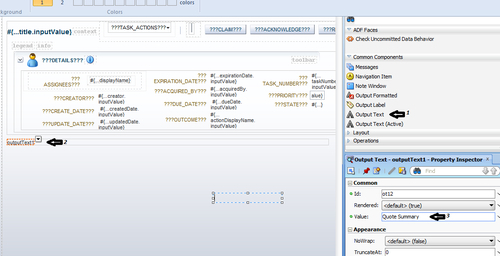
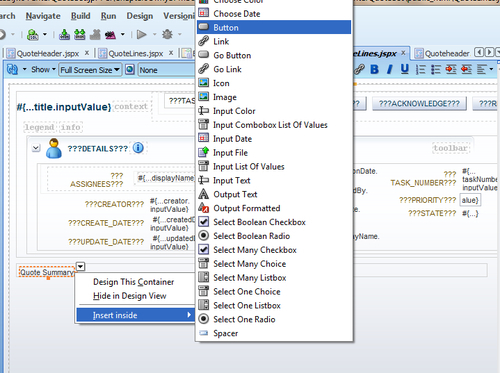
- Select the Horizontal Panel, click the drop-down and select Insert inside. Choose Button from the list.
- Click on the Button action icon, and select Bind to ADF Control.
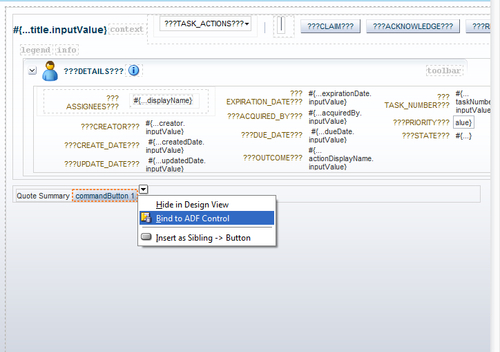
The Bind to ADF Control dialog will open.
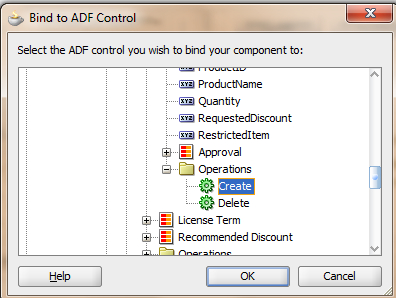
- Expand EnterQuoteUI_EnterQuoteDetails | getTaskDetails | Return | Task | Payload | Quote Request | Product Items | Operations.
- Select Create under Operations as the bind to ADF Control setting for this button in the Bind to ADF Control editing dialog,and click OK.
- Select the horizontal panel, click the drop-down, and select Insert Inside. Choose Button from the list.
- Click on the button, click the button action icon, and select Bind to ADF Control.
A Bind to ADF Control dialog will open.
- Expand EnterQuoteUI_EnterQuoteDetails | getTaskDetails | Return | Task | Payload | Quote Request | Product Items | Operations.
- Select the Create operation under Bind to ADF Control, for this button and click OK.
- In the Edit Bind Action dialog, click OK.
- Go to Data Control and expand EnterQuoteUI_EnterQuoteDetails | getTaskDetails | Return | Task | Payload | Quote Request.
- Drag-and-drop Product Item in the vertical panel.
- Click Table and select ADF Table.
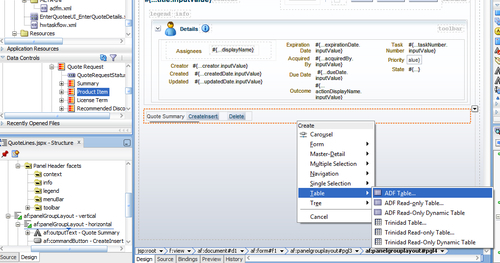
- In the Edit Table Column dialog, accept defaults and click OK.
- When you have completed the preceding steps, click Save.
- You created Task Actions, attachment, and comments, as you have done before.
You can verify the JSPX page in the project navigator and from its physical location, too.
You can now deploy the project and can test it, and verify payload from the EM Console, as follows:
- Log in to Oracle BPM Workspace as user salesrepresentative.
- Click on the process name in the Applications list.
- Enter quote details for the Quote Header page, as follows:
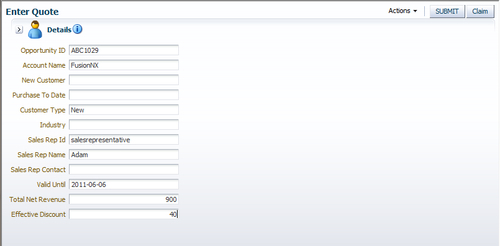
- Click Actions | Save. This will open the Quote Lines page.
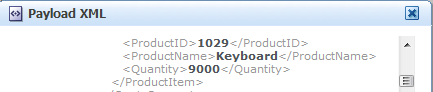
- Click the CreateInsert button and you can enter product details, as shown in the following screenshot:
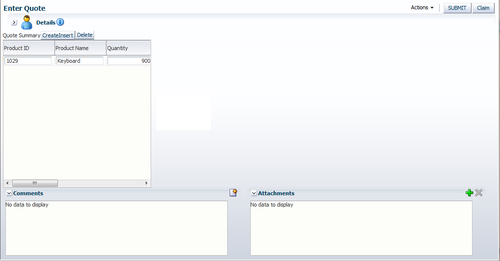
Once this has been done, you can click the Submit button.
- Log in to the Oracle EM Console and click Running Instance for the SalesToContractDemo project.
- You can verify the product details you have entered from the Payload of the activities.