In this chapter, we will be looking at how we can send device software updates and Java-based applications to BlackBerry devices. We have the option of sending device software and Java-based applications over the air or via a wired approach. Please note that sending runtime MDS applications is covered in the next chapter.
Before we are able to push device software and Java-based applications to our devices, we need to set up our software environment. This consists of the following (each area will be discussed in detail further on in this chapter):
- Creation of a shared folder on our network: This shared folder will be used by the BlackBerry Administration Service when installing Java-based applications on to devices. You do not place any application files into this folder or modify any files that are placed automatically by the BlackBerry Administration Service in to this folder.
- Addition of applications to the application repository: This feature is pre-installed on the BlackBerry Enterprise Environment, and can be accessed via the BlackBerry Administration Service. It will store and manage all versions of device software that you require for your organization alongside storage and management of Java-based applications for your organization.
- Creation of a software configuration: This specifies what versions of the BlackBerry device software and which Java-based applications we can install, update, or remove from BlackBerry devices. We can also use software configurations to specify what applications are required, are optional, or are not permitted on Blackberry devices. These configurations are then applied to individual user accounts or groups.
- Creation of an application control policy: This will specify what resources the application can access on the BlackBerry device. There is a default application control policy that can be used. Alternatively, we can create our own.
- Configure settings for deployment jobs: Once the software configuration is assigned to an individual user or group, the BlackBerry Administration Service creates a deployment job to install the device software or Java-based application on the BlackBerry devices, and deploys a job to apply the correct application control policies to the devices.
Now that we have a brief understanding of what is required to setup our software environment, let's have a look at each of these sections in more detail.
When these applications are developed for a BlackBerry device, they will contain a .cod file that contains the complied application code for the application, which is then in turn executed on the BlackBerry devices to enable them to be installed on the device. During the same process, we can generate a .jad or more commonly an .alx file. These files are descriptor files that provide information about the Java BlackBerry application. So in essence, a BlackBerry Java application will have two main files associated with it — the .cod (executable) file and the .alx (descriptor) file. It is these two files in a ZIP format that we require to initiate a software deployment on BlackBerry devices.
When we create this shared folder, we need to bear in mind two vital points. Firstly, this shared folder is not the same one that is being used for the BlackBerry device software distribution and is completely independent of that folder (which we will be creating in the next section when we look at deploying BlackBerry device software). Secondly, this shared folder cannot be located in the following drive location X:Program FilesCommon FilesResearch In Motion. This shared folder is used by the BlackBerry Administration Service to install Java-based applications on to the BlackBerry devices. Do not place any installation files, .cod or .alx into this shared folder. Also, do not make any changes to the files that the BlackBerry Administration Service stores in this folder during the software configuration process. We must create this shared folder before we add application files to the repository. The folder will require the following permissions:
- Administration accounts that you use for the BlackBerry Administration Service must have write permissions to the shared folder.
- The administration accounts that run the BlackBerry Administration Service Application Server service must have write permissions for the shared folder.
Let's have a look at setting up the shared folder required:
- On the BlackBerry Enterprise Server, browse to the
C:drive or a location of your choice that is not the same as the one mentioned previously or is not the same as where the BlackBerry device software is stored. - Create a new folder and name it
BSC.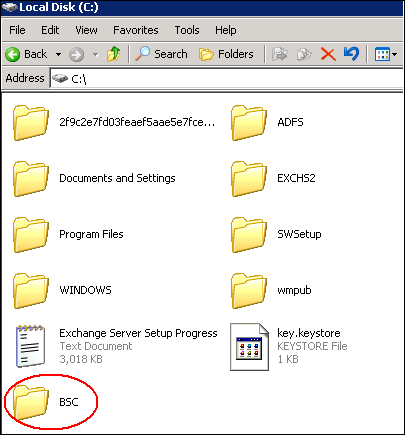
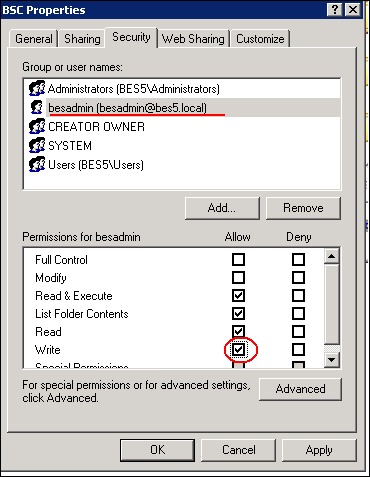
- Click on the properties of the folder, select the Sharing tab, place the radio button on to Share this folder, give the Share name as
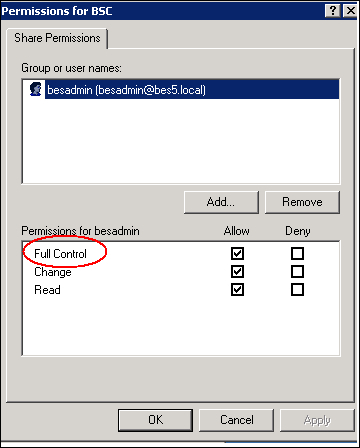
BSC, click on Permissions tab. Remove the everyone group and add the following users giving them full control:- The administration account that you use to log in to the BlackBerry Administration Service
- The administration account that runs the BlackBerry Administration Service Application Server service

- To double-check which account this is, we can go on the server that the BES is installed on and click Start and in the Run box type
services.msc. In the window that opens, scroll to the BlackBerry Administration Service Application Server service, right-click and select Properties. Click on the Log On tab and the account will be displayed.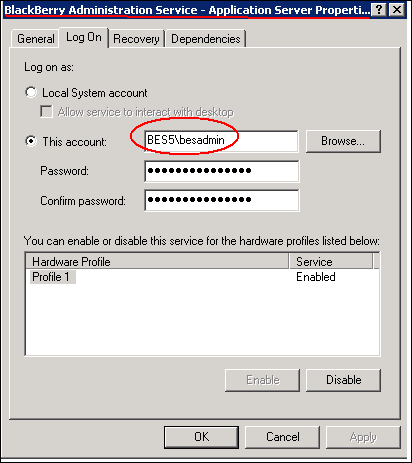
- Give the account full control to the folder and click on Apply.
- Click on the Security tab and add the same accounts giving them write permissions, click Apply and OK.
- Next, we have to specify within the BlackBerry Administration Service, the location of our shared folder. When we specify the folder we must use a UNC (Universal Naming Convention) format for example,
\servernameshare_name. - Log in to the BlackBerry Administration Service.
- Expand BlackBerry Solution topology, expand BlackBerry Domain and expand Component view.
- Click on BlackBerry Administration Service and select Edit component.
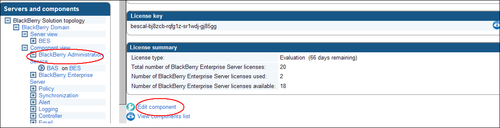
- In the Software management section, type the UNC path to the shared folder.

- Click on Save all.
Now we need to look at configuring the application repository. We need to add our application bundle (the application bundle includes the ZIP files we discussed previously, the .cdo, .alx, and/or .jad files) to the application repository. The following procedure demonstrates how to add the bundle to the repository. For users of older versions of BlackBerry Enterprise Servers — versions 5 and below — it should be noted that you can no longer copy the .cdo or .alx files to a shared location and index them. In BES version 5, the applications are published via the BlackBerry Administration Service and indexing is done automatically. For the following example, we can download the smartview application form.
- Log in to the BlackBerry Administration Service.
- Under BlackBerry Solution Management, expand Software then Applications and click on Add or update applications.
- Browse to the ZIP files for the applications, and once selected click Next.

- Click on Add application. If the application like the one in our example is a collaboration application, we need to click on the Publish application.

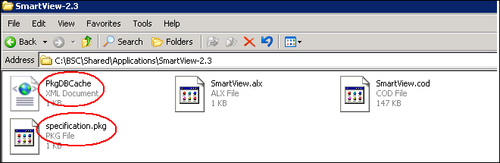
Once you have published the application, you can see that the shared folder we created earlier will be populated with the application files along with a PkgDBCache.xml and specification.pkg file. Next, we are going to look at application control policies before we examine software configurations in more detail.
Similar to the IT policies we saw in the previous chapter, we can configure application control policies, which help us to control the data and APIs that the Java application can use and access on the device. It also allows us to control the external data sources and network connections that the application can access and utilize. The BlackBerry Enterprise Server has built-in application control policies or we can create our own. Let's examine the default built-in policies first.
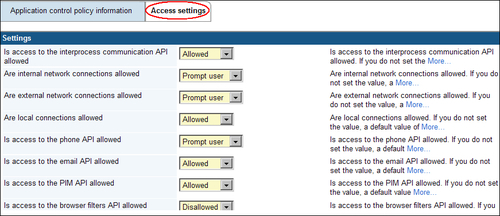
This policy will allow the Java application to be installed and permitted to run on the BlackBerry devices; furthermore, if this policy is applied then the application is installed automatically without any user intervention. The policy then has configurable access settings that can be edited, such as: "Is phone access allowed for the application", "Are external network connections allowed" and so on. More configurable settings will be seen later on.
This policy will make the Java application optional on the BlackBerry device; it won't be installed automatically and users can choose to install the application. It also has the same configurable access settings as the standard required policy that can be edited.
This policy will prevent users from installing and running the application on their device. For the first two policies, we can edit the access controls based on our organizational needs. This procedure is shown in Lab 5 under the Changing a standard application policy section of this chapter.
We can also create a custom application policy, and assign the policy to a Java application. This procedure is shown in Lab 5 under the Creating a custom application control policy section of this chapter .
We have already mentioned and seen the similarities between IT policies and application control policy; both can be applied to an individual user account or to a group. There is a policy precedence that takes place on the BlackBerry device, to avoid conflicts. An IT policy will always take precedence over an application policy. For example, let's say you have assigned for the same device an IT policy set that has a rule which states NO to Allow Internal Connections, and an application control policy that has an access rule stating Internal Connections are Allowed. The application will NOT be able to make internal connections, as the IT policy takes precedence.
The final set of application policies that we need to cover are for those applications that we have not listed in our software configuration. We will be looking at software configurations in more detail next, but just to recap, the software configuration specifies which device software and which Java-based applications can be installed or updated on devices. If our software configuration allows users to install applications that are not listed in the software configuration then we need to create an application control policy for these unlisted applications to specify what resources the applications can access on the device.
The BlackBerry Administration Service has two standard built-in application control policies for unlisted applications:
- One for unlisted applications that are optional
- One for unlisted applications that are not permitted
We can change the default access settings for the standard optional application control policy or we can create a custom application control policy for unlisted applications that are optional.
To change the standard application control policy for unlisted applications that are optional, follow the procedure:
- Log on to the BlackBerry Administration Service.
- Under the BlackBerry Solution Management, expand Software.
- Click on Manage application control policies for unlisted applications.

- Click on Standard Unlisted Optional.
- Select Edit application control policy.
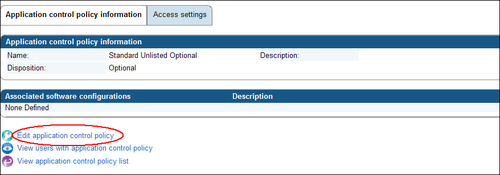
- Select the Access settings tab, configure the settings for the policy and click on Save all.
As mentioned, we can also create a custom policy, this is demonstrated in Lab 5.