
In the previous chapters, we have discussed about Salesforce Sales Cloud. Sales Cloud is a product designed to automate business sales processes. By implementing Sales Cloud, you can boost your sales reps' productivity by allowing them to manage customers in a faster and simpler way. In this chapter, we will describe Service Cloud features in detail, such as case management, knowledge management, and entitlement management. In addition to this, we will also look at the way of setting up escalation rules in Salesforce. The following topics will be covered in this chapter:
- Case management
- Escalation rule
- Entitlement management
- Knowledge management
- Live agent
Service Cloud is a product designed to automate support processes. By implementing Service Cloud, you can boost your support reps' productivity by allowing them to manage customers in a faster and simpler way, and it also helps reduce the organization's expenses in support. It includes all Service Cloud features, for example, account, contact, case, article management, knowledge, entitlement, live agent, report, and dashboard. Service Cloud can help an organization to reduce the number of support cases open over time by providing self-service to their customers and by implementing communities.
Service Cloud allows an organization to provide various support channels for their customers so that they reach out to them if support is required. Service Cloud helps you maintain a self-service portal, enforce entitlement on new cases, and live chat features to customers--everything on the cloud. The productivity accomplished by implementing Service Cloud in your organization will allow your support reps to close a case faster and maintain good relationships with the existing customers. Quality customer support is crucial to a successful business. When customers get adequate and quality customer support from an organization, they tend to share it on their social network, which leads to direct publicity and increases the reputation of an organization.
A common business challenge in the customer support world is incomplete, outdated, or incorrect information. This is frustrating to customers as well as customer support agents; it can happen because earlier customer contacts with the company are not shared with all support agents, customer history is not shared with support agents, or because of leaving the current or previous customer support agent completely out of the loop. By implementing Service Cloud, you can automatically share customer information across the departments. It is enormously easy to enter and update customer information by support agent, and by putting validation rules, you can ensure that the data entered in Salesforce is correct and accurate.
Service Cloud also helps to align support teams, field service teams, and social customer service team, so they can work together in an organized manner to provide quick support to their customers and close cases faster. There are some advantages of implementing Service Cloud. They are as follows:
- Improve lead conversation rate
- Reduce operational support costs by implementing self-service
- Close cases faster and keep your customers happy
- Personalize customer service by implanting live messages
- Implement different customer support channels traditional to social media to CTI integration
- Analyze how your customer support team works in real time with the help of reports and dashboards
- Utilize performance metrics to understand how to help the customer support team perform even better
- Utilize omni-channel to assign cases to the most knowledgeable agent for each inquiry
Customer life cycle starts from the campaign (company branding or product awareness) and the first stage is completed with closing a deal successfully. The second stage starts with educating the customer and providing them full support to utilize your product or service.
The following diagram represents the customer life cycle chain:
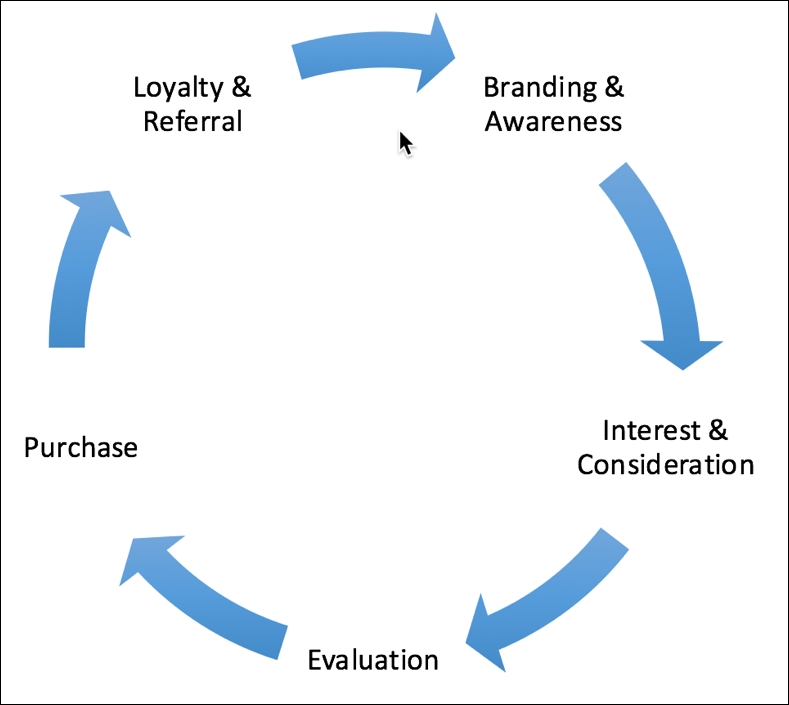
In Salesforce words, it starts from creating a campaign. Through a campaign, an organization may get leads; once those leads are ready to buy some products, convert those leads into accounts, contacts optionally opportunities. Once you have won the opportunities, the next step is to deliver the orders. After this, customer support starts. It means that you grant portal access to them so that they can reach out to support if required, and that you educate your customers so that they can take full advantage of your products or services.
In the real world, customer support has become a vital part of the organization's business process. For all types of product and service industries, customer support is an important activity. In general, support (case) tickets are used to capture customer comments on various types of problems that start after purchasing a product or service. Occasionally, customers can ask important feature requests using support platform, and that may be beneficial when developing future product enhancements.
Managing support cases can get cruel. Whenever you think you are done with it, another one is waiting for you in the queue. There are a few support cases that nobody wants to accept because it is too difficult. Moving stray tickets from one department to another department can easily cross the proper resolution times. In the end, you will be flooded with increasing support ticket numbers, and your customer gets angry because their cases are not resolved yet. To avoid this, you need to get organized and follow best practices to improve customer support handling:
- Quick response to new cases: Make sure that the first response time is under 30 minutes. Even though a support rep does not have an immediate resolution to the customer's issue, it is good to let them know that you are taking care of their problems. To implement this, use entitlement and escalation rules.
- Pay attention to case status: Many times, cases get lost or customers don't get a resolution because of incorrectly assigned case statuses. Selecting the right case ticket status is critical to successful case resolution. For example, it is just like dispatching a product to a customer: if you use an incorrect address, the product won't reach the customer.
- Don't bounce a support case between departments: It is very hard to get a quicker case resolution if you bounce it from one department to another department. It is a very typical scenario: a support rep sending a case to the technical team to fix a bug, and then the technical team sending the ticket back to get more information. It is better to create a case team and provide necessary access to the team so that they can manage a case better.
- Handle old cases first: When accepting cases from a queue, ask your support reps to accept the old cases first instead of accepting an easy one.
- Don't leave cases unfinished: A support case remains unsolved for customers unless and until they get a satisfactory resolution. Don't leave your customers in the dark.
- Post case closure survey: It is very important to send a survey to the customers to gather their feedback in order to improve support service.
Before creating a new case, first understand the various channels you can offer to your customer to reach out to support if they have any issue with a product or service:
- Create a case manually
- Create a case via Email-to-Case
- Create a case through Web-to-Case
- Create a case from a social media post on the company's Facebook page or Twitter
- Reach out to the call center to raise a case
- Create a case through SMS using APIs or with the help of the AppExchange app
Perform the following steps to create a new case:
- Make sure that you have selected the Service app.
- Click on the Cases tab, and then click on the New button. Now, create a new case for an
Automation Championaccount, as shown in the following screenshot: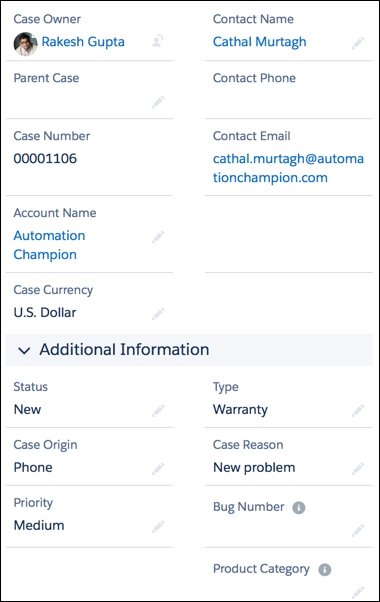
The Email-to-Case provides another channel to the customer, so that they can reach out to the support team by sending an e-mail to a pre-defined e-mail address.
A business scenario: David Guzman is working as System Administrator at Universal Containers. He has received a requirement from higher management to enable Email-to-Case for the customers of Universal Containers; therefore, customers can create a case by sending an e-mail instead of calling support center. It will also help Universal Container to cut down call center running costs.
Salesforce offers two types of Email-to-Case settings; they are Email-to-Case and On-Demand Email-to-Case. In both the options, if the customer responds to an existing case, then it will attach the e-mail to that existing case only. This means that it is not going to create a new case every time; the decision of creating a new case or adding a comment to an existing case will depend on Case_Thread ID. When creating a custom e-mail template for a case, make sure to add Case_Thread ID in the subject or the body of the e-mail. Before going ahead, let's understand the difference between Email-to-Case and On-Demand Email-to-Case:
|
Email-to-Case |
On-Demand Email-to-Case |
|
It requires downloading and installing an Email-to-Case agent behind your company firewall |
It doesn't need you to install any additional software other than enabling it |
|
It helps you to keep the e-mail traffic within the company firewall |
It doesn't keep the e-mail traffic within the company firewall |
|
It is a good option if you want to allow your customer to send e-mails with an attachment size greater than 25 MB |
It is a good option if you don't want to allow your customers to send e-mails with an attachment size greater than 25 MB. |
|
It requires at least one account that supports the UMAP protocol |
It works with any type of e-mail client |
Perform the following steps to solve the preceding business requirement:
- Click on Setup (gear icon) | Setup | PLATFORM TOOLS | Feature Settings | Service | Email-to-Case.
- Click on Edit button and enable the On-Demand Email-to-Case setting, as shown in the following screenshot:

- Once you are done, click on the Save button.
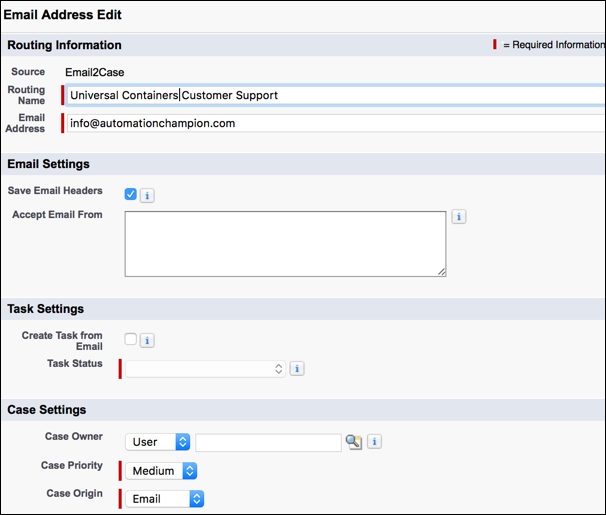
- Now, the next step is to set up a routing e-mail address to which the customer will send an e-mail in order to create a case. To do so, click on Setup (gear icon) | Setup | PLATFORM TOOLS | Feature Settings | Service | Email-to-Case. Navigate to the Routing Addresses related list and click on the New button, as shown in the following screenshot:

- The next step is to provide the required information, for example, Routing Name, Email Address, and set Case Priority and Case Origin. Optionally, it allows you to create a task for new cases:
- The owner of the e-mail mentioned in the Email Address field will receive an e-mail notification with the verification link. Once it is verified, you can share Email Services Address with your customers.

From the next time, whenever the customer wants to raise a case, they must send an e-mail to the e-mail service address.
- If you want to use the e-mail address specified in the Email-to-Case routing information, that is,
[email protected]instead of using a long e-mail services address, then an extra step is required. Open the e-mail client for the aforementioned e-mail address and add a forwarding address:
Once the forwarding setting is done as shown in the preceding screenshot, you are ready to share the e-mail address specified in the Email-to-Case routing information with customers.