
To automate the complex business process in Salesforce, it is required that you must have Apex and Visualforce understanding. After completing this chapter, you will get an understanding of how to automate business processes using Process Builder without code.
It's a very common scenario to auto create a child record when a parent record gets updated and meets specific criteria. For example, as soon as an order gets delivered it will auto create an asset record it. To resolve these types of business scenarios, a developer usually writes an Apex trigger, but there are alternate ways through which you can achieve it, and that too, without writing the code, as follows:
- Apex Trigger
- Combination of Flow and Process Builder
- Combination of Flow and Inline Visualforce Page on the Order Detail page
- Process Builder
A business scenario: David Guzman is working as a system administrator at Universal Containers. He has received a requirement to auto create an opportunity as soon as an account, Status__c, gets updated as Active after the approval process completion (refer to
Chapter 7, Optimizing Business Processes with Visual Workflow and Approval Processes). Use the following values to create a new action:
- Name: Account name
- Stage: Prospecting
- Close Date: Today + 90 days
- Associate it with account record.
Perform the instructions given in the subsequent subsections to fulfill the preceding business requirement using Process Builder.
The next step is to create a process for auto creating an opportunity record once an account record Status__c updated as Active.
- Click on Setup (gear icon) | Setup | PLATFORM TOOLS | Process Automation | Process Builder.
- Click on the New Button and enter the following details:
- Name: Enter the name for the process. Enter
Auto Create new Opportunityas Name. It must be within 255 characters. - API Name: This will be autopopulated based on the Name.
- Description: Write some meaningful text, so other developers/administrators can easily understand why this process is created.
- The process starts when: For this, select when A record changes. In case you want to invoke the process by another process, then select It's invoked by another process.
It will look like the following screenshot:

Click on the Save button once you are done; it will redirect you to the process canvas, which allows you to create the complete process.
- Name: Enter the name for the process. Enter
Once you are done with process property definitions, the next task is to select the object on which you want to create a process and define the evaluation criteria:
- Click on the Add Object node, as shown in the following screenshot:

It will open a window on the right-hand side, which allows you to select the object on which you want to create the process. Enter the following details:
- Object: Select the Account object.
- Start the process: For Start the process, select when a record is created or edited. It means the process will only execute at the time of record creation.
- Recursion - Allow process to evaluate a record multiple times in a single transaction?: Select this checkbox only when you want the process to evaluate the same record for up to five times in a single transaction. It might be possible that the same record is updated by another process, Workflow Rule, or Visual Workflow in the same transaction. It will look like the following screenshot:

Once you are done, click on the Save button. Similar to the Workflow Rule, once you save the panel, it doesn't allow you to change the selected object.
Once you are done with defining the evaluation criteria, the next step is to define the process criteria. It is like the Rule Criteria in Workflow Rule. The process will execute the associated actions once when the process criteria are true:
- To define the process criteria, click on the Add Criteria node, as shown in the following screenshot:

Enter the following details to define the process criteria:
- Criteria Name: Enter a name for the criteria node. Enter
Only for Active accountas Criteria Name. - Criteria for Executing Actions: Select the type of criteria you want to define. You can either use formula or filter to define the process criteria or no criteria. In this scenario, select Conditions are met.
- Set Conditions: Here, you can define the filter condition for your process. In this scenario, select
Status__Cequals picklist Active. It means the process will fire only when accountStatus__cis Active. - Do you want to execute the actions only when specified changes are made to the record?: Select this checkbox if you want the actions to be executed only if the record meets the criteria now but the values the record had immediately before it was saved didn't meet the criteria. Select this checkbox for the current business scenario.
It will look like the following screenshot:

Once you are done, click on the Save button.
- Criteria Name: Enter a name for the criteria node. Enter
Once you are done with defining the process criteria, the next step is to add one immediate action to create an Opportunity. To do this use Create a Record action. Immediate actions are executed as soon as evaluation criteria are met whereas scheduled actions are executed at a specified time.
The next step is to add an immediate action.
- Click on Add Action available under IMMEDIATE ACTIONS, as shown in the following screenshot: Enter the following details to define the immediate action:

- Action Type: Select the type of action you want to perform. In this scenario, select Create a Record.
- Action Name: Enter a name for this action. Enter
Create an Opportunity recordas Action Name. - Record Type: Start typing and then select the Opportunity object.
Then, map the fields according to the following screenshot:

To select the field, you can use Field Picker. To enter the value, use the Text Entry field. Once you are done, click on the Save button. In the end, your process should look like the following screenshot:

Once you are done with the process creation, the next step is to activate it:
- To activate a process, click on the Activate button, as shown in the following screenshot:

A warning message will appear on the screen; read it carefully and then click on the Confirm button, as shown in the following screenshot:

Once you click on the Confirm button, it will activate the process. Once the process is activated, it is not possible to make any changes to it. If you want to do so, you must clone it and save it as either a new version or a new process.
Now onwards, if you try to create a new account manually, set Status__c to Active; the process will fire and it will create an opportunity. However, if you want to auto create an opportunity record after the completion of the account approval defined in
Chapter 7, Optimizing Business Processes with Visual Workflow and Approval Processes then make sure that you have selected Re-evaluate Workflow Rules after Field Change for the final Approval Action field update:

If some of the processes are not required, then you can deactivate those. To deactivate an activated Flow, open the activated Flow and click on the Deactivate button, as shown in the following screenshot:
Once the process is deactivated, Salesforce stops using a to evaluate it, when any record is created or edited.
If a process is no longer in use, then you can delete it. You can only delete those processes that are in Status Draft, Inactive, or Invalid Draft; it means that you can't delete an active process. If you want to delete an active process, first deactivate it and then you can immediately delete it. If a process has scheduled actions, then you can't delete it; for this, you must wait until those pending actions have been completed or deleted. To delete a process, follow the given instructions:
- Click on Setup | Build | Create | Workflow & Approvals | Process Builder.
- It will redirect you to the Process Management page. Identify the process that you want to delete and click on Arrow as shown in the following screenshot:

- It will open a popup for you from where you can delete a process. Click on the Confirm button:
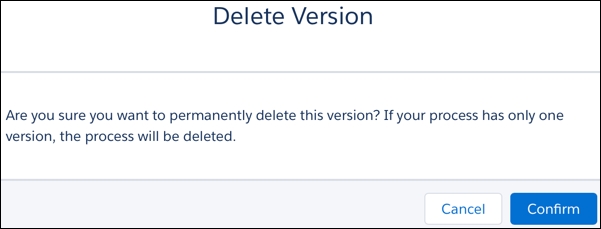
Once you have successfully deleted a version or process, it will be removed from the Process Management page.
Another common scenario is to update child records when a parent record gets updated and fulfill the entry criteria. For example, as soon as a Stage opportunity is updated as Closed Lost, auto-update all the related Quote Status to Denied. To resolve these types of business scenario, a developer usually writes an Apex trigger, but there are alternate ways through which you can achieve it, and that too without writing the code, as follows:
- Apex Trigger
- Combination of Flow and Process Builder
- Combination of Flow and Inline Visualforce Page on Order detail page
- Process Builder
A business scenario: David Guzman is working as a system administrator at Universal Containers. He has received a requirement to auto-update a related open opportunity (except Closed Won) Stage to Closed Lost as soon as the account Status__c is marked as Out of business. Use the following values to create a new action:
Before proceeding ahead, update the Status__c field on the account object and add the value, out of business.
Perform the following instructions to fulfill the preceding business requirement using Process Builder:
- Click on Setup (gear icon) | Setup | PLATFORM TOOLS | Process Automation | Process Builder.
- Click on the New button and enter the following details:
- Name: Enter the name for the process. Enter
Auto update open Opportunities to lostas Name. It must be within 255 characters. - API Name: This will be autopopulated based on the Name.
- Description: Write some meaningful text, so other developers/administrators can easily understand why this process is created.
- The process starts when: For this, select when A record changes.
It will look like the following screenshot:

Once you are done, click on the Save button.
- Name: Enter the name for the process. Enter
- Once you are done with the process property definitions, then the next task is to select the object on which you want to create a process and define the evaluation criteria. For this, click on the Add Object node and enter the following details:
- Object: Select Account object.
- Start the process: For Start the process, select when a record is created or edited.
- Allow process to evaluate a record multiple times in a single transaction: Select this checkbox only when you want a process to evaluate the same record for up to five times in a single transaction. Don't select this option for a current business scenario.
It will look like the following screenshot:

Once you are done, click on the Save button.
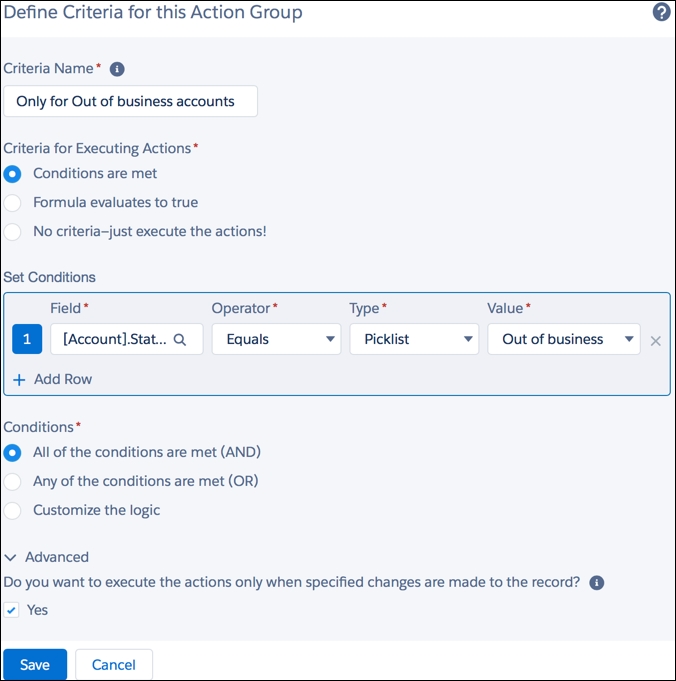
- Once you are done with defining the evaluation criteria, the next step is to define the process criteria. To define the process criteria, click on the Add Criteria node; it will open an additional window on the right-hand side of the process canvas screen where you have to enter the following details:
- Criteria Name: Enter a name for the criteria node. Enter
Only for Out of business accountsas Criteria Name. - Criteria for Executing Actions: Select the type of criteria you want to define. You can either use formula or filter to define the process criteria or no criteria. In this scenario, select Conditions are met.
- Set Conditions: Here you can define the filter condition for your process. In this scenario, select
Status__Cequals picklist Out of business. - Do you want to execute the actions only when specified changes are made to the record?: Select this checkbox if you want actions to be executed only if the record meets the criteria now but the values that the record had immediately before it was saved didn't meet the criteria. Select this checkbox for the current business scenario.
It will look like the following screenshot:
Once you are done, click on the Save button.
- Criteria Name: Enter a name for the criteria node. Enter
- The next step is to add one immediate action to update the related opportunities. To do this, use the Update Records action available under the process. Click on Add Action available under IMMEDIATE ACTIONS. It will open an additional window on the right-hand side of the process canvas screen, where you have to enter the following details:
- Action Type: Select the type of action you want to perform. In this scenario, select Update Records.
- Action Name: Enter a name for this action. Enter
Update open opportunities to closed lostas Action Name. - Record Type: Choose Select a record related to the Account and then select the Opportunities object.
Map the fields as per the following screenshot:

To select the field, you can use Field Picker. To enter the value, use the Text Entry field. Once you are done, click on the Save button. In the end, your process should look like the following screenshot:

- The last step is to activate it. To activate a process, click on the Activate button.
Now onwards, if someone updates the account Status__c to Out of business, the process will fire and it will update all open opportunities (except Closed Won) to Closed Lost.
Organizations are using Chatter as collaboration and company social networking tool. There are many scenarios when sales reps want to auto post new account acquire details to a Chatter group. This is possible through Apex code, but there is another way through which you can achieve it without code, that is, Process Builder. Process Builder has a specific action for it, that is, Post to Chatter.
A business scenario: David Guzman is working as a system administrator at Universal Containers. He has received a requirement from the sales team to auto post a message to the Chatter group, Universal Containers Sales Team, once an opportunity is successfully closed.
Before proceeding ahead make sure to create a Chatter group named Universal Containers Sales Team.
Perform the following instructions to fulfill the preceding business requirement using Process Builder:
- Click on Setup (gear icon) | Setup | PLATFORM TOOLS | Process Automation | Process Builder.
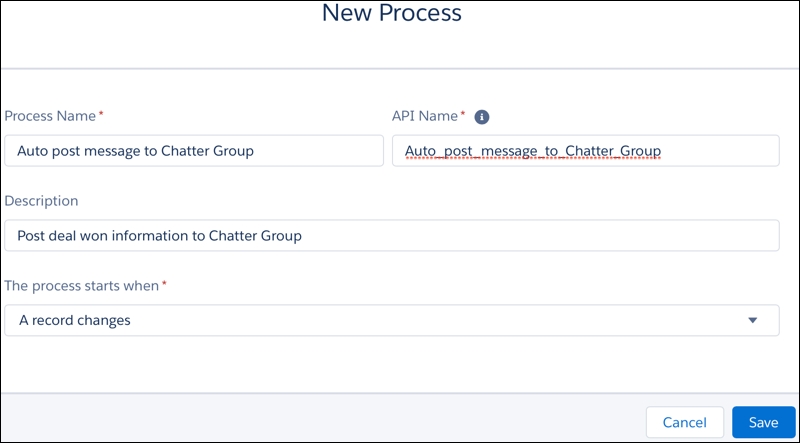
- Click on the New Button and enter the following details:
- Name: Enter the name for the process. Enter
Auto post message to Chatter Groupas Name. - API Name: This will be autopopulated based on Name.
- Description: Write some meaningful text, so other developers/administrators can easily understand why this process is created.
- The process starts when: For this, select when A record changes.
It will look like the following screenshot:
Once you are done, click on the Save button.
- Name: Enter the name for the process. Enter
- Once you are done with the process property definitions, the next task is to select the object on which you want to create a process and define the evaluation criteria. For this, click on the Add Object node and enter the following details:
- Object: Select the Opportunity object.
- Start the process: For Start the process, select when a record is created or edited.
- Allow process to evaluate a record multiple times in a single transaction: Select this checkbox only when you want a process to evaluate the same record for up to five times in a single transaction. Don't select this option for the current business scenario.
It will look like the following screenshot:

Once you are done, click on the Save button.
- Once you are done with defining the evaluation criteria, the next step is to define the process criteria. To define the process criteria, click on the Add Criteria node. It will open an additional window on the right-hand side of the process canvas screen where you have to enter the following details:
- Criteria Name: Enter a name for the criteria node. Enter
Only for Closed Won Opportunitiesas Criteria Name. - Criteria for Executing Actions: Select the type of criteria you want to define. You can either use a formula or filter to define the process criteria or no criteria. In this scenario, select Conditions are met.
- Set Conditions: Here you can define the filter condition for your process. In this scenario, select Stage equals picklist Closed Won.
- Do you want to execute the actions only when specified changes are made to the record?: Select this checkbox if you want the actions to be executed only if the record meets the criteria now but the values that the record had immediately before it was saved didn't meet the criteria. Select this checkbox for the current business scenario.
It will look like the following screenshot:

Once you are done, click on the Save button.
- Criteria Name: Enter a name for the criteria node. Enter
- The next step is to add one immediate action to post a message to Chatter group. For this, we will use the Post to Chatter action available in process. Click on AddAction available under IMMEDIATE ACTIONS. It will open an additional window on the right-hand side of the process canvas screen, where you have to enter the following details:
- Action Type: Select the type of action; in this case, select Post to Chatter.
- Action Name: Enter a name for this action. Enter
Post message to Universal Containers Sales Team Chatter Groupas Action Name. - Post to Chatter: It allows you to select the area (means Chatter group, user, or current record) where you want to post opportunity details. From the drop-down menu, select Chatter Group, start typing on the textbox, and then select the Chatter group, Universal Containers Sales Team.
- Message: Enter the message that you want to post. You can use the fields above the text box to mention a user or group, add a topic, or insert a merge field into the message.
It will look like the following screenshot:

Use Merge Field to add fields from Opportunity and the related object. To add the topic, use Add an existing topic textbox. Once you are done, click on the Save button. In the end, your process should look like the following screenshot:

- The last step is to activate it. To activate a process, click on the Activate button.
Now onwards, if someone updates the Opportunity Stage as Closed Won, the process will fire and post a message to the Chatter Group, and it will look like the following screenshot:

It is also possible to include the link of the opportunity record. To do so, construct the URL and include in the Chatter post message.
Using Process Builder, you can auto-submit a record into an approval process. Now, the user must submit a record for approval manually. To resolve these types of business scenarios a developer usually writes an Apex trigger, but there are alternate ways through which you can achieve it, and that too, without writing the code, as follows:
- Apex Trigger
- Combination of Flow and Process Builder
- Process Builder
A business scenario: David Guzman is working as a system administrator at Universal Containers. He has received a requirement to auto-submit a new account for approval if Status__c equals to Inactive. He has already created a two-step approval process for this in
Chapter 7, Optimizing Business Processes with Visual Workflow and Approval Processes.
Perform the following instructions to fulfill the preceding business requirement using Process Builder:
- Click on Setup (gear icon) | Setup | PLATFORM TOOLS | Process Automation | Process Builder.
- Click on the New button and enter the following details:
- Name: Enter the name for the process. Enter
Auto submit account record for approvalas Name. - API Name: This will be autopopulated based on the Name.
- Description: Write some meaningful text, so other developers/administrators can easily understand why this process is created.
- The process starts when: For this, select when A record changes.
It will look like the following screenshot:

- Name: Enter the name for the process. Enter
- Once you are done with the process property definitions, then the next task is to select the object on which you want to create a process and define the evaluation criteria. For this, click on the Add Object node and enter the following details:
- Object: Select the Account object.
- Start the process: To Start the process, select only when a record is created.
- Allow process to evaluate a record multiple times in a single transaction: Select this checkbox only when you want the process to evaluate the same record for up to five times in a single transaction. Don't select this option for the current business scenario.
It will look like the following screenshot:

Once you are done, click on the Save button.
- Once you are done with defining the evaluation criteria the next step is to define the process criteria. To define the process criteria, click on the Add Criteria node. It will open an additional window on the right-hand side of the process canvas screen, where you have to enter the following details:
- Criteria Name: Enter a name for the criteria node. Enter
Only for new accountsas Criteria Name. - Criteria for Executing Actions: Select the type of criteria you want to define. You can either use a formula or filter to define the process criteria or no criteria. In this scenario, select Conditions are met.
- Set Conditions: Here, you can define the filter condition for your process. In this scenario, select
Status__Cequals picklist Inactive.
It will look like the following screenshot:

Once you are done, click on the Save button.
- Criteria Name: Enter a name for the criteria node. Enter
- The next step is to add one immediate action to auto-submit records into the approval process. For this, we will use the Submit for Approval action available under process. Click on Add Action available under IMMEDIATE ACTIONS. It will open an additional window on the right-hand side of the process canvas screen, where you have to enter the following details:
- Action Type: Select the type of action you want to perform. In this scenario, select Submit for Approval.
- Action Name: Enter a name for this action. Enter
Auto submit account records into approvalas Action Name. - Object: It will automatically populate from the object you have created in the process.
- Approval Process: You can either select Default approval process, or if the object contains more than one approval process, then you can use the Specific approval process option from the drop-down menu. Select Default approval process.
- Skip the entry criteria for this process?: If you want to submit the record for approval regardless of the approval process entry criteria, then select this option. In this scenario, leave it as is.
- Submitter: It allows you to choose the user for auto-submitting records into the approval process and receives all the related notifications. In this scenario, select Current User.
- Submission Comments: Optionally, you can enter submission comments; It will appear in the approval history for the specified record. Enter
Auto submit from Processin this case.
It will look like the following screenshot:

Once you are done, click on the Save button.
- The last step is to activate it. To activate a process, click on the Activate button.
Now onwards, if someone creates an account with status, the process will fire and auto-submit records for approval.