
Let's start with an example. David Guzman is working as a system administrator at Universal Containers. He wants to develop an application using a flow to calculate the summation of two numbers. What he wants is this: on the first screen, he wants to allow users to enter two numbers and display the summation of it on the next screen. Perform the following instructions to develop a flow for the preceding business requirement:
- Go to Setup (gear icon) | Setup | PLATFORM TOOLS | Process Automation | Flows.
- Click on the New Flow button; it will open the flow canvas for you.
- Then navigate to the Palette tab and drag and drop Screen element to the canvas; it will open a Screen element window for you.
- Enter the name as
Sum of two numbers. You can also add a description. Under the Navigation options section, select the Don't show Previous button from the dropdown. Also, select the Show Pause button checkbox and enter the pause message. This message will appear when a user pauses an interview of this flow. This will look like the following screenshot:
If you want to format the pause message, then click on
 and it will open the rich text editor for you. This text editor saves the content in HTML format:
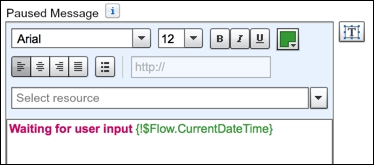
- The next task is to add fields to the screen. From Screen element, navigate to the Add a Field tab, double-click on the Number field available under the INPUTS section to add it to the screen. In the Screen overlays preview pane, click on the Number field to configure its settings by entering Label, Unique Name, Default Value, and Scale (enter
0). Select the Required checkbox under the General Info section, as shown in the following screenshot:
1) To make sure that a user always enters a property value greater than zero, we must add a validation rule to it. To do this, navigate to the Input Validation section under the First Number field setting and select the Validate checkbox. Then, it will open the formula editor for you where you can write a validation rule for this field. It also allows you to configure an error message for the validation rule. It will be displayed when the formula evaluates to
False.It allows you to use a standard formula composition in a formula resource. You can also use it to validate user input in Screen element. But the flow formula doesn't support all the functions. A flow formula can't contain more than 3,000 characters. Formulas that are not supported by the flow include
ETRECORDIDS,IMAGE,INCLUDE,INCLUDES,ISCHANGED,ISNEW,ISPICKVAL,PARENTGROUPVAL,PREVGROUPVAL,PRIORVALUE,REQUIRE,SCRIPT, andVLOOKUP. If you use these functions in your formula, they will always returnnull. The validation rule for the Currency field looks like the following screenshot: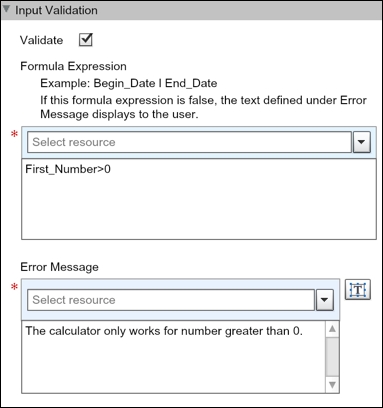
- Likewise, add another number field to allow users to enter second number, as shown in the following screenshot:

- Also, add a validation rule so the user will always enter commission that is greater than
0. To achieve this, useSecond_Number > 0. - You can also configure help text for the screen under the Help Text section of Screen element.
- Also, add a validation rule so the user will always enter commission that is greater than
- Click on the OK button available on Screen element.
- To calculate the summation of two numbers, create a formula. To do this, navigate to the Resources tab and double-click on Formula, available under the Create new section, and create a formula as shown in the following screenshot:

The
{!First_Number}and{!Second_Number }are screen input fields that we created in steps 5 and 6. - The next task is to display the summation of two numbers on the screen. For this, drag and drop Screen element to the canvas; it will open a Screen element window for you. Here, you have to enter the name as
Display summation of two numbers; you can also add a description. Under the Navigation options section, select Don't show Previous button from the dropdown. - Now navigate to the Add a field tab available under Screen element. Double-click on Display Text available under the OUTPUTS section.
- In the Screen overlays preview pane, click on the Display Text field to configure its settings by entering
Unique Name, for Display Text from drop-down select formula that we created in step 8. It will look like the following screenshot:
- Once done, click on the OK button available on Screen element.
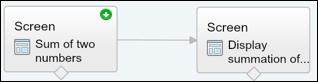
Until now, we have created two screens: one for getting input from a user and other to show the summation. Our next task is to connect both the elements so that at runtime, the flow could decide the order of execution of the elements. To do this, find the node at the bottom of the source element and drag it to the target element; it promptly selects which outcome you want to assign the path to. Also, set Sum of two numbers as the Start element, as shown in the following screenshot:
The next task is to save your flow. To do this, click on the Save button available in the top left-hand corner of the flow canvas and enter Summation of two numbers as the name and then fill in Unique Name, Description, Flow, and Interview Label. To test this flow, click on the Run button and enter First Number and Second Number, as shown in the following screenshot:

Click on the Next button, then it will display the summation on another screen:

Finally, click on the Finish button and it will redirect you to the first screen.
Once you have activated a flow and you want to modify it, Salesforce will not allow you to modify the activated flow. There are two possibilities and they are mentioned as follows:
- Create a new flow by copying the activated flow.
- Modify the activated flow and save it as a New version or Save the activated flow as New version and modify it. Once you are done with the modification, activate the new version of the flow.
Note
If you want to learn more about Visual Workflow, consider exploring Learning Salesforce Visual Workflow; refer to https://www.packtpub.com/application-development/learning-salesforce-visual-workflow .