
Entitlement management helps an organization to provide the correct support to their customers. It helps a support agent to identify what all kind of service levels the customer is eligible for. There is a thin gap between an escalation rule and entitlement management. An escalation rule helps an organization to make sure that the cases do not remain open forever whereas entitlement management helps a support agent to identify what all kind of service levels the customer is entitled to, based on their service contract, asset, or account.
Let's start with an example: you have just opened a support ticket with your cellular operator to resolve the network issue. As we all know, cellular providers are not selling any support plan, such as Silver, Gold, or Platinum, separately. It means they are treating all support tickets equivalently; in this case, they can utilize an escalation rule to make sure that the cases do not remain open forever.
Here is another example: let's say that you have just purchased an iPhone 7 Plus 128 GB and one iPad Pro 9.7 128 GB. By default, it comes with 90 days of complimentary Apple care plan. Additionally, you have purchased an Apple care plan for iPad. Now you have a 90-day apple care plan for iPhone and a 3-year Apple care plan for iPad. Now, assume that after 100 days of your purchase, you call Apple's technical support to get some help regarding the iPhone. The support agent will first verify whether you are entitled for the iPhone support or not by checking the entitlement and service contract.
Before proceeding with the entitlement setup process, make sure that you have chosen the correct model that suits your support process. There are three usual ways to set up entitlement management. Once you have decided what should determine the support eligibility, review the following three models and choose the model that best matches with your business needs:
|
Entitlement model |
What determines support eligibility |
When to use this model |
|
Entitlement Only |
Support agents will determine customer eligibility for support based on the entitlement defined at the account, contact, or asset level |
If your entitlement doesn't have a renewal process. you are not selling entitlements separately; they're bundled with products (warranties). You don't want to manage the customers' entitlements as a part of the service contract. For example, a mattress firm like DynanstyMattress offers 30-years limited warranties to all their customers. |
|
Entitlement + Service Contacts |
Support agents will determine customer eligibility for support based on their service contract |
Your customers' entitlements are renewed periodically at the service contract level. You are selling entitlements separately from the products, and they are part of the service contract. For example, you have purchased a Dell laptop including 1-year home site warranty. This 1-year warranty falls under the service contract. |
|
Entitlement + Service Contacts + Contract Line Items |
Support agents will determine customer eligibility for support, based on the products listed in their service contract |
Entitlements are created and updated through a third-party system, such as ERP. Warranties, subscriptions, and other support products can appear as line items, and they are mapped to one or more entitlements. Your support team manages service contract transaction, such as, renewals, mergers, and transfers. For example, you have purchased an iPhone 7 Plus, iPad Pro 9.7 and iMac 21.5 from Apple store. You additionally purchased Apple care for iPad and iMac. |
Service contracts are agreements between an organization and their customers for a type of customer support. It can represent different types of customer support, such as warranties, subscriptions, or service-level agreements. It is always possible to change the model later. In this chapter, we will discuss the first model, that is, entitlement only.
Before creating an entitlement process, you must understand every step you need to configure correctly. To set up the entitlement process correctly, you need to perform the steps mentioned in the following screenshot:

A business scenario: David Guzman is working as a System Administrator at Universal Containers. His manager, Brigette Hyacinth, asks him to implement an entitlement process (Gold 24X7 Support) in Salesforce, based on the following table:
|
Order |
Milestone |
Criteria |
Minutes to complete milestone |
Milestone action time |
Milestone action (e-mail alerts to) |
|
1 |
First Response |
Case: Priority EQUALS High |
60 |
Success: Immediate Warning: 30 minutes before Violation: 0 minutes after |
Success: Case Owner Warning: Account Owner, Case Owner Violation: Account Owner, Case Owner |
|
2 |
First Response |
Case: Priority EQUALS Medium, Low |
180 |
Success: Immediate Warning: 30 minutes before Violation: 0 minutes after |
Success: Case Owner Warning: Account Owner, Case Owner Violation: Account Owner, Case Owner |
|
3 |
Resolution Time |
Case: Priority EQUALS High |
960 |
Success: Immediate Warning: 30 minutes before Violation: 0 minutes after |
Success: Case Owner Warning: Account Owner, Case Owner Violation: Account Owner, Case Owner |
|
4 |
Resolution Time |
Case: Priority EQUALS Medium, Low |
1800 |
Success: Immediate Warning: 30 minutes before Violation: 0 minutes after |
Success: Case Owner Warning: Account Owner, Case Owner Violation: Account Owner, Case Owner |
As of Spring'17 release, entitlement management is not supported by Lightning Experience. Perform the following steps to solve the preceding business requirement:
- Click on Setup | Build | Customize | Entitlement Management | Entitlement Settings.
- To enable entitlement management, select the Enable Entitlement Management checkbox.
- Once you are done, click on the Save button.
- Now, you will get some options, for example:
- Options to Enable Entitlement Versioning (It allows you to manage different version of an entitlement process).
- Limit the Entitlement lookup field to only return entitlements with Active Stats, Same account on the case, Same asset on the case, and Same contact on the case.
- Enable Milestone Feed Items, enable Milestone Time Settings (The Stopped Time field on milestones displays how long a support agent has been blocked from completing a milestone. The Actual Elapsed Time field on milestone shows how long it took to complete a milestone.).
Enable all these features, as shown in the following screenshot:

- The next step is to set the field-level security for the following case fields so that you can view and edit it:
- Entitlement Name
- Entitlement Process Start Time
- Entitlement Process End Time
- Milestone Status
- Milestone Status icon
- Stopped
- Stopped Since
- Asset
- Timeline (Minutes)
Also, add a new section, Entitlement Information, on the case page layout, as shown in the following screenshot:

Make sure to enable field history tracking for entitlement to see when the values were changed.
- Now, the next step is to add the related list to different object page layouts, as per your business requirement:
- Add the Entitlements related list on the Account page layouts. It tells the support agent that any contacts on the account are eligible for support.
- Add the Entitlements related list on the Contact page layouts. It helps the support agent to understand which specific contacts are eligible for support.
- Add the Entitlements related list on the Asset page layouts. It helps the support agent to understand which specific assets are eligible for support.
- Add the Entitlement Templates related list to the Product page layouts. Entitlement Templates helps you to predefine the terms and conditions of support that the support users can add to the products.
- Add the Case Milestones related list on the Case page layouts.
- Add Actual Elapsed Time, Entitlement, Elapsed Time, Stopped Time, Target Response, Target Remaining, and Time Since Target on the Case Milestones page layouts into a new section called
Milestones Time Information, as shown in the following screenshot:

Make sure that the Entitlement tab is visible in Salesforce and you have granted permissions to the respective users.
- In case, going forward if you are planning to use a service contract and contract line items, then this is the right time to implement it.
Milestones represent mandatory steps in the support process, for example, case resolution time and first response time:
- To create a milestone as per the preceding business requirement, click on Setup | Build | Customize | Entitlement Management | Milestones and then click on the New Milestone button
- Enter the following information as mentioned:
- Enter
First Responseas Name. - Enter the Description.
- For Recurrence Type, select No Recurrence. The different recurrence types are as follows:
- No Recurrence: The milestone will only occur once on the record.
- Independent: The milestone will occur whenever the milestone criteria are met on the record.
- Sequential: The milestone will occur repeatedly whenever the milestone criteria are met on the record.
Your milestone page should look like the following screenshot:

- Enter
- Once you are done, click on the Save button.
- Repeat the steps 8, 9, and 10 to add one more milestone, Resolution Time.
Setting up an entitlement process gives the support agents a timeline of the required steps to follow when resolving support cases:
- To create a milestone as per the preceding business requirement, click on Setup | Build | Customize | Entitlement Management | Entitlement Processes and then click on the New Entitlement Process button.
- If you get the option to choose Entitlement Process Type, then select Case. Once you are done, click on the Next button.
- Enter the details as follows:
- Enter
Gold 24X7 Supportas Entitlement Process Name. - Enter the Description.
- Don't select the Active checkbox; we will activate the process after we add a milestone action to it.
Leave the other fields as is; finally, it will look like the following screenshot:
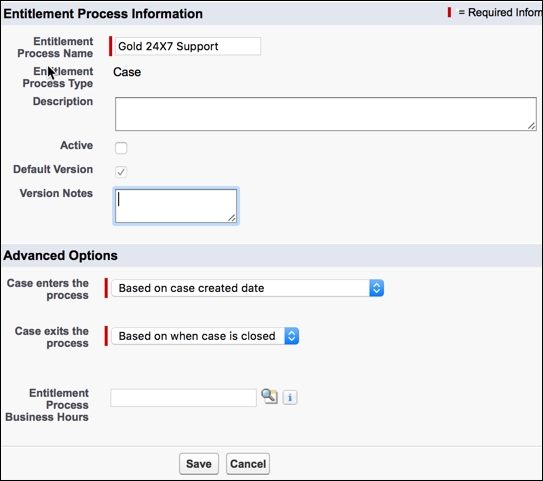
If you want to apply case business hours to the entitlement process, then don't populate Entitlement Process Business Hours, as shown in the preceding screenshot.
- Enter
- Once you are done, click on the Save button.
Adding milestones to an entitlement process defines the required steps in your support process:
- You should now be on the detail page of the entitlement process you created. To add a milestone to an entitlement process, navigate to the Milestone related list and click on the New button:
- For Milestone Name, choose First Response.
- For Time Trigger (Minutes), enter
60. It means support agents will have 60 minutes to complete this action. - Leave the Enable Apex Class for the Time Trigger (Minutes) unselected. This allows you to calculate the time trigger dynamically.
- For Start Time, select Entitlement Process.
- Leave the Milestone Business Hours field as is.
- For Order, enter
1. - For Criteria, select Case: Priority equals High.
It will look like the following screenshot:

- Once you are done, click on the Save button.
- Repeat the steps 16 and 17, to add an additional milestone to the entitlement process as defined in the business requirement table. In the end, Gold 24X7 Support will have four milestones related to it.

Milestones are calculated in minutes and seconds, but their start and end times are only precise to the minute. For example, suppose a milestone is triggered at 09:20:30 AM and it took around 15 minutes for the support agent to complete the milestone, the milestone target time is 09:35:00 AM, not 09:35:30 AM. Thus, the remaining time for the support agent to complete the milestone is 14 minutes and 30 seconds, not complete 15 minutes. Now, the next step is to define the milestone actions for each milestone.
Milestone actions are immediate and time-dependent workflow actions (new task, new e-mail alert, new field update, and new outbound message) that occur at every milestone in an entitlement process. Once you have created an entitlement process and added a milestone to it, the next process is to add milestone actions to the milestone. A milestone action has three types of actions, as follows:
- Success Actions: This action will trigger only when a milestone is completed. This action will still fire for a milestone that is closed late.
- Warning Actions: This action will trigger only when a milestone is near violation.
- Violation Actions: This action will trigger only when a milestone is violated.
- Let's start with defining a milestone action for milestone order 1, as per the requirements defined in the table. You should now be on the detail page of the entitlement process you created. Click on the name of Milestone (order 1) on the Milestone related list, as shown in the following screenshot:

- Under Warning Action, click the Add Time Trigger button.
- Enter
30and select Minutes to have the agents notified 30 minutes before the milestone time expires. - Once you are done, click on the Save button.
- Navigate to the Warning Actions section, click Add Workflow Action, and select New Email Alert to add an e-mail alert action.
It should look like the following screenshot:

- Enter
- Once you are done, click on the Save button.
- Likewise, repeat the steps 19, 20, and 21 to create e-mail alerts for Success Actions and Violation Actions as mentioned in the business requirement table. In the end, it should look like the following screenshot:

Likewise, repeat the steps 19, 20, and 21 to create e-mail alerts for three remaining milestones as mentioned in business requirement table.
The final step is to active your entitlement process. To do so, perform the following instructions:
- Click on Setup | Build | Customize | Entitlement Management | Entitlement Processes and then click on the name of the entitlement process, that is, Gold 24X7 Support.
- Click on the Edit button.
- Select the Active checkbox.
- Once you are done, click on the Save button.
Now that we have created an entitlement process, it's time to use it. First, create an entitlement for an asset and associate your entitlement process to it:

From the next time, creating a case from this entitlement will automatically apply your Gold 24X7 Support entitlement process. It means that the support agent will see the resolution time counting down on the case.