
21. Troubleshooting Your Network
When Good Networks Go Bad
As part of my software consulting work, I end up doing a fair bit of network support for my clients. And every time I get a call from a client with a network problem, I cringe. I never know whether it’s going to take 10 minutes or a week to fix. Sometimes the problem isn’t so bad; I’ve fixed more than one “broken” computer by turning it on. If such an easy fix doesn’t present itself immediately, though, a bit of a cold sweat breaks out on my forehead. The problem could be anything. How do you even start to find a nasty problem in the maze of cards, wires, drivers, and hidden, inexplicable system services? And it’s difficult enough debugging the stuff that belongs there. What if viruses, adware, or rootkits are messing up the works?
Well, if you work for a corporation with a network support staff, of course, the answer to any of these questions is “Call the Help Desk!” or “Call Bob!” or call whoever or whatever is responsible for network problems in your organization, and then take a refreshing walk around the block while someone else sweats over your network. It’s great if you can get that kind of support. If you want to or have to go it alone, though, the good news is that some tools provided with Windows can help you find the problem. After discussing troubleshooting in general, this chapter shows you how to use these tools.
In reading this chapter, you probably won’t find the solution to any particular network problem you’re having. I can’t really help you solve any one specific problem here, but I can show you some of the tools available to help you identify the source of a problem you might have.
Getting Started
I’ve spent many years helping clients and friends with hardware, software, and network problems. One thing I’ve noticed is that the most common—and most frustrating—way people report a problem is to say “I can’t...” or “The computer won’t...” Unfortunately, knowing what doesn’t happen isn’t helpful at all. I always have to ask “What happens when you try?” The answer to that question usually gets me well on the way to solving the problem. The original report usually leaves out important error messages and symptoms that can identify the problem. So, start by trying to express whatever problem you’re having in terms of what is happening, not what isn’t. You’ll move from “I can’t log on at the bank” to something like “The bank’s website says my password is invalid” or “Windows says that I don’t have any network connections.” This leads from the vague toward something that you can grapple with.
Extending that principle, as you work on a problem, pay as much attention to what does work as to what doesn’t. Knowing what isn’t broken lets you eliminate whole categories of problems. For example, check to see whether a problem affects just one computer or all the computers on your local area network (LAN). If other computers can manage the task that one computer is having trouble with, you know that the problem is located in that one computer, or in its connection to the others.
The following are some other questions I always ask:
• Does the problem occur all the time or just sometimes?
• Can you reproduce the problem consistently? If you can define a procedure to reproduce the problem, can you reduce it to the shortest, most direct procedure possible?
• Has the system ever worked, even once? If so, when did it stop working, and what happened just before that? What changed?
These questions can help you determine whether the problem is fundamental (for example, due to a nonfunctioning network card) or interactive (that is, due to a conflict with other users, with new software, or confined to a particular subsystem of the network). You might be able to spot the problem right off the bat if you look at the scene this way. If you can’t, you can use some tools to help narrow down the problem.
Generally, network problems fall into one or more of these categories:
• Application software
• Network clients
• Name-resolving services
• Network protocols
• Addressing and network configuration
• Driver software
• Network cards and hardware configuration
• Wiring/hubs
If you can determine which category a problem falls in, you’re halfway to finding the culprit. At that point, diagnostic tools and good, old-fashioned deductive reasoning come into play.
You might be able to eliminate one or more categories right away. For example, if your computer can communicate with some other computers but not all of them, and your network uses a central hub, you can deduce that at least your computer’s network card and the wiring from your computer to the hub are working properly.
Tip
![]()
You might also peruse Chapter 16, “Troubleshooting Your Internet Connection,” for tips on diagnosing network problems specific to the Internet (TCP/IP) protocol.
Windows comes with some diagnostic tools to help you narrow down further the cause of a network problem. In the rest of this chapter, I outline these tools and suggest how to use them.
Diagnostic Tools
Each diagnostic tool described in this section serves to test the operation of one or more of the categories mentioned in the preceding section. The tools are discussed in roughly the order you should try them.
Some tools can be used to find problems in any of the many networking components. These tools quickly identify many problems.
The Network and Sharing Center
The Network and Sharing Center is the first place to start diagnosing a network problem because it can quickly take you to Windows network troubleshooters, status displays, and network settings. It can also display a network map that shows whether your computer can communicate with any other computers on your LAN using the Windows file and printer sharing client services. If at least one other computer is visible and online, you can be pretty sure that your computer’s network card and cabling are okay.
There are several ways to bring up the Network and Sharing Center:
• Click the small network icon located in the right corner of the taskbar near the time of day. At the bottom of the pop-up, click Open Network and Sharing Center.
• Click Start, Control Panel, View Network Status and Tasks (under Network and Internet).
• Click Start, Computer. At the bottom left, click Network. Then, at the top click Network and Sharing Center.
Use whichever method is convenient. This brings up the window shown in Figure 21.1. The little map at the top of the window shows your current network status. A broken line or red X indicates that you have no functioning network or Internet connection.
Figure 21.1 The Network and Sharing Center gives you a quick overview of your network and Internet status and leads to other diagnostic and setup tools.
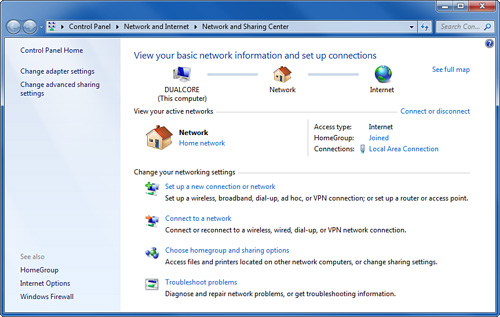
Under View Your Active Networks, Windows displays information about any active network and/or direct Internet connections. For example, in Figure 21.1, you can see that I am attached to a LAN, through the Local Area Connection network adapter. Its network location is Home Network, which means that file and printer sharing are allowed and that a homegroup can be used.
![]() If you want to use the HomeGroup feature, your network location must be “Home Network.” For more information, see “Setting Up a Homegroup,” p. 478.
If you want to use the HomeGroup feature, your network location must be “Home Network.” For more information, see “Setting Up a Homegroup,” p. 478.
This window leads to several other useful tools:
• To see whether various networking features are turned on or off, click Change Advanced Sharing Settings.
• To let Windows try to diagnose your network problem, click Troubleshoot Problems. Then select a troubleshooter for the particular problem you’re having (see “Network Diagnostics,” later in the chapter, for a description of the troubleshooters).
• To check or modify the settings for one of your network adapters, click Change Adapter Settings.
• To check or change your homegroup settings, click Choose Homegroup and Sharing Options.
• To see if your computer can find other computers on your network, click See Full Map.
If you’re having problems with file and printer sharing, the first thing to check is the Network Map.
Network Map
To view the Network Map, open the Network and Sharing Center as described in the previous section. Then, click See Full Map. The window that appears should look something like Figure 21.2, except that the names of the computers on your network will be different. My network also includes a router (gateway) device, which also appears in this display because its Universal Plug and Play (UPnP) feature has been enabled.
Figure 21.2 The Network Map shows other computers your computer knows about. The actual connections may or may not be shown.
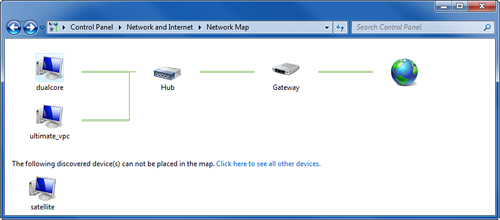
If you see at least one other computer besides your own displayed here, your computer’s network cabling, network adapter, and drivers are working correctly. In addition, both your computer and the computers shown are both running the Network Discovery service and/or file sharing. (To turn on Network Discovery, go back to the Network and Sharing Center and click Change Advanced Sharing Settings.)
Note
![]()
If you have a computer that Windows says “cannot be placed on the map,” it might be running a Windows version prior to Vista, running some other OS, or connected to your OS through a more complex network.
If other computers don’t appear, and you know that Network Discovery is turned on and that Windows Firewall is open, it’s possible that the network browser function, which is a behind-the-scenes service that Windows uses to locate other computers, is not working. This is a common problem. To investigate it, try these procedures:
• Wait 20 minutes and press the F5 key. Other computers may appear this time.
• Check each of the computers in your workgroup and make sure that each computer is set to use the same workgroup name and that each computer has the same set of network protocols installed. In particular, because Windows 7 supports only TCP/IP, any computers running Windows 98 or Me must be reconfigured to use only TCP/IP and not IPX/SPX or NetBEUI.
![]() For more information about networking with older versions of Windows, see “Networking with Other Operating Systems,” p. 487.
For more information about networking with older versions of Windows, see “Networking with Other Operating Systems,” p. 487.
Now, click the Back arrow to return to the Network and Sharing Center. Next, look at the label under your network connection in the middle View Your Active Networks section. The network type label should say Work Network or Home Network. If it says Public Network, file and printer sharing should not be available because this would be risky in a public setting with other unknown computers. You can change it from Public to Home or Work if you trust the other computers on your network.
![]() For more information, see “Choosing Your Network Location,” p. 475.
For more information, see “Choosing Your Network Location,” p. 475.
If you are having trouble with file and printer sharing with some or all of your other computers, and this screen didn’t identify the problem, click Change Advanced Sharing Settings. This displays settings that Windows uses with Work/Home networks and Public networks, respectively. The settings are divided into two parts:
• Home/Work—Used for network connections that lead to home or office networks. A network can be a home or work network even if it provides Internet access, as long as a router or firewall is placed between the network and the Internet, and as long as you trust all the computers plugged in to the network.
• Public—Used for network connections that lead to a public network. A public network could be a direct Internet connection (for example, a connection that plugged in directly to a DSL or cable modem), or a network in a public place such as a hotel or café, where you do not trust the other computers.
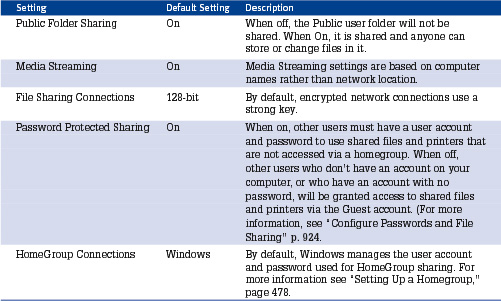
Actually, though, this control panel is somewhat misleading. Only the first two settings are different for Home/Work and Public networks: Network Discovery and File and Printer Sharing. The remaining settings are location-independent; that is, they apply to all network locations. The default settings are listed in Tables 21.1 and 21.2.
Table 21.1 Location-Dependent Advanced Sharing Settings
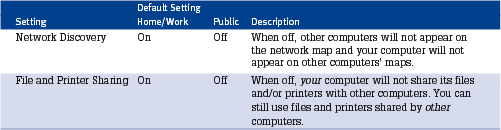
Table 21.2 Location-Independent Advanced Sharing Settings
Network Diagnostics
Windows 7 features a network repair tool called Network Diagnostics that is said (by Microsoft) to be capable of recognizing and diagnosing more than 100 network problems. I’m skeptical of claims like this, but, on the other hand, it takes only a few seconds to let Network Diagnostics examine your network and offer whatever advice it can, so it’s absolutely worth a crack.
To run the Network Diagnostics tool, open the Network and Sharing Center as described on page 577. Click Troubleshoot Problems. Then, select one of the network troubleshooters:
• Internet Connections—Select this if you are having a problem reaching the Internet or just a particular website.
• Shared Folders—Select this if you can’t access a network shared folder whose name you know.
• HomeGroup—Select this if you are having problems accessing a homegroup.
• Network Adapter—Select this if you are having general problems accessing the Internet and/or network resources.
• Incoming Connections—Select this if other computers can’t connect to your computer’s shared files or to other programs or services that you want to make available on your computer (for example, Remote Desktop, a web server, and so on).
Tip
![]()
Whichever troubleshooter(s) you use, if the word Advanced appears on the first screen, click it and select Run As Administrator, and also check Apply Repairs Automatically.
• Connection to a Workplace Using DirectAccess—Select this if you can’t access your corporate network over the Internet via the DirectAccess virtual private networking feature.
Note
![]()
The troubleshooters aren’t good at determining that nothing is actually wrong with their particular area of concern. If a troubleshooter says that it can’t find the problem, don’t assume that there is a problem with that specific topic. There might not be one. Just try another troubleshooter.
Windows will display a box that says “Identifying the problem...” and will then display a results window that explains what was found to be wrong, what Windows did about it (if anything), what the outcome was, and where to go for more assistance.
If the diagnostics tool doesn’t solve your network problem, check Windows Firewall to be sure it isn’t blocking a desired network service.
Windows Firewall
Another configuration setting that could prevent file and printer sharing from working correctly is Windows Firewall. To ensure that file and printer sharing isn’t blocked, open the Windows Firewall window by clicking Start, Control Panel, System and Security, Windows Firewall. Windows Firewall is much improved in Windows 7, and can filter network activity based on the type of network to which you’re attached. So, in Windows 7, for both Home or Work (Private) networks and for Public networks, the Windows Firewall State should be On, and Incoming Connections should be set to Block All Connections to Programs That Are Not on the List of Allowed Programs.
Click Allow a Program or Feature Through Windows Firewall to view the settings. File and Printer Sharing should be checked, but not in the Public column. Core Networking should be checked in both columns.
![]() For more information about configuring the firewall, see “Configuring Windows Firewall,” p. 937.
For more information about configuring the firewall, see “Configuring Windows Firewall,” p. 937.
If the firewall settings appear to be correct, the next step is to check Windows Event Viewer, to see whether Windows has left a record of any network problems there.
Event Viewer
Event Viewer another important diagnostic tool and one of the first to check because Windows often silently records useful information about problems with hardware and software in an Event Log. To check, open the Event Viewer: Click Start, right-click Computer, select Manage, and then select the Event Viewer system tool. Start with Custom Views, Administrative Events. This provides a view of all significant management events from all of the various Windows events logs (and there are a lot of them!).
If nothing useful appears there, select Windows Logs, and examine the System, Application, and Security logs in turn. Finally, open Applications and Services Logs, Microsoft, Windows, and under any of the network-related categories, view the Operational and Admin logs.
Event Viewer displays Event Log entries, most recent first, on the right (see Figure 21.3).
Figure 21.3 Event Viewer might display important diagnostic information when you have network problems.
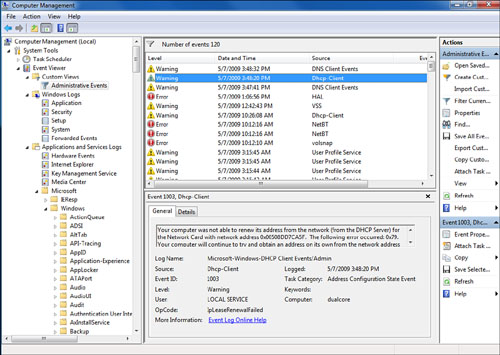
Log entries for serious errors are displayed with a red X in a circle; warnings appear with a yellow ! in a triangle. Informational entries (marked with a blue i) usually don’t relate to problems. Double-click any error or warning entries in the log to view the detailed description and any associated data recorded with the entry. The Warning entry in Figure 21.3 indicates that my computer couldn’t acquire a network address in a reasonable amount of time. It turns out that my router had come unplugged.
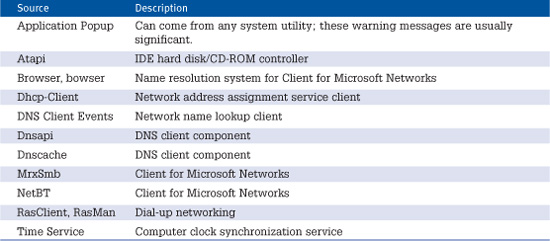
These messages are usually significant and informative to help diagnose network problems; they might indicate that a network card is malfunctioning, that a domain controller for authentication or a DHCP server for configuration can’t be found, and so on. The Source column in the error log indicates which Windows component or service recorded the event. These names are usually fairly cryptic. Table 21.32 lists a few of the more common nonobvious ones.
Table 21.3 Network Sources of Event Log Entries
If you’re at a loss to solve the problem even with the information given, check the configuration of the indicated component, or remove and reinstall it to see whether you can clear up the problem.
![]() To learn more details about the Event Log, see “Event Viewer,” p. 655.
To learn more details about the Event Log, see “Event Viewer,” p. 655.
Tip
![]()
A problem with one network system usually causes other problems. Therefore, the oldest error message in a closely timed sequence of errors is usually the most significant, with subsequent errors just a result of the first failure. Because the Event Log is ordered most-recent-first, you might get the most useful information down a bit from the top of the list.
Device Manager
Hardware problems with your network card will most likely be recorded in the Event Log. If you suspect that your network card is the culprit, and nothing is recorded in the Event Log, check the Device Manager.
To use it, click Start, right-click Computer, select Manage, and choose the Device Manager system tool. Any devices with detectable hardware problems or configuration conflicts appear with a yellow ! icon when you display the Device Manager. If no yellow icons appear, you don’t have a detected hardware problem. This doesn’t mean that you don’t have a problem, but the odds are slim that your network card is the problem.
Tip
![]()
The real cause of your problem might reveal itself at system startup time rather than when you observe the problem. Reboot your system and note the time. Then reproduce the problem. Check the Event Log for messages starting at the reboot time.
If devices are shown with ! icons, double-click the device name to see the Windows explanation of the device status and any problems. A device that you’ve told Windows not to use (disabled) will have a red X on it; this is generally not a problem.
![]() For more detailed instructions and tips on device troubleshooting, see Chapter 25, “Troubleshooting and Repairing Problems.”
For more detailed instructions and tips on device troubleshooting, see Chapter 25, “Troubleshooting and Repairing Problems.”
Testing Network Cables
If your computer can’t communicate with any other computer on your LAN, and the Device Manager doesn’t indicate a faulty network card, you might have a wiring problem. Wiring problems can be the most difficult to solve because it’s difficult to prove that data is leaving one computer but not arriving at another. The ping program, discussed later in this chapter, can help with this problem.
![]() To learn how you can use the
To learn how you can use the ping command to diagnose Internet-related problems, as opposed to LAN problems, see “ping,” p. 434.
If your computer is not properly wired into the LAN or is connected through a wireless network, in many cases, Windows displays an offline icon right on the system tray and indicates that your network card is disconnected. It might not, though, so you shouldn’t take a lack of this kind of message to mean that no wiring problems exist.
If your network uses UTP cabling plugged in to a hub, there’s usually a green LED indicator on each network card and at each port on the hub. Be sure that the lights are on at each end of your network cable and those for the other computers on your LAN.
Note
![]()
If you really want to get into the guts of your network cabling or are planning a major installation and want to learn more details so that you can oversee a professional installation, I recommend that you read Networking with Microsoft Windows Vista by Paul McFedries, published by Que.
You also can use inexpensive (about $75) cable test devices that check for continuity and correct pin-to-pin wiring order for UTP wiring. They come as a set of two boxes. One gets plugged in to each end of a given cable run, and a set of blinking lights tells you whether all four wire pairs are connected and in the correct order. (If you install your own network cabling and/or make your own patch cables,.)
Checking Network Configuration
If hardware isn’t at fault, you might have a fundamental network configuration problem. Often the Event Log or Device Manager gives these problems away, but if they don’t, you can use another batch of tools to check the computer’s network configuration.
ipconfig
If your computer can’t communicate with others on your LAN, after you check the Event Log and Device Manager, use the ipconfig command-line utility to see whether your computer has a valid IP address. Check other computers on the LAN, too, to ensure that they do as well.
In the Command Prompt window (which you open by choosing Start, All Programs, Accessories, Command Prompt), type the following command:
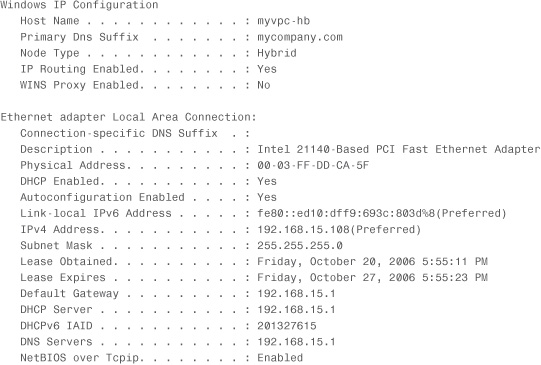
ipconfig /all
The results should look something like this:
(Unless you’re troubleshooting IPv6 Teredo connections, ignore the parts that mention Tunnel Adapters.)
The most important items to look for are the following:
• Host Name—This should be set to the desired name for each computer. If you can correspond with some computers but not others, be sure that the ones that don’t work are turned on and correctly named. Make sure you don’t have two computers with the same name, and that none of the computer names is the same as the workgroup name.
• IP Address—This should be set appropriately for your network. If your LAN uses Internet Connection Sharing (ICS), the address will be a number in the range 192.168.0.1 through 192.168.0.254. If your LAN uses DHCP for automatic configuration, your network manager can tell you whether the IP address is correct. Networks with cable/DSL sharing routers usually use numbers starting with 192.168.x where x is a number from 0 to 15.
If your IP address starts with the numbers 169.254, your computer is set for automatic configuration but no DHCP server was found, so Windows has chosen an IP address by itself. This is fine if your LAN uses this automatic configuration system; perhaps you’ve just connected a few computers so you can share files and printers. However, if you expected to get Internet access through your network—that is, if you use ICS or a hardware Internet connection router, or you have a more complex network with a DHCP server—this is a serious problem. Restart the connecting sharing computer or the router, and then restart your computer and try again.
• Network Mask—This is usually 255.255.255.0, but other settings are possible. All computers on the same LAN should have the same network mask.
Note
![]()
To learn more about IP addressing, network masks, and configuration, visit http://support.microsoft.com and search for article number 164015, “Understanding TCP/IP Addressing and Subnetting Basics.”
Each computer on the same LAN should have a similar valid IP address and the same network mask. If they don’t, check your network configuration. The built-in Windows Repair function may also be used to help fix problems with DHCP-based (automatic) IP address assignment.
Computer
You can check computer’s identification and workgroup or domain membership setup from the Computer window. To do so, click Start, Computer. Look at the bottom of the screen for the computer name and domain or workgroup name, as shown in Figure 21.4.
Figure 21.4 Your computer’s name and workgroup or domain membership are displayed at the bottom of the Computer window.

On a Windows Workgroup network, the workgroup name should be the same on all computers on your workgroup LAN. All of the computer names must be different from each other.
Note
![]()
None of your computers can use the workgroup or domain name as its computer name. For example, if your workgroup is MSHOME, you can’t also name a computer MSHOME. If you find this on one of your computers, change that computer’s name.
On a Windows domain network, you should see your computer’s name displayed as part of a Windows domain name (for example, my computer named myvpc-hb would be called myvpc-hb.mycompany.com on a domain network) and the domain name. Your domain name might not include .com. It might say .local instead or use a different ending. In any case, be sure that your computer is actually a domain member. If the word “Workgroup” appears instead, your computer is not a domain member and will not be able to use domain logins or some domain resources.
Network Connections
You can manually check all installed network protocols and services and their configuration by viewing Network Connections and viewing the properties for Local Area Connection. To view this screen, click Start, Control Panel, View Network Status and Tasks (under Network and Internet), Change Adapter Settings. Then, right-click your Local Area Connection icon (or the appropriate wireless connection icon) and select Properties.
Confirm that each required protocol is installed and correctly configured. In general, the settings on each computer on your LAN should match, except that the IP address differs (usually only in the last of its four dot-separated numbers). If your LAN uses automatic IP address configuration, use the ipconfig command, described earlier, to check the settings.
Testing Network Connectivity
A few tools can help you determine whether the network can send data between computers; these tools test the network protocols as well as low-level network hardware layers.
ping
Ping is a fundamental tool for testing TCP/IP network connectivity. Because most networks today use the Internet (TCP/IP) protocol for file and printer sharing services, as well as for Internet access, most Windows users can use the ping test to confirm that their network cabling, hardware, and the TCP/IP protocol are all functioning correctly. Ping sends several data packets to a specified computer and waits for the other computer to send the packets back. By default, it sends four packets and prints the results of the four tests.
To see whether the network can carry data between a pair of computers, use the ipconfig command (described previously) to find the IP address of the two computers. Then, on one computer, open a Command Prompt window by choosing Start, All Programs, Accessories, Command Prompt.
Next, type the following command:
ping 127.0.0.1
This command tests the networking software of the computer itself by sending packets to the special internal IP address 127.0.0.1. This test has the computer send data to itself. It should print the following:

If it doesn’t, the TCP/IP protocol itself is incorrectly installed or configured; check the computer’s IP address configuration, or, if that seems correct, remove and reinstall the Internet Protocol from Local Area Connection in Network Connections. (I have to say, in more than 15 years of working with PC networks, I’ve never seen this test fail.)
If your computer can send data to itself, try another computer on your LAN. Find its IP address by running ipconfig on that computer and then issue the ping command again on the first computer, as in this example:
ping 192.168.0.23
Of course, you should use the other computer’s real IP address in place of 192.168.0.23. You should get four replies as before:

These replies indicate that you have successfully sent data to the other machine and received it back.
Note
![]()
If you enter a computer name, and ping can’t determine the computer’s IP address, the problem isn’t necessarily a wiring problem—it could be that the DNS or WINS name lookup system is not working correctly. Try using an IP address with ping in this case to help determine what the problem really is.
If, on the other hand, the ping command returns Request timed out, the packets either didn’t make it to the other computer or were not returned. In either case, you have a problem with your cabling, network adapter, or the TCP/IP protocol setup.
You can use ping to determine which computers can send to which other computers on your LAN or across wide area networks (WANs) or the Internet. Ping works when given a computer’s IP address or its network name.
Diagnosing File and Printer Sharing Problems
If the tests in the previous sections don’t point to a problem—that is, if basic network connectivity is fine but you’re still having problems with file or printer sharing—the next step depends on whether you have a workgroup or domain-type network.
If you’re on a domain network, it’s time to call your network administrator for assistance. They’ve had more training and experience in network troubleshooting than I can impart in the space allowed here.
If you’re on a home or small office workgroup network, there are a few things you might try. Here are some tips:
• Did you make sure that file sharing is enabled on each of your computers?
• Do your Windows 7 and Vista computers have a network location setting of Home or Work? The Public setting blocks file sharing.
On Windows XP, there is no network location setting. Instead, open Windows Firewall and make sure that File and Printer Sharing is checked.
• If you use Internet Connection Sharing, restart the computer that’s sharing your Internet connection and wait a minute or two after it’s booted up. Then, restart your other computers. This may help. The ICS computer needs to be up and running before any other computers on your LAN start up.
• If you don’t see other computers in the Network Map window, wait 10 to 20 minutes (really), and then select View, Refresh or press F5. Sometimes it takes up to 20 minutes for the list of online computers to be updated.
• If you can see the folders shared by another computer but can’t move any files into them, or edit files in them, then your network is fine—you just have a permissions problem. On the computer that is sharing the folder, be sure that the folder is shared so that remote visitors can change files. For more information, see “Using Shared Folders in Windows 7,” p. 542.
If the sharing computer has password-protected sharing enabled (or, on XP, Simple File Sharing turned off), the owner of the other computer should check to see that your user account has permission to read and/or modify the files in the shared folder. In the folder or files’ Security properties, check to see that your user account is listed or that the group you’re in, such as Users or Everyone, has the necessary permissions. File permissions are discussed on page 903 under “NTFS File Permissions.”
In Windows 7, Password Protected Sharing works differently than it did on Vista and XP (where the feature was called Simple File Sharing). If you can’t access a file over the network that you know you could access if you were logged on directly at the sharing computer, that computer might be using the Guest account to access the file, not yours. For more information, see “Configure Passwords and File Sharing” on page 924.
One way you can tell whether this feature is causing your problem is to log on at the sharing computer, right-click [My] Computer and select Manage. At the left, open the Shared Folders item and select Sessions. Try to access the problem file or folder from across the network. You should see an entry for the networked computer. If the username is Guest, you will only be able to read or write files that group Everyone can read or write. As I mentioned previously, see page 924 for a discussion about the way Password Protected Sharing works in various situations.