
The Security Assertion Markup Language (SAML) specification is an open security standard envisioned by Organization for the Advancement of Structured Information Standards (OASIS) Technical Committee for the exchange of security context across service boundaries. The SAML tokens are XML-based (can be transmitted using SOAP/HTTP) and provide a way of implementing claims-based identity that is particularly useful in interoperable scenarios across the identity providers and the service providers. This recipe shows how to create the SAML security tokens using the System.IdentityModel assembly in .NET Framework 4.0.
If you are not familiar with the SAML v1.1 specification, you can get the standard set and the schema files from http://www.oasis-open.org/standards#samlv1.1.
To generate a SAML v1.1 token, the System.IdentityModel.Tokens namespace in the System.IdentityModel assembly provides a SamlSecurityToken class that inherits from System.IdentityModel.Tokens.SecurityToken, the base class for creating all types of security tokens. To create a SamlSecurityToken, we will be extending the solution created in the previous recipe:
- Right-click on the
WindowsIdentityToClaimsConsoleproject, and add reference to the System.ServiceModel assembly, as shown in the following screenshot:
- Open the
Program.csfile, and include the System.IdentityModel tokens and System.ServiceModel security namespaces. - Before we can create
SamlSecurityToken, we need to create an instance of theSamlAssertionobject that holds the claims information abstracted from the current windows identity. We will write a private static method that accepts a collection of theClaimobjects and returns aSamlAssertionobject:var accessControlClaims = claims.FindClaims(ClaimTypes.Sid, Rights.PossessProperty); SamlAssertion assertion = CreateSamlAssertionFromWindowsIdentityClaims(accessControlClaims);
Note
The
WindowsClaimSetinstance is filtered to fetch only the claims of theSecurityIdentifiertype and having thePossessPropertyright. - Inside the
CreateSamlAssertionFromWindowsIdentityClaimsmethod, first we will create an instance of theSamlAttributeStatementclass and assignSamlSubjectto it. In our example, we have named the subject asWindows Group Claim:SamlSubject subject = new SamlSubject() { Name = "Windows Group Claim" }; SamlAttributeStatement statement = new SamlAttributeStatement() { SamlSubject = subject }; - Next, we will create an instance of
SamlAssertionand assign theAssertionIdandIssuerproperties. The issuer could beselfwhen the claims are self-asserted. In our example, we have specifiedSystembecause the claims are issued by Windows:SamlAssertion assertion = new SamlAssertion() { AssertionId = string.Format("_{0}", Guid.NewGuid().ToString()), Issuer = "System" };Note
AssertionIdis prepended with an underscore. According to the specification,AssertionIdmust start with a non-numeric character. - Iterate the collection of claims and create the
SamlAttributeinstances using theClaimproperties:foreach (var claim in claims) { Claim samlClaim = new Claim(claim.ClaimType, GetResourceFromSid(claim.Resource as SecurityIdentifier), claim.Right); SamlAttribute attribute = new SamlAttribute(samlClaim); statement.Attributes.Add(attribute); }Note
The
Resourceproperty of theClaiminstance is type casted intoSecurityIdentifier, and the translated named string is used to create the attribute. - We can now create
SamlSecurityTokenusing theSamlAssertioninstance returned by theCreateSamlAssertionFromWindowsIdentityClaimsmethod:SamlSecurityToken token = new SamlSecurityToken(assertion);
- Compile and run the project. A SAML v1.1 token is generated and saved into the filesystem under
Cdrive (change the path in code to map to an accessible location in your machine). The console window will display the message—Saml Token Successfully Created. Open the token file (Saml.xml) in an XML editor, and you will find the claims fetched from your Windows Identity listed as thesamlattributes: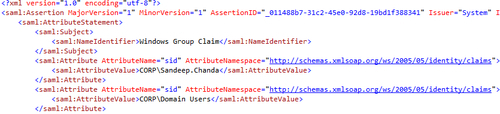
The System.IdentityModel.Tokens namespace exposes the objects that can be serialized into the XML elements corresponding to the SAML v1.1 security token specification. According to the specification, claims are abstracted in SamlAssertion (<saml:Assertion>) in the form of one or more SamlAttributeStatement (<saml:AttributeStatement>) instances containing a subject (<saml:Subject>) and a set of attributes (<saml:Attribute>) representing the claim type (AttributeName) and claim value (<saml:AttributeValue>). SamlAssertion is uniquely identified using AssertionId and Issuer. You will notice that in our solution we are not storing the Claim object directly into SamlAttribute. SAML v1.1 specification puts a restriction that only resources identifiable by a named string can be used as a SamlAttribute value. In our example, we are using a helper method to translate SecurityIdentifier into readable NTAccount named permissions:
private static string GetResourceFromSid(SecurityIdentifier sid)
{
try
{
return sid.Translate(typeof(NTAccount)).ToString();
}
catch (Exception)
{
return sid.Value;
}
}
SamlAssertion is digitally signed using a certificate to create SamlSecurityToken. This token can be serialized and included in a SOAP header to be transmitted across security boundaries. Additional policies for SamlSecurityToken can be provided by using the SamlAdvice and SamlCondition classes corresponding to the<saml:SamlAdvice> and<saml:SamlConditions> elements of the SAML v1.1 specification.
The SAML token needs to be digitally signed using a certificate to validate the authenticity of the issuer. In our solution, we are signing the assertion using a self-issued X.509 certificate. The SamlAssertion class exposes a SigningCredentials property that is used to digitally sign the SAML assertion:
private static void SignSamlAssertion(SamlAssertion assertion)
{
X509Certificate2 certificate2 = GetCertificateFromStore(StoreLocation.CurrentUser, DateTime.Now, "CN=SamlTokenSigningCertificate");
if (certificate2 != null)
{
X509AsymmetricSecurityKey securityKey = new X509AsymmetricSecurityKey(certificate2);
assertion.SigningCredentials = new SigningCredentials(
securityKey,
SecurityAlgorithms.RsaSha1Signature,
SecurityAlgorithms.Sha1Digest,
new SecurityKeyIdentifier(new X509ThumbprintKeyIdentifierClause(certificate2)));
}
}
The System.ServiceModel.Security namespace has a WSSecurityTokenSerializer class that can be used to serialize and deserialize the security tokens conforming to the WS-Security and the WS-Trust specifications. In our solution, we are using a XmlWriter class to persist the token into the filesystem:
private static void SerializeSamlTokenToFile(SamlSecurityToken token)
{
using (XmlWriter writer = XmlWriter.Create(@"c:saml.xml"))
{
try
{
WSSecurityTokenSerializer keyInfoSerializer = new WSSecurityTokenSerializer();
keyInfoSerializer.WriteToken(writer, token);
Console.WriteLine("Saml Token Successfully Created");
}
catch (Exception)
{
Console.WriteLine("Failed to save Saml Token to Disk");
}
}
}
The SamlAssertion class contains the SamlAdvice and SamlCondition properties that provide additional information to the service provider while processing a token. These properties conform to the<saml: Advice> and<saml: Conditions> elements of the SAML v1.1 specification. SamlAdvice could be used to provide supporting information about an issuer. Similarly, conditions such as SamlDoNotCacheCondition and SamlAudienceRestrictionCondition are defined by the SAML v1.1 specification and are used to apply the token caching and audience restriction policies respectively.
The complete source code for this recipe can be found in the Chapter 1Recipe 2 folder. In addition, the MSDN article at http://msdn.microsoft.com/en-us/magazine/cc163366.aspx by Keith Brown provides useful information about claims-based identity and the security identifier translation used in our recipe is sourced from this article.