
Now that we have done most of the heavy lifting by creating the SAML v1.1 security token in the previous recipe, in this recipe we will showcase the steps to create an RP-STS that can validate the incoming security token and retrieve back the claims issued by the IP-STS.
First, we create a contract in the Common project and then use an ASP.NET web forms based RP to provide an implementation to retrieve the claims from the incoming security token. Follow these steps:
- Open the
IdentityManagementsolution created in the previous recipe. Create an abstract classSecureTokenConsumerBaseunder the Common project. - Specify an abstract method
GetTokenHandlerCollectionto retrieve aSecurityTokenHandlerCollectioninstance. - Specify a
DeserializeTokenabstract method to de-serialize the incoming token into aSecurityTokenobject. The method accepts theSecurityTokenHandlerCollectionobject as a parameter. - Finally, create a virtual method
ParseAttributesFromSecureTokento provide a default implementation for retrieving the claim key/value pairs from theSecurityToken:public abstract class SecureTokenConsumerBase { protected abstract SecurityTokenHandlerCollection GetTokenHandlerCollection(); protected abstract SecurityToken DeserializeToken(SecurityTokenHandlerCollection handlers); public virtual Dictionary<string, string> ParseAttributesFromSecureToken() { Dictionary<string, string> attributes = new Dictionary<string, string>(); var handlers = GetTokenHandlerCollection(); var token = DeserializeToken(handlers); ClaimsIdentityCollection idc = handlers.ValidateToken(token); foreach (var claimsIdentity in idc) { foreach (var claim in claimsIdentity.Claims) { attributes.Add(claim.ClaimType, claim.Value); } } return attributes; } } - Add a Visual Studio 2010 C# ASP.NET Web Application project to the
IdentityManagementsolution and name itWebRP. Add a reference to theSystem.IdentityModel, System.ServiceModel, Microsoft.IdentityModel, and theCommonassemblies. - Add a class file to the project and name it
Saml11SecureTokenConsumer. Implement theSecureTokenConsumerBaseabstract class. - Implement the
GetTokenHandlerCollectionmethod to return aSecurityTokenHandlerCollectionobject that will be used to read and validate the token:protected override SecurityTokenHandlerCollection GetTokenHandlerCollection() { SecurityTokenHandlerCollection collection = SecurityTokenHandlerCollection.CreateDefaultSecurityTokenHandlerCollection(); List<SecurityToken> serviceTokens = new List<SecurityToken>(); X509Certificate2 encryptCert = CertificateUtil.GetCertificate( StoreName.My, StoreLocation.LocalMachine, ConfigurationManager.AppSettings["RpCertificate"]); serviceTokens.Add(new X509SecurityToken(encryptCert)); SecurityTokenResolver serviceResolver = SecurityTokenResolver.CreateDefaultSecurityTokenResolver(serviceTokens.AsReadOnly(), false); collection.Configuration.ServiceTokenResolver = serviceResolver; X509CertificateStoreTokenResolver certificateStoreIssuerResolver = new X509CertificateStoreTokenResolver(StoreName.My, StoreLocation.LocalMachine); collection.Configuration.IssuerTokenResolver = certificateStoreIssuerResolver; return collection; }The certificate that is used to encrypt the token, defines a
SecurityTokenResolverinstance. The subject information is retrieved from theWeb.config AppSettingskey,RpCertificate. - Implement the
DeserializeTokenmethod to read the incoming encrypted token XML string into aSecurityTokenobject using the handler:protected override SecurityToken DeserializeToken(SecurityTokenHandlerCollection handlers) { ServiceConfiguration config = new ServiceConfiguration(_serviceConfig); handlers.Configuration.AudienceRestriction = config.AudienceRestriction; handlers.Configuration.IssuerNameRegistry = config.IssuerNameRegistry; var txtReader = new StringReader(_token); StringBuilder sb = new StringBuilder(); XmlReader reader = XmlReader.Create(txtReader); var token = handlers.ReadToken(reader); resolvedToken = SerializeToken(token as SamlSecurityToken); return token; }The service configuration name is set via the public constructor that accepts the token XML string and the configuration name as parameters.
The
SerializeTokenmethod uses theSaml11SecurityTokenHandlerobject to serialize the token:private string SerializeToken(SamlSecurityToken token) { var handler = new Saml11SecurityTokenHandler(); XmlWriterSettings settings = new XmlWriterSettings() { Encoding = Encoding.UTF8, Indent = true }; StringBuilder sb = new StringBuilder(); var writer = XmlTextWriter.Create(sb, settings); writer.WriteProcessingInstruction("xml", "version="1.0" encoding="UTF-8" standalone="yes""); handler.WriteToken(writer, token); writer.Close(); return sb.ToString(); } - Create the
Microsoft.IdentityModelconfiguration in theWeb.configfile:<microsoft.identityModel> <service name="IdentityServiceConfig"> <audienceUris> <add value="http://localhost:8002/Default.aspx"/> </audienceUris> <issuerNameRegistry type="Microsoft.IdentityModel.Tokens.ConfigurationBasedIssuerNameRegistry, Microsoft.IdentityModel, Version=3.5.0.0, Culture=neutral, PublicKeyToken=31bf3856ad364e35"> <trustedIssuers> <add name="STSTestCert" thumbprint="c0705376307238dbdcd8a85b266c4b0fd1ca0e3d"/> </trustedIssuers> </issuerNameRegistry> </service> </microsoft.identityModel>
Specify the RP URL under the
<audienceUris>element. - In the
Default.aspx.csfile, override theCreateChildControlsmethod to create an instance of theSaml11SecureTokenConsumerclass and display the claims in the page retrieved using theParseAttributesFromSecureTokenmethod of theSaml11SecureTokenConsumerclass:protected override void CreateChildControls() { base.CreateChildControls(); var rv = Request.Params["wresult"]; Saml11SecureTokenConsumer tokenConsumer = new Saml11SecureTokenConsumer(Server.HtmlDecode(rv), "IdentityServiceConfig"); _claimList = tokenConsumer.ParseAttributesFromSecureToken(); HtmlTable table = new HtmlTable(); table.Border = 1; foreach (var item in _claimList) { HtmlTableRow row = new HtmlTableRow(); HtmlTableCell cell1 = new HtmlTableCell(); cell1.InnerText = item.Key; HtmlTableCell cell2 = new HtmlTableCell(); cell2.InnerText = item.Value; row.Controls.Add(cell1); row.Controls.Add(cell2); table.Controls.Add(row); } this.form1.Controls.Add(table); HtmlTextArea saml = new HtmlTextArea(); saml.Value = tokenConsumer.ResolvedToken; saml.Rows = 40; saml.Cols = 120; this.form1.Controls.Add(saml); } - Open the
StsProcessing.aspxpage under theWebSTSproject and include the following script to allow the page to perform an automatic post:<script type="text/javascript"> setTimeout('document.forms[0].submit()', 0); </script> - Compile the solution. Run the
WebSTSapplication. You will be redirected to theDefault.aspxpage of theWebRPapplication and if the token resolves correct, the retrieved claims will be displayed in the page along with the decrypted SAML 1.1 token (see the following screenshot):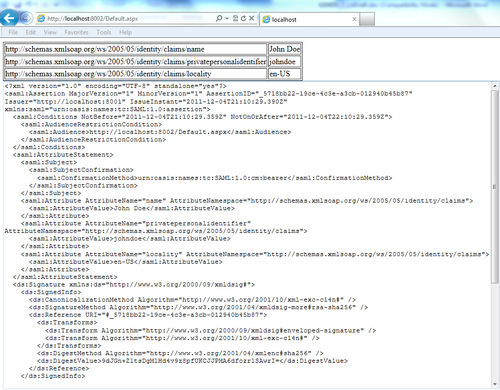
In case of the RP-STS, the process is just the reverse of what we did for generating a token in the previous recipe. In this case, we de-serialize the XML string into a SecurityToken instance using the token handler and then the claims are retrieved from the token. There are, however, a few important steps to note in the process. First, a SecurityTokenResolver instance is created using the RP certificate and is set as the service token resolver (ServiceTokenResolver property) on the default SecurityTokenHandlerCollection object. The certificate location is also set for the issuer using the IssuerTokenResolver property. The issuer will get validated by using the IssuerNameRegistry information set in the Microsoft.IdentityModel configuration section and the store location set in the IssuerTokenResolver property to find the resolver certificate. The SecurityTokenHandlerCollection instance is then used to validate the incoming token and return the collection of claim attributes using the ValidateToken method, as seen in the default ParseAttributesFromSecureToken implementation in the SecureTokenConsumerBase abstract class.
The ability to gain control over the process of generating and consuming SAML tokens is a powerful idea. Outside the Microsoft ecosystem, this ability allows you to build interoperable claims-based identity enabled applications by removing the dependency on Federation Metadata. For example, you can now request resources from a JSP application by posting the SAML 1.1 token to the target Java-based RP-STS, using HTTP POST.