
ACS Management Service is a component of ACS that allows you to programmatically manage and configure the settings in an ACS namespace using the Open Data (OData) protocol. There may be scenarios where you may need to programmatically configure the ACS components such as relying parties, identity providers, and so on. This is particularly useful in the scenarios, for example, putting the ACS configuration as a part of your build and deployment process. Additionally, there are features that are not provided by ACS Management Portal such as adding the custom OpenID providers, which can only be done programmatically.
To access ACS Management Service for a specific service namespace, an OData client must know the Management Service endpoint URL. You can view the Management Service endpoint URL on the Management Service page of ACS Management Portal. In ACS, this endpoint URL is https://YourServiceNamespace.accesscontrol.windows.net/v2/mgmt/service where YourServiceNamespace is the name of your Windows Azure service namespace.
To configure a relying party application using ACS Management Service, first you need to collect the ACS configuration information. Perform the following steps:
- Go to ACS Management Portal and obtain the value of the ACS Management Service account. You can use the default
ManagementClientaccount. To view this value, in ACS Management Portal, click on Management Service under the Administration section in the tree on the left-hand side of the page. - Obtain the value of the ACS Management Service account password. To view this value, do the following:
- In ACS Management Portal, click on Management Service under the Administration section in the tree on the left-hand side of the page.
- On the Management Service page, click on ManagementClient under Management Service Accounts.
- On the Edit Management Service Account page, under Credentials, click on Password.
- On the Edit Management Credential page, copy the value in the Password field.
- Obtain the value of your Windows Azure service namespace. For this recipe, we will use the same namespace created in the first recipe, namely
MyACSNamespace. - Obtain the value of the ACS hostname. Usually, it is
accesscontrol.windows.net.Now, you have collected the ACS configuration information that you will need to programmatically use ACS Management Service.
- Create a new console application. Name the project as
ACSManagementServiceClient: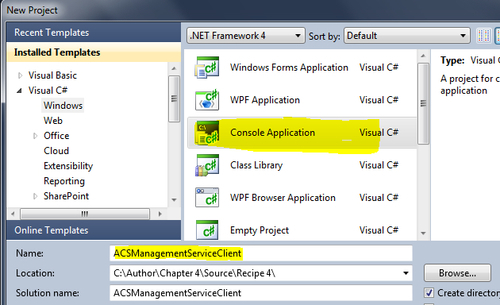
- Change the target framework in the project properties from .NET Framework 4.0 Client Profile to .NET Framework 4.0.
- Add the following constants to the beginning of your
Programclass:public const string serviceIdentityUsernameForManagement = "ManagementClient"; public const string serviceIdentityPasswordForManagement = "My Password/Key for ManagementClient"; public const string serviceNamespace = "MyACSNamespace"; public const string acsHostName = "accesscontrol.windows.net"; public const string acsManagementServicesRelativeUrl = "v2/mgmt/service/"; static string cachedSwtToken;
- Next, add a reference to the
System.Web.Extensionsassembly in the project. - Right-click on Service References, click on Add Service Reference, and add a service reference to the Management Service. As we have been using the
MyACSNamespacenamespace, the Management Service URL is https://myacsnamespace.accesscontrol.windows.net/v2/mgmt/service, as shown in the following screenshot: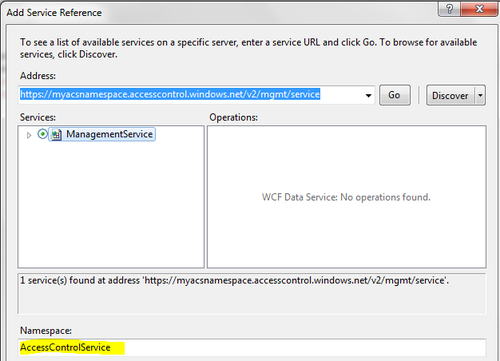
- Add the following namespaces to the top of your
Programclass:using System; using System.IO; using System.Collections.Generic; using System.Linq; using System.Text; using System.Web; using System.Net; using System.Data.Services.Client; using System.Collections.Specialized; using System.Web.Script.Serialization; using System.Globalization; using ACSManagementServiceClient.AccessControlService;
The last namespace in the preceding code snippet brings the service that you just added in the scope.
- Next, add the following methods to the
Programclass:public static ManagementService CreateManagementServiceClient() { string managementServiceEndpoint = String.Format(CultureInfo.InvariantCulture, "https://{0}.{1}/{2}", serviceNamespace, acsHostName, acsManagementServicesRelativeUrl); ManagementService managementService = new ManagementService(new Uri(managementServiceEndpoint)); managementService.SendingRequest += GetTokenWithWritePermission; return managementService; } public static void GetTokenWithWritePermission(object sender, SendingRequestEventArgs args) { GetTokenWithWritePermission((HttpWebRequest)args.Request); } public static void GetTokenWithWritePermission(HttpWebRequest args) { if (cachedSwtToken == null) { cachedSwtToken = GetTokenFromACS(); } args.Headers.Add(HttpRequestHeader.Authorization, "Bearer " + cachedSwtToken); } private static string GetTokenFromACS() { // // Request a token from ACS // var client = new WebClient(); client.BaseAddress = string.Format(CultureInfo.CurrentCulture, "https://{0}.{1}", serviceNamespace, acsHostName); var values = new NameValueCollection(); values.Add("grant_type", "client_credentials"); values.Add("client_id", serviceIdentityUsernameForManagement); values.Add("client_secret", serviceIdentityPasswordForManagement); values.Add("scope", client.BaseAddress + acsManagementServicesRelativeUrl); byte[] responseBytes = client.UploadValues("/v2/OAuth2-13", "POST", values); string response = Encoding.UTF8.GetString(responseBytes); // Parse the JSON response and return the access token var serializer = new JavaScriptSerializer(); Dictionary<string, object> decodedDictionary = serializer.DeserializeObject(response) as Dictionary<string, object>; return decodedDictionary["access_token"] as string; }
Now, let's create a relying party application programmatically. Perform the following steps to do it:
- Add a
CreateRelyingPartyApplicationmethod in theProgramclass to create the relying party application. Note that the various attributes of the relying party are being created and set programmatically on the relying party. This has exactly the same effect as that achieved by configuring the relying party application from ACS Management Portal in the first recipe:public static void CreateRelyingPartyApplication(ManagementService svc) { var relyingParty = new RelyingParty() { Name = "MyProgrammaticRelyingPartyApplication", AsymmetricTokenEncryptionRequired = false, TokenType = "SAML_2_0", TokenLifetime = 3600 }; svc.AddToRelyingParties(relyingParty); //Create the Realm Address var realmAddress = new RelyingPartyAddress() { Address = "http://Programmatic RelyingPartyApplication.com/Realm", EndpointType = "Realm" }; svc.AddRelatedObject(relyingParty, "RelyingPartyAddresses", realmAddress); //Create the Return URL Address var replyAddress = new RelyingPartyAddress() { Address = "http://Programmatic RelyingPartyApplication.com/Reply", EndpointType = "Reply" }; svc.AddRelatedObject(relyingParty, "RelyingPartyAddresses", replyAddress); // Create a Rule Group for This Relying Party Application var rg = new RuleGroup(); rg.Name = "SampleRuleGroup For " + relyingParty.Name; svc.AddToRuleGroups(rg); // Assign This New Rule Group to Your New Relying Party Application var relyingPartyRuleGroup = new RelyingPartyRuleGroup(); svc.AddToRelyingPartyRuleGroups(relyingPartyRuleGroup); svc.AddLink(relyingParty, "RelyingPartyRuleGroups", relyingPartyRuleGroup); svc.AddLink(rg, "RelyingPartyRuleGroups", relyingPartyRuleGroup); //Save Your New Relying Party Application svc.SaveChanges(SaveChangesOptions.Batch); } - Finally, update the
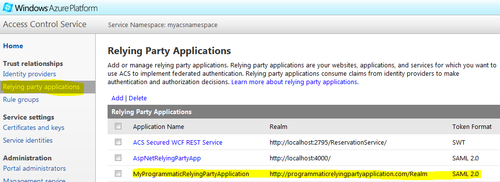
Mainmethod of theProgramclass, as shown in the following code snippet and run the application:static void Main(string[] args) { CreateRelyingPartyApplication (CreateManagementServiceClient()); } - If the program runs successfully, go to ACS Management Portal and verify that the newly created relying party application is present in the Relying Party Applications list. Click on the application link and verify various attributes such as Realm, Return URL, and so on:
Identity providers and other ACS components like Service Identities can be similarly configured programmatically.
ACS provides the management API and exposes it as a service. This is no different from calling a WCF service method after generating the service proxy. When you call the ACS management API methods, it creates the setting and stores them in its persistence store and can display them on the management portal.