
You can have your iOS applications such as those running on iPhone integrated with ACS. The Microsoft Developer and Platform Evangelism (DPE) team has released Windows Azure Toolkit for iOS, which allows the iOS application developers to easily integrate their applications with ACS and access Windows Azure Storage Services from native iOS applications.
You can download the iOS toolkit from https://github.com/WindowsAzure-Toolkits/wa-toolkit-ios.
To create an ACS-integrated iOS application, perform the following steps:
- First, configure ACS. Configure the relying party application, the identity providers, and the rules as described in the Configuring Access Control Service for an ASP.NET MVC 3 relying party recipe. The only difference, with respect to configuring the relying party application, is that this time you don't have a URL for the website. You will provide some ID, for example
uri:wattoolkitiosdemoand for the token format use SWT instead of SAML 2.0. - To create an iOS application, launch Xcode and create a new project. Select View-based Application and click on Next, as shown in the following screenshot:
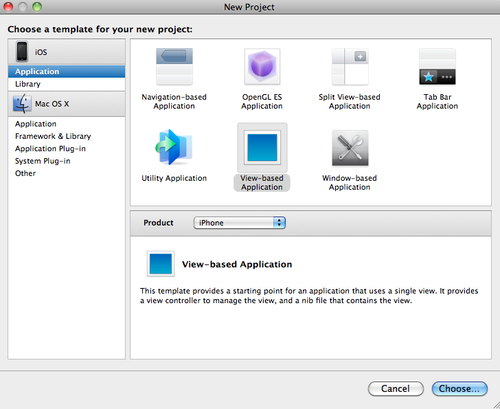
- Enter Product Name and Company Identifier and click on Next.
- Now, locate the version of the Windows Azure Toolkit for the iOS library that you have downloaded earlier. In the download, there will be a ZIP file containing two versions of the library (one for the device and the other for the simulator) and some header files for the project. Right-click on your project and select the Add Files to… menu option.
- Locate the
.afile (for the simulator) and the header files and add them to your project. You may create a new group (called lib) to store them in it. - Now, you need to add the reference to a library required for XML parsing. To do this, click on the topmost project file, click on the target in the 2nd column of the IDE, and select Build Phases from the tab menu.
- In the main window, expand Link Binary with the Libraries option. Ensure that the
libwatoolkitios.afile has been automatically added as a reference. Click on the + button to add a new library, and select thelibxml2.dyliblibrary from the drop-down list. Click on the Add button to add a reference to this library for your project. - Before we start adding any code, we need to add a couple of required linker flags to the project. To do this, click on the Build Settings tab (next to Build Phases). In the search box, type other linker to filter the settings. You should see a setting called Other Linker Flags. Double-click on the right-hand side of this row to add the new flags. Click on the + button to add the two flags. First is ObjC and the second is all_load. Once you complete this, your linker flags should look, as shown in the following screenshot:
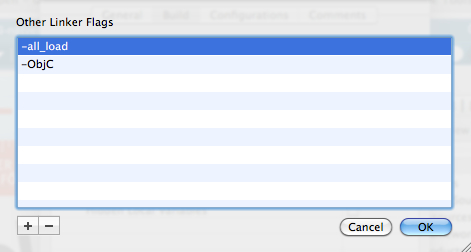
- Click on the OK button to save these settings. The project is now configured correctly to reference the Windows Azure Toolkit library.
- To test that this library works, click on the [ProjectName]AppDelegate.m project file. Add the following
#importstatement at the top of the class:#import "WACloudAccessControlClient.h"
- Next, search for a method called
didFinishLaunchingWithOptionsand after the[self.window makeKeyAndVisible]line, enter the following code snippet:NSLog(@"Access Control Client Initialize"); WACloudAccessControlClient *acsClient = [WACloudAccessControlClient accessControlClientForNamespace: @"YOUR ACS NAMESPACE HERE" realm:@"YOUR REALM HERE"]; [acsClient showInViewController:self.viewController allowsClose:NO withCompletionHandler:^(BOOL authenticated) { if (!authenticated) { NSLog(@"Authentication Failed"); } else { NSLog(@"Creating the authentication token..."); WACloudAccessToken *acsToken = [WACloudAccessControlClient sharedToken]; /* Consume Token */ } }];Replace the namespace and realm in the first line with the service namespace and the realm for your own service, as created in the first step.
As you can see from the preceding code snippet, the code creates a new instance of the access control client, requests that the client shows itself in the current view controller, and then extracts a token.
- Build and run the application in the iOS simulator. Once the application starts, you should be prompted to select an identity provider from the list that you configured in your ACS service. Pick one of the providers, and enter a valid set of credentials. If prompted for permission, click on the Allow button to continue. The login window will now disappear and you'll be returned to your application.
You've successfully integrated your iOS application with ACS.
The workings of this recipe are straightforward and similar to what you have seen before. The application running in the phone connects to ACS and pulls the list of the identity providers configured under your ACS namespace and as the user signs in to one of those providers, the identity provider token received is passed to ACS to retrieve the ACS token. The ACS token then can be used to perform various tasks such as calling the services in cloud as you have seen earlier in this chapter.