
In this recipe, we will create an ASP.NET MVC 3 application and integrate it with ACS. ACS can handle the authentication and the authorization for your website, but before it can do so you need to tell ACS a few things, which are essential for an out-of-band authentication that ACS enables. The main factors in this process are as follows:
- Your web application: It will act as the relying party application
- Client: It is a browser or an application that is attempting to gain access to your web application
- Identity provider: It is a site or a service that can authenticate the client (for example, Windows Live ID)
- ACS: The partition of ACS that is dedicated to your relying party application
The following are the prerequisites for ACS:
- .NET Framework 4.0 and Visual Studio 2010 (any edition above express).
- Windows Identity Foundation runtime, which can be downloaded from http://support.microsoft.com/?kbid=974405.
- Windows Identity Foundation SDK, which can be downloaded from http://www.microsoft.com/download/en/details.aspx?displaylang=en&id=4451.
Note
Windows Identity Foundation is now built into .NET Framework 4.5. No additional runtime will be necessary if you are developing on Windows 8 Developer Preview and .NET Framework 4.5. Also, all the features of WIF will be available under the System.IdentityModel.* namespaces in .NET Framework 4.5.
- In this chapter, we will be creating the ASP.NET MVC 3 Web Applications. If you are not familiar with ASP.NET MVC 3, you can learn about it at http://www.asp.net/mvc/mvc3. You can also install ASP.NET MVC 3 from the same link. Visual Studio comes with the project templates for ASP.NET MVC 2 by default.
To use ACS, you must create a project first and add one or more service namespaces inside it. Perform the following steps:
- Navigate to the Windows Azure portal by typing the following URL in your web browser—https://windows.azure.com. Create a Windows Azure account if you don't have one already.
- Log in with your Windows Live ID.
Note
You can create a Windows Live ID at https://accountservices.passport.net/ if you don't have one already.
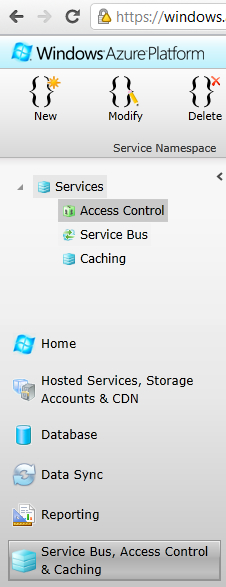
- Once logged in, click on the Service Bus, Access Control & Caching button at the lower left-hand side of the screen. Then select Access Control and click on New, as shown in the following screenshot:
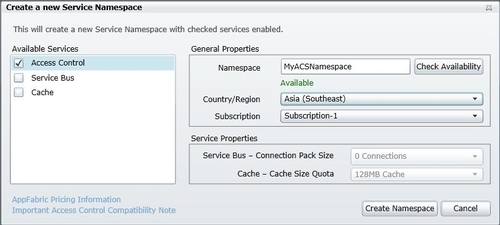
- In the Create a new Service Namespace dialog box, supply the name of the namespace in the Namespace field and check its availability by clicking on Check Availability. Select the appropriate Country/Region and click on Create Namespace, as shown in the following screenshot:
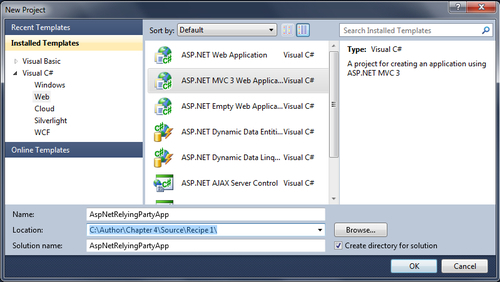
- Next, we will create the relying party application. First, create an ASP.NET MVC 3 application, which will be used as a relying party application in ACS. Open Visual Studio and create a new project. In the New Project dialog box, select ASP.NET MVC 3 Web Application project type and specify the name as AspNetRelyingPartyApp and click on OK, as shown in the following screenshot:
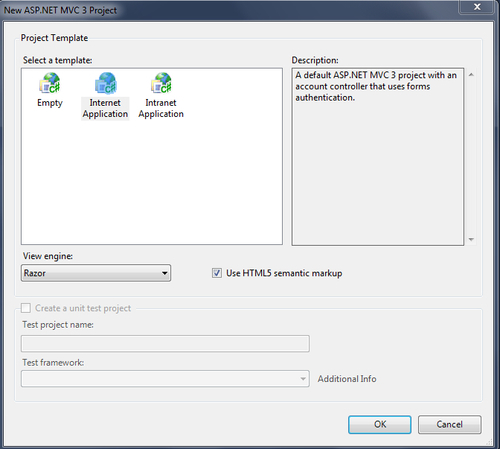
- In the New ASP.NET MVC 3 Project dialog box, select Internet Application and click on OK, as shown in the following screenshot:
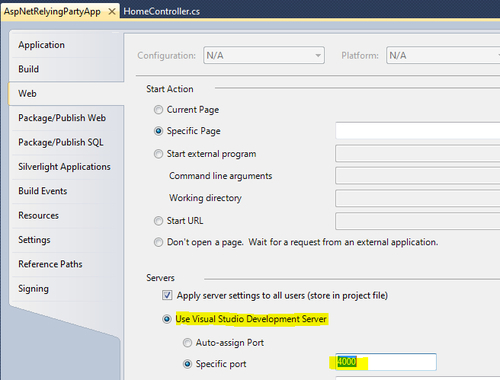
- Next, right-click on the project and go to Properties. Select the Web tab on the Properties page and make sure that Use Visual Studio Development Server is selected in the Servers section. Also, set the Specific port field to 4000. Save and close the settings:
- Run the project. Verify that the site is indeed running and the address in the browser is
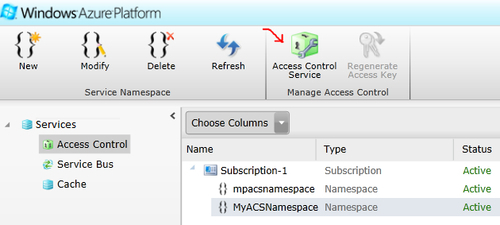
http://localhost:4000/. - Now, it is the time to add and configure the website that we just created as a relying party application in ACS Management Portal. For this, navigate to ACS Management Portal, select the namespace created previously and click on Access Control Service in the toolbar, as shown in the following screenshot:
- On the next screen, select Relying party applications under the Trust relationships section. Click on Add and fill in the following details:
- a. In Name, type the name of the relying party application—AspNetRelyingPartyApp.
- b. In Mode, select Enter settings manually.
- c. In Realm, type the URI that the security token issued by ACS applies to. Provide the base address of the website created previously, that is,
http://localhost:4000/, as mentioned in step 8. - d. In Return URL, type the URL that ACS returns the security token to. Type
http://localhost:4000/. - e. In Error URL (optional), enter the URL that ACS can post to if an error occurs during sign-in. For simplicity, we will leave this blank.
- f. In Token format, select a token format for ACS to use when issuing security tokens to this relying party application. Keep the default SAML 2.0 selected.
- g. In Token encryption policy, select an encryption policy for tokens issued by ACS for this relying party application. We will keep the default value of None.
- h. In Token lifetime (seconds), specify the amount of time for a security token issued by ACS to remain valid. Keep the default value of 600.
- i. In Identity providers, select the identity providers to use with this relying party application. Keep the default of Windows Live ID.
- j. In Rule groups, select the rule groups for this relying party application to use while processing the claims. Keep the default Create New Rule Group checked.
- k. In the Token Signing Settings section, select whether to sign SAML tokens with the default service namespace certificate or with a custom certificate specific to this application. Keep the default value of Use service namespace certificate (standard) .
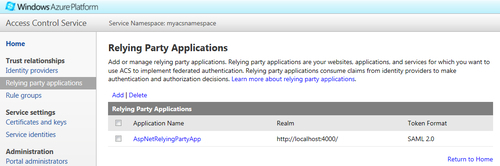
- l. Click on Save. If it is successful, you will see your application in the Relying Party Applications list, as shown in the following screenshot:
- Next, we need to create the rules that determine how claims are passed from the identity provider to your relying party application (your website in this case). To create the rules, perform the following steps:
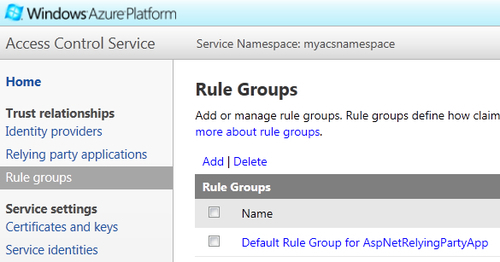
- a. On the ACS Management Portal home page, click on Rule Groups in the tree on the left-hand side or click on the Rule Groups link under the Getting Started section.
- b. On the Rule Groups page, click on Default Rule Group for AspNetRelyingPartyApp, as shown in the following screenshot:
- c. On the Edit Rule Group page, click on Generate.
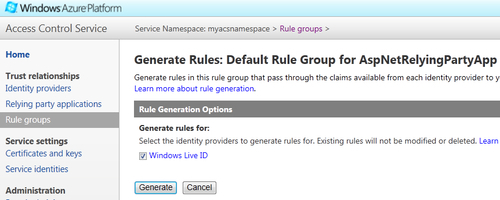
- d. On the Generate Rules: Default Rule Group for AspNetRelyingPartyApp page, check the identity provider selected by default (Windows Live ID), and then click on the Generate button, as shown in the following screenshot:
- e. You should see one rule in the Rules list on the Edit Rule Group page. Click on Save.
So far, we have created a site that can act as a relying party application and have done the necessary configuration in ACS just to enable it. Now, we need to integrate these two by configuring trust between ACS and the relying party application. Perform the following steps to achieve it:
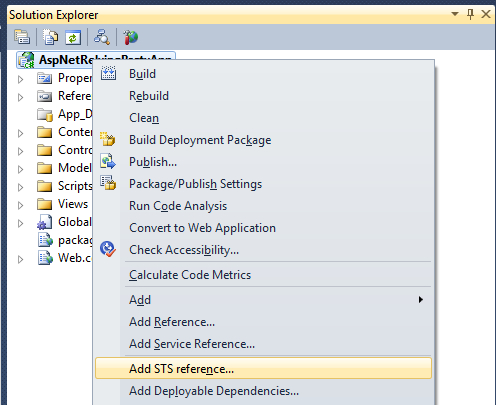
- Open the website that we created previously in Visual Studio and in the Solution Explorer window, right-click on the web project and select Add STS reference... from the menu, as shown in the following screenshot:
- In the Federation Utility wizard, perform the following steps:
- a. On the Welcome to the Federation Utility wizard page, in the Application URI field, enter the application URI as
http://localhost:4000/and click on Next. - b. A warning pops up—ID 1007: The Application is not hosted on a secure https connection. Do you wish to continue? For this sample application, click on Yes.
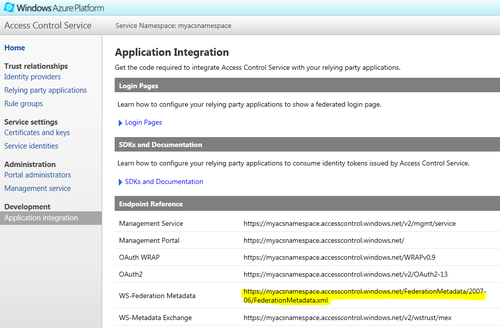
- c. On the Security Token Service page, select Use Existing STS. Enter the WS-Federation Metadata URL published by ACS (go to ACS Management Portal and copy the value of the WS-Federation Metadata endpoint under Application Integration) and then click on Next:
- d. On the STS signing certificate chain validation error page, click on Next.
- e. On the Security token encryption page, click on Next.
- f. On the Offered claims page, click on Next.
- g. On the Summary page, click on Finish. This should show a success dialog. Click on OK.
- a. On the Welcome to the Federation Utility wizard page, in the Application URI field, enter the application URI as
- Open the
Web.configfile for the website and add the following code snippet under<system.web>:<system.web> <httpRuntime requestValidationMode="2.0"/> - To test the integration between your web application and ACS, first log off from all the sites that you had logged in through your Windows Live ID (for example, ACS Management Portal) and run the application in Visual Studio by pressing F5. You will be redirected to the Windows Live ID login page instead of the home page of your website. Once you provide the correct Windows Live credentials, you should be redirected to the home page of your site. Now, you have successfully integrated your website with ACS.
When your web application handles user authentication with ACS, the client must obtain a security token issued by ACS in order to log on to your application. This token contains a set of claims about the user's identity. ACS does not issue a token unless the user proves his identity first, by presenting a security token from another trusted issuer (identity provider) that has authenticated that user. The following diagram shows the various interactions that occur behind the scenes starting with the client requesting a resource from your web application (relying party):
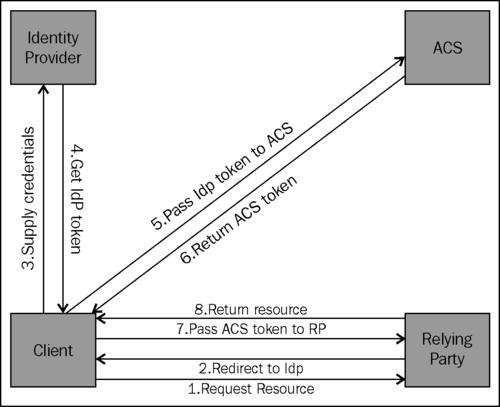
As the relying party doesn't trust the client, it redirects him to the identity provider, where the user provides the credentials and, if successful, the identity provider issues a token. This token is passed to ACS which validates the token and runs the rules engine. ACS provides an ACS token to the client which the client passes to the relying party. The relying party validates the ACS token presented by the client and returns the requested resource.