
The WIF runtime has out of the box support for WS-Federation Passive Requestor Profile. The runtime exposes the Microsoft.IdentityModel.Protocols.WSFederation namespace that contains the necessary methods and properties to support passive sign-in and sign-out requests.
In addition, the WIF SDK for .NET Framework 4.0 provides the utilities and the templates that make it very easy to configure an ASP.NET/ASP.NET MVC 3 Web Application for claims support. The SDK provides a Federation Utility, which can be used to establish trust between an RP and an STS and facilitate an out-of-band metadata exchange. In this recipe, we will walk through the process of creating an ASP.NET MVC 3 Relying Party application and see how the identity management can be delegated to an STS in passive mode.
If you are not familiar with ASP.NET MVC 3, you can learn about it at http://www.asp.net/mvc/mvc3.
You can download ASP.NET MVC 3 using the Web Platform Installer from http://www.microsoft.com/web/gallery/install.aspx?appid=MVC3.
The WIF SDK for .NET Framework 4.0 provides Visual Studio 2010 website templates for creating the ASP.NET Relying Party and Security Token Service websites. However, ASP.NET MVC 3 has no out of the box support for claims. Perform the following steps to create an ASP.NET MVC 3 Relying Party application:
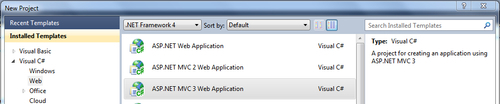
- Run Visual Studio in Administrator Mode, and from the File | New Project menu, select the ASP.NET MVC 3 template under the Web category:
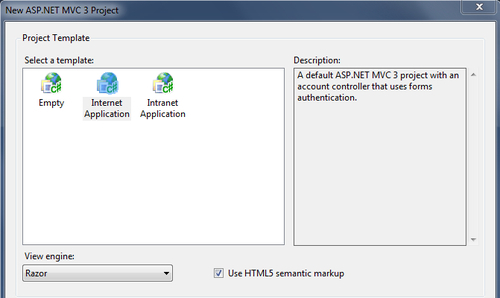
- From the ASP.NET MVC 3 template wizard, select Internet Application and select Razor as the View engine, as shown in the following screenshot:
- An ASP.NET MVC 3 Web Application project will be created with the Internet Application default template that has support for ASP.NET forms-based authentication using the .NET Framework 4.0 membership provider. You will notice that the authentication is handled using a
AccountControllercontroller class. The template generates methods for login, sign-out, and registering a new user in theAccountControllerclass.
- An ASP.NET MVC 3 Web Application project will be created with the Internet Application default template that has support for ASP.NET forms-based authentication using the .NET Framework 4.0 membership provider. You will notice that the authentication is handled using a
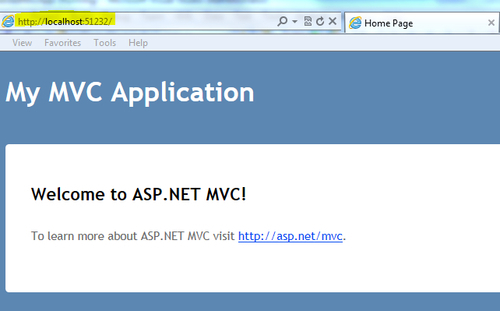
- Compile and run the application. Make a note of the URL from the browser address bar once the site is launched. The URL will be used in step 5 to identify the Audience URI with the STS and create the metadata:
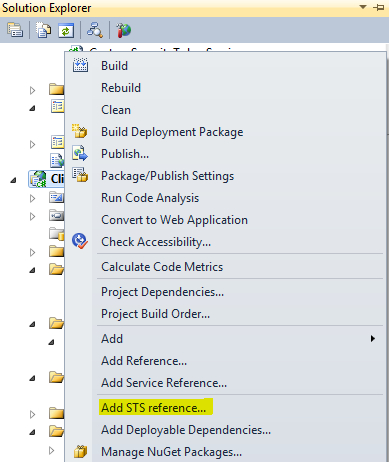
- Right-click on the project and click on Add STS reference… from the context menu, as shown in the following screenshot:
- In the Federation Utility wizard, enter the application URL in the Application URI drop-down list and click on Next:
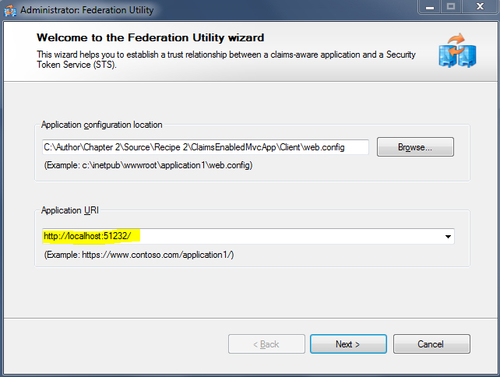
- The application URI should be the one that you noted in step 3.
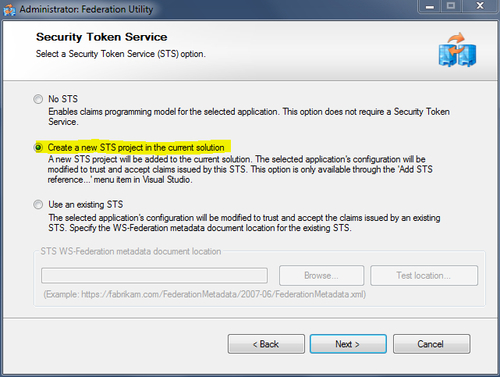
- Select the Create a new STS project in the current solution option from the Security Token Service step, and click on Next, as shown in the following screenshot:
In the final step of the wizard, review the configuration, and click on Finish. The Federation Utility wizard will create an ASP.NET STS website in the solution. It will also add a
FederationMetadata.xmlfile in the ASP.NET MVC 3 Web Application and a bunch of changes in theWeb.configfile to enable claims support.The STS website contains a
Login.aspxpage that accepts the credentials and sets the authentication cookie. In our solution, we will assume that the entered credentials are valid. In a more real scenario, the membership provider should be used to validate the credentials:protected void Page_Load( object sender, EventArgs e ) { // Note: Add code to validate user name, password. This code is for illustrative purpose only. // Do not use it in production environment. if ( !string.IsNullOrEmpty( txtUserName.Text ) ) { if ( Request.QueryString["ReturnUrl"] != null ) { FormsAuthentication.RedirectFromLoginPage( txtUserName.Text, false ); } else { FormsAuthentication.SetAuthCookie( txtUserName.Text, false ); Response.Redirect( "default.aspx" ); } } else if ( !IsPostBack ) { txtUserName.Text = "Adam Carter"; } } - Open the
Default.aspx.cspage in the STS website, and add the following code after thetryblock:catch (System.Threading.ThreadAbortException) { }Note
There is a known issue with the redirect action that the API generates, which throws
ThreadAbortException. We need to catch the exception in our code. - Compile and run the ASP.NET MVC 3 Web Application. You will be redirected to the
Login.aspxpage in the STS website. Notice the WS-Federation Passive Requestor Profile Sign-in action parameters in the URL:http://localhost:51243/Client_STS/Login.aspx?ReturnUrl=%2fClient_STS%2fdefault.aspx%3fwa%3dwsignin1.0%26wtrealm%3dhttp%253a%252f%252flocalhost%253a51232%252f%26wctx%3drm%253d0%2526id%253dpassive%2526ru%253d%25252f%26wct%3d2011-10-30T04%253a59%253a06Z&wa=wsignin1.0&wtrealm=http%3a%2f%2flocalhost%3a51232%2f&wctx=rm%3d0%26id%3dpassive%26ru%3d%252f&wct=2011-10-30T04%3a59%3a06Z
- Click on Submit on the login page. The STS processes the sign-in request and redirects to the ASP.NET MVC 3 application default view. Now, you will be signed in to the application using the credentials you entered on the login page of the STS website:

Most of the work is done here by the Federation Utility. The wizard establishes trust between the STS and the RP using the federation metadata. You will find the FederationMetadata.xml file added to the ASP.NET MVC 3 Web Application under the FederationMetadata folder. The utility creates a signing certificate and adds the Microsoft.IdentityModel configuration section in the Web.config file of the RP:
<microsoft.identityModel>
<service>
<audienceUris>
<add value="http://localhost:51232/" />
</audienceUris>
<federatedAuthentication>
<wsFederation passiveRedirectEnabled="true" issuer="http://localhost:51243/Client_STS/" realm="http://localhost:51232/" requireHttps="false" />
<cookieHandler requireSsl="false" />
</federatedAuthentication>
<applicationService>
<claimTypeRequired>
<!--Following are the claims offered by STS 'http://localhost:51243/Client_STS/'. Add or uncomment claims that you require by your application and then update the federation metadata of this application.-->
<claimType type="http://schemas.xmlsoap.org/ws/2005/05/ identity/claims/name" optional="true" />
<claimType type="http://schemas.microsoft.com/ws/2008/06/ identity/claims/role" optional="true" />
</claimTypeRequired>
</applicationService>
<issuerNameRegistry type="Microsoft.IdentityModel.Tokens. ConfigurationBasedIssuerNameRegistry, Microsoft.IdentityModel, Version=3.5.0.0, Culture=neutral, PublicKeyToken=31bf3856ad364e35">
<trustedIssuers>
<add thumbprint="C0705376307238DBDCD8A85B266C4B0FD1CA0E3D" name="http://localhost:51243/Client_STS/" />
</trustedIssuers>
</issuerNameRegistry>
</service>
</microsoft.identityModel>
The<claimTypeRequired> section specifies the claims requested by the RP. Additional claims can be added using the<claimType> element.
<location path="FederationMetadata">
<system.web>
<authorization>
<allow users="*" />
</authorization>
</system.web>
</location>
The STS website verifies the action parameters from the login page and processes the sign-in or sign-out requests:
if ( action == WSFederationConstants.Actions.SignIn )
{
// Process signin request.
SignInRequestMessage requestMessage = (SignInRequestMessage)WSFederationMessage.CreateFromUri( Request.Url );
if ( User != null && User.Identity != null && User.Identity.IsAuthenticated )
{
SecurityTokenService sts = new CustomSecurityTokenService( CustomSecurityTokenServiceConfiguration.Current );
SignInResponseMessage responseMessage = FederatedPassiveSecurityTokenServiceOperations.ProcessSignInRequest( requestMessage, User, sts );
FederatedPassiveSecurityTokenServiceOperations.ProcessSignInResponse( responseMessage, Response );
}
else
{
throw new UnauthorizedAccessException();
}
}
The default STS website template installed by the WIF SDK for .NET Framework 4.0 provides an implementation of the Security Token Service (Microsoft.IdentityModel.SecurityTokenService), which is used to issue a token. The GetOutputClaimsIdentity method is overridden, and the requisite claims are added. Additional claims required by the RP application can be added in this method (we will see it later in this chapter):
protected override IClaimsIdentity GetOutputClaimsIdentity( IClaimsPrincipal principal, RequestSecurityToken request, Scope scope )
{
if ( null == principal )
{
throw new ArgumentNullException( "principal" );
}
ClaimsIdentity outputIdentity = new ClaimsIdentity();
// Issue custom claims.
// TO DO: Change the claims below to issue custom claims required by your application.
// Update the application's configuration file too to reflect new claims requirement.
outputIdentity.Claims.Add( new Claim( System.IdentityModel.Claims.ClaimTypes.Name, principal.Identity.Name ) );
outputIdentity.Claims.Add( new Claim( ClaimTypes.Role, "Manager" ) );
return outputIdentity;
}
The default ASP.NET HTTP request validator identifies the federation parameter—wresult as potentially dangerous and aborts the processing of the request once the STS redirects to the application home page after issuing the token. To work on this problem, we need to implement AuthenticationRequestValidator (inheriting from System.Web.Util.RequestValidator) to validate the incoming federation message, as shown in the following code snippet:
public class AuthenticationRequestValidator : RequestValidator
{
protected override bool IsValidRequestString(HttpContext context, string value, RequestValidationSource requestValidationSource, string collectionKey, out int validationFailureIndex)
{
validationFailureIndex = 0;
if (requestValidationSource == RequestValidationSource.Form && collectionKey.Equals(WSFederationConstants.Parameters.Result, StringComparison.Ordinal))
{
SignInResponseMessage message = WSFederationMessage.CreateFromFormPost(context.Request) as SignInResponseMessage;
if (message != null)
{
return true;
}
}
return base.IsValidRequestString(context, value, requestValidationSource, collectionKey, out validationFailureIndex);
}
}
The AuthenticationRequestValidator class must be configured in the Web.config file in order for the ASP.NET pipeline to recognize it:
<httpRuntime requestValidationType="AuthenticationRequestValidator" />
Note
You can also use the WifRequestValidator NuGet Package available at http://www.nuget.org/List/Packages/WifRequestValidator.
If there are multiple relying parties participating in the federation scenario, then the FederatedSignOut (Microsoft.IdentityModel.Web.WSFederationAuthenticationModule) method can be used to sign out from each RP.
Microsoft.IdentityModel.Web.WSFederationAuthenticationModule.FederatedSignOut(null, new Uri("http://rp1"));
At the time of writing this book, a developer preview version of ASP.NET MVC 4 was released, which plans to include built-in recipes for supporting the WIF runtime. More information on this can be found at http://aspnet.codeplex.com/wikipage?title=ASP.NET%20MVC%204%20RoadMap.
The complete source code for this recipe can be found in the Chapter 2Recipe 2 folder. In addition, the Web Sites Identity Training Course on MSDN at http://msdn.microsoft.com/en-us/identitytrainingcourse_websites_unit provides a couple of Hands-On Labs to learn more about identity management in ASP.NET.