
Imaging a device is one of the most important steps in mobile device forensics. When possible, it's imperative to obtain a physical image of an Android device before performing any techniques to extract the data directly from the device. In forensics, this process of obtaining a physical acquisition is commonly called imaging the device. The terms physical image, forensic image, and raw image are often used to refer to the image captured through this process. Let's first revisit how imaging is done on a desktop computer as it helps us to correlate and realize the problems associated with imaging Android devices. Let's assume that a desktop computer, which is not powered on, is seized from a suspect and sent for forensic examination. In this case, a typical forensic examiner would remove the hard disk, connect it to a write blocker, and obtain a bit-by-bit forensic image using any of the available tools. The original hard disk is then safely protected during the forensic imaging of the data.
With an Android device, all of the areas that contain data cannot be easily removed. Also, if the device is active at the time of receiving it for examination, it is not possible to analyze the device without making any changes to it, because any interaction would change the state of the device.
An Android device may have two file storage areas: internal and external storage. Internal storage refers to the built-in non-volatile memory. External storage refers to the removable storage medium, such as a micro SD card. However, it's important to note that some devices do not have a removable storage medium such as an SD card, but they divide the available permanent storage space into internal and external storage. Hence, it's not always true that external storage is removable. When a removable SD card is present, a forensic image of the memory card has to be obtained. As discussed in Chapter 7, Understanding Android, these removable cards are generally formatted with the FAT32 filesystem. Some mobile device acquisition methods will acquire the SD card through the Android device. This process, while useful, will be slow due to the speed limitations of USB phone cables.
Android, by default, does not provide access to internal directories and system-related files. This restricted access is to ensure the security of the device. For instance, the /data/data folder is not accessible on a non-rooted device. This folder is especially of interest to us because it stores most of the user-created data and many applications write valuable data into this folder. Hence, to obtain an image of the device, we need to root the Android device. Rooting a device gives us superuser privileges and access to all of the data. It is important to realize that this book has been stressing that all of the steps taken should be forensically sound and should not make changes to the device whenever possible. Rooting an Android device will make changes to it and should be tested on any device that you have not previously investigated. Rooting is common for Android devices, but getting root access could alter the device in a manner that renders the data changed or—worse yet—wiped. Some Android devices, such as the Nexus 4 and 5, may force the data partition to be wiped before allowing root access. This negates the need to root the device to gain access because all of the user data is lost during the process. Just remember that, while rooting provides access to more data when successfully done, it can also wipe data or destroy the phone. Hence, you must ensure that you have consent or legal rights to manipulate an Android device before proceeding with the root. As rooting techniques have been discussed in Chapter 8, Android Forensic Setup and Pre-Data Extraction Techniques, we will proceed with the example assuming that the device is rooted.
The following is a step-by-step process to obtain a forensic image of a rooted Android device:
- Connect the Android device to the workstation and verify that the device is identified by issuing the adb devices command, as shown here:

- Once the adb access is ready, the partitions can be acquired from the Android device using the following steps:
- Using the dd command: The dd command can be used to create a raw image of the device. This command helps us to create a bit-by-bit image of the Android device by copying low-level data.
- Inserting a new SD card: Insert a new SD card into the device to copy the image file to this card. Make sure that this SD card is wiped and does not contain any other data. You might also need to testify that no additional data is present on the drive.
- Executing the command: The filesystem of an Android device is stored in different locations within the /dev partition. A simple mount command on a Samsung Galaxy S3 phone returns the following output:
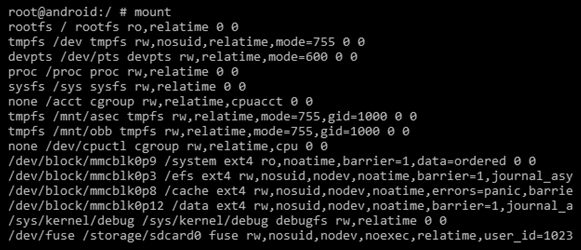
- From the preceding output, we can identify the blocks where the /system, /data, and /cache partitions are mounted. Although it's important to image all of the files, most of the data is present in the /data and /system partitions. When time allows, all partitions should be acquired for completeness. Once this is done, execute the following command to image the device:
dd if=/dev/block/mmcblk0p12 of=/sdcard/tmp.image
In the preceding example, the data partition of a Samsung Galaxy S3 was used (where if is the input file and of is the output file).
The preceding command will make a bit-by-bit image of the mmcblk0p12 file (data partition) and copy the image file to an SD card. Once this is done, the dd image file can be analyzed using the available forensic software.
If the image cannot be written to the SD card directly, you can use the netcat command to write the output directly to the machine. The netcat tool is a Linux-based tool used for transferring data over a network connection. Android devices do not usually come with netcat installed. Let's see how to use this command in the following steps:
- To check whether netcat is installed, simply open the ADB shell and type nc. If it returns saying nc is not found, netcat will have to be installed manually on the device. You can download netcat compiled for Android at https://sourceforge.net/projects/androidforensics-netcat/files/.
- Push netcat on to the device using the following command on your computer:
adb push nc /dev/Case_Folder/nc
The command should have created Case_Folder in /dev and nc should be in it.
- Now, we need to give it permission to execute from the ADB shell. This can be done as follows:
chomd +x /dev/Case_Folder/nc
- Open two Terminal windows with the ADB shell open in one of them. The other will be used to listen to the data being sent from the device. Now, we need to enable port forwarding over ADB from your computer:
adb forward tcp:9999 tcp:9999
9999 is the port we chose to use for netcat; it can be any arbitrary port number between 1023 and 65535 on a Linux or Mac system (1023 and below are reserved for system processes and require root permission to use them). In the other Terminal window, run the following:
nc 127.0.0.1 9999 > data_partition.img
The data_partition.img file should now be created in the current directory of your computer. When the data is finished transferring, netcat will terminate in both terminals and return to Command Prompt. The process can take a significant amount of time depending on the size of the image.