
There are many tools available that can image a memory card. The following example uses WinHex to create a raw disk image of the SD card. The following is the step-by-step process with which to image a memory card using WinHex:
- Connecting the memory card: Remove the SD card from the memory slot and use a card reader to connect the memory card to the forensic workstation.
- Write-protect the card: Open the disk using WinHex. Navigate to Options | Edit Mode and select Read-only Mode (=write-protected mode), as shown in the following screenshot. This is to make sure that the device is write-protected and no data can be written on it:

WinHex view of Edit Mode (left) and WinHex Read-only Mode enabled (right)
- Calculating the hash value: Calculate the hash value of the memory card to make sure that no changes are made at any point during the investigation. Navigate to Tools | Compute hash and choose any hashing algorithm.
- Creating the image of the disk: Navigate to File | Create Disk Image, as shown in the following screenshot. Select the raw image option (.dd) to create an image. This completes the imaging of the memory card:
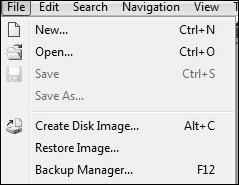
The WinHex disk image option
Once a forensic image is obtained using any of the methods described previously, it needs to be analyzed to extract the relevant information. There are several commercial tools, such as Cellebrite and XRY, that can analyze image files. Analyzing Android images is covered in detail in Chapter 10, Android Data Analysis and Recovery.