File carving is an extremely useful method in forensics because it allows data that has been deleted or hidden to be recovered for analysis. In simple terms, file carving is the process of reassembling computer files from fragments in the absence of filesystem metadata. In file carving, specified file types are searched for and extracted across the binary data to create a forensic image of a partition or an entire disk. File carving recovers files from the unallocated space in a drive based merely on file structure and content without any matching filesystem metadata. Unallocated space refers to the part of the drive that no longer holds any file information indicated by the filesystem structures, such as the file table.
Files can be recovered or reconstructed by scanning the raw bytes of the disk and reassembling them. This can be done by examining the header (the first few bytes) and footer (the last few bytes) of a file.
File-carving methods are categorized based on the underlying technique in use. The header-footer carving method relies on recovering the files based on their header and footer information. For instance, for JPEG files, these start with 0xffd8 and end with 0xffd9.
The locations of the header and footer are identified and everything between those two endpoints is carved. Similarly, the carving method based on the file structure uses the internal layout of a file to reconstruct the file. However, the traditional file-carving techniques, such as the ones that we've already explained, may not work if the data is fragmented. To overcome this, new techniques, such as smart carving, use the fragmentation characteristics of several popular filesystems to recover the data.
Once the phone is imaged, it can be analyzed using tools such as Scalpel. Scalpel is a powerful open source utility to carve files. This tool analyzes the block database storage, identifies the deleted files, and recovers them. Scalpel is filesystem-independent and is known to work on various filesystems, including FAT, NTFS, EXT2, EXT3, HFS, and more. More details about Scalpel can be found at https://github.com/sleuthkit/scalpel. The following steps explain how to use Scalpel on an Ubuntu workstation:
- Install Scalpel on the Ubuntu workstation using the sudo apt-get install scalpel command.
- The scalpel.conf file present under the /etc/scalpel directory contains information about the supported file types, as shown in the following screenshot:

- Scalpel needs to be run along with the preceding configuration file on the dd image being examined. You can run the tool using the following command by inputting the configuration file and the dd file:
$ scalpel -c /home/unigeek/Desktop/scalpel-android.conf /home/unigeek/Desktop/userdata.dd -o /home/unigeek/Desktop/rohit
Once this command is run, the tool starts to carve the files and build them accordingly as shown in the following screenshot:

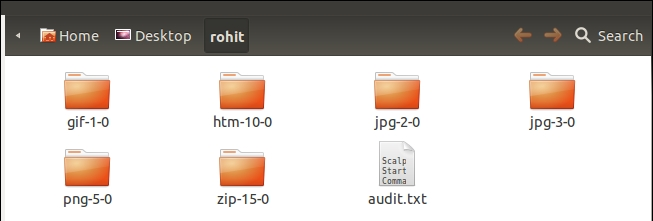
- The output folder that was specified in the preceding command now contains lists of folders that are based on the file types, as shown in the following screenshot. Each of these folders contains data that is based on the folder name. For instance, jpg 2-0 contains files related to the .jpg extension that have been recovered:

- As shown in the preceding screenshot, each folder contains recovered data from the Android device, such as images, PDF files, ZIP files, and more. While some pictures are recovered completely, some are not recovered fully, as shown in the following screenshot:

Applications such as DiskDigger can be installed on Android devices to recover different types of files from both the internal memory and SD cards. DiskDigger includes support for JPG files, MP3 and WAV audio, MP4 and 3GP video, raw camera formats, Microsoft Office files (DOC, XLS, and PPT), and more. However, as mentioned earlier, the application requires root privileges on the Android device to recover the content from the internal memory. These changes should be clearly documented by you. The DiskDigger Android app operates in two different modes, basic scan mode and full scan mode.
The full scan mode works only on rooted devices, whereas the basic scan mode works on any device. As shown in the following screenshot, on a rooted phone, the app automatically locates and displays the available partitions:

After you select the memory partition, the tool now prompts you to select the types of files that you would like to recover. Proceed by selecting the file types of interest:

Once the scanning begins, the DiskDigger app will automatically show you the files that are available for recovery. The recovered files can be either saved to the app or to the device directly. Hence, file-carving techniques play a very important role in recovering important deleted files from the device's internal memory.
