
Preparing to Print Your Presentation
To avoid wasting paper, you'll want to ensure that your PowerPoint presentation is truly ready to print before sending it to the printer. This includes setting page and print options, customizing headers and footers, and previewing your presentation in the color scheme in which it will print. If you're going to provide hard copy handouts of your presentation to your audience, you'll definitely need to print your presentation. But even if you plan to deliver your presentation onscreen only, it's still a good idea to view your presentation on paper. When proofing a hard copy version of your presentation, you'll often notice problems that you didn't catch onscreen.
Tip from
If you're going to provide your audience with handouts, it's usually a good idea to hand them out after you're finished presenting. Why? You want to be sure your audience is focusing on what you're saying and not on reading handouts during your actual presentation.
→ For more details on proofreading and spell-checking your presentation, see “Checking Spelling and Style” in Chapter 3, “Working with Text.”
Setting Page Setup Options
Before you print, you'll want to set up page options such as a default output and orientation. To do this, follow these steps:
Choose File, Page Setup to open the Page Setup dialog box, shown in Figure 10.2.
Select your output from the Slides Sized For drop-down list. Options include On-screen Show, Letter Paper, Ledger Paper, A3 Paper, A4 Paper (international standard), B4 (ISO) Paper, B5 (ISO) Paper, 35mm Slides, Overhead, Banner, and Custom.
Figure 10.2 . Set up page orientation and other defaults in the Page Setup dialog box.

Tip from
If you want to create 35mm slides from your PowerPoint presentation, you can send it to a service bureau (often electronically) to have this done. Genigraphics (http://www.genigraphics.com) is one example of a bureau that specializes in PowerPoint presentations.
The Width and Height settings appear in inches automatically, based on your selection in step 2. You can customize these settings, if necessary.
In the Number Slides From field, select the number to use on the first slide.
Choose either a Portrait or Landscape orientation for your slides. Landscape is the default.
Choose either a Portrait or Landscape orientation for your notes, handouts, and outline. Portrait is the default for these, but you can switch to landscape if your presentation doesn't fit on the page with portrait orientation.
Click OK to close this dialog box.
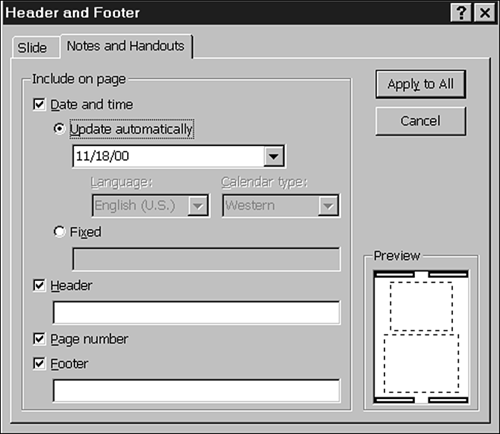
Customizing Headers and Footers
You can also add headers and footers to your outline, notes, and handouts when you print them. To do this, choose View, Header and Footer and go to the Notes and Handouts tab on the Header and Footer dialog box, seen in Figure 10.3.
You can add any or all of the following when you print notes, handouts, or outlines:
Date and Time Select this check box and then either choose to update the date automatically or enter a fixed date. If you choose to update automatically, you can pick a format from the drop-down list. Options include displaying the date only, the time only, or the date and time in up to 13 different ways. You can also choose your base language and calendar type (depending on the language selection). If only English is enabled, the Calendar Type and Language buttons aren't active. The date and time appear on the upper-right corner of the page.
→ For details on multilingual presentations, see Appendix B, “Using PowerPoint's Foreign Language Capabilities.”
Figure 10.3 . Indicate the headers and footers you want to print.
Note
The date options you can choose from the Update Automatically drop-down list are based on your choice of language/country. For example, choosing English (UK) results in date options that display a dd/mm/yy format rather than the mm/dd/yy format that is used in the United States.
Header Prints the header text you enter in the text box on the upper-left corner of the page.
Page Number Prints the page number on each page on the lower-right corner of the page.
Footer Prints the footer text you enter in the text box on the lower-left corner of the page.
Click Apply to All to close the dialog box.
Previewing a PowerPoint Presentation
Before you print your presentation, you can preview it using PowerPoint's Print Preview feature.
![]() To preview, click the Print Preview button on the Standard toolbar, or choose File, Print Preview.
To preview, click the Print Preview button on the Standard toolbar, or choose File, Print Preview.
You have several formatting and output options from this view:
→ For more information on the Print dialog box, see “Printing PowerPoint Presentations” later in this chapter.
Print What Enables you to select what you want to print from a drop-down list. Options include Slides, Handouts (from one to nine per page), Notes Pages, and Outline View.
Zoom Reduces or enlarges the size of the content on your screen. Sizes range from 25% to 400%. You can also choose to fit the slide to the screen.
Tip from
Clicking the slide is another way to zoom in and out. Clicking serves as a toggle between a 100% view and fitting the slide to the page.
→ For more information on the Header and Footer dialog box, see “Customizing Headers and Footers” earlier in this chapter.
Color/Grayscale Displays a submenu from which you can preview your presentation in Color, Grayscale, or Pure Black and White.
→ For more information on color previewing, see “Previewing in Grayscale and Black and White” later in this chapter.
Scale to Fit Paper Changes the size of slides to fit the paper, making them either larger or smaller as appropriate.
Print Hidden Slides This option is available only if your presentation includes hidden slides.
Include Animations Displays animated graphics in your presentation as icons on the printed page.
Include Comment Pages Prints comment pages with your presentation.
Printing Order Displays a submenu from which you can choose to print slides horizontally or vertically. This isn't the same as printing in portrait or landscape orientation, but rather refers to how multiple slides appear on a single page. Look at the preview to the right of the option buttons to see how the printing order changes depending on whether you select Horizontal or Vertical.
Previewing in Grayscale and Black and White
If you don't have a color printer, you can print a color presentation in two different ways: grayscale or black and white. Table 10.1 illustrates how each PowerPoint object appears when printed in grayscale or black and white.
| Object | Grayscale | Black and White |
|---|---|---|
| Bitmaps | Grayscale | Grayscale |
| Charts | Grayscale | Grayscale |
| Embossing | None | None |
| Fill | Grayscale | White |
| Frames | Black | Black |
| Lines | Black | Black |
| Patterns | Grayscale | White |
| Shadows (object) | Grayscale | Black |
| Shadows (text) | None | None |
| Slide backgrounds | White | White |
| Text | Black | Black |
![]() To preview what your color presentation will look like in grayscale, click the Color/Grayscale button on the Standard toolbar and choose Grayscale from the submenu.
To preview what your color presentation will look like in grayscale, click the Color/Grayscale button on the Standard toolbar and choose Grayscale from the submenu.
To preview the same presentation in black and white, choose Pure Black and White from the submenu. To return to viewing your presentation in color, choose Color from the Color/Grayscale submenu.
The Grayscale View floating toolbar appears when you preview in grayscale or pure black and white (it doesn't appear when you're viewing in color). You can manually change how an object prints in either grayscale or black and white with this toolbar. To do so, click Setting from the Grayscale View toolbar and choose the color option you prefer.
To close the Grayscale View toolbar, either return to viewing your presentation in color, or click the Close Grayscale View or Close Black and White View button on the Grayscale View toolbar.