
Printing PowerPoint Presentations
To print an open PowerPoint presentation, follow these steps:
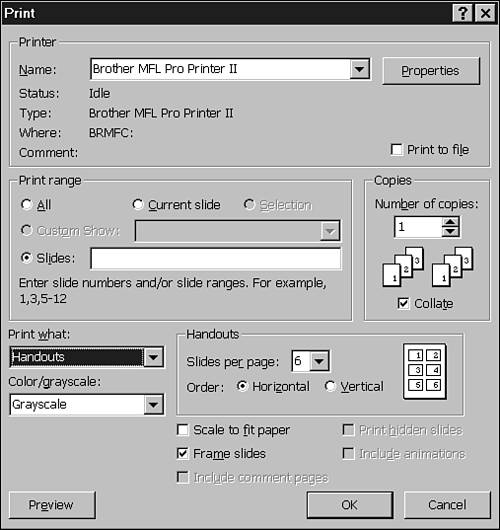
Choose File, Print to open the Print dialog box, shown in Figure 10.4. You can also click the Print button on the Standard toolbar if you want to print with the defaults, rather than setting options in the Print dialog box. Be sure that your default settings match your desired output, such as grayscale or black and white. You can set these defaults in the Print dialog box.
Select the printer you want to use from the Name drop-down list.
Figure 10.4. You can specify numerous print param eters in the Print dialog box.
Note
Click the Properties button to change the properties and print parameters of the selected printer.
Note
If you want to send your presentation to a fax machine rather than a printer, choose the fax from the Name drop-down list. You must have installed appropriate fax software to do this.
Note
You can also print your PowerPoint presentation to a file by selecting the Print to File check box. The Print to File dialog box then opens when you print your presentation, prompting you for a filename to save as a printer file (PRN). Printing to a file is useful if you want to print at a resolution higher than what your current printer supports. You can then use another printer that supports the same print language, such as PostScript, to print your file without having to open PowerPoint itself.
In the Print Range group box, select the slides you want to print. Choices include
Selection Prints the selected slides. For example, if you select specific slides on the Outline tab, only these slides are printed.
Custom Show Enables you to select a custom show to print. This option isn't available if you haven't created at least one custom show.
→ For more information on custom shows, see “Working with Custom Shows” in Chapter 9, “Presenting a Slideshow.”
Slides Enables you to pick and choose multiple slides. Enter the numbers of the slides you want to print. For example, you could enter 1-4, 10 to print slides 1, 2, 3, 4, and 10. Page numbers must be selected in ascending order.
Enter the Number of Copies you want to print. If you choose to print more than one copy, specify whether or not to collate. Collating keeps multiple copies in sequence. If you print five copies of a presentation without collating, for example, you will print five copies of page one first, then five copies of page two, and so on.
Specify what you want to print in the Print What drop-down list. Options include Slides, Handouts, Notes Pages, and Outline View.
Tip from
If you choose to print three slides per handout, PowerPoint provides lined spaces to the right of each slide on which you can write notes. If you choose another number of pages, you won't have this note space.
From the Color/Grayscale drop-down list, choose the color options you want. Options include
Color Prints the presentation in color, optimized for a color printer. If you select this option and print to a black-and-white printer, the presentation will print in black and white.
Grayscale Prints the presentation as grayscale (using shades of black, white, and gray) which optimizes a color presentation for a black-and-white printer.
Pure Black and White Prints the presentation in black and white only, without any gray.
Next, choose any of the following print options that apply:
Scale to Fit Paper Changes the size of slides to fit the paper, making them either larger or smaller as appropriate.
Frame Slides Includes a border around the slides. Not available when you print Outline view.
Include Comment Pages Prints comment pages with your presentation.
Print Hidden Slides This option is available only if your presentation includes hidden slides.
Include Animations Displays animated graphics in your presentation as icons on the printed page.
Click the Preview button to see what your printed presentation will look like, based on your selected options. When you're satisfied with your print choices, click OK to print to your printer.
Having trouble printing? See “Resolving Print Problems” in the “Troubleshooting” section near the end of the chapter.
Tip from
You can customize printing defaults for the existing presentation in the Options dialog box. To access it, choose Tools, Options and go to the Print tab.
→ For more information about printing, see “Setting Print Options” in Chapter 21, “Customizing PowerPoint.”
Printing an Outline
In the Print dialog box, you can choose to print a presentation's outline by selecting the Outline View option in the Print What drop-down list.
→ For more detailed information about printing, see “Printing PowerPoint Presentations” in this chapter.
Before you do this, however, you might want to set up your outline for printing.
![]() To display the entire contents of each slide, click the Expand All button on either the Standard or Outlining toolbar. If the Outlining toolbar doesn't appear, choose View, Toolbars, Outlining.
To display the entire contents of each slide, click the Expand All button on either the Standard or Outlining toolbar. If the Outlining toolbar doesn't appear, choose View, Toolbars, Outlining.
![]() To print only the title of each slide, click the Collapse All button on the Outlining toolbar.
To print only the title of each slide, click the Collapse All button on the Outlining toolbar.
![]() To print an outline with the same formatting as the presentation itself (font styles and sizing, line spacing, and the like), click the Show Formatting button on the Standard or Outlining toolbar.
To print an outline with the same formatting as the presentation itself (font styles and sizing, line spacing, and the like), click the Show Formatting button on the Standard or Outlining toolbar.
→ To better understand outlines, see “Collapsing and Expanding Outline Points” in Chapter 5, “Organizing Presentations in PowerPoint.”
Printing a PowerPoint Presentation with Microsoft Word
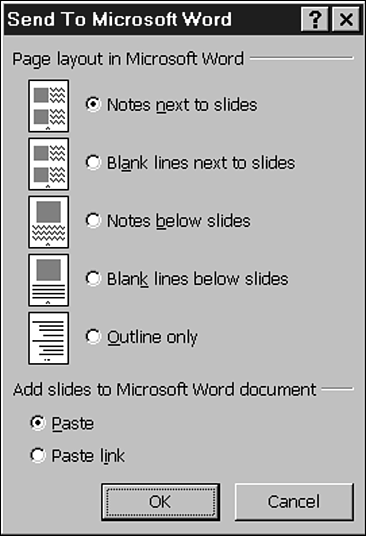
If you want to make more customizations than PowerPoint provides, you can also send your presentation to Word, customize it, and print from that application. Choose File, Send To, Microsoft Word to open the Send To Microsoft Word dialog box, shown in Figure 10.5.
This dialog box includes several choices on how to display the PowerPoint presentation in Word.
You can either paste or paste link the slides into Word. Pasting is the equivalent of embedding. If you embed a PowerPoint presentation into Word and later change that presentation in PowerPoint, those changes won't appear in the Word document. If you paste link the PowerPoint presentation into Word and later make changes in PowerPoint, these changes appear the next time you open the document in Word.
Figure 10.5. The Send To Microsoft Word dialog box includes several options for exporting to Word.
→ To learn more about linking objects, see “Linking Office Objects” in Chapter 19, “Integrating with Office XP.”
→ For more information on embedding, see “Working with Embedded Office Objects” in Chapter 19.
Click OK to send your presentation to Word and open it in that application. After your presentation is opened in Word, you can use all of Word's features to customize your notes and handouts.