

Programming Databases, Part 1
Database programming is another truly enormous topic, so there isn’t room to cover it all here.
However, Visual Studio provides tools that make some simple kinds of database programs so
easy to write that your education won’t be complete until you’ve written a few.
In this lesson, you learn how to make a simple database application. You learn how to connect
to a database, load data, let the user navigate through records, and save any changes.
CONNECTING TO A DATABASE
The first step in building a database program is giving it a connection to the data. You can do
this interactively at design time quite easily, although quite a few steps are involved.
1. First open the Data menu and select Add New Data Source to display the dialog shown
in Figure 35-1. As you can see in the figure, there are several different places you might
want the program to get data.
FIGURE 351
35
596906c35.indd 395 4/7/10 12:34:50 PM

396
LESSON 35 Programming Databases, Part 1
The data source used in this example is a database, so select Database and click Next.
2. The dialog’s next screen lets you decide whether you want to use a dataset or an entity data
model for your data. For this example, pick Dataset and click Next to make the dialog dis-
play the screen shown in Figure 35-2.
A dataset is an in-memory representation of a data source. A dataset can
include multiple tables that are related with complex database relationships,
although this example’s database contains only a single table.
FIGURE 352
3. If you have previously built data connections, you can
pick one from the dropdown list. Otherwise, click the
New Connection button to display the dialog shown in
Figure 35-3.
In this figure, I selected a Microsoft Access database.
If you want to use some other kind of database, such
as a SQL Server or Oracle database, click the Change
button and select the right kind of database.
Enter the name of the database in the textbox or click
the Browse button and select it. When you’re finished,
if you like, you can click Test Connection to see if
Visual Studio can connect to the database.
Click OK to create the new connection and return to
the dialog shown in Figure 35-2.
FIGURE 353
596906c35.indd 396 4/7/10 12:34:50 PM

Connecting to a Database
397
PICKING A DATABASE
Picking the right database product is a tough decision. Access databases have the
advantage that a C# program can read and manipulate one even if Access isn’t
installed. That means you can build a database on one computer that has Access
installed and then copy it to another computer without Access and use it there.
SQL Server, Oracle, MySQL, and similar database products tend to provide more
database features than Access. For example, they support bigger databases, triggers,
views, and other features that Access does not provide.
A common compromise is to start development with SQL Server Express, a free
version of SQL Server that has some size restrictions. Later if you decide you need
the extra space provided by the full version of SQL Server, you can upgrade rela-
tively easily. You can learn more about SQL Server Express and download it at
www.microsoft.com/express/Database.
Unfortunately a C# program cannot use these more powerful databases unless you
have them installed, an assumption I don’t want to make, so this Lesson works
with Access databases. You can get the necessary databases from the lesson’s code
download and use them even if you don’t have Access installed.
If you’re planning to do more database programming, I encourage you to install
one of the more powerful database products, particularly since SQL Server Express
and MySQL are free.
4. When you click Next, Visual Studio asks whether you want to include the database in the
project. Click Yes to copy the database file into the project so it can easily be distributed with
the program.
5. The dialog’s next page asks whether you want to include the database connection string in
the program’s configuration file so the program can use that string to connect to the database
at run time. This is often convenient because it lets you change the connection string without
rebuilding the application. Note, however, that you shouldn’t store database passwords in
the configuration file, so if the database requires a password, you may want to leave the con-
nection string out of the configuration file.
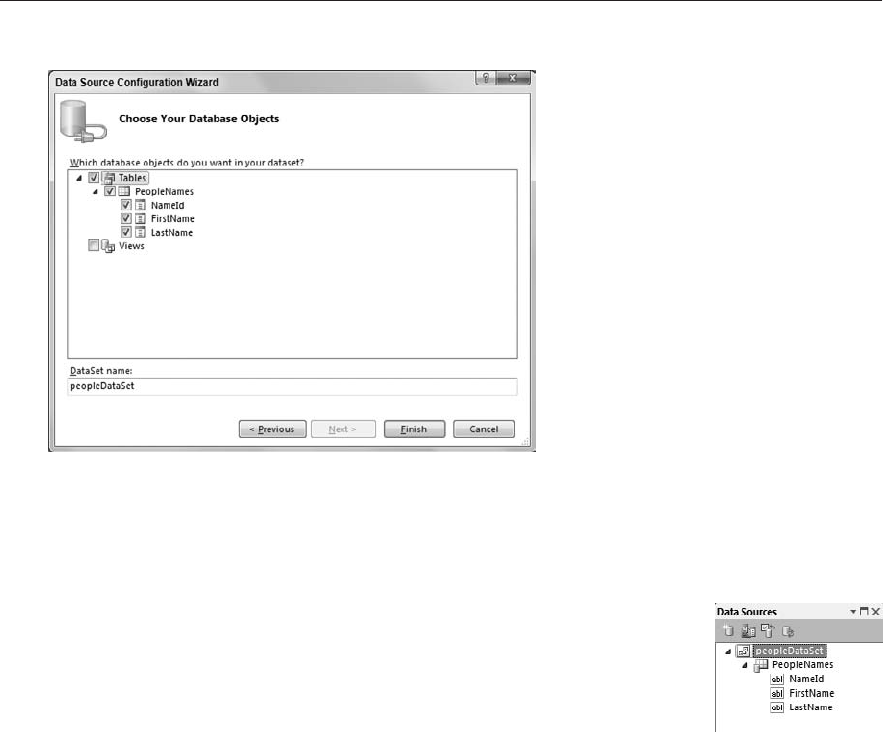
When you click Next again, you see the page shown in Figure 35-4.
6. Expand the database object treeview and select the tables and fields that you want the pro-
gram to use. In this example, the database contains only one table. In Figure 35-4 I selected
the Tables entry and that selected the table and all of its fields.
7. When you click Finish, Visual Studio defines a dataset that can hold the data in the database.
It also adds some code to make working with the dataset easier.
Now that you’ve added a data source to the project, Visual Studio provides easy ways to make two
kinds of database programs: one that displays data in a grid and one that displays data one record
at a time.
596906c35.indd 397 4/7/10 12:34:51 PM
398
LESSON 35 Programming Databases, Part 1
FIGURE 354
DISPLAYING RECORDS IN A GRID
To display records in a grid, first open the Data Sources window. If you can’t
find it, use the Data menu’s Show Data Sources command. Figure 35-5 shows
the Data Sources window after I connected to a Microsoft Access database
named People.mdb.
To display data in a grid, click a table in the Data Sources window and drag
it onto the form. When you drop the table, Visual Studio adds several objects
to the form to help manage the table’s data. It adds:
A DataGridView
— This control displays the data.
A dataset
— This dataset holds the data at run time. The dataset is basically an in-memory
copy of the database that the program can manipulate.
A BindingSource
— This object encapsulates the data source. It provides a link between the
form’s controls and the data source.
A data adapter
— This object provides methods to move data between the database and the
dataset.
A table adapter manager
— This object helps coordinate movement of data by the data
adapter.
Binding navigator
— This object provides navigation services for the controls on the form.
For example, buttons that move to the next or previous record use these navigation services.
FIGURE 355
596906c35.indd 398 4/7/10 12:34:51 PM
Displaying Records in a Grid
399
This seems like a confusing assortment of objects. Fortunately you don’t need to do much with them
for the simple database applications described in this lesson.
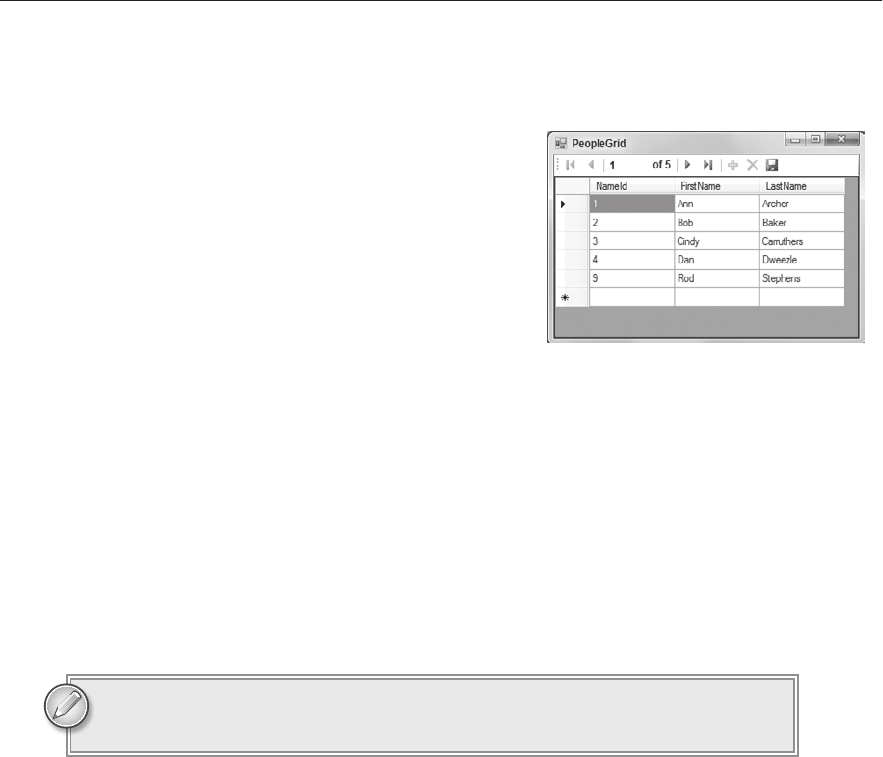
Figure 35-6 shows the program created by Visual Studio
at run time. The only changes I made were to resize the
form and dock the
DataGridView control to make it fill
the form.
The
DataGridView and the BindingNavigator (which
provides the buttons at the top) automatically let the user
perform a lot of simple database tasks, such as:
Clicking a cell to change its value
Selecting a row and pressing Delete to delete the
corresponding record
Clicking and dragging to the left of the data to select multiple rows, which the user can then
delete all at once
Using the navigation buttons to move through the records
Entering values in the last row to create a new record
Resizing rows and columns
Clicking the floppy disk button to save changes to the data
Clicking a column header to sort the records using that column
In this kind of program, changes are made locally to the dataset and are not
copied to the database until the user clicks the Save button.
There are only a few things that this automatically generated program doesn’t do that you should
add for this simple example. The most important of these is to check for unsaved changes before
allowing the form to close.
The following
FormClosing event handler prevents the user from accidentally closing the form with
unsaved changes:
// Check for unsaved changes.
private void Form1_FormClosing(object sender, FormClosingEventArgs e)
{
// See if there are unsaved changes.
if (this.peopleDataSet.HasChanges())
{
// Make the user confirm.
DialogResult result = MessageBox.Show(
“Do you want to save changes before closing?”,
“Save Changes?”,
MessageBoxButtons.YesNoCancel,
FIGURE 346
596906c35.indd 399 4/7/10 12:34:51 PM
..................Content has been hidden....................
You can't read the all page of ebook, please click here login for view all page.