

442
LESSON 39 Drawing with gDi+
PEN
The Pen class represents a linear feature such as a line or curve. This object determines such properties
as a line’s color, thickness, dash style, and cap style (the shape of the ends of the line and its dashes).
There are two main ways to get a
Pen. First, you can use the Pens class’s static color properties.
(The
Pen and Pens classes are two different classes.) For example, the value Pens.Black returns a
simple black
Pen. All of these pens are one pixel wide, and you cannot change their properties (such
as dash style). The shapes drawn in Figure 39-1 use this kind of stock pen.
The second way to get a
Pen is to make an instance of the Pen class. The simplest constructors
can take a color or a color and thickness as parameters. For example, the following code makes a
10-pixel wide blue
Pen and uses it to draw an ellipse:
// Use a thick blue pen.
using (Pen thickPen = new Pen(Color.Blue, 10))
{
e.Graphics.DrawEllipse(thickPen, 10, 70, 100, 50);
}
When you create your own Pen object, you can change its properties. For example, the following
code creates a
Pen and sets its DashStyle property before drawing with it:
// Use a dashed pen.
using (Pen dashedPen = new Pen(Color.Red, 5))
{
dashedPen.DashStyle = System.Drawing.Drawing2D.DashStyle.Dash;
e.Graphics.DrawEllipse(dashedPen, 10, 130, 100, 50);
}
Table 39-2 summarizes the Pen class’s most useful properties. The descriptions refer to drawing
lines but the same properties apply to any linear feature.
TABLE 392
PROPERTY PURPOSE
Brush
A Brush that determines the Pen’s appearance
Color
The Pen’s color
CompoundArray
An array of values that splits lines drawn with the pen lengthwise
CustomEndCap
1
Determines the shape of a line’s end point
CustomStartCap
1
Determines the shape of a line’s start point
DashCap
Determines the shape of the ends of a line’s dashes
DashOffset
Determines the distance from the start of a line to its first dash
DashPattern
An array of floats that determines the pattern of pixels drawn and
skipped by a line’s dash pattern
596906c39.indd 442 4/7/10 12:35:13 PM

Brush
443
PROPERTY PURPOSE
DashStyle
Selects a standard dash style
EndCap
Selects a standard end point shape
LineJoin
Determines whether the corners where lines meet (for example, in a poly-
gon) are mitered, beveled, or rounded
StartCap
Selects a standard start point shape
Width
The line’s thickness in pixels
1
These are cool features but are fairly advanced and complicated so they’re not covered further here.
The UsePens example program shown in Figure 39-3 and
available as part of this lesson’s code download demon-
strates some of the
Pen class’s features. The form’s Paint
event handler draws an ellipse with a stock pen, an
ellipse with a thick pen, a dashed ellipse, an ellipse with
a custom dash pattern, a polygon with a pen that uses a
CompoundArray property, and two lines with start and
end caps.
You can learn more about the
Pen class’s properties by looking at the UsePens program’s code or at
msdn.microsoft.com/library/system.drawing.pen_members.aspx.
BRUSH
The Brush class determines the way in which an area is filled. This object determines such properties
as the fill color, fill pattern, or color gradient.
As is the case with
Pens, you can use stock Brushes or you can create your own. Unlike the case
with the
Pen class, however, there are several different Brush classes:
HatchBrush
— Fills an area with a hatch pattern
LinearGradientBrush
— Fills an area with a color gradient that shades from one color to
another, possibly multiple times
PathGradientBrush
— Fills an area defined
by a path with a color gradient
SolidBrush
— Fills an area with a solid color
TextureBrush
— Fills an area with an image
Example program UseBrushes shown in Figure 39-4
and available as part of this lesson’s code download
demonstrates several kinds of brushes.
FIGURE 393
FIGURE 394
596906c39.indd 443 4/7/10 12:35:13 PM
444
LESSON 39 Drawing with gDi+
The four rectangles on the left demonstrate a TextureBrush, PathGradientBrush,
LinearGradientBrush, and SolidBrush. The three overlapping circles demonstrate transpar-
ent
SolidBrushes, and the square on the right demonstrates a TextureBrush filled with a small
repeating image.
For example, the following code shows how the program draws the hatched rectangle in the upper
left corner.
// Use a HatchBrush.
using (HatchBrush br = new HatchBrush(
HatchStyle.DiagonalBrick,
Color.Green,
Color.White))
{
e.Graphics.FillRectangle(br, 10, 10, 100, 50);
e.Graphics.DrawRectangle(Pens.Black, 10, 10, 100, 50);
}
You can look at the code for additional details, but I will mention a few extra facts about the
different kinds of brushes.
The
HatchBrush provides more than 50 hatch patterns. If you want a pattern that isn’t in the
list, use a
TextureBrush. Parameters to the HatchBrush’s constructor give the pattern’s fore-
ground and background colors.
The
LinearGradientBrush shades from one color at one point to another color at another
point. More complicated versions of the brush can shade between several colors and points
and let you change the way colors drop off.
The
PathGradientBrush makes colors shade from points along a path to another color at a
“center point,” although you can move the “center point” so it isn’t actually in the center.
Stock
SolidBrushes use predefined, solid, opaque colors. You can also define SolidBrushes
by specifying the brush’s color and that color can be translucent.
By default the
TextureBrush tiles the area it is filling with copies of its image. You can change
that behavior so the brush fills the area with different kinds of reflections of the image if you
like. For example, it could flip copies that are adjacent in the X direction horizontally so they
look like mirror images.
Instead of passing x, y, width, and height parameters to rectangle or ellipse
methods, you can pass a
Rectangle or RectangleF.
If you are going to fill a shape and then outline it, use the same
Rectangle or
RectangleF for both so you’re guaranteed that the fill and draw methods line up
properly, even if you need to change the location later.
You can learn more about the Brush class’s properties by looking at the following web pages:
HatchBrush
— msdn.microsoft.com/library/system.drawing.drawing2d
.hatchbrush.aspx
596906c39.indd 444 4/7/10 12:35:14 PM
Try It
445
LinearGradientBrush
— msdn.microsoft.com/library/system.drawing.drawing2d
.lineargradientbrush.aspx
PathGradientBrush
— msdn.microsoft.com/library/
system.drawing.drawing2d.pathgradientbrush.aspx
SolidBrush
— msdn.microsoft.com/library/
system.drawing.solidbrush.aspx
TextureBrush
— msdn.microsoft.com/library/
system.drawing.texturebrush.aspx
TRY IT
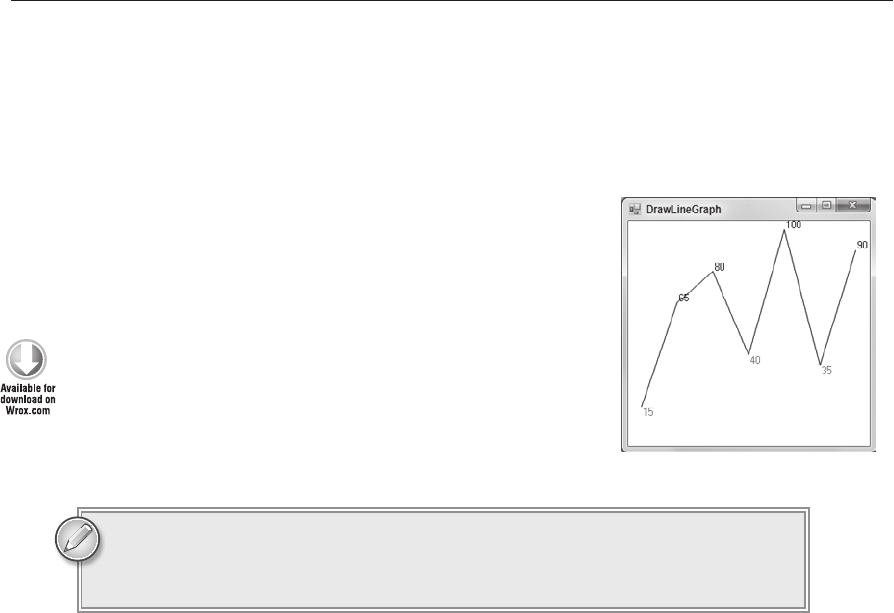
In this Try It, you build the program shown in Figure 39-5.
The program’s
DrawLineGraph function takes as parameters
a
PictureBox, a Graphics object, and an array of values and
draws the graph on the
PictureBox.
You can download the code and resources for this Try It from the book’s web
page at
www.wrox.com or www.CSharpHelper.com/24hour.html. You can find
those solutions in the Lesson39 folder.
Lesson Requirements
Start a new program and make a
PictureBox named graphPictureBox that is docked to fill
the form.
Give the
PictureBox a Paint event handler that makes an array of floats and invokes the
DrawLineGraph method.
Make the
DrawLineGraph method loop through the values drawing lines between them.
Hints
Calculate the width and height of the
PictureBox minus a margin.
Divide the width by the number of values minus one to get a horizontal scale factor.
Divide the width by the maximum value to get a vertical scale factor.
Make variables
x0 and y0 to record the location of the graph’s previous point. Initially
set those equal to the location of the first point. Use the scale factors to figure out where
to put the point. Remember the margins and that Y coordinates increase downward in a
PictureBox.
FIGURE 395
596906c39.indd 445 4/7/10 12:35:14 PM
446
LESSON 39 Drawing with gDi+
Loop through the values drawing lines from the previous point to the next one. After each
value, update the x0 and y0 variables to hold the location of the point you just handled.
As you draw each point, draw its value below or above the point, depending on whether the
value is less than 50.
Step-by-Step
Start a new program and make a
PictureBox named graphPictureBox that is docked to fill
the form.
1. This is straightforward.
Give the
PictureBox a Paint event handler that makes an array of floats and invokes the
DrawLineGraph method.
1. Use code similar to the following:
// Draw the graph.
private void graphPictureBox_Paint(object sender, PaintEventArgs e)
{
oat[] values = { 15, 65, 80, 40, 100, 35, 90 };
DrawLineGraph(graphPictureBox, e.Graphics, values);
}
Make the
DrawLineGraph method loop through the values drawing lines between them.
1. Use code similar to the following:
// Draw a line graph that lls the PictureBox
// (except for a margin).
private void DrawLineGraph(PictureBox graphPictureBox,
Graphics graphics, oat[] values)
{
// Make things smooth.
graphics.SmoothingMode =
System.Drawing.Drawing2D.SmoothingMode.AntiAlias;
graphics.TextRenderingHint =
System.Drawing.Text.TextRenderingHint.AntiAliasGridFit;
// Figure out the geometry of the drawable area.
const int marginX = 15;
const int marginY = 10;
int width = graphPictureBox.ClientSize.Width - 2 * marginX;
int height = graphPictureBox.ClientSize.Height - 2 * marginY;
// Calculate scale factors.
oat scaleX = width / (values.Length - 1);
oat scaleY = height / values.Max();
// Find the rst point’s coordinates.
oat x0 = marginX + scaleX * 0;
oat y0 = graphPictureBox.ClientSize.Height –
marginY - scaleY * values[0];
for (int i = 0; i < values.Length; i++)
596906c39.indd 446 4/7/10 12:35:15 PM
..................Content has been hidden....................
You can't read the all page of ebook, please click here login for view all page.