
Creating Controls
Way back in the computer stone ages, when programmers worked by candlelight on treadle-
powered computers and hand-carved wooden monitors, input and output were very simple. The
computer wrote text in toxic green on the bottom of a monitor and the text scrolled up as the
monitor became full. The user typed on a keyboard to enter text at a single input prompt, and
that was about it. Multiple windows performing useful work simultaneously, forms displaying
many labels and textboxes, buttons, scrollbars, full-color images, and even mice existed only in
the fevered dreams of science-fiction writers.
Today these things are so commonplace that we take them completely for granted. They
appear in desktop software, web pages, laptops, handheld computers, and even cell phones.
Building these sorts of objects in the old days would have been extremely difficult, but today
it’s practically trivial to add them to your application.
You already saw in Lesson 1 how easy it is to make an application (albeit a trivial one) that
displays a form that runs independently of the others on the computer. It’s almost as easy to
use labels, textboxes, buttons, scrollbars, images, menus, popups, and everything else that
makes up a modern application.
Visual C# makes all of these objects and more available as controls.
In this lesson, you learn how to add controls to a form. You learn how to size, position, and
arrange controls. You also learn how to use a control’s properties to change its appearance
and behavior at design time and at run time. When you’re done with this lesson, you’ll be
able to build a professional-looking form.
UNDERSTANDING CONTROLS
A control is a programming entity that combines a visible appearance on the screen and code
to manage it. The code defines the control’s appearance and behavior.
For example, a
TextBox control displays a blank area on the screen where the user can type
information. The code inside the control determines how the control draws itself and provides
2
596906c02.indd 19 4/7/10 12:31:30 PM

20
LESSON 2 Creating Controls
normal textbox features such as multi-line or single-line behavior; scrolling and scrollbars displayed
as needed; copy, cut, and paste; a context menu displayed when you right-click the control; the ability
to navigate when the user presses the [Tab] key; and much more.
WHAT’S IN A NAME?
By convention, the names of control types (and other types) use Pascal casing where
multiple words are strung together with the first letter of each word capitalized, for
example,
TextBox, ProgressBar, Button, and PictureBox.
In addition to controls, Visual C# provides components. A component is similar to a control except it
has no visible piece on the form. For example, the
Timer component acts as a clock to let the program
do something at regular intervals. The
Timer interacts with the program, but doesn’t display anything
visible to the user. (Some components such as
ErrorProvider and ToolTip may display visible effects
on the screen, but the components themselves are not visible on the form.)
The features of controls (and components) fall into three categories: properties, methods, and events.
Properties
A property determines the appearance and state of a control. If a Car were a control, its properties
would be things like
Color, NumberOfCupHolders, CurrentSpeed, and TransmissionType. Your
program could set a
Car’s Color to HotPink (to attract the attention of other drivers) or set its
CurrentSpeed to 110 (to attract the attention of the police).
For a programming example, the
TextBox control has a Font property that determines the font it
uses and a
ForeColor property that determines the color of its text.
Methods
A method is an action that the control can perform. Your code can call a method to make the
control do something. For example, the
Car control might have methods such as Start, Stop,
EjectPassenger, and OilSlick. Your program could call the OilSlick method to make the car
spray oil out the back so you can escape from spies.
For a programming example, the
TextBox has a Clear method that blanks the control’s text and an
AppendText method that adds text to the end of whatever the control is currently displaying.
Events
An event occurs when something interesting happens to the control. The control raises or fires the
event to tell the program that something happened. For example, a
Car might have RanOutOfGas
and
Crashed events. The Car control would raise the Crashed event to tell the program that the
user had driven it into a tree. The program could then take action such as calling an ambulance and
a tree surgeon.
596906c02.indd 20 4/7/10 12:31:30 PM

Creating Controls
21
For a programming example, the TextBox has a TextChanged event that tells the program that its text
has changed. When the event occurs, the program could examine the text to see if the user had entered
a valid input. For example, if the
TextBox should hold a number and the user entered “One,” the pro-
gram could beep and change the
TextBox’s BackColor property to Yellow to indicate an error.
Later lessons discuss events and the code that handles them in greater detail. This lesson focuses on
adding controls to a form, arranging them, and setting their properties.
CREATING CONTROLS
Adding controls to a form is easy. In fact, it’s so easy and there are so many different ways to add
controls to a form that it takes a while to describe them all.
Start by creating a new project as described in Lesson 1. Open the form in the Form Designer. (If the
form isn’t already open, double-click it in Solution Explorer.)
The following list describes some of the ways you can put controls on the form:
Click a tool in the Toolbox to select it. Then click and drag on the form. When you release
the mouse, Visual Studio creates the control in the area you selected and then selects the
pointer in the Toolbox.
Click a tool in the Toolbox to select it. Then hold down the [Ctrl] key while you click and
drag on the form to place a copy of the control on the form. When you release the mouse,
Visual Studio creates the control in the area you selected and keeps the control’s tool selected
in the Toolbox so you can make another control of that type.
Double-click a tool in the Toolbox to select it to create an instance of the control on the form
at a default size and position. (You’ll then probably want to resize and reposition it.)
Select one or more controls that are already on the form. Press [Ctrl]+C to copy them and
then press [Ctrl]+V to paste them onto the form. You can even copy and paste from one
instance of Visual Studio to another.
Select one or more controls on the form. While holding down the [Ctrl] key, drag the
controls to a new location. Visual Studio makes a copy of the controls, leaving the originals
where they started.
There are several ways to select controls on the Form Designer. Click on a control
to select only it. Click and drag to select multiple controls.
Hold down the [Shift] or [Ctrl] key while clicking or clicking and dragging to
toggle whether controls are in the current selection.
And, if you want to deselect all controls, simply click on the form’s surface or
press [Esc].
596906c02.indd 21 4/7/10 12:31:31 PM
22
LESSON 2 Creating Controls
The first method (select a tool and then click and drag to create a control) is probably used most
often, but some of the other methods are particularly useful for creating a lot of very similar groups
of controls.
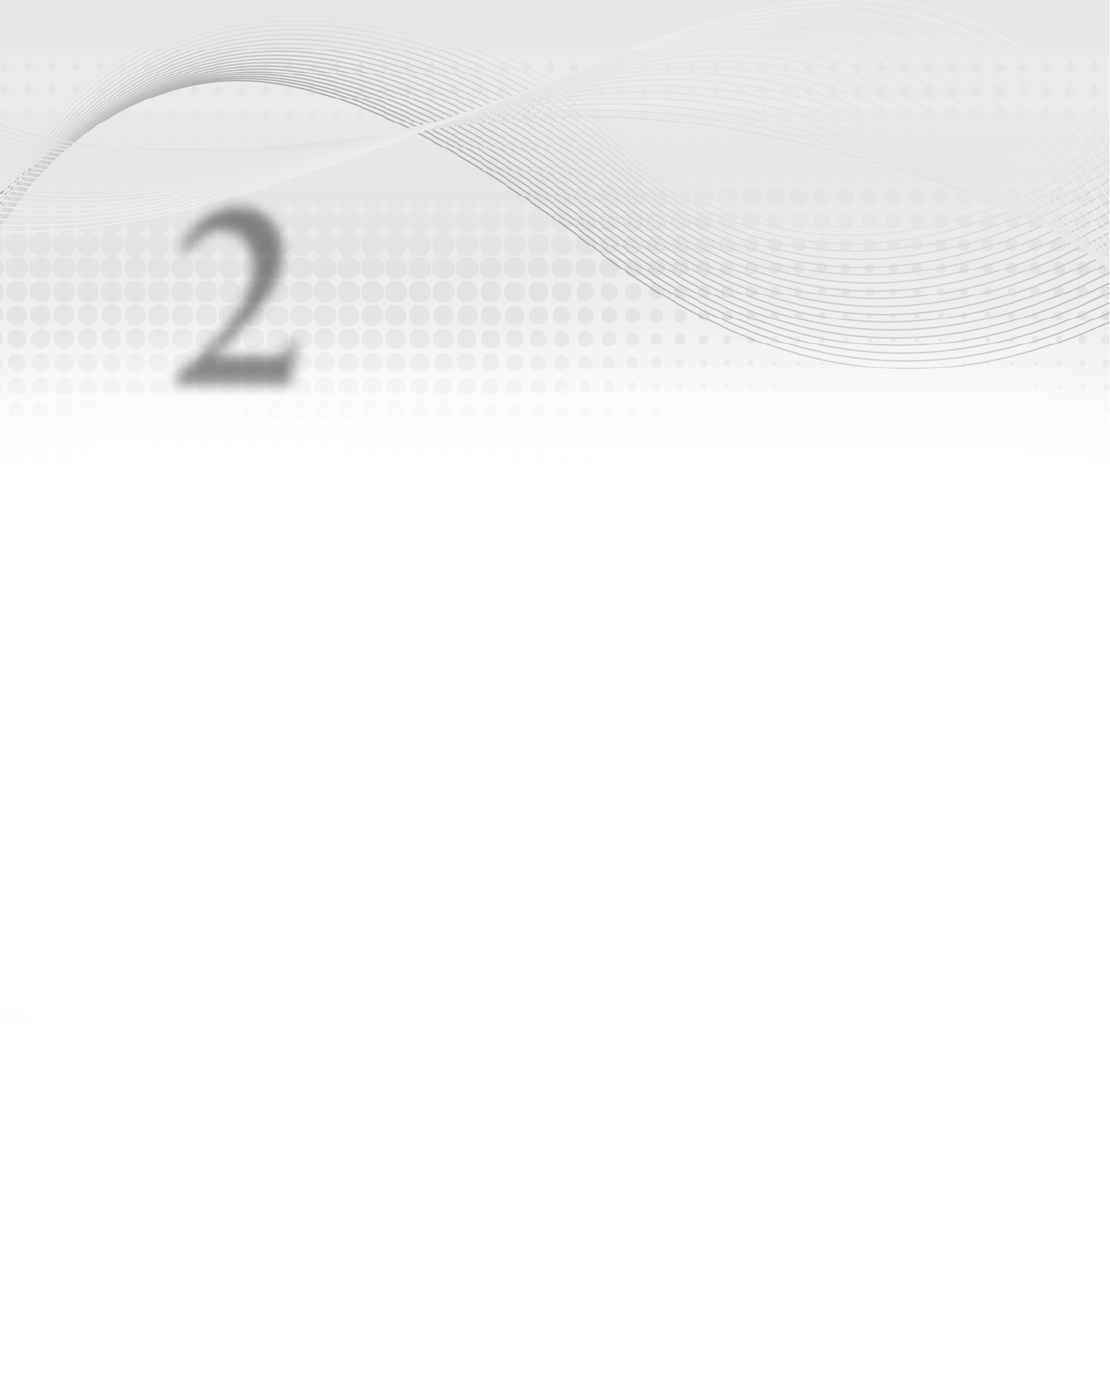
For example, the form in Figure 2-1 displays four rows, each of
which holds a
Label and a TextBox. You could easily build all of
these controls individually, but you can build them even faster by
using copy and paste. First place one
Label and TextBox on the
form, arrange them next to each other, and give them any property
values that you want all of the
Labels or TextBoxes to share. (For
example, you may want to set their fonts or colors.) Now click and
drag to select both controls, copy and paste, and drag the new con-
trols into position. Repeat this two more times and you’ll have all
of the controls in position. You’ll still need to change the
Labels’
text but the basic arrangement will be done without going back and
forth to the Toolbox.
SETTING CONTROL PROPERTIES
After you’ve added controls to a form, you can use the Properties window to view and change their
property values. If you have more than one control selected, the Properties window shows only the
properties that the controls have in common.
For example, if you select a
TextBox and a Label, the Properties window shows the Text prop-
erty because both
Labels and TextBoxes have a Text property. However, it won’t display the
Multiline property because the TextBox control has that property but the Label control does not.
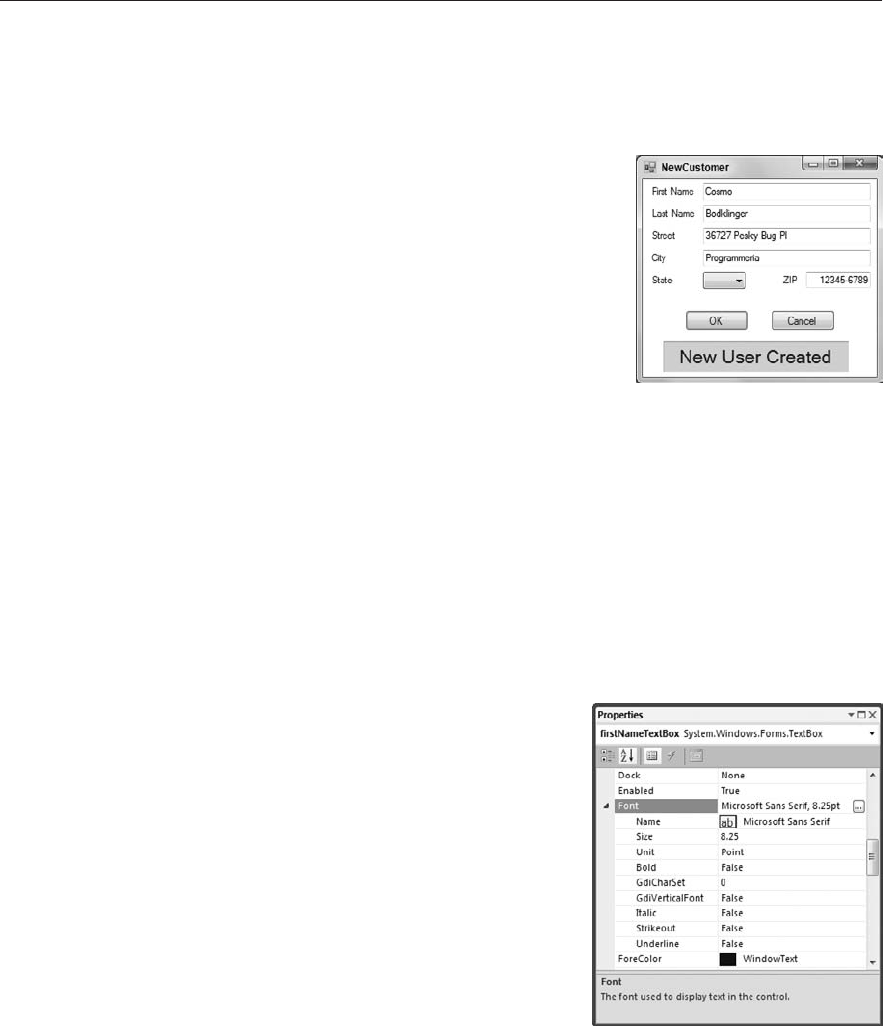
The Properties window provides special support for many
control properties. For example, Figure 2-2 shows the
Properties window when a
TextBox is selected.
Notice that the
Font property contains its own sub-properties
Name, Size, Unit, Bold, and so forth. Click the triangle next
to a property to expand or collapse it and show or hide its
sub-properties.
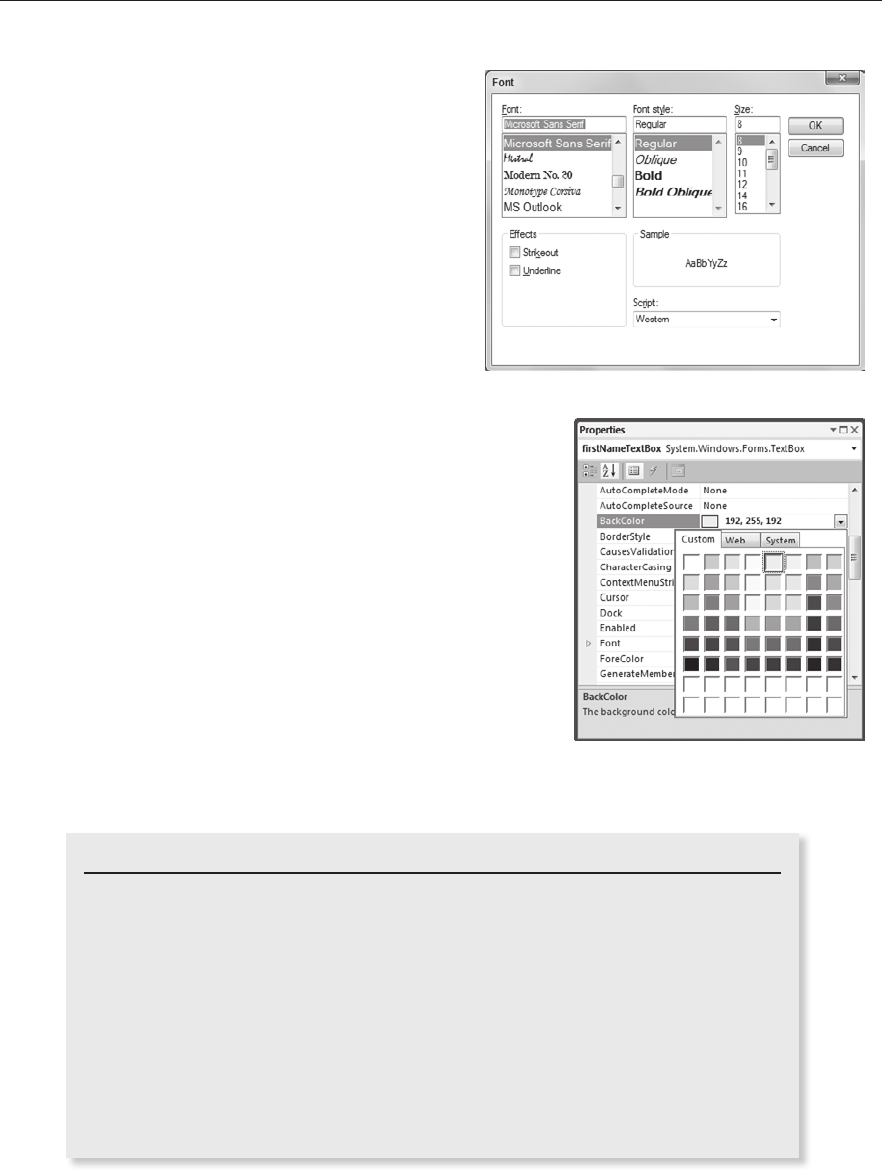
Also notice in Figure 2-2 the ellipsis to the right of the
Font
property. If you click that ellipsis, the dialog box shown in
Figure 2-3 appears. You can use this dialog box to edit the
font sub-properties and see a sample of the font.
The Properties window provides appropriate support when
it can for other properties. Many properties can hold only
certain values. For example, the
Font’s Italic, Bold,
Strikeout, and Underline sub-properties can only take the values True or False. The Font’s Unit
sub-property can only take the values
World, Pixel, Point, Inch, Document, and Millimeter. In
these cases, the Properties window provides a dropdown listing the allowed choices.
FIGURE 21
FIGURE 22
596906c02.indd 22 4/7/10 12:31:31 PM
Setting Control Properties
23
Figure 2-4 shows the editor that the Properties win-
dow displays when you click the dropdown arrow
to the right of a
TextBox’s BackColor property.
The Custom tab lets you pick a color from a pal-
ette, the Web tab lets you pick standard web page
colors, and the System tab lets you pick system col-
ors such as the normal control background color or
the menu highlight color.
By using the Properties window’s editors and typing
in values when there is no editor, you can change a
control’s appearance and behavior.
Control Names
Whenever you create a control, Visual Studio gives
it a rather nondescript name such as
label2, textBox5, or
pictureBox1. Although these names tell you what kind of
object the control is, they don’t tell you what it is for and
that’s much more important when you later need to use the
control in your code. Names like
firstNameTextBox and
streetTextBox are much more meaningful than textBox3
and
textBox7.
Note that you don’t need to give good names to every control,
just the ones that you will need to use in the code. You often
don’t need to name
Labels, GroupBoxes, and other purely
decorative controls.
You can learn more about Microsoft’s naming conventions at
the web page “Guidelines for Names” at
msdn.microsoft
.com/library/ms229002.aspx
.
WHAT’S IN A NAME, REDUX
Earlier in this chapter I said that control type names use Pascal casing. By conven-
tion, the names of specific instances of controls use camel casing where multiple
words are strung together with the first letter of each word capitalized, except for
the first word. For example, the control type
TextBox uses Pascal casing and the
specific control name
firstNameTextBox uses camel casing.
It’s called camel casing because it sort of looks like a camel lying down: low at
the ends with one or more humps in the middle. I guess
stateLabel would be a
dromedary (one-humped) camel,
priceTextBox would be a Bactrian (two-humped)
camel, and
numberOfEmployeesCoveredByPlanTrackBar would be some sort
of camel created by Dr. Seuss.
FIGURE 23
FIGURE 24
596906c02.indd 23 4/7/10 12:31:31 PM
..................Content has been hidden....................
You can't read the all page of ebook, please click here login for view all page.