
94
LESSON 8 Using standard dialogs
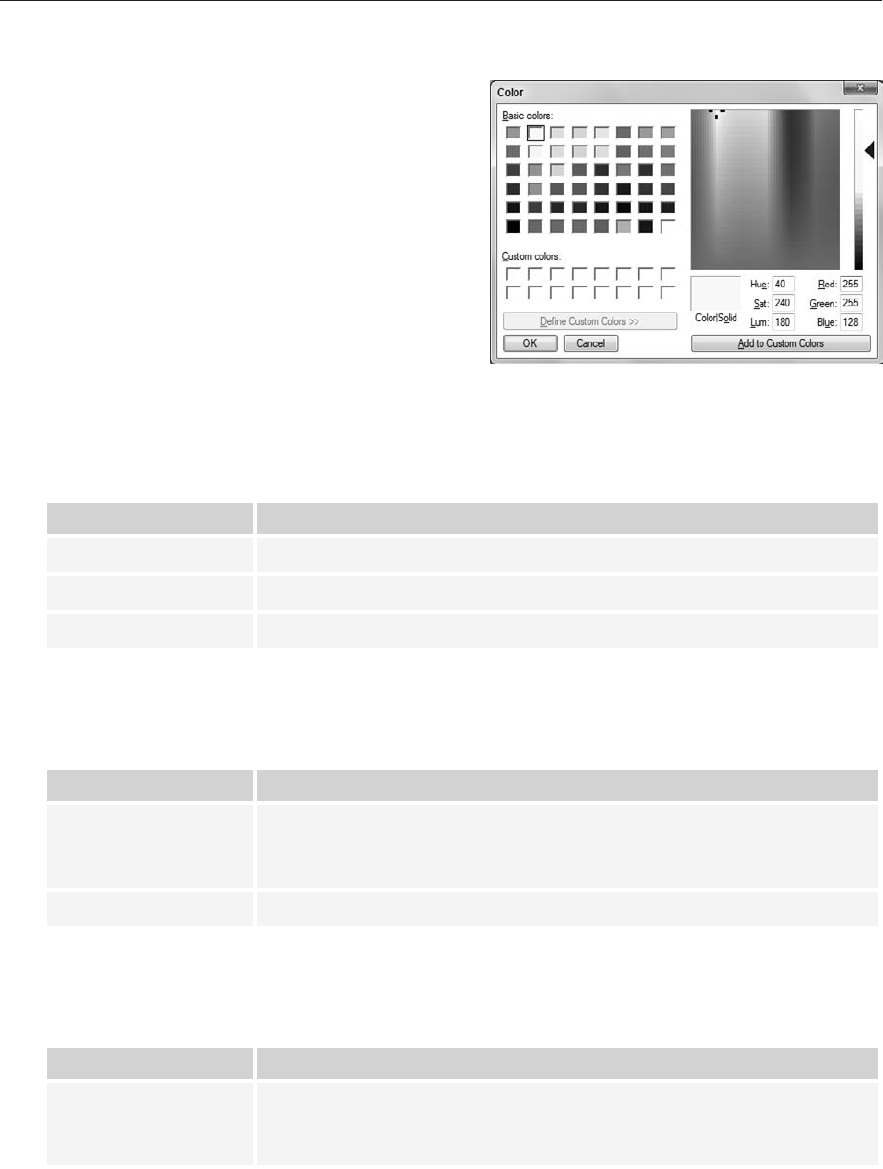
For example, the ColorDialog has an
AllowFullOpen property that determines whether
the user can click the dialog’s Define Custom Colors
button to show an area where the user can create
new colors. Figure 8-2 shows a
ColorDialog dis-
playing this area.
You can learn more about these extra proper-
ties by reading the online help. For example,
Microsoft’s help page for the
ColorDialog is
msdn.microsoft.com/en-us/library/system
.windows.forms.colordialog.aspx
. You can
replace colordialog in this URL with the name
of another dialog to find its web page.
Table 8-2 summarizes the
ColorDialog’s most useful properties.
TABLE 82
PROPERTY PURPOSE
AllowFullOpen
Determines whether the user can create custom colors.
Color
The selected color.
FullOpen
Determines whether the custom color area is open when the dialog appears.
Table 8-3 summarizes the FolderBrowserDialog’s most useful properties.
TABLE 83
PROPERTY PURPOSE
RootFolder
The root folder where the dialog starts browsing. This can take values such
as
Desktop, Favorites, History, and MyComputer. The Properties
window lets you pick from those values.
SelectedPath
The selected folder.
Table 8-4 summarizes the FontDialog’s most useful properties.
TABLE 84
PROPERTY PURPOSE
FixedPitchOnly
Determines if the dialog allows the user to select only fixed-width fonts. This is
useful, for example, if you are going to use the font to build a report and you
need the characters to all have the same width so columns line up properly.
FIGURE 82
596906c08.indd 94 4/7/10 12:32:12 PM

Using Dialog Properties
95
PROPERTY PURPOSE
Font
The selected font.
FontMustExist
Determines whether or not the dialog raises an error if the selected font
doesn’t exist (for example, if the user types “ExtraBold” for the font style
and that style isn’t available for the selected font).
MaxSize
The largest allowed size for the font.
ShowColor
Determines whether or not the dialog lets the user select a font color. If
you set this to
True, use the dialog’s Color property to see which color
was selected.
ShowEffects
Determines whether or not the dialog lets the user select underline, strike-
out, and font color. (To select font color,
ShowColor and ShowEffects
must both be
True.)
Table 8-5 summarizes the OpenFileDialog’s most useful properties.
TABLE 85
PROPERTY PURPOSE
AddExtension
If this is True and the user selects a filename without an extension, the
dialog adds the default extension to the name.
CheckFileExists
If this is True, the dialog won’t let the user pick a file that doesn’t exist.
CheckPathExists
If this is True, the dialog won’t let the user pick a file path that doesn’t
exist.
DefaultExt
The default file extension.
FileName
The selected file’s name.
Filter
The file selection filter. (See the section “Using File Filters” later in this
lesson for details.)
FilterIndex
The index of the currently selected filter. (See the section “Using File
Filters” later in this lesson for details.)
InitialDirectory
The directory where the dialog initially starts.
ReadOnlyChecked
Indicates whether the user checked the dialog’s Read Only box.
ShowReadOnly
Determines whether the dialog displays its Read Only box.
Title
The text displayed in the dialog’s title bar.
596906c08.indd 95 4/7/10 12:32:12 PM

96
LESSON 8 Using standard dialogs
The SaveFileDialog has many of the same properties as the OpenFileDialog. See Table 8-5 for
descriptions of the properties
AddExtension, CheckFileExists, CheckPathExists, DefaultExt,
FileName, Filter, FilterIndex, InitialDirectory, and Title.
Table 8-6 summarizes
SaveFileDialog properties that are not shared with the OpenFileDialog.
TABLE 86
PROPERTY PURPOSE
CreatePrompt If this is True, and the user selects a file that doesn’t exist, the dialog asks
if the user wants to create the file.
OverwritePrompt If this is
True and the user selects a file that already exists, the dialog
asks if the user wants to overwrite it.
ValidateNames Determines whether the dialog verifies that the filename doesn’t contain
any invalid characters.
Table 8-7 summarizes the PrintDialog’s most useful property.
TABLE 87
PROPERTY PURPOSE
Document You set this property to tell the dialog what document object to print.
Lesson 31 has more to say about this.
Table 8-8 summarizes the PrintPreviewDialog’s most useful property.
TABLE 88
PROPERTY PURPOSE
Document You set this property to tell the dialog what document object to preview.
Lesson 31 has more to say about this.
USING FILE FILTERS
Most of the dialogs’ properties are fairly easy to understand. Two properties that are particularly
confusing and important, however, are the
Filter and FilterIndex properties provided by the
OpenFileDialog and SaveFileDialog.
The
Filter property is a list of text prompts and file matching patterns separated by the | character.
The items alternate between text prompts and the corresponding filter. The dialog provides a drop-
down list where the user can select one of the text prompts. When the user selects a prompt, the dialog
uses the corresponding filter to decide which files to display.
596906c08.indd 96 4/7/10 12:32:12 PM

Using File Filters
97
For example, consider the following value:
Bitmap Files|*.bmp|Graphic Files|*.bmp;*.gif;*.png;*.jpg|All Files|*.*
This value represents three file types:
The text prompt “Bitmap Files” with filter
*.bmp.
The text prompt “Graphic Files” with filter
*.bmp;*.gif;*.png;*jpg. That filter matches
files ending with .bmp, .gif, .png, or .jpg.
The text prompt “All Files” with filter
*.*.
Figure 8-3 shows an
OpenFileDialog. The filter dropdown (just above the Open and Cancel buttons)
has the text prompt “Graphics Files” selected. (The dialog automatically added the filter in parentheses
just to confuse the user.) The dialog is listing the files in this directory that match the filter. In this case,
the directory only contains a couple bitmaps and png files, and some other non-graphical files.
FIGURE 83
Once you understand the Filter property, the FilterIndex property is simple. FilterIndex is
simply the index of the selected filter, where 1 means the first filter. (Remember in Lesson 7 when
I said, “almost all numbering starts with 0 in C#”? This is one of the exceptions.) You can use
FilterIndex to initially select the filter that you think will be most useful for the user.
The
OpenFileDialog and SaveFileDialog both use the same type of Filter and FilterIndex prop-
erties. In fact, usually if a program displays both of these dialogs, they should use the same
Filter
value. If a program can load .txt and .rtf files, it should probably be able to save .txt and .rtf files.
To carry this idea one step further, you could set the SaveFileDialog’s
FilterIndex property to the value selected by the user in the OpenFileDialog
under the assumption that a user who loads a .txt file is later likely to want to
save it as a .txt file.
596906c08.indd 97 4/7/10 12:32:13 PM

98
LESSON 8 Using standard dialogs
TRY IT
In this Try It, you get to try out all of the standard dialogs except the PageSetupDialog (which
is hard to use until you’re doing actual printing). You initialize, display, and process the results
of the dialogs (if the user clicks the OK button).
You can download the code and resources for this Try It from the book’s web
page at
www.wrox.com or www.CSharpHelper.com/24hour.html. You can find
them in the Lesson08 folder in the download.
Lesson Requirements
In this lesson, you:
Use
Labels, TextBoxes, and Buttons to make a form similar to the one shown in
Figure 8-4.
FIGURE 84
Add
ColorDialog, FontDialog, FolderBrowserDialog, OpenFileDialog, SaveFileDialog,
PrintDialog, and PrintPreviewDialog components to the form.
When the user clicks the BackColor button, display the
ColorDialog but don’t allow the
user to define custom colors. If the user clicks OK, set the form’s
BackColor property to
the dialog’s
Color value.
When the user clicks the Font button, display the
FontDialog, allowing the user to select the
font’s color. If the user clicks OK, set the form’s
Font property to the dialog’s Font value and
its
ForeColor property to the dialog’s Color property.
When the user clicks the Folder button, display the
FolderBrowserDialog. Make the dialog
start browsing at MyComputer. If the user clicks OK, make the Folder
TextBox display the
dialog’s
SelectedPath property.
596906c08.indd 98 4/7/10 12:32:14 PM
..................Content has been hidden....................
You can't read the all page of ebook, please click here login for view all page.