

Making Menus
In addition to buttons, labels, and textboxes, menus are one of the most common user inter-
face elements in interactive programs.
This lesson explains how to add menus and context menus to forms and catch their events so
your program can take action when the user selects menu items.
CREATING MENUS
To create a menu, simply drop a MenuStrip control on a form. By default, the MenuStrip is
docked to the top of the form so you don’t really need to position it carefully. Just double-click
the Toolbox’s
MenuStrip tool and you’re set.
Unlike most controls, the
MenuStrip appears in the
Component Tray below the form in addition to on the
form itself. Figure 5-1 shows the SimpleEdit program
in the Form Designer. Below the form you can see
the Component Tray containing a
MenuStrip and a
StatusStrip.
When you select a
MenuStrip in the Form Designer, the
menu bar at the top of the form displays a Type Here
box. Click that box and type the menu’s caption to cre-
ate a main menu.
If you create a main menu entry and select it, the Form
Designer displays a new Type Here box to let you create
menu items (see Figure 5-2).
Continue entering text in the Type Here boxes to build
the whole menu structure. Figure 5-3 shows the Edit
menu for a new version of the SimpleEdit program.
Notice that the menu contains several cascading sub-
menus. The Offset submenu is expanded in Figure 5-3.
FIGURE 51
5
596906c05.indd 57 4/7/10 12:31:50 PM

58
❘
LESSON 5 Making Menus
You can use the Type Here boxes to create submenus to any
depth, although in practice three levels (as in Edit ➪ Offset ➪
Subscript) are about all the user can stomach.
In addition to menu items, you can place separators, text-
boxes, and combo boxes in menus. Textboxes and combo
boxes are unusual in menus so I won’t cover them here.
Separators, however, are quite useful for grouping
related menu items.
To create a separator, right-click an item, open the
Insert submenu, and select Separator. Alternatively,
you can create a normal menu item and set its
Text
to a single dash (-).
SETTING MENU PROPERTIES
The items in a menu are ToolStripMenuItems, and
like other controls, they have properties that deter-
mine their appearance and behavior.
Table 5-1 summarizes the most useful
ToolStripMenuItem properties.
TABLE 51
PROPERTY PURPOSE
Checked
Determines whether the item is checked. In Figure 5-3, the Bullet and
Normal items are checked. (See also
CheckOnClick.)
CheckOnClick
If you set this to True, the item automatically toggles its checked state
when the user selects it.
Enabled
Indicates whether the item is enabled.
Name
The ToolStripMenuItem’s name. Normally you should give a good name
to any menu item that makes the program do something at run time so your
code can refer to it.
ShortcutKeys
Indicates the item’s shortcut key combination (if any). Either type a value
such as Ctrl+C or click the dropdown arrow to the right to display the short-
cut editor shown in Figure 5-4.
Text
The text that the item displays. Place an ampersand before the character
that you want to use as the item’s accelerator. For example, if you set an
item’s
Text to &Edit, the item appears as Edit in its menu and the user can
activate it by pressing [Alt]+E while the menu is open.
FIGURE 52
FIGURE 53
596906c05.indd 58 4/7/10 12:31:51 PM

Handling Menu Events
❘
59
ESSENTIAL ELLIPSES
By convention, if a menu item opens a dialog or requires some other feedback from
the user before proceeding, its
Text should end with an ellipsis (...). If the menu
item starts an action immediately, it should not include an ellipsis.
For example, the Open... menu item displays a file open dialog, so its caption ends
with an ellipsis. In contrast, the Edit menu’s Copy item immediately copies the
selected text so it doesn’t need an ellipsis.
Accelerators allow the user to navigate menus with the keyboard instead of
the mouse. When the user presses [Alt], the menu’s items display underlines
below their accelerator keys. For example, the File menu might appear as File.
The user can then press the accelerator key to open that menu and then use
other accelerators to select the menu’s items.
Recent versions of the Windows operating system typically don’t underline
menu accelerators until you press the [Alt] key.
You should give accelerators to most if not all of your program’s menus, submenus, and menu items.
Experienced users can often navigate a menu system faster by using accelerators than they can by
using the mouse.
Be sure not to give the same accelerator character to two menu items in the same
menu. For example, in the File menu, don’t have Save and Save As menu items.
Shortcuts allow the user to instantly activate a menu item. For example, in many programs [Ctrl]+O
opens a file and [Ctrl]+S saves the current file. (I remember the difference between accelerators and
shortcuts by realizing that “accelerator” and the [Alt] key both begin with the letter “a.”)
Be extra sure not to give two menu items the same shortcut!
HANDLING MENU EVENTS
When the user clicks a menu item, its control raises a Click event exactly as a clicked Button does,
and you can handle it in the same way. You can even create default event handlers in the same way:
by double-clicking the control.
FIGURE 54
596906c05.indd 59 4/7/10 12:31:51 PM
60
❘
LESSON 5 Making Menus
CREATING CONTEXT MENUS
A context menu appears when you right-click a particular control. In Visual C# building a context
menu is almost as easy as building a form’s main menu.
Start by dropping a
ContextMenuStrip on the form. Like a MenuStrip, a ContextMenuStrip
appears below the form in the Component Tray so you can just double-click the Toolbox’s
ContextMenuStrip tool and not worry about positioning the menu.
Unlike a
MenuStrip, a ContextMenuStrip does not appear at the top of the form. In the Form
Designer, you can click a
MenuStrip either on the form or in the Component Tray to select it. To
select a
ContextMenuStrip, you must click it in the Component Tray. (Immediately after you add a
ContextMenuStrip to a form, it is selected so you can see it on the form.)
After you select the
ContextMenuStrip, you can edit it much as you can a MenuStrip. The big dif-
ference is that a
ContextMenuStrip does not have top-level menus, just submenu items.
Figure 5-5 shows the Form Designer with a
ContextMenuStrip
selected. By now the menu editor should look familiar.
After you create a
ContextMenuStrip, you need to associate it
with the control that should display it. To do that, simply set the
control’s
ContextMenuStrip property to the ContextMenuStrip
from the dropdown list. To do that, select the control’s
ContextMenuStrip property in the Properties window, click the
dropdown arrow on the right, and select the
ContextMenuStrip.
The rest is automatic. When the user right-clicks the control, it
automatically displays the
ContextMenuStrip.
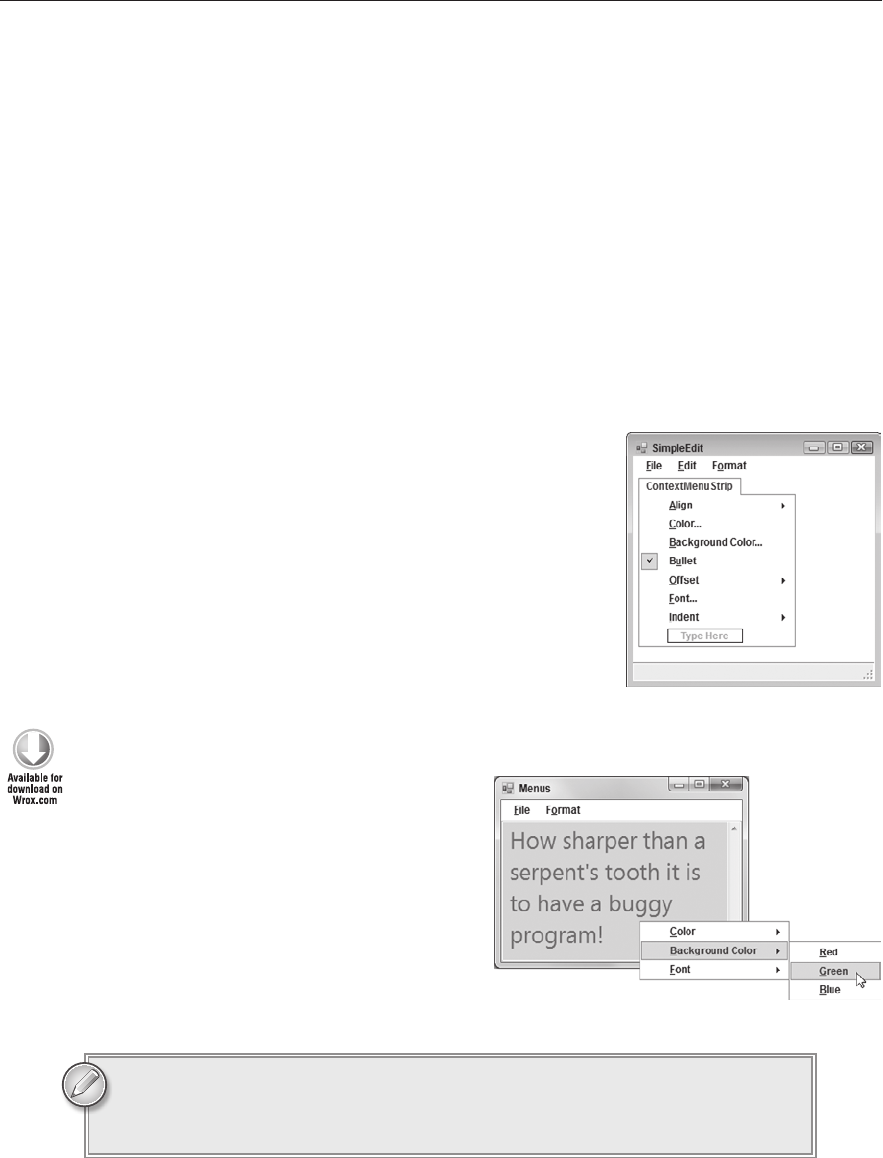
TRY IT
In this Try It, you create a main menu and a
context menu. The main menu includes an
Exit command that closes the form. Both
menus contain commands that let you change
the appearance of a
TextBox on the form.
Figure 5-6 shows the finished program dis-
playing its context menu.
You can download the code and resources for this Try It from the book’s web
page at
www.wrox.com or www.CSharpHelper.com/24hour.html. You can find
them in the Lesson05 folder in the download.
FIGURE 55
FIGURE 56
596906c05.indd 60 4/7/10 12:31:52 PM

Try It
❘
61
Lesson Requirements
In this lesson, you:
Create the form shown in Figure 5-6.
➤
Create the following main menu structure (note the accelerator keys and shortcuts):
➤
File
Exit
Format
Color
Red Ctrl+R
Green Ctrl+G
Blue Ctrl+B
Background Color
Red
Green
Blue
Font
Small Ctrl+S
Normal Ctrl+N
Large Ctrl+L
Add code behind the main menu items.
➤
Make the context menu duplicate the main menu’s Format submenu.
➤
Attach the context menu items to the event handlers used by the main menu.
➤
Attach the context menu to the
➤
TextBox.
Hints
The E
➤
xit menu item can close the program’s form by calling this.Close().
Creating a font isn’t trivial (and I haven’t covered that yet). It’s much easier to keep a sample of
➤
a font in a control somewhere on the form and then set the TextBox’s Font property equal to
that control’s
Font property. And what better control to store the font than the menu item itself?
Step-by-Step
Create the form shown in Figure 5-6.
➤
1. Create the main menu by double-clicking the Toolbox’s MenuStrip tool.
596906c05.indd 61 4/7/10 12:31:53 PM
..................Content has been hidden....................
You can't read the all page of ebook, please click here login for view all page.