
Advertising on Your Free Application
If the Internet has taught us anything, it is that we can give our product away, and still make some money from advertising. You should be able to make some money on the clickable ads that will appear on your application. It will not be enough to live on, so plan for that.
In the lite version of Angry Birds, there is usually a bar that appears in the corner for ads (see Figure 6-5). I will have to admit that I hit it accidentally, but I’ve never bought anything on it. This is a prime example of advertising on an application, and you can bet that the paid version is without those ads.

Figure 6-5. The lite version of Angry Birds. Note the bar for advertising in the corner. Like Rovio’s popular mobile game, you can use the space for advertising on your application.
Hopefully, you have created a plan for how much money will be made, as detailed in Chapter 4. You should figure in that free applications make more money in ad revenue than paid ones. In fact, most paid applications don’t have ads. However, in order to make a significant profit from a site with ads, you have to get a lot of downloads.
You can go to several ad network companies that give the user an ad marketplace for developers that want to sell space on their applications. All that is required is just a little bit of code added to your application. Here is a brief list of some of them, and it is by no means exhaustive:
- Adtini
- Jumptap
- Mojiva
- Quattro Wireless
- Traffic Marketplace
- ValueClick Media
- VideoEgg
- Yahoo
Then there are the ad exchanges, who manage to bring together several competing ad companies for business and ensure that there is an ad on display any time your application is open.
AdMob
According to its web site at www.admob.com/, AdMob “provides app developers with a solution to distribute and monetize your apps.” It is the world’s leading mobile advertising network, it has a huge client list, and its backed by Silicon Valley’s top VC firms. It is a significant presence on mobile platforms, and it was acquired by Google in May of 2010 (see Figure 6-6).

Figure 6-6. The home screen for Admob. Not only can Admob service ads for Android applications, but it has a special section called “The Guide to the App Galaxy.”
If you already have a Gmail account and you go to Admob’s site, it is easy to register. All that is required is to log in with a Gmail account, and you will receive a confirmation e-mail that gives you the following:
- Step-by-step instructions for creating ads and starting your campaign
- Information about tools available for advertisers
- Information about tools for publishers
Also included in the confirmation e-mail is a link to the help center. Granted, this will only help you if you are an advertiser, but even as a developer you should know what happens here.
The advertiser will start a campaign—a way that their ads will be presented on applications. The advertisers enter in a start date, end date, budget, and delivery method. They will then be asked to choose an ad group to meet advertising goals, as well as be given the opportunity to add multiple ad groups. They can then customize what devices that they want the ad on, as well as the countries and operators they want targeted. Advertisers can customize the user demographic, run a text ad or a banner ad unit, and design them as they see fit. The ads will then begin to run, and the advertisers can monitor the campaign’s performance.
Okay, that’s how it works for advertisers, but let’s gets back to you, the developer. For app integration, you will need to have your application finished and published, as discussed in Chapter 9. Follow these steps:
- Register and/or login at
www.admob.com/. If you have a Google account, all you need to do is enter your password.- Click the Sites & Apps tabs at the top.
- Click Add Site/App. You will see a screen like the one in Figure 6-7.
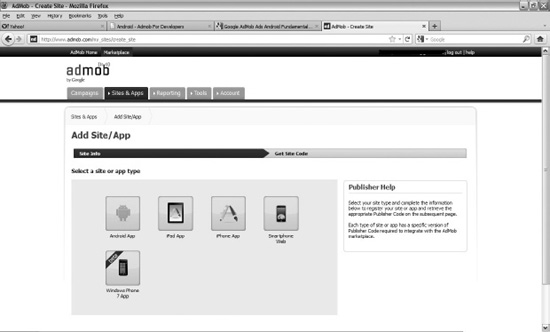
Figure 6-7. Setting up ads for your application on Admob
- Provide the information about the Android application, as shown in Figure 6-8. You will need to use the full application name for App Name. For the Android Package URL, you should go to the Android Market, and copy and paste the URL for your application on the Android Market. Category will be the same, and you can create the description. Click Continue.

Figure 6-8. After you select the type of application, you need to fill out the details.
- You will see a screen like in Figure 6-9. Click the Download the SDK button.

Figure 6-9. What you see after you register your app
- Save the Android SDK in a place where you will remember it.
- Open your application in Eclipse. Right-click your application in Package Explorer. Select New, and then select Folder. You will see a window like in Figure 6-10.
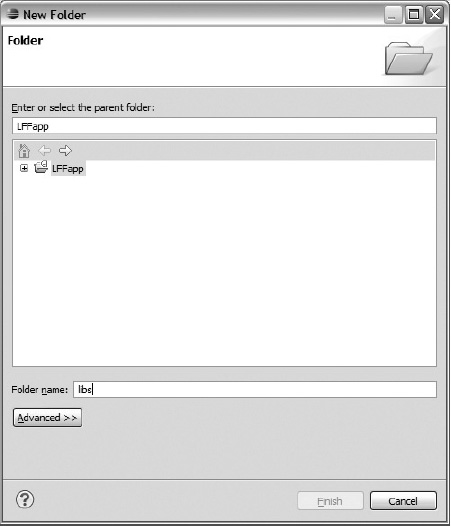
- For the “Folder name” section, enter libs.
- Go to your file manager, and open up the file where you keep
GoogleAdMobAdsSdk. The version you have might be different than the one you have in Figure 6-11.
Figure 6-11. The Google AdMob Sdk folder, ready to be used for ads on your application
- Copy whatever version you have of the executable JAR file
GoogleAdMobAdsSdk, and paste it onto your application’s newlibsfile that you just created. You will have to right-click thelibsfile and click Refresh to get it working.- Now it is time to get some code in your application.
Go into the AndroidManifest file and add the following code right before the last <application> and <manifest>:
<application android:icon="@drawable/icon" android:label="@string/app_name"

               android:debuggable="true">

    <activity android:label="@string/app_name" android:name="BannerExample">

      <intent-filter>

        <action android:name="android.intent.action.MAIN"/>

        <category android:name="android.intent.category.LAUNCHER"/>

      </intent-filter>

    </activity>

    <activity android:name="com.google.ads.AdActivity"

              android:configChanges="keyboard|keyboardHidden|orientation"/>
You will have to add this line of code in the manifest as well:
<uses-permission android:name="android.permission.ACCESS_NETWORK_STATE"/>
You will then need to add this to the main.xml program:
<?xml version="1.0" encoding="utf-8"?>

<LinearLayout xmlns:android="http://schemas.android.com/apk/res/android"

              xmlns:ads="http://schemas.android.com/apk/lib/com.google.ads"

              android:orientation="vertical"

              android:layout_width="fill_parent"

              android:layout_height="fill_parent">

  <com.google.ads.AdView android:id="@+id/adView"

                         android:layout_width="wrap_content"

                         android:layout_height="wrap_content"

                         ads:adUnitId="MY_AD_UNIT_ID"

                         ads:adSize="BANNER"

                         ads:loadAdOnCreate="true"/>

</LinearLayout>
An MY_AD_UNIT_ID is the publisher’s ID provided by Admob. You can get that number by logging into your account, clicking Marketplace, selecting Sites & Apps, and clicking Manage Settings in your application.
You should see the ads appear on your application after you have made these updates.
With AdMob comes AdWhirl, which was acquired by AdMob. AdWhirl is an open source ad mediation tool that allows its users to monetize inventory as effectively as possible. Users can allocate inventory to house ads, AdMob ads, and ads from other networks.
Now that you have an idea of how advertising works on Admob for the advertiser and the advertisee, you might want to consider advertising your application with Admob.
Mobclix
In Mobclix’s own words, it is “the industry's largest mobile ad exchange network via its sophisticated open marketplace platform and comprehensive account management solution for iPhone application developers, advertisers, ad networks, and agencies.” Don’t let the word iPhone put you off from giving it a try, as it also works on other platforms as well, including Android. Mobclix works with many ad networks, as shown on its web site (see Figure 6-12).

Figure 6-12. The home screen for Mobclix, at http://mobclix.com/
The company boasts the highest eCPMs, which are “effective cost per thousand impressions.” It translates to the money you will make for every thousand impressions. Mobclix also claims that its monthly infographics can reveal insight on user behavior, so that you can lay out a more thoughtful ad campaign.
Signing up for Mobclix is simple, and it is equally simple to register one’s applications. I found that when I signed up, I got a confirmation e-mail that stated that I had to “integrate Mobclix SDK into my app and submit to iTunes.” I found that odd, as I want to get started with Android.
You should be able to download the Mobclix Android SDK at http://groups.google.com/group/mobclix-android-sdk?pli=1 for the latest version. The setup is similar to that of Admob. From there, you can use their 100 percent fill rates and analytics to start making money.