
Day 21. Implementing IPv6 Addressing
CCENT 100-101 ICND1 Exam Topics
![]() Identify the appropriate IPv6 addressing scheme to satisfy addressing requirements in a LAN/WAN environment.
Identify the appropriate IPv6 addressing scheme to satisfy addressing requirements in a LAN/WAN environment.
![]() Describe the technological requirements for running IPv6 in conjunction with IPv4.
Describe the technological requirements for running IPv6 in conjunction with IPv4.
Key Topics
Today, we review the various ways to implement IPv6 addressing, including subnetting, autoconfiguration of hosts, and running IPv6 and IPv4 in a dual-stack configuration. In later days, we will review more IPv6 implementations, including static routing, OSPFv3, and DHCPv6.
Representing the IPv6 Address
The IPv6 address can look rather intimidating to someone who is used to IPv4 addressing. However, the IPv6 address can be easier to read and is much simpler to subnet than IPv4.
Conventions for Writing IPv6 Addresses
IPv6 conventions use 32 hexadecimal numbers, organized into eight hextets of four hex digits separated by a colon, to represent a 128-bit IPv6 address. For example:
2340:1111:AAAA:0001:1234:5678:9ABC
To make things a little easier, two rules allow you to shorten what must be typed for an IPv6 address:
![]() Rule 1: Omit the leading 0s in any given hextet.
Rule 1: Omit the leading 0s in any given hextet.
![]() Rule 2: Omit the all-0s hextets. Represent one or more consecutive hextets of all hex 0s with a double colon (::), but only for one such occurrence in a given address.
Rule 2: Omit the all-0s hextets. Represent one or more consecutive hextets of all hex 0s with a double colon (::), but only for one such occurrence in a given address.
Note
The term hextet refers to four consecutive hexadecimal digits. Eight hextets are in each IPv6 address.
For example, consider the following address. The highlighted hex digits represent the portion of the address that could be abbreviated.
FE00:0000:0000:0001:0000:0000:0000:0056
This address has two locations in which one or more hextets have four hex 0s, so two main options exist for abbreviating this address, using the :: abbreviation in one or the other location. The following two options show the two briefest valid abbreviations:
![]() FE00::1:0:0:0:56
FE00::1:0:0:0:56
![]() FE00:0:0:1::56
FE00:0:0:1::56
In the first example, the second and third hextets preceding 0001 were replaced with ::. In the second example, the fifth, sixth, and seventh hextets were replaced with ::. In particular, note that the :: abbreviation, meaning “one or more hextets of all 0s,” cannot be used twice because that would be ambiguous. So, the abbreviation FE00::1::56 would not be valid.
Conventions for Writing IPv6 Prefixes
IPv6 prefixes represent a range or block of consecutive IPv6 addresses. The number that represents the range of addresses, called a prefix, is usually seen in IP routing tables, just like you see IP subnet numbers in IPv4 routing tables.
As with IPv4, when writing or typing a prefix in IPv6, the bits past the end of the prefix length are all binary 0s. The following IPv6 address is an example of an address assigned to a host:
2000:1234:5678:9ABC:1234:5678:9ABC:1111/64
The prefix in which this address resides would be as follows:
2000:1234:5678:9ABC:0000:0000:0000:0000/64
When abbreviated, this would be
2000:1234:5678:9ABC::/64
If the prefix length does not fall on a hextet boundary (is not a multiple of 16), the prefix value should list all the values in the last hextet. For example, assume that the prefix length in the previous example is /56. So, by convention, the rest of the fourth hextet should be written, after being set to binary 0s, as follows:
2000:1234:5678:9A00::/56
The following list summarizes some key points about how to write IPv6 prefixes:
![]() The prefix has the same value as the IP addresses in the group for the first number of bits, as defined by the prefix length.
The prefix has the same value as the IP addresses in the group for the first number of bits, as defined by the prefix length.
![]() Any bits after the prefix length number of bits are binary 0s.
Any bits after the prefix length number of bits are binary 0s.
![]() The prefix can be abbreviated with the same rules as IPv6 addresses.
The prefix can be abbreviated with the same rules as IPv6 addresses.
![]() If the prefix length is not on a hextet boundary, write down the value for the entire hextet.
If the prefix length is not on a hextet boundary, write down the value for the entire hextet.
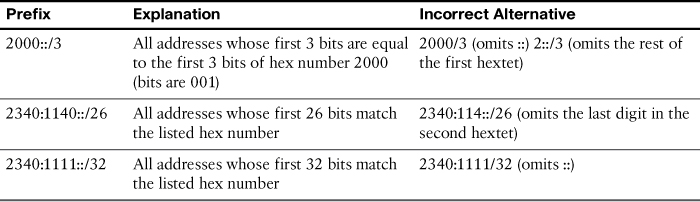
Table 21-1 shows several sample prefixes, their formats, and a brief explanation.
IPv6 Subnetting
In many ways, subnetting IPv6 addresses is much simpler than subnetting IPv4 addresses. A typical site will be assigned an IPv6 address space with a /48 prefix length. Because the least significant bits are used for the interface ID, that leaves 16 bits for the subnet ID and a /64 subnet prefix length, as shown in Figure 21-1.

For our subnetting examples, we will use 2001:0DB8:000A::/48, or simply 2001:DB8:A::/48, which includes subnets 2001:DB8:A::/64 through 2001:DB8:A:FFFF::/64. That’s 216 or 65,536 subnets, each with 264 or 18 quintillion interface addresses.
Subnetting the Subnet ID
So, to subnet in a small- to medium-size business, simply increment the least significant bits of the subnet ID (as shown in Example 21-1), assign /64 subnets to your networks, and be done with it.
Example 21-1 Subnetting the Subnet ID
2001:DB8:A:0001::/64
2001:DB8:A:0002::/64
2001:DB8:A:0003::/64
2001:DB8:A:0004::/64
2001:DB8:A:0005::/64
Of course, if you are administering a larger implementation, you can use the four hexadecimal digits of the subnet ID to design a quick and simple four-level hierarchy. There is plenty of room for most large enterprise networks to design a logical address scheme that aggregates addresses for an optimal routing configuration. And if not, applying for and receiving another /48 address is not difficult.
Subnetting into the Interface ID
If you extend your subnetting into the interface ID portion of the address, it is a best practice to subnet on the nibble boundary. A nibble is 4 bits or one hexadecimal digit. For example, let’s borrow the first 4 bits from the interface ID portion of the network address 2001:DB8:A:1::/64. That means that the network 2001:DB8:A:1::/64 would now have 24 or 16 subnets from 2001:DB8:A:1:0000::/68 to 2001:DB8:A:1:F000::/68. Listing the subnets is easy, as shown in Example 21-2.
Example 21-2 Subnetting into the Interface ID
2001:DB8:A:1:0000::/68
2001:DB8:A:1:1000::/68
2001:DB8:A:1:2000::/68
2001:DB8:A:1:3000::/68
thru
2001:DB8:A:1:F000::/68
EUI-64 Concept
Static IPv6 addressing will be reviewed on Day 17, “Basic Router Configuration: IPv6,” including how to configure the router to use EUI-64 addressing (EUI stands for Extended Unique Identifier). Today, we are reviewing the concept behind the EUI-64 configuration.
Recall from Figure 21-1 that the second half of the IPv6 address is called the interface ID. The value of the interface ID portion of a global unicast address can be set to any value, as long as no other host in the same subnet attempts to use the same value. However, the size of the interface ID was chosen to allow easy autoconfiguration of IP addresses by plugging the MAC address of a network card into the interface ID field in an IPv6 address.
MAC addresses are 6 bytes (48 bits) in length. So to complete the 64-bit interface ID, IPv6 fills in 2 more bytes by separating the MAC address into two 3-byte halves. It then inserts hex FFFE in between the halves and sets the seventh bit in the first byte to binary 1 to form the interface ID field. Figure 21-2 shows this format, called the EUI-64 format.

For example, the following two lines list a host’s MAC address and corresponding EUI-64 format interface ID, assuming the use of an address configuration option that uses the EUI-64 format:
![]() MAC Address: 0034:5678:9ABC
MAC Address: 0034:5678:9ABC
![]() EUI-64 Interface ID: 0234:56FF:FE78:9ABC
EUI-64 Interface ID: 0234:56FF:FE78:9ABC
Note
To change the seventh bit (reading left to right) in the example, convert hex 00 to binary 00000000, change the seventh bit to 1 (00000010), and then convert back to hex, for hex 02 as the first two digits.
Stateless Address Autoconfiguration
IPv6 supports two methods of dynamic configuration of IPv6 addresses:
![]() Stateless Address Autoconfiguration (SLAAC): A host dynamically learns the /64 prefix through the IPv6 Neighbor Discovery Protocol (NDP) and then calculates the rest of its address by using an EUI-64 method.
Stateless Address Autoconfiguration (SLAAC): A host dynamically learns the /64 prefix through the IPv6 Neighbor Discovery Protocol (NDP) and then calculates the rest of its address by using an EUI-64 method.
![]() DHCPv6: Works the same conceptually as DHCP in IPv4. We will review DHCPv6 on Day 12, “DHCP Configuration.”
DHCPv6: Works the same conceptually as DHCP in IPv4. We will review DHCPv6 on Day 12, “DHCP Configuration.”
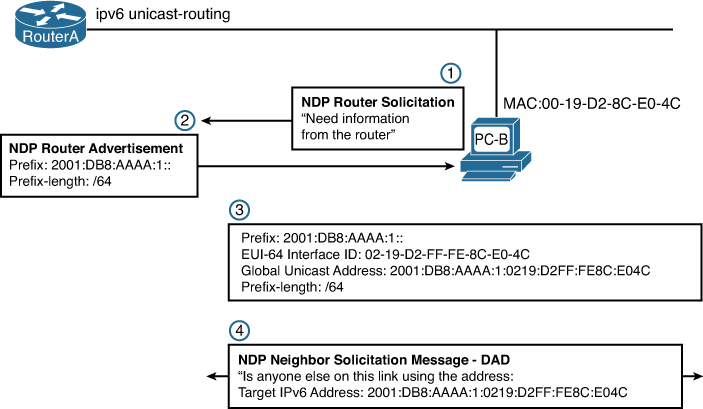
By using the EUI-64 process and the Neighbor Discovery Protocol (NDP), SLAAC allows a device to determine its entire global unicast address without any manual configuration or a DHCPv6 server. Figure 21-3 illustrates the SLAAC process between a host and a router configured with the ipv6 unicast-routing command, which means that it will send and receive NDP messages.
Migration to IPv6
Two major transition strategies are currently used to migrate to IPv6:
![]() Dual-stacking: An integration method in which a node has implementation and connectivity to both an IPv4 and IPv6 network. This is the recommended option and involves running IPv4 and IPv6 at the same time.
Dual-stacking: An integration method in which a node has implementation and connectivity to both an IPv4 and IPv6 network. This is the recommended option and involves running IPv4 and IPv6 at the same time.
![]() Tunneling: Tunneling is a method for transporting IPv6 packets over IPv4-only networks by encapsulating the IPv6 packet inside IPv4. Several tunneling techniques are available.
Tunneling: Tunneling is a method for transporting IPv6 packets over IPv4-only networks by encapsulating the IPv6 packet inside IPv4. Several tunneling techniques are available.
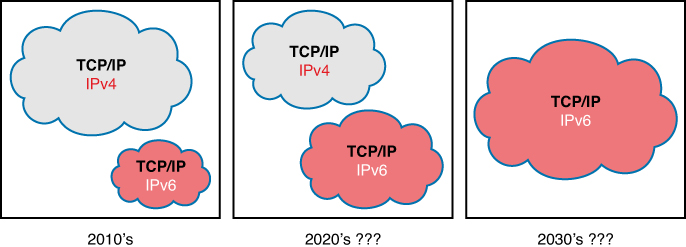
Because of the simplicity of running dual-stack, it will most likely be the preferred strategy as IPv4-only networks begin to disappear. But it will probably still be decades before we see enterprise networks running exclusively IPv6. Figure 21-4 illustrates one way that Wendell Odom thinks about the transition to IPv6, “but who knows how long it will take?”
Remember this advice: “Dual-stack where you can; tunnel where you must.” These two methods are the most common techniques to transition from IPv4 to IPv6. Dual-stacking is easy enough. Just configure all your devices to use both IPv4 and IPv6 addressing. Tunneling, however, is more complex and beyond the scope of the CCENT or CCNA exam topics.
