Day 7. Switch Security Configuration
CCENT 100-101 ICND1 Exam Topics
![]() Configure and verify switch port security.
Configure and verify switch port security.
Key Topics
Today we review switch security, including configuring port security, how to restore a disabled port, shutting down unused ports and assigning them to an unused VLAN, and configuring the native VLAN as something other than VLAN 1.
Configuring Port Security
If you know which devices should be cabled and connected to particular interfaces on a switch, you can use port security to restrict that interface so that only the expected devices can use it. This reduces exposure to some types of attacks in which the attacker connects a laptop to the wall socket or uses the cable attached to another end device to gain access to the network.
Port security configuration involves several steps. Basically, you need to make the port an access port, which means that the port is not doing any VLAN trunking. You then need to enable port security and then configure the actual Media Access Control (MAC) addresses of the devices allowed to use that port. The following list outlines the steps, including the configuration commands used:
Step 1. Configure the interface for static access mode using the switchport mode access interface subcommand.
Step 2. Enable port security using the switchport port-security interface subcommand.
Step 3. (Optional) Override the maximum number of allowed MAC addresses associated with the interface (1) using the switchport port-security maximum number interface subcommand.
Step 4. (Optional) Override the default action to when there is a security violation (shutdown) using the switchport port-security violation {protect | restrict | shutdown} interface subcommand.
Step 5. (Optional) Predefine any allowed source MAC address(es) for this interface using the switchport port-security mac-address mac-address command. Use the command multiple times to define more than one MAC address.
Step 6. (Optional) Instead of Step 5, configure the interface to dynamically learn and configure the MAC addresses of currently connected hosts by configuring the switchport port-security mac-address sticky interface subcommand.
When an unauthorized device attempts to send frames to the switch interface, the switch can issue informational messages, discard frames from that device, or even discard frames from all devices by effectively shutting down the interface. Exactly which action the switch port takes depends on the option you configure in the switchport port-security violation command. Table 7-1 lists actions that the switch will take based on whether you configure the option protect, restrict, or shutdown (default).

Example 7-1 shows a port security configuration where each access interface is allowed a maximum of three MAC addresses. If a fourth MAC address is detected, only the offending device’s traffic will be discarded. If the violation option is not explicitly configured, the traffic for devices that are allowed on the port would also be discarded because the port would be shut down by default.
Example 7-1 Port Security Configuration Example
S1(config)# interface range fa 0/5 - fa 0/24
S1(config-if-range)# switchport mode access
S1(config-if-range)# switchport port-security
S1(config-if-range)# switchport port-security maximum 3
S1(config-if-range)# switchport port-security violation restrict
S1(config-if-range)# switchport port-security mac-address sticky
To verify port security configuration, use the more general show port-security command or the more specific show port-security interface type number command. Example 7-2 demonstrates the use of both commands. In the examples, notice that only one device is currently attached to an access port on S1.
Example 7-2 Port Security Verification Command Output Examples
S1# show port-security
Secure Port MaxSecureAddr CurrentAddr SecurityViolation Security Action
(Count) (Count) (Count)
---------------------------------------------------------------------------
Fa0/5 3 1 0 Restrict
Fa0/6 3 0 0 Restrict
Fa0/7 3 0 0 Restrict
Fa0/8 3 0 0 Restrict
Fa0/9 3 0 0 Restrict
Fa0/10 3 0 0 Restrict
Fa0/11 3 0 0 Restrict
Fa0/12 3 0 0 Restrict
Fa0/13 3 0 0 Restrict
Fa0/14 3 0 0 Restrict
Fa0/15 3 0 0 Restrict
Fa0/16 3 0 0 Restrict
Fa0/17 3 0 0 Restrict
Fa0/18 3 0 0 Restrict
Fa0/19 3 0 0 Restrict
Fa0/20 3 0 0 Restrict
Fa0/21 3 0 0 Restrict
Fa0/22 3 0 0 Restrict
Fa0/23 3 0 0 Restrict
Fa0/24 3 0 0 Restrict
---------------------------------------------------------------------------
Total Addresses in System (excluding one mac per port) : 0
Max Addresses limit in System (excluding one mac per port) : 8320
S1#show port-security interface fastethernet 0/5
Port Security : Enabled
Port Status : Secure-down
Violation Mode : Restrict
Aging Time : 0 mins
Aging Type : Absolute
SecureStatic Address Aging : Disabled
Maximum MAC Addresses : 3
Total MAC Addresses : 1
Configured MAC Addresses : 0
Sticky MAC Addresses : 1
Last Source Address:Vlan : 0014.22dd.37a3:1
Security Violation Count : 0
Restoring a Port After a Violation
When port security is activated on an interface, the default action when there is a violation is to shut down the port. A security violation can occur in one of two ways:
![]() The maximum number of secure MAC addresses has been added to the address table for that interface, and a station whose MAC address is not in the address table attempts to access the interface.
The maximum number of secure MAC addresses has been added to the address table for that interface, and a station whose MAC address is not in the address table attempts to access the interface.
![]() An address learned or configured on one secure interface is seen on another secure interface in the same VLAN.
An address learned or configured on one secure interface is seen on another secure interface in the same VLAN.
When a violation occurs, a syslog message is sent to the console stating that the interface is now in the err-disable state. The console messages include the port number and the MAC address that caused the violation, as shown in Example 7-3.
Example 7-3 Port Security Violation Verification and Restoration
S1#
Sep 20 06:44:54.966: %PM-4-ERR_DISABLE: psecure-violation error detected on Fa0/18,
putting Fa0/18 in err-disable state
Sep 20 06:44:54.966: %PORT_SECURITY-2-PSECURE_VIOLATION: Security violation
occurred, caused by MAC address 000c.292b.4c75 on port FastEthernet0/18.
Sep 20 06:44:55.973: %LINEPROTO-5-PPDOWN: Line protocol on Interface
FastEthernet0/18, changed state to down
Sep 20 06:44:56.971: %LINK-3-UPDOWN: Interface FastEthernet0/18, changed state to
down
!The two following commands can be used to verify the port status.
S1# show interface fa0/18 status
Port Name Status Vlan Duplex Speed Type
Fa0/18 err-disabled 5 auto auto 10/100BaseTX
S1# show port-security interface fastethernet 0/18
Port Security : Enabled
Port Status : Secure-shutdown
Violation Mode : Shutdown
Aging Time : 0 mins
Aging Type : Absolute
SecureStatic Address Aging : Disabled
Maximum MAC Addresses : 1
Total MAC Addresses : 0
Configured MAC Addresses : 0
Sticky MAC Addresses : 0
Last Source Address:Vlan : 000c.292b.4c75:1
Security Violation Count : 1
!To restore a port, manually shut it down and then reactivate it.
S1(config)# interface FastEthernet 0/18
S1(config-if)# shutdown
Sep 20 06:57:28.532: %LINK-5-CHANGED: Interface FastEthernet0/18, changed state to
administratively down
S1(config-if)# no shutdown
Sep 20 06:57:48.186: %LINK-3-UPDOWN: Interface FastEthernet0/18, changed state to
up
Sep 20 06:57:49.193: %LINEPROTO-5-UPDOWN: Line protocol on Interface
FastEthernet0/18, changed state to up
You can use the show interface type number status or show port-security interface type number command to verify the current state of the port. To restore the port, you must first manually shut down the interface and then reactivate it, as shown in Example 7-3.
Changing the Native and Management VLANs
A native VLAN is defined in the IEEE 802.1Q specification to maintain backward compatibility with untagged traffic common to legacy LAN scenarios. A native VLAN serves as a common identifier on opposite ends of a trunk link. VLAN 1 is the native VLAN by default.
A management VLAN is any VLAN configured to access the management capabilities of a switch. VLAN 1 is the management VLAN by default. The management VLAN is assigned an IP address and subnet mask, allowing the switch to be managed through HTTP, Telnet, SSH, or SNMP.
It is a best practice to configure the native VLAN as an unused VLAN distinct from VLAN 1 and other VLANs. In fact, it is not unusual to dedicate a fixed VLAN to serve the role of the native VLAN for all trunk ports in the switched domain. Likewise, the management VLAN should also be configured as something other than VLAN 1. The management and native VLANs can be configured as the same VLAN, as shown in Example 7-4.
Example 7-4 Configuring the Native and Management VLAN
S1(config)# vlan 86
S1(config-vlan)# name Management&Native
S1(config-vlan)# interface vlan 86
*Jul 13 14:14:04.840: %LINEPROTO-5-UPDOWN: Line protocol on Interface Vlan86,
changed state to down
S1(config-if)# ip address 10.10.86.10 255.255.255.0
S1(config-if)# no shutdown
S1(config-if)# ip default-gateway 10.10.86.254
S1(config)# interface range fa0/1 - 2
S1(config-if-range)# switchport mode trunk
S1(config-if-range)# switchport trunk native vlan 86
S1(config-if-range)#
*Jul 13 14:15:55.499: %LINEPROTO-5-UPDOWN: Line protocol on Interface Vlan86,
changed state to up
S1(config-if-range)#
First, a VLAN is created that will be used for the management and native VLAN. Next, by activating interface VLAN 86, the switch can now be remotely managed. Finally, the trunk ports are statically configured and VLAN 86 is set as the native VLAN for all untagged traffic. After it is configured, the interface VLAN 86 will come “up.”
Shutting Down and Securing Unused Interfaces
Router interfaces, as you know, must be activated with the no shutdown command before they become operational. The exact opposite is true for the Cisco Catalyst switches. To provide out-of-the-box functionality, Cisco chose a default configuration that included interfaces that would work without any configuration, including automatically negotiating speed and duplex. In addition, all interfaces are assigned to the default VLAN 1.
This default configuration exposes switches to some security threats. The security best practices for unused interfaces are as follows:
![]() Administratively disable the interface using the shutdown interface subcommand.
Administratively disable the interface using the shutdown interface subcommand.
![]() Prevent VLAN trunking by making the port a nontrunking interface using the switchport mode access interface subcommand.
Prevent VLAN trunking by making the port a nontrunking interface using the switchport mode access interface subcommand.
![]() Assign the port to an unused VLAN using the switchport access vlan number interface subcommand.
Assign the port to an unused VLAN using the switchport access vlan number interface subcommand.
![]() Set the native VLAN to not be VLAN 1, but to instead be an unused VLAN, using the switchport trunk native vlan vlan-id interface subcommand.
Set the native VLAN to not be VLAN 1, but to instead be an unused VLAN, using the switchport trunk native vlan vlan-id interface subcommand.
Even though you shut down unused ports on the switches, if a device is connected to one of those ports and the interface is enabled, trunking could occur. In addition, all ports by default are in VLAN 1. A good practice is to put all unused ports in a “black hole” VLAN. Example 7-5 demonstrates this best practice, assuming that ports 20–24 are unused.
Example 7-5 Assigning Unused Ports to a Black Hole VLAN
S1(config)# vlan 999
S1(config-vlan)# name BlackHole
S1(config-vlan)# interface range fa0/20 - 24
S1(config-if-range)# shutdown
S1(config-if-range)# switchport mode access
S1(config-if-range)# switchport access vlan 999
S1(config-if-range)#
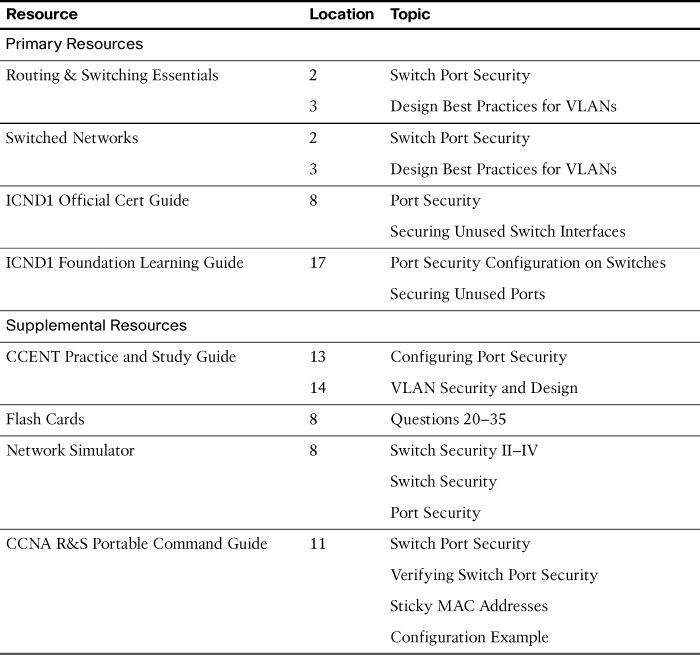
Study Resources
For today’s exam topics, refer to the following resources for more study.