Day 8. Basic Device Security
CCENT 100-101 ICND1 Exam Topics
![]() Configure and verify network device security features.
Configure and verify network device security features.
![]() Configure and verify NTP as a client.
Configure and verify NTP as a client.
Key Topics
More than likely, your CCENT studies had security issues, concerns, and configurations sprinkled throughout your training. This is reflected in the Study Resources section, where you can see a variety of places to read up on network device security. We have already covered some important security configurations including passwords and SSH. Today, we will do a comprehensive review of basic device security. But because we have already reviewed some security configurations (passwords and SSH, for example), this review will also point you to the correct “day” to revisit, when necessary.
Network Security Overview
Computers and networks, if left in their default configurations, are vulnerable. Whether through unintentional or malicious attacks, the damage can be costly. Intruders can gain access to a network through software vulnerabilities, through hardware attacks, or through guessing someone’s username and password. Even in small networks, it is necessary to consider security threats and vulnerabilities when planning a network implementation.
Physical Security
Software vulnerabilities are top of mind in today’s networks. However, a sound security policy starts with the physical security of devices, including protecting against physical damage to equipment as follows:
![]() Environmental threats: Temperature or humidity extremes
Environmental threats: Temperature or humidity extremes
![]() Electrical threats: Voltage spikes, insufficient power, power loss, unconditioned power
Electrical threats: Voltage spikes, insufficient power, power loss, unconditioned power
![]() Maintenance threats: Poor handling of electrical components, lack of parts, and poor cabling and labeling
Maintenance threats: Poor handling of electrical components, lack of parts, and poor cabling and labeling
In addition, sensitive networking equipment should be secured behind a locked security system—for example, a locked door or a more elaborate security clearance process.
Types of Security Vulnerabilities
There are three primary vulnerabilities or weaknesses shown in the following list with examples of each:
![]() Technological: Vulnerabilities inherent in the software such as the TCP/IP suite, operating system weakness, password protection, lack of authorization, routing protocols, and firewall holes
Technological: Vulnerabilities inherent in the software such as the TCP/IP suite, operating system weakness, password protection, lack of authorization, routing protocols, and firewall holes
![]() Configuration: Unsecured user accounts, easy-to-guess passwords, misconfigured services, default settings, misconfigured network equipment
Configuration: Unsecured user accounts, easy-to-guess passwords, misconfigured services, default settings, misconfigured network equipment
![]() Security: Lack of a written security policy, organizational politics, installation or modifications done “by the book,” no disaster recovery policy
Security: Lack of a written security policy, organizational politics, installation or modifications done “by the book,” no disaster recovery policy
Mitigating Network Attacks
The damage from network attacks can be mitigated by following a vigilant policy that includes the following:
![]() Backing up critical data offsite and maintaining a regular schedule of software upgrades or patches.
Backing up critical data offsite and maintaining a regular schedule of software upgrades or patches.
![]() Implementing AAA (authentication, authorization, and accounting) network security can help mitigate internal and external threats.
Implementing AAA (authentication, authorization, and accounting) network security can help mitigate internal and external threats.
![]() Controlling traffic with firewall devices that do multiple levels of packet filtering and stateful packet inspection.
Controlling traffic with firewall devices that do multiple levels of packet filtering and stateful packet inspection.
![]() Securing endpoint devices through well-documented policies and employee training.
Securing endpoint devices through well-documented policies and employee training.
Security Best Practices
The following are ten best practices that are a good starting point for securing your network:
![]() Develop a written security policy.
Develop a written security policy.
![]() Shut down unused services and ports.
Shut down unused services and ports.
![]() Use strong passwords and change them often.
Use strong passwords and change them often.
![]() Control physical access to devices.
Control physical access to devices.
![]() Use secure HTTPS for login screens.
Use secure HTTPS for login screens.
![]() Perform backups on a regular basis.
Perform backups on a regular basis.
![]() Educate employees about social engineering attacks.
Educate employees about social engineering attacks.
![]() Encrypt and password-protect sensitive data.
Encrypt and password-protect sensitive data.
![]() Implement security hardware and software.
Implement security hardware and software.
![]() Keep software up to date.
Keep software up to date.
Securing the IOS
Part of network security is securing actual devices, including end devices and intermediate devices, such as network devices. When a new operating system is installed on a device, the security settings are set to the default values. In most cases, the level of security provided by the default settings of a device is inadequate. Cisco access switches, like the 2960, are ready to be installed “out of the box” in the network. For both routers and switches, the console port is open and ready for full access with no passwords. Home routers use default passwords that are easily obtained with a quick Internet search. Initial steps to secure the operating system include
![]() Change the default usernames and passwords immediately.
Change the default usernames and passwords immediately.
![]() Restrict access to authorized personnel only.
Restrict access to authorized personnel only.
![]() Disable or uninstall unnecessary services.
Disable or uninstall unnecessary services.
Passwords, Authentication, Timers, and SSH
We reviewed password and SSH configuration on Day 27, “Basic Switch Configuration,” and Day 21, “Implementing IPv6 Addressing,” within the context of basic switch and router configuration. As a quick reminder, Figure 8-1 reviews the locations where IOS can require a password.
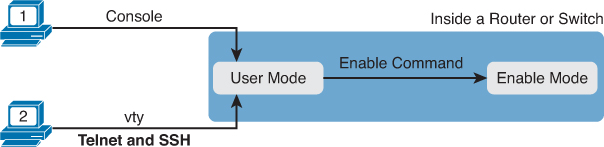
The following list points out the reasons for using the various password options:
![]() Use the enable secret command to override the enable password command, which is now deprecated and shouldn’t be used.
Use the enable secret command to override the enable password command, which is now deprecated and shouldn’t be used.
![]() Avoid using simple password checking for the console or vtys with the login line-mode command because this method does not identify individual users.
Avoid using simple password checking for the console or vtys with the login line-mode command because this method does not identify individual users.
![]() Disable support for inbound Telnet connections because Telnet sends the passwords as clear text. Instead, configure SSH and the transport input ssh command in vty line mode.
Disable support for inbound Telnet connections because Telnet sends the passwords as clear text. Instead, configure SSH and the transport input ssh command in vty line mode.
![]() Authenticate CLI logins using an external authentication server. However, if necessary, use locally configured username secret commands, which hide the passwords with a hash, as shown in Example 8-1.
Authenticate CLI logins using an external authentication server. However, if necessary, use locally configured username secret commands, which hide the passwords with a hash, as shown in Example 8-1.
Example 8-1 Strong Encryption with the username secret Command
R1(config)# username BobAdmin secret a11-34cT%
R1(config)#
*Jun 10 12:33:33.043: End->Password:yY6nb9c6RgExpgm9VkW7r96lXigSmiGMCcS7hNrVsfE
R1(config)# do show run | begin username
username admin password 7 030752180500
username BobAdmin secret 4 yY6nb9c6RgExpgm9VkW7r96lXigSmiGMCcS7hNrVsfE
!
The password for admin in Example 8-1 is encrypted with the service password-encryption text. Search the web for “cisco password decrypt” and you will find out what the password is for 030752180500. Although the secret passwords can also be cracked, it is a much more involved process.
Because passwords are easy to crack, a password policy should at least take into consideration the following guidelines:
![]() Use a password length of eight to ten characters.
Use a password length of eight to ten characters.
![]() Make passwords complex, using uppercase, lowercase, numbers, symbols, and spaces.
Make passwords complex, using uppercase, lowercase, numbers, symbols, and spaces.
![]() Avoid passwords based on easily identifiable pieces of information.
Avoid passwords based on easily identifiable pieces of information.
![]() Deliberately misspell a password.
Deliberately misspell a password.
![]() Change passwords often.
Change passwords often.
![]() Do not write passwords down.
Do not write passwords down.
As we’ve seen, the service password-encryption command prevents unauthorized individuals from viewing plain-text passwords in the configuration file. The IOS has two additional commands that can help with the length of passwords and protect against brute-force attacks, as shown in Example 8-2.
Example 8-2 Securing Passwords, Mitigating Brute-Force Attacks, and Lowering Timeout Defaults
R1(config)# service password-encryption
R1(config)# security passwords min-length 8
R1(config)# login block-for 120 attempts 2 within 60
R1(config)# line vty 0 15
R1(config-line)# exec-timeout 3 30
R1(config-line)# do show run | begin line vty
line vty 0 4
exec-timeout 3 30
password 7 060506324F41
login local
transport input ssh
<output omitted>
!With the login command configured, a syslog message is generated on password
failures.
*Jun 9 23:22:45.875: %SEC_LOGIN-1-QUIET_MODE_ON: Still timeleft for watching
failures is 114 secs, [user: admin] [Source: 10.1.1.2] [localport: 22] [Reason:
Login Authentication Failed - BadPassword] [ACL: sl_def_acl] at 23:22:45 UTC Sun
Jun 9 2013
!After 120 seconds, the user can attempt to authenticate again.
*Jun 9 23:24:45.875: %SEC_LOGIN-5-QUIET_MODE_OFF: Quiet Mode is OFF, because block
period timed out at 23:23:15 UTC Sun Jun 9 2013
The commands shown in Example 8-2 have the following effect:
![]() Hopefully, there are no plain-text passwords in the configuration file. But if there are, they will at least be encrypted to prevent someone from “looking over the shoulder” and reading a password.
Hopefully, there are no plain-text passwords in the configuration file. But if there are, they will at least be encrypted to prevent someone from “looking over the shoulder” and reading a password.
![]() Passwords must be at least eight characters long.
Passwords must be at least eight characters long.
![]() Login attempts are limited to two within 60 seconds. Additional attempts are blocked for 120 seconds.
Login attempts are limited to two within 60 seconds. Additional attempts are blocked for 120 seconds.
![]() After being logged in to a vty line, the session will time out if idle for 3 minutes and 30 seconds. The default exec-timeout is 5 minutes.
After being logged in to a vty line, the session will time out if idle for 3 minutes and 30 seconds. The default exec-timeout is 5 minutes.
Notice that SSH is enabled on the vty lines and that the login local command is also configured. The username user secret password command configured in Example 8-1 would be used to log in remotely. The password under the vty line would only be valid if SSH was disabled and the login local command was changed to simply login.
Banners
Cisco switches can display a variety of banners depending on what a router or switch administrator is doing. Table 8-1 lists the three most popular banners and their typical uses.
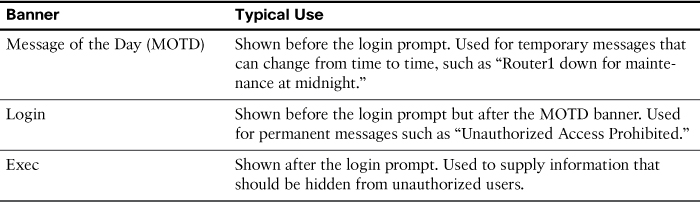
The banner global configuration command can be used to configure all three types of these banners. In each case, the type of banner is listed as the first parameter, with MOTD being the default option. The first nonblank character after the banner type is called a beginning delimiter character.
Example 8-3 shows the configuration process for all three types of banners from Table 8-1. The first banner in the example, the MOTD banner, omits the banner type in the banner command as a reminder that motd is the default banner type. The delimiter is the “$” symbol, but it could be any character as long as it is the same at the beginning and end of the banner text and is not reused inside the banner text.
Example 8-3 Banner Configuration Examples
! The "banner" command defaults the "motd" parameter, as shown here.
R1(config)# banner $
Enter TEXT message. End with the character '$'.
Automated backup scheduled for 11PM Today $
R1(config)# banner login $
Enter TEXT message. End with the character '$'.
*******************************************
WARNING: Unauthorized Access Prohibited!!!!
*******************************************
$
R1(config)# banner exec $
Enter TEXT message. End with the character '$'.
Policy Reminder: User password changes scheduled for next week.
$
R1(config)#
Banners display at different times depending upon how the user is accessing the device. If the user is accessing it from the console, the user will see the banner motd and the banner login messages immediately. The banner exec text is displayed after successful login, as shown in Example 8-4.
Example 8-4 User Accessing R1 Through the Console Port
R1 con0 is now available
Press RETURN to get started.
Automated backup scheduled for 11PM Today
*******************************************
WARNING: Unauthorized Access Prohibited!!!!
*******************************************
User Access Verification
Password:
Policy Reminder: User password changes scheduled for next week.
R2>
If the user is accessing the device remotely, he will only see the banner login text when attempting to log in. After a successful login, the banner motd and banner exec texts display, as shown in Example 8-5.
Example 8-5 User Remotely Accessing R1 from R2
R2# ssh -l admin 10.1.1.2
*******************************************
WARNING: Unauthorized Access Prohibited!!!!
*******************************************
Password:
Automated backup scheduled for 11PM Today
Policy Reminder: User password changes scheduled for next week.
R1>
Disable Services
In any service that a computer uses for good reason, hackers can use it as a way to attack a network. So, every good security plan looks to change the default settings to minimize security risks. Cisco makes several recommendations about which services to disable and enable. Knowing these specific recommendations is beyond the CCENT and CCNA scope. However, we can quickly highlight some important services to consider.
HTTP Service
Depending on the IOS, HTTP service might be enabled by default. An attacker could enter her default gateway address in a web browser to see whether she is prompted for a username and password. The Cisco recommendation is to disable HTTP service and only enable the HTTPS service if you intend to allow users to connect to the router or switch using a web browser.
CDP
Cisco Discovery Protocol (CDP) allows devices on the same link to learn basic information from each other. However, that basic information can help an attacker learn some useful information about the network. So, as a security recommendation, Cisco suggests disabling CDP on all interfaces connected to untrusted parts of the network. To be even more secure, CDP could be disabled globally.
Small Services
IOS has a set of services that IOS categorizes as small services. For example, the Echo service is one of these small services. It acts a lot like ping, with ICMP Echo Request and Echo Reply messages, but unlike these ICMP messages, the Echo application uses either TCP or UDP. Some IOS versions leave these services enabled by default, while some do not. To be thorough, disable both TCP and UDP small services.
Example 8-6 shows a configuration on R1 disabling the functions mentioned in this section.
Example 8-6 Disabling IOS Services
R1(config)# no ip http server
R1(config)# no service tcp-small-servers
R1(config)# no service udp-small-servers
R1(config)# interface gigabitEthernet 0/0
R1(config-if)# no cdp enable
! CDP is only disabled on the specified interface. To disable CDP globally,
! enter the "no cdp run" command in global configuration mode.
R1(config-if)#
Note
If you are interested in learning more about the Cisco recommendations for disabling services, search for “Guide to Harden Cisco IOS Devices” for more detailed documentation.
Network Time Protocol
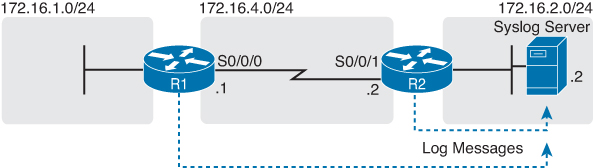
As you know, routers and switches issue log messages in response to different events. For example, when an interface fails, the device creates log messages. With default settings, IOS sends these messages to the console port. But it can be configured to also send messages to a Syslog server, where they can be stored for administration review and troubleshooting. Figure 8-2 shows a topology with a Syslog server.
Most log messages list the date and time as part of the message so that when a network engineer looks back at the message, the engineer knows exactly when that message occurred.
Network Time Protocol (NTP) provides a way to synchronize the time-of-day clock so that timestamps will be consistent across devices, making troubleshooting easier.
To configure a router or switch to synchronize its time with an existing NTP server, use the ntp server command, as shown in Example 8-7.
Example 8-7 Configuration and Verification of an NTP Client
R1(config)# ntp server 172.16.2.2 version 4
R1(config)# ^Z
R1#
R1# show ntp status
Clock is synchronized, stratum 8, reference is 172.16.2.2
nominal freq is 250.0000 Hz, actual freq is 250.0000 Hz, precision is 2**21
ntp uptime is 4700 (1/100 of seconds), resolution is 4000
reference time is D42BD899.5FFCE014 (13:48:09.374 UTC Fri Oct 19 2012)
clock offset is -0.0033 msec, root delay is 1.28 msec
root dispersion is 3938.51 msec, peer dispersion is 187.59 msec
loopfilter state is 'CTRL' (Normal Controlled Loop), drift is 0.000000000 s/s
system poll interval is 64, last update was 42 sec ago.
R1# show ntp associations
address ref clock st when poll reach delay offset disp
*172.16.2.2 127.127.1.1 7 36 64 1 1.261 -0.001 7937.5
* sys.peer, # selected, + candidate, - outlyer, x falseticker, configured
The output of the show ntp status command gives the NTP status in the very first line—R1 is synchronized with the NTP server at 172.16.2.2. The show ntp associations command lists a single line of output for each other NTP device with which the router has associated.
Routers and switches can actually be the NTP server with just one command (ntp master) as well. And NTP can use authentication so that a router or switch does not get fooled into changing its timestamp.
