
Day 4. Troubleshoot Trunking Issues
CCENT 100-101 ICND1 Exam Topics
![]() Troubleshoot and resolve trunking problems on Cisco switches.
Troubleshoot and resolve trunking problems on Cisco switches.
Key Topics
Trunking issues can be related to VLANs, but they can also be the result of trunking configuration errors. Today, we review methods for troubleshooting trunking.
Trunking Troubleshooting Overview
To summarize issues with VLANs and trunking, the four potential issues are as follows:
Step 1. Identify all access interfaces and their assigned access VLANs and reassign into the correct VLANs as needed. (Day 5)
Step 2. Determine whether the VLANs exist and are active on each switch. If not, configure and activate the VLANs to resolve problems as needed. (Day 5)
Step 3. Check the allowed VLAN lists on the switches on both ends of the trunk, and ensure that the lists of allowed VLANs are the same.
Step 4. Ensure that for any links that should use trunking, one switch does not think it is trunking, while the other switch does not think it is trunking because of an unfortunate choice of configuration settings.
We reviewed Step 1 and Step 2 on Day 5, “Troubleshoot VLAN Issues.” Let’s review Step 3 and Step 4 today.
Check Both Ends of a Trunk
For the CCENT exam, you should be ready to notice a couple of oddities that happen with some unfortunate configuration choices on trunks.
It is possible to configure a different allowed VLAN list on the opposite ends of a VLAN trunk. As shown in Figure 4-1, when the VLAN lists do not match, the trunk cannot pass traffic for that VLAN.
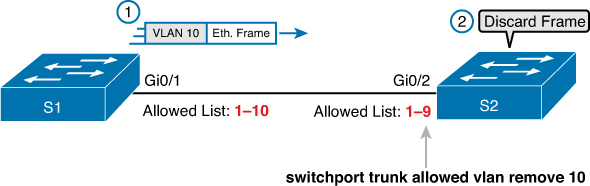
You can only isolate this problem by comparing the allowed lists on both ends of the trunk. Example 4-1 displays the output of the show interfaces trunk command on S2.
To compare the allowed VLANs on each switch, you need to look at the second of three lists of VLANs listed by the show interfaces trunk command, as highlighted in the output in Example 4-1.
Example 4-1 Verify the Allowed VLANs on S2
S2# show interfaces trunk
Port Mode Encapsulation Status Native vlan
Gi0/2 desirable 802.1q trunking 1
Port Vlans allowed on trunk
Gi0/2 1-4094
Port Vlans allowed and active in management domain
Gi0/2 1-9
Port Vlans in spanning tree forwarding state and not pruned
Gi0/2 1-9
To add VLAN 10 to S2’s trunk, enter the following commands:
S2(config)# interface g0/2
S2(config-if)# switchport trunk allowed vlan add 10
The keyword add provides the ability to add one or more VLANs to the trunk without having to specify again all the existing VLANs that are already allowed.
Check Trunking Operational States
Trunks can also be misconfigured. In some cases, both switches conclude that their interfaces do not trunk. In other cases, one switch believes that its interface is correctly trunking, while the other switch does not.
The most common incorrect configuration—which results in both switches not trunking—is a configuration that uses the switchport mode dynamic auto command on both switches on the link. The keyword auto does not mean that trunking happens automatically. Instead, both switches passively wait on the other device on the link to begin negotiations.
With this particular incorrect configuration, the show interfaces switchport command on both switches confirms both the administrative state (auto) as well as the fact that both switches operate as “static access” ports. Example 4-2 highlights those parts of the output for S2.
Example 4-2 Verify the Trunking State for a Specific Interface
SW2# show interfaces gigabit0/2 switchport
Name: Gi0/2
Switchport: Enabled
Administrative Mode: dynamic auto
Operational Mode: static access
Administrative Trunking Encapsulation: dot1q
Operational Trunking Encapsulation: native
! lines omitted for brevity
Always check the trunk’s operational state on both sides of the trunk. The best commands to check trunking-related facts are show interfaces trunk and show interfaces switchport.
Study Resources
For today’s exam topics, refer to the following resources for more study.
